
Feb 262007
I thought I write a quick tutorial on how to use the corner punch to make a scallop border. I am sure most of you know how it works, but it’s always nice to have a visual.
1. Step one:
Take the guard off the corner punch.
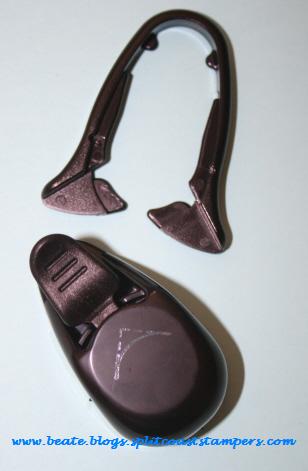
1. Step one:
Take the guard off the corner punch.
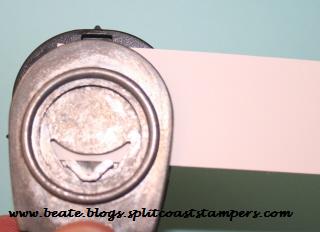
Step two:
Take your border strip, face your punch upward. Line it up with the end of the paper and punch.
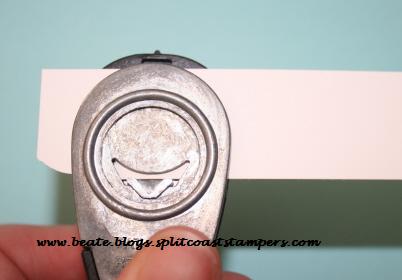
Step three:
Slide your punch over and line the beginning of the second scallop up with the end of the first one. Punch.
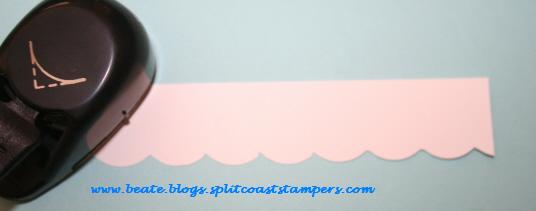
Step four:
Continue to slide your punch over until your border is finished. Easy Peasy!
Hugs and smiles
Beate
56 Responses to “Quick tutorial on Scallop border”
Sorry, the comment form is closed at this time.


I didn’t know how to do that, and I SO appreciate you giving a quick, and easy tutorial! That’s cool. I love seeing how things I already own can be used differently. Thanks!
Hi Beate! Thanks for leaving a comment on my blog…like i said you’re the best! So i have been doing this with the Slit punch. It looks like you get a cleaner scallop wtih the corner punch instead (that or you’re just better at it – which is probably the truth of it). Any advice on using slit over corner rounder in your experience? 🙂 B
oh, fun! I’ve also been using my slit punch to make scallops. just a different look here and it will be nice to have this “look” available to me! To me, this scallop is a more formal/feminine scallop, where the other one is big and loopy and fun.
anyway, thanks for posting the tutorial!
🙂
~Jody
I just bought this punch after hearing on SCS that you can use it to make scallops. Love it!! Thanks ever so much for the tutorial!
Beate you are heaven sent!!! I ran across your blog and I am so glad that I did!!!!! I can’t wait to try this out! Thanks again!!
OMGosh, I was just thinking about photographing a tutorial on this, too, because they showed it at Regionals this weekend! Isn’t this an awesome find? So many possibilities . . . great job, Beate!
I’ve only tried scallops with the slit punch, but after seeing your wonderful tutorial…I need to try my corner rounder. Your results with this punch, look perfect!!
Oh my gosh I HAVE to try this — what a great border!
Thank you so much for showing pictures with your instructions!
Some of us are very visual, and have to see it to do it 🙂
Is it easy to take the guard off ?? And, is it easy to put back on?
Thank you for your tutorial
Judy in OR
JudyOR…it’s really easy to take off. Just pull a little on the guard and the punch comes right off. It’s just as easy to put on again.
Thank you for your reply. I will have to give this a try.
you rock, what a great idea and such easy to follow instructions..thanks so much for sharing
OH My goodness. THat is genius!
LOL! You know why this would work great for me? My guard piece is broken! Thanks for sharing this tip… 😀
Great tutorial. I just found your blog. I’ve seen a lot of your posts on scs and love your work. You are very talented. I’ve done the scallop border using circle punches and connecting them, but this is so much easier. thanks
Cool! I didn’t even know you could do that! I was wondering how everyone was doing this w/ this punch.
TFS!
Debbie
Wow, thank you! I didn’t know that’s how you got this different look of scallop–I was wondering about this!
[…] is made with the corner punch. If you haven’t seen how that is done yet, check my tutorial here. I then added doodles with the chocolate Chip […]
I just love these instructions. This punch seems a lot easier
than the slit punch. Can’t wait to try it and thanks for
sharing. Love all your beautiful work. Barb
wow, great stamps.
Maggie
[…] The scalloped edge was made by removing the corner guard on my Stampin’ UP! corner rounder and punching straight across the edge of the cardstock. My friend, Beate has a excellent visual tutorial. You can view it here: Fresh and Fun. […]
I didn’t know how to make a scalloped border using this punch. WOW, Thanks so much. I always used the slip punch to make them, but now I have another choice. You are the best. I love your detailed turorial here & on SCS.
Hi Beate~
I am just now starting to really get involved with SCSs and one of the gazillion cards I looked at said that she had done the scallop with the corner rounder. I’ve looked high and low for a tutorial and just stumbled over it looking at another card! I’ve printed it out and can hardly wait to try it! I really need to get off the computer and do some “work”! 🙂 Thank you so very much for this. You have blessed my day!
Hello Beate:
Thanks for this visual of the scallops with the corner rounder. I was stressing and made a post on SCS and a wonderful person guided me here.
Thanks again
Tai
[…] edge on my Almost Amethyst strip of cardstock (you can see a quick tutorial of it by Beate Johns HERE). I stapled the piece of ribbon onto the Almost Amethyst. The flower was done using the rose […]
[…] is made from a 2 1/2″ x 4″ piece of black cardstock. I scored it in half, punched a scallop border with the corner rounder on both […]
[…] If you don’t know how to use your corner rounder to make scallops, you can find my tutorial on that here. […]
Oh my gosh! You just saved me $17.95 + s&h + tax. I was going to order the Marvy Oval Scalloped Punch.
I love using the slit punch, but I wanted a larger scallop to make my Grandmother’s 90th Birthday Party scrapbook. It took me a few trys to get it perfect, but I love it.
I am using the Larger Corner Rounder.
Unfortunately, I broke the guard trying to figure out how to get it off. But, it was worth it.
Thanks so much.
[…] square of Basic Black followed by a 4 3/4″ square Certainly Celery POP designer paper. The scallop border on the bottom of the paper was made with the corner […]
Great tutorial! TFS
[…] pack measures 2″ x 5 1/4″. I added a layer of Pumpkin Pie cardstock underneath and and punched the scallop border with my retired corner […]
Hi, how can I see all your cards? I’m new at this website and I would like to see them if at all possible. Thanks and have a great day!
is this the very latest punch that is in the newest catty (as of Aug 2007)? thanks!!!!!!!! lela
[…] The left panel had a 1″ x 5 1/2″ strip of shimmery white cardstock added. I used my corner rounder to make the scalloped border. […]
Love this tutorial!! Thank you!
your blog is great i love
[…]wow, great stamps.
SOFIAA
[…]
I LOVE U this is SO SUPER
[…] 4 3/4″ side as my card front. I took a thin 4 1/4″ long Whisper White strip and added scallops with my corner rounder. That was taped under the card front with only the scallops peaking […]
You are way to clever! This is such a great way to make scallops! Thanks for posting this!
So glad I found this turtorial, I just got my corner punch yesterday and I could not figure out how to make scallps. So thanks to you I can make them now.
Love all you projects.
Jan
[…] punched a scalloped edge using our corner rounder punch (if you’re not sure how to do this, here’s a link to a tutorial that was created by Beate Johns), then punched a small hole in the center of each scallop […]
Thank you, thank you, thank you for this tutorial! Who knew the guard came off the corner rounder…words cannot express my thanks for all you share with us here on SCS.
Thank you again, Beate!
Melissa Leach
Statesville, NC
Thank you!I will have to give this a try.
[…] on the internet on how to make scalloped edges with our corner rounder. You’ll find it here. Also a tutorial on how to make a scalloped circle. You’ll find it here. Have fun […]
I had no clue about this…thanks so much for giving this short tut. I tried it and it turned out BEAUTIFULLY!!!! Thanks, Bet.
[…] time, I would probably start with the squares or rectangles. If push comes to shuff, you can always add scallops to circles and ovals with your corner rounder. It’s a lot harder to get them right on squares and rectangles. Filed under : Product […]
I friend was mentioning this to me today. I had tried it before, but w/out success. However, your visuals were quite helpful for me. Thanks much.
merci pour le tutoriel
j’ai trouvé la méme perforeuse pour faire ces feston
merci
anice
merci pour la technique
j’ai réussis a faire un ruban ric rac
avec la méme perforeuse.
anice
It’s a wonderful idea!!!!!!
I didn’t know how to do that, and I SO appreciate you giving a quick, and easy tutorial! I didn’t realize you could take off the guard or even that there was a guard. Thanks.
I didn’t know how to do that, and I SO appreciate you giving a quick, and easy tutorial!I didn’t even realize there was a guard to remove.
These can be so fun to use when you are scrapbooking or just trying to make cute invitations for a party. Good post and great ideas!! Thank you for sharing.
[…] Can you see that scallop border at the bottom? Scallops are so, so hot now which means you could load up on a lot of different punches and shaped paper trimmers or you can just use your corner rounder punch. We learned this technique at regionals but Beates Johnson, the tutorial genius at Slitcoaststampers, also did a great tutorial on her new blog, here. […]