
Today’s tutorial on SCS is written by Stephanie Luman and is for the Flower Pot Pocket card.
It’s easy and oh so cute! If you haven’t tried it out, what are you waiting for?
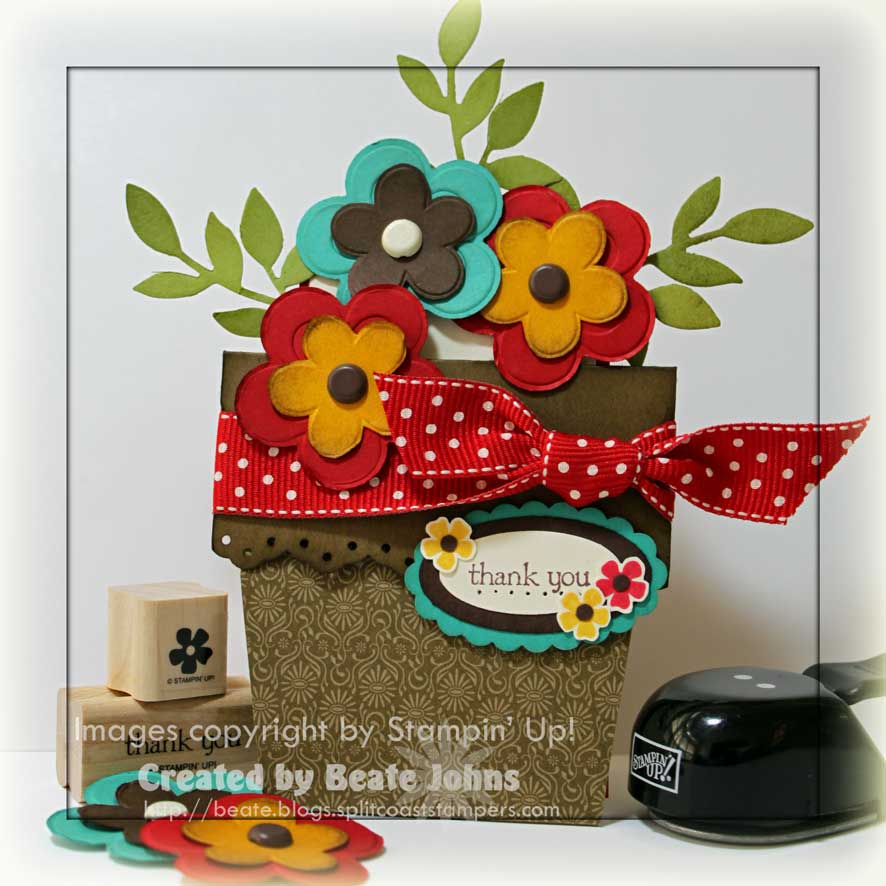
My Flower Pot base is Soft Suede cardstock.
The flap edge was punched with the Eyelet Border Punch and the entire flap was sponged with Soft Suede ink.
The lower part of the Pot is covered with Thoroughly Modern Designer Paper. Polka Dot Red Ribbon was tied around the flap.
The sentiment is from For All You Doand is stamped with Chocolate Chip on Very Vanilla cardstock. It was punched out with the small oval punch, layered first on a sponged Chocolate Chip large oval punch-out, then on a Bermuda Bay Scallop Oval. I underlined the sentiment with a paper pierced row and added three little flowers. They had been stamped in Crushed Curry and Real Red, cut out and topped with a tiny Chocolate Chip Circle I had punched out with the Double circle punch (retired).
The flowers were punched with the Embosslit Cherry Blossom, the branches with the die cut Little Leaves.
I punched two for each flower, cut the center out, sponged both of them and added 5/16″ brads in each center. The branches were taped on with Scor-Tape, the flowers with dimensionals.
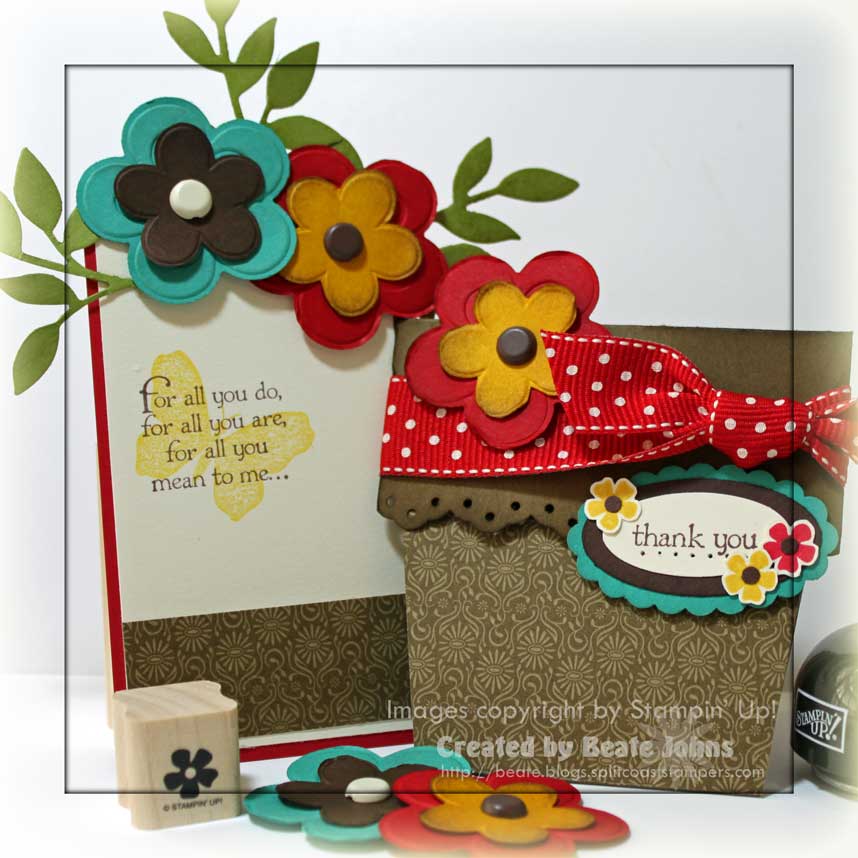
The first layer of the insert is a 2 1/2″ x 4 1/2″ piece of Textured Real Red cardstock, layered with a 1/4″ smaller piece of Very Vanilla. A 7/8″ x 2 1/4″ piece of Thoroughly Modern DP was added to the bottom of the insert to tie it in with the front.
The sentiment is also from For All You Doand is stamped in Chocolate Chip. The buttefrly from the same set was stamped in second generation Crushed Curry over it.
P.S.: If you want to see/hear my first attempt at a video tutorial for SCS, check it out here. I was very nervous and you can hear it when I talk. I hope I will get better with the following tutorials.
[youtube]https://www.youtube.com/watch?v=ir-nDyJoGvE[/youtube].
Beate
37 Responses to “Tutorial on SCS – Flower Pot Pocket Card”
Sorry, the comment form is closed at this time.


This is absolutely beautiful, Beate!! I love the colors you chose, and the DSP is perfect. TFS!
WOW!!! This card is so adorable. I can’t wait to try out the tutorial. Thanks again.
This is super fun, Beate! I love the colors and that yummy ribbon!
This is gorgeous, Beate!! You are back in full cardmaking mode for sure. I agree, the flower pot card is really fun and easy to make. My stamp campers made one last month and loved it. 🙂
thanks so much!
barb
Super Duper CUTE! I really love that color combo too!
What a pretty card….. Your flowers are perfectly arranged! One of the best flower pot cards I’ve seen to date!
Super cute! I love the color combo you chose. Thanks for sharing!!! 🙂
Wow, die Karte ist sooooooo schön geworden. Die Farben passen super gut zusammen.
Beate… your card is awesome. I haven’t ever tried the flower pot cards yet, but think I will. I was wondering if you have any tips on using the little leaves sizzlit. I got mine last week and can’t get a good cut with it.. thanks in advance for any tips you may share. Pam
STUNNING as usual! LOVE, LOVE, LOVE it!!! You are such the STAMPING GODDESS!!!
Hugs, Smiles, and Blessings! <
This is very cute! I think you did a fantastic job with your video tutorial as well.
I don’t think this could be any more fabulous. Your accent is adorabe! I could/would watch a video every day if I could LOL!
It’s a good life!
Terri E.
Your tutorial was awesome! I have never made the flower pot card but after watching your video, I’ll definitely give it a shot! You make it look so easy. Thanks for the inspiration.
I love your card..it’s so pretty!
This is so cute and my kind of flower pot. They never die, hee hee Wonderful job Beate.
Beate your flower pot card is fantastic and your video tutorial was great! I didn’t think you sounded nervous at all, your a natural!
Hello Beate,
thank you for the flower pot video. You didn’t sound nervous at all. The instructions were easy to follow and you sounded like a pro! I am looking forward to the next one.
Great job on the video and loved the flower pot card.
Lovely to watch instructions done by a left-hander!!! Thanks so much for the left handed ribbon tying instructions. You didn’t sound nervous to me at all ….
What a great tutorial. You make it look so easy, now I can’t wait to try it.
Beate, this is beautiful! You did a FABULOUS job with your tutorial!!! Thanks for sharing!
Don’t you just love these little cards? I need to remember to make them more often. Your colors are beautiful together!
Congrats on your video! You were awesome!!
Speedy Gonzales! It’s great to have you back and thanks for the left handed bow tying – yep, I have been struggling!! It is also nice to see everything made with SU products! Great job!
Beate, your video tutorial is FANTASTIC! Great job! I love your accent, and thrilled to find out that you’re a lefty (me too!)!
so pretty, love the colors and so neat to be able to watch you create the card!
Beate, You did a great job on your video tutorial. I appreciate seeing how the bow was tied. I love your version of the flower pot!
I’ve never made one of these before, and yours is gorgeous, Beate!! Excellent tutorial, and I loved hearing your voice and sweet accent!! You ROCK!!
The card is super-cute and I love the color combination! Your tutorial was just wonderful; you didn’t sound nervous to me!
TFS this very kewl project with us; I hope this is just one of many videos to come, Beate!!
Aloha Beate, I love your video tutorial. I hope you make more video tutorial – you do it so very well. It’s also good to hear your voice. Thank you so very much for sharing your talent.
WOW Beate, was für eine megageniale Blumentopfkarte, ich bin total begeistert und sende Dir blumige Grüße.
LG
Anke
Love,Love,Love your video, you make it look so easy to follow along and your accent is beautiful. Can’t wait to see another one. 🙂
carolyn
Your tutorial was great! I was especially excited to see and hear directions for tying a knot for a left hander! Ribbons are hard for me and I guess I just never knew how to do it…thanks! Look forward to seeing more tutes from you!!!
FABULOUS Tute Beate! It is so cute to hear your voice, and your flower pot is just adorable! Fantastic job 🙂 Love Keesh x
Love the flower-pot card and love the tutorial. You did not sound nervous at all…you are a natural.
Thanks for the advice on tying a bow left-handed. It must be wonderful to be able to cut with your right hand…I have struggled with developing my laft-handed cutting skills for years.
Fantastic job…we look forward to many more.
What a lovely project and a great tutorial! You are a natural teacher, and it shows through, even on video. Your steps were clear and easy to follow and it really made me want to try one. I couldn’t tell one bit that you were nervous. I thought you did a great job! Thanks for taking the time to prepare the tutorial and post it.
What an adorable card! Loved the video tutorial!
I love the card! I think the tutorial was perfect! I do have one question though. How did you get the sides of the pot angled? Did you have to cut some off?
ABSOLUTELY AWESOME……THANKS FOR SHARING YOUR CREATIVITY…….