
Ever since I saw the sneaks for Flourishes Dove and Holly set, I knew I NEEDED that set. Marcella creates the most amazing stamp sets.
So when the set came right before I had to come up with a video for the Joy Fold card, I knew I was going to use it. And to mix it up a bit, I created a square Joy fold card….because, I LOVE square cards.
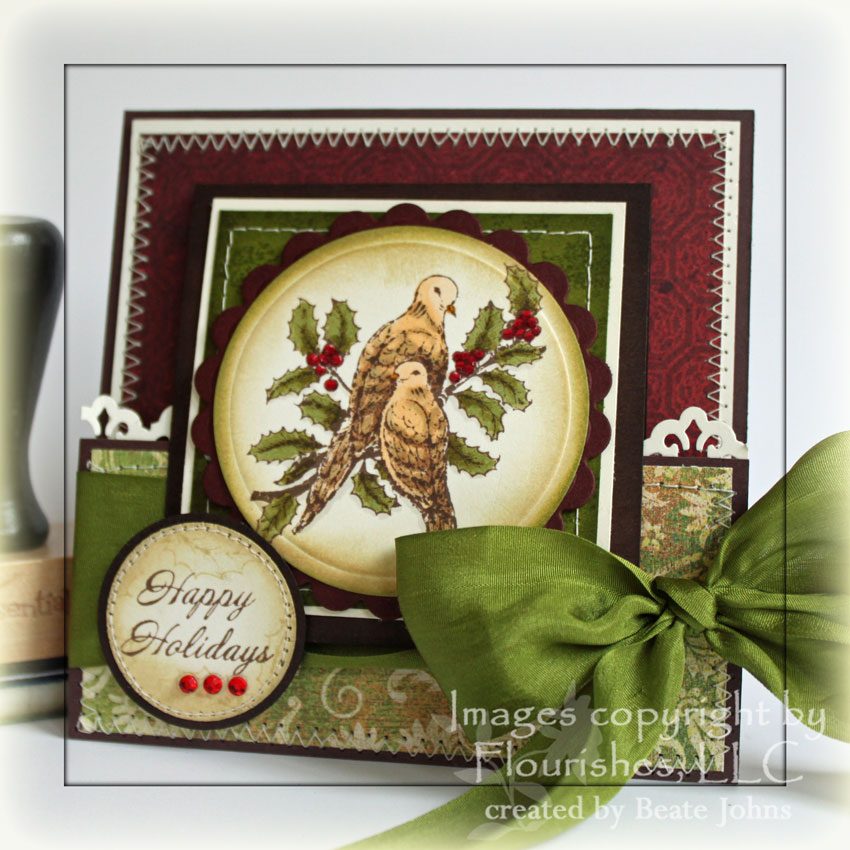
My card base is a 4 1/4″ x 6 1/4″ piece of Chocolate chip cardstock scored at 4 1/4″. The edges were sponged with Walnut Stain Distress ink. For the backing I layered a 3 3/4″ square piece of Basic Grey Boxer paper on a 4″ square of Very Vanilla cardstock. The layers were stitched together and adhered to the card base.
A 1 7/8″ x 4″ piece of Basic Grey Fruitcake paper strip was adhered to the front flap. Behind the front flap I taped a strip of Vanilla cardstock that had been punched with an EK punch. It was sewn to the card front. May Arts Olive Silk Ribbon was tied around the flap.
The flap base is a 3″ x 6″ piece of Chocolate Chip cardstock, sponged with Walnut Stain ink and folded in half. A 2 1/2″ square of Old Olive Cardstock was stamped with Vintage Wallpaper and Peeled Paint ink, the edges were sponged and it was sewn to a 2 3/4″ square of Vanilla cardstock.
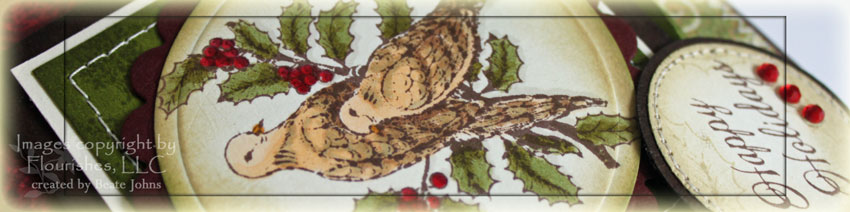
The doves were stamped in Rich Cocoa Memento Ink on Gina K’s Pure Luxury Ivory cardstock and colored with Copic Markers (E51, E55, E57, YR23, YR24, YG93, YG95, R46, R59, W1). It was cut with Circle Nestabilities, sponged with Antique Linen and layered on a Burgundy cardstock scallop that was sponged with Aged Mahogany. It was attached to the flap with dimensionals. Crystal Effect was added over the Holly berries.
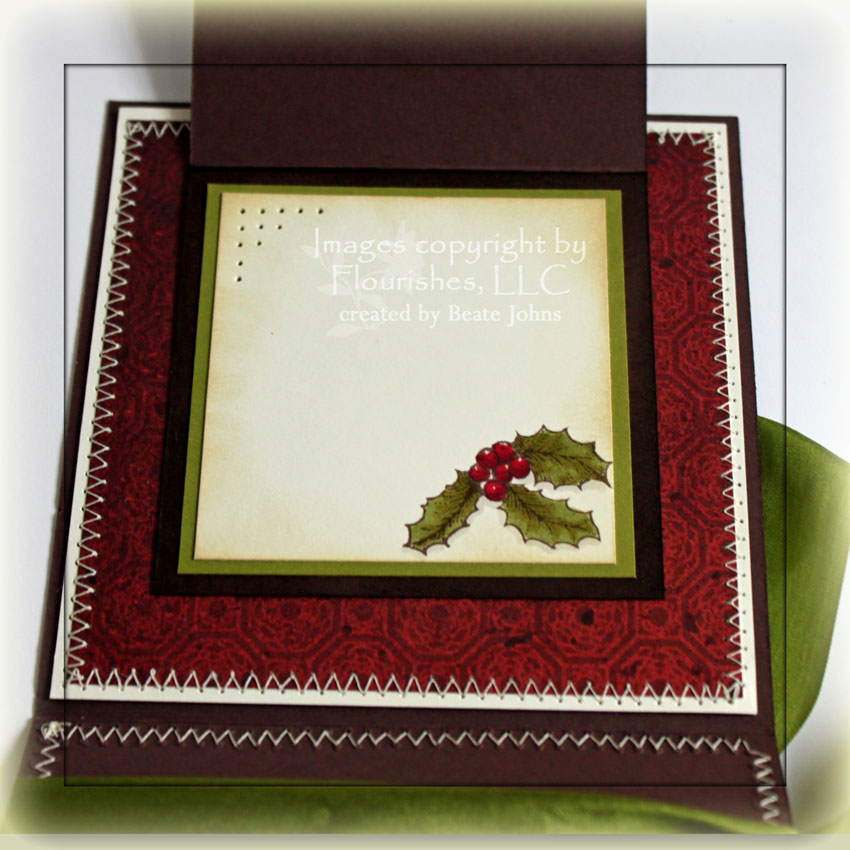
The inside of the flap was layered with a 2 3/4″ square of Old Olive cardstock and a 1/4″ smaller piece of Pure Luxury Ivory cardstock. The holly stamp was stamped in Rich Cocoa Memento ink in the right bottom corner and colored with the same markers that were used for the Dove image. Again Crystal Effect was used to enhance the Holly berries.
Here is the video for the visual learner:
[youtube]https://www.youtube.com/watch?v=8u_RnvolcZc[/youtube]
Beate
19 Responses to “Video tutorial – Joy Fold Card”
Sorry, the comment form is closed at this time.


wow … gorgeous! haven’t tried a joyfold yet but will definitely be making one after this beautiful card!
Such an elgant card. Love the detail!
Another masterpiece. What a clever idea and what a beautiful card!
This is such an awesome card. I have made this type of card before but you have given me some new ideas. Thanks!
Oh love this in the square card! Gorgeous Beate! Another going on my list to try, lol!
Beate, I love all the detail you put into your cards. The stitching on this is such a wonderful touch. Thank you for the time you put into doing these tutorials for us. Thanks also for the reminder of this fun fold.
What an awesome card. I just got the Doves and Holly stampset in so this is perfect timing! I know what I will be doing tonight. Thank you so much for another terrific creation and for sharing your talent with us.
Hugs,
Sue
Oh my, this is sooooo beautiful. Gorgeous colours and that bow is wonderful. Love your bows Beate.
Gorgeous card and I must say that I appreciate the video tutorials. I used one on SCS last night for the tri-fold shutter card and it helped so much!! Thank you!!!
thanks for the video tutorial, Beate. And your card is beautiful!
Oh my, Beate!! This is just sooo beautiful! Your bow is amazing, and love all the details you have put into this card from the stitching to the sentiment holding the flap!
This is absolutely gorgeous!
Hugs,
Caro
Your card is drop dead gorgeous! The colors, stamps and beautiful details look amazing together. Your video was so helpful! I love the look of your square joy fold card!
Oh my goodness, Beate — this is fantastic! Look at all those wonderful layers and that gorgeous bow!! 🙂
Beautiful card, Beate, and wonderful video tutorial.
Thank you so much for this tutorial it’s gorgeous and I’m have a wonderful time making them. i would like to use this technnique on Midwest stampers Yahoo group with credit to you and SCS if I can get permission to do so. You can contact me at [email protected] to let me know if that would be ok. Thanks, Karen Wallace
Beautiful card!
Just Beautiful, your coloring is excellent and a neat way to keep it closed, tfs!
This is absolutely gorgeous, and so perfectly embellished!! I LOVE it, Beate!!