
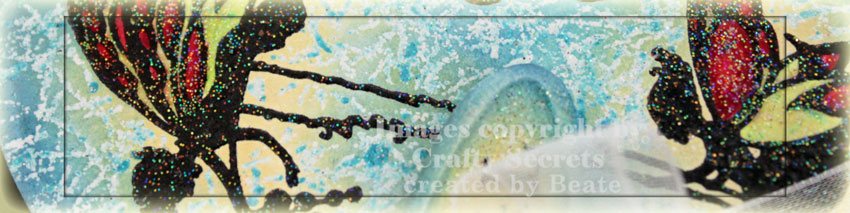
Today I want to share with you another card I made for a video tutorial. I usually don’t really like the look or the Rolling Marble background, but I do like how this card turned out. It almost looks like my fairies are under water.
I added just a few steps to the regular technique to achieve this look. First I stamped the Fairies from Crafty Secrets in Black Soot Distress ink on Neenah White cardstock and embossed them with clear embossing powder. One of the great things about the Distress inks is that they stay wet longer. That is great for sponging and also great because you have time to heat emboss with these inks. I colored the wings of the fairies with Copic Markers. Next colored over the wings with a Versamarker and embossed them with Iridescent Ice Embossing Powder (Stampin’ Up!).
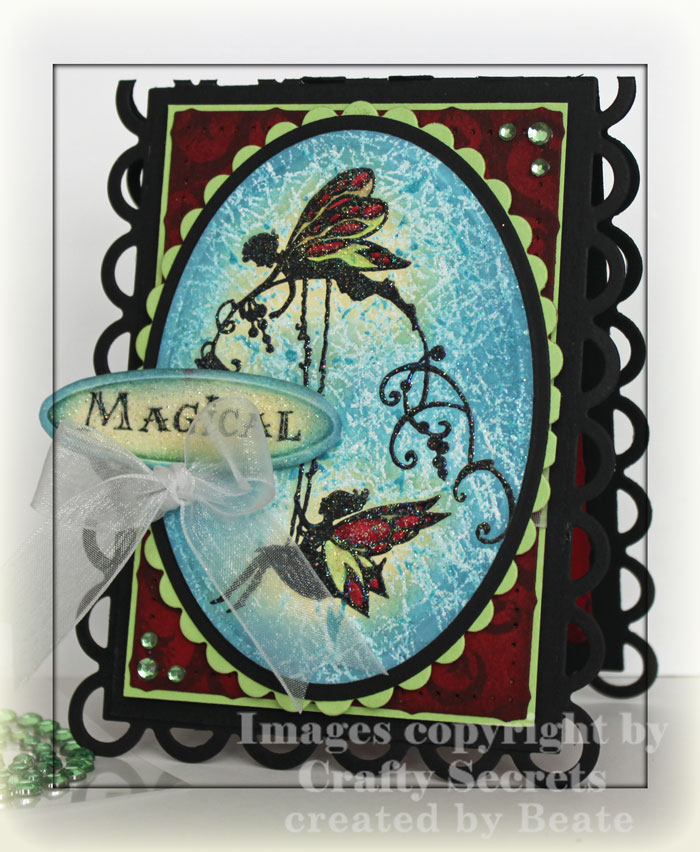
Next I used Versamark and Broken China Distress ink re-inker for the Rolling Marble background and embossed those lines with Iridescent Ice Embossing powder. Once the Embossing Powder cooled, the image was cut out with Oval Nestabilities. I sponged around the Fairies with Scattered Straw Distress ink. The rest of the image was sponged with Broken China ink, the edges with Faded Jeans. The image was first adhered to a slightly bigger black cardstock oval, then to a scalloped oval cut out of Core’dinations Cardstock.
The card base was created with Spellbinders Scalloped Edge Frame out of black cardstock. I cut the red pieces with the same die, sponged them with Aged Mahogany Distress ink and used Unity’s Border of Bells with the same ink to add pattern to the cardstock. The red piece was adhered to a slightly bigger Core’dinations cardstock rectangle and taped to the card base.
The sentiment is also from the Fairies set. It was stamped in Black Soot Ink. It was cut with one of the dies from Spellbinders Ribbon Tag Trio. The ribbon slots were cut off. After the sentiment was completely dry, the center was lightly sponged with Scattered Straw, the edges with Broken China Distress ink. The center was covered with the Versamarker and embossed in Iridescent Ice Embossing powder. It was adhered to the main image with dimensionals. A white organdy bow was added under the sentiment. Kaiser Rhinestones on the top right and bottom left corner finish off the card.
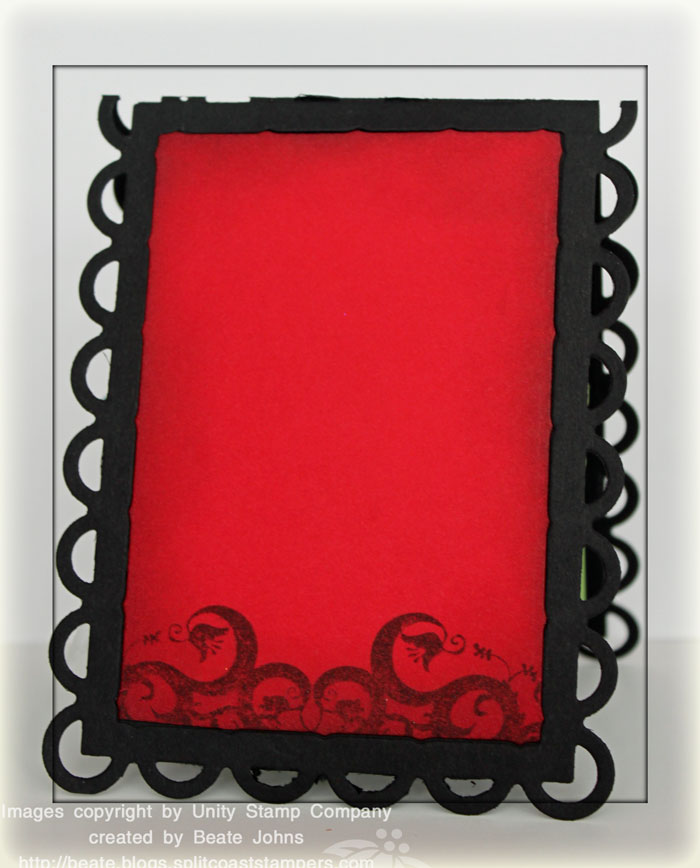
The inside of the card is kept very simple. I added another red layer in the center of the Frame. The edges had been sponged with Aged Mahogany Distress ink and the bottom edge had been stamped with Unity’s Border of Bells.
Here is a video for the visual learner:
[youtube]https://www.youtube.com/watch?v=4LtbcEPau8s[/youtube]
Thanks for stopping by! I hope you have a Happy New Year filled with Health, Happiness and Love!
Hugs and smiles
Beate
15 Responses to “Underwater Fairies”
Sorry, the comment form is closed at this time.


What a ‘magical’ card Beate! love the technique you used – the colors are wonderful! Wishing you a very happy 2010!
HAPPY NEW YEAR BEATE!!!
Your fairy card is beautiful! The rolled marble background looks awesome with the fairies, its such a cool technique.
Oh my goodness, Beate!! This is just stunning!! I guess the best word for this card is MAGICAL!!!
I hope you have a wonderful New Year!!
haven’t done this tech in a while! happy new year! 🙂
Dear Beate,
thank you for sharing all your wonderful ideas! This one is beautiful too and my little nieces will be delighted to get such a magical card for birthday!
Wishing you a happy healthy wonderful new year!
I think your card says it all….it’s magical! Love how you used the scalloped edge frame as the card base!
How did you achieve the scalloped edge for the card, Beate?
Just beautiful!
barb
Wow! Great card! Neat technique! I hope you had a lovely Holiday and new year!!
~Lacey
An absolute showstopper. Love the technique and the stamps are fabulous. Hugs, Mary
Beutiful card! Just love the colors you used.
I love your added step on this technique…I like how it makes the rolled marks not so harsh too! Gorgeous as usual Beate!
This little box is soooo easy, however I needed it to be a little taller. I started with c/s measuring 4.25 x 8 1/8 adding once inch total.
Score 1 inch and turn 1 inch, same as tutorial. Turn to side, score 2.5, 3.5, 6, 7. All of the rest is same.
Now it will hold 2 (halloween type wrapped) square milky ways, snickers, etc. Sue
The card is beautiful. Love all that you put into it. The techniques are get and I loved the colors. Thank you for sharing!
I love the images, wonderful frame, and beautiful sparkle!! Your background turned out so pretty as well, Beate!!
Good post and pictures. I feel happy when i see style. Thanks for sharing these pictures with us.