

Today’s tutorial on SCS is written by Jane Matsumoto. It’s how to create a box with four scallop edge envelopes. It’s very cute, but after Ranger U, I am so not in the cute mood. So I decorated it a bit different. I embossed a grungeboard swirl with Vintage Photo Distress Embossing powder and added a flower from Foilage and a Philosopy Tag.
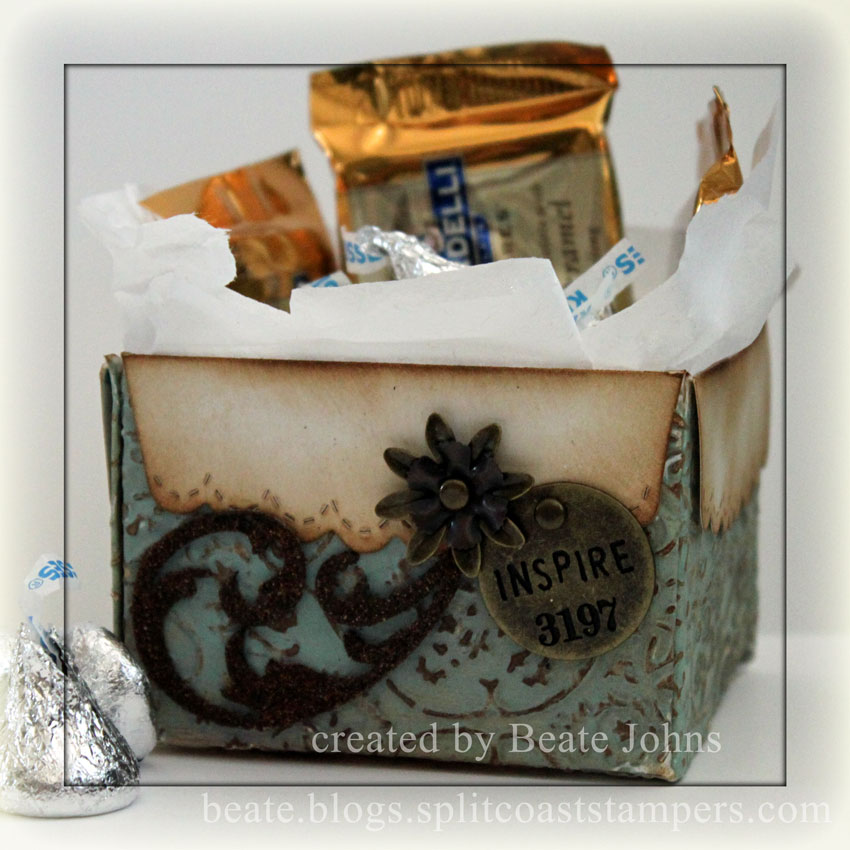
My box is made out of Neenah Solar White cardstock. I embossed all four sides with Cuttlebug’s Textile. Next I treated the cardstock with a technique Tim showed us on Grungeboard. He called it Grunge Distress. Since I was not using Grungeboard, I call it Acrylic Distress. I shot some step by step pictures to show you. Just click on more if you want to see it.
P.S.: I will have to take out the candy and tissue and add some brown speckles on it. It’s just too darn white.
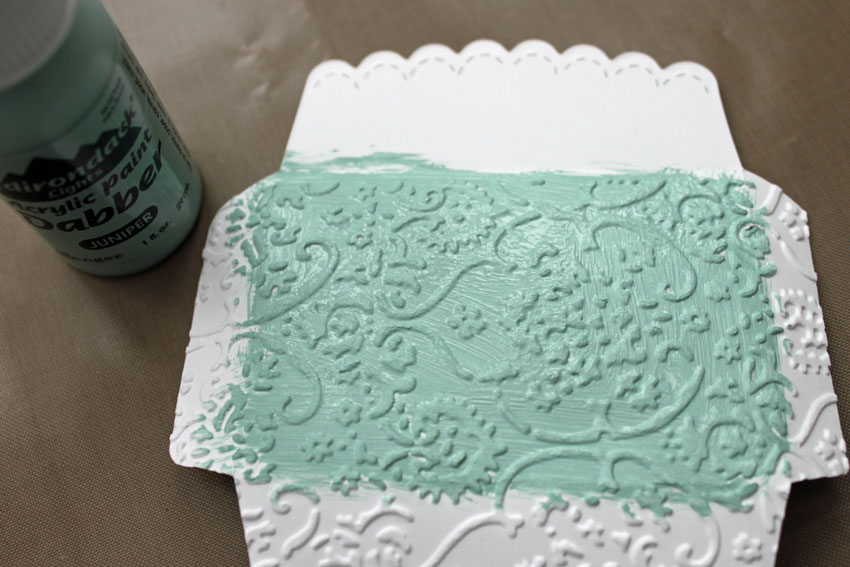
Apply Acrylic Ink over the embossed cardstock. Let dry.
I used Adirondack Juniper Acrylic Paint Sponge Dabber.

Sand off some of the Acrylic Paint over the embossed image. Clean off the fine dust off your cardstock.
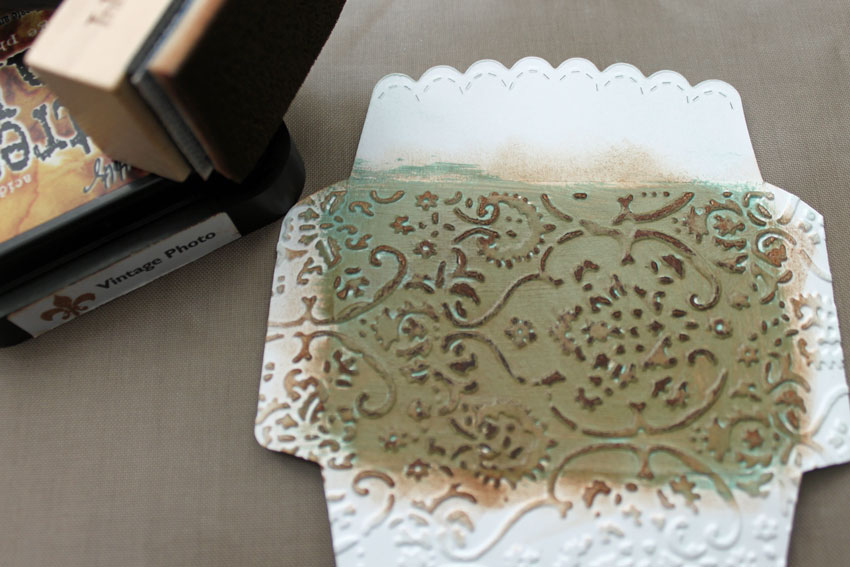
Apply a dark brown ink over the acrylic paint layer. I used Vintage Photo Distress ink with a Blending Tool.
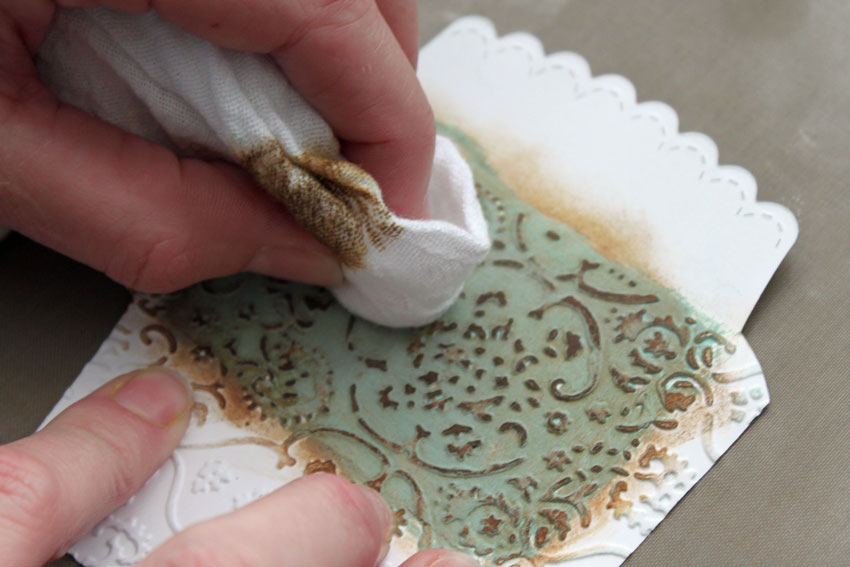
Mist a rag (Tim uses one all the time. So now I have several as well.) with water and rub off the ink over the acrylic paint. It will stay in the spots where the Acrylic Paint was sanded off.
Cool, right? Hugs and smiles
Beate
20 Responses to “Tutorial on SCS – Scalloped Envelope Box ….Ranger style”
Sorry, the comment form is closed at this time.


GORGEOUS and I giggled when I read you thought it was too white!
Beautfully grungy! Did you get some binkies for yourself? After Ranger U, I love my craft sheet and always have binkies lying around.
I love distressing and you did a wonderful job! Your step-by-step instructions are easy to follow. Love your project!!
This is stunning Beate! I have ALL the new distress inks on order and can’t WAIT to play with them! I’m sure I’ll be casing some of your fabby projects!
Hugs and Love
Vicki
Ok that’s it! I’m coming to your house for you to teach me how to distress things. I’ve tried and I can’t do it…lol
This is beautiful! LOL @ it being too white. I would never have noticed something like that. Looks like perfection to me!
looks great! I think I will try this today. Thank you for sharing all your great ideas.
so cool, love how you grunged it up and gave it texture!
Stunning! Love the pictures showing the different steps you used to get this beautiful look. I had to laugh when you wrote that you thought it was too white. 🙂
Is the scallop envelope from SU or a different company?
barb
It’s amazing how we have all been bitten by the TIM bug…gotta love that! Your tut is really cool. Your colors gave the CS a burnished look…sooo cool! Gotta get some acrylic paints…does it have to be any certain brand of acrylic paint?
Tim is addicting, isn’t he Beate? LOL! I find myself adding little bits of vintage and grunge on everything! Love the way your Box came out!
Elaine Allen
So I see you were introduced to Tim’s Inky binky!!! Love your box!!! Go Ranger!
love the box and then when you add TIM to it – shazaam – you hit gold with this one. Thanks for sharing.
I love this box! I have to make one now-thanks for inspiring me (thanks to Tim also).
thank you for sharing the photos! I LOVE this technique and am going to be giving this a try.
Love the color of paint you used too.
Thank you for the photos and the truly beautiful project! I have not tried this technique but I am inspired now!
I love the grungy look of your box, Beate!! Just gorgeous!!
Oh Beate Deine Box ist ein TRAUM, sssssoooo schön, der Wahnsinn.
Herzliche Grüße
von Anke
so pretty! I need to go get myself some rags, too, I think. I can never find the ones I do have…
Beate, just love all your projects! This is the first time I’ve seen a picture of you, what a smile! 🙂 And I can’t wait to try several of your project! lol Thanks and keep creating these great projects!