

I created this card as a sample for the video for the Faux Stitching tutorial. It was very hard for me not to use my sewing machine instead. I used three different stitches on the card to show them off. On the top right corner I used a non continous stitch, zigzag on the upper edge of the horizontal strip, continous straight stitch on the bottom of the strip.
The image is from JustRite Stampers Autumn Blessings. It was stamped in Tuxedo Black Memento Ink on Neenah Solar White cardstock and colored with Copic Markers (Apples: YR31, R22, R27, R39, Berries: R29, R59, Leaves: G82, G94, G85, Basket: E31, E34, E35, E37, E39, Ground: W1, W2). The image was cut with Classic Circle Nestabilities and airbrushed with YR31. It was then layered on a piece of black cardstock, cut and embossed with Lacey Circle Nestabilities.
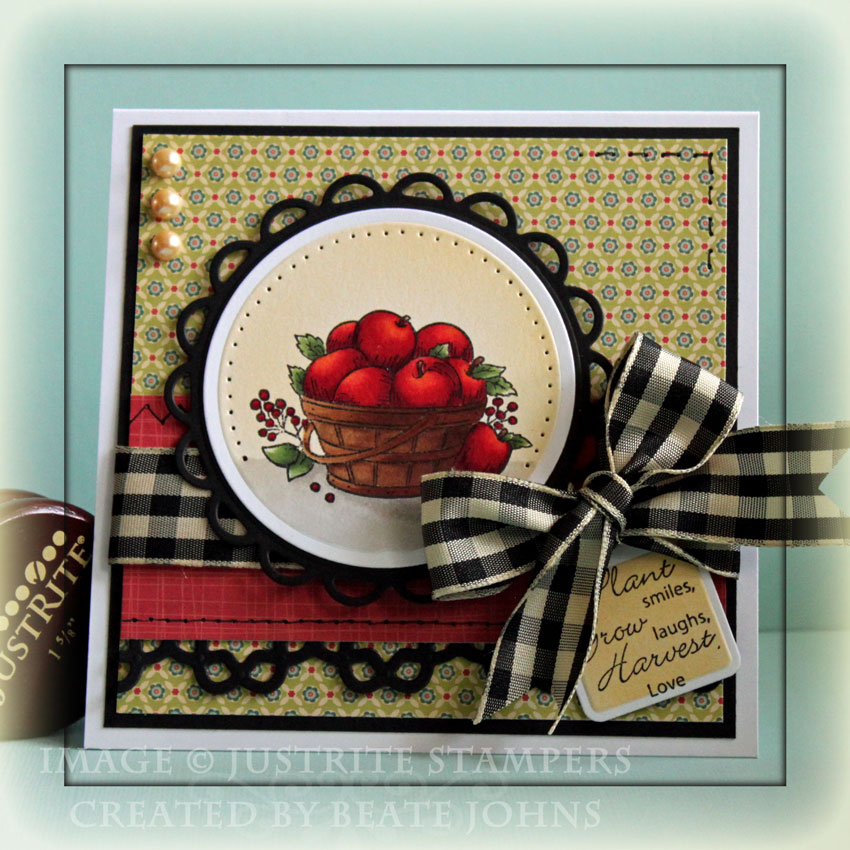
A 4 1/2″ wide black cardstock strip was cut and embossed with Lotus Borderabilities and adhered under a 1 7/8″ x 4 1/2″ strip of Early Bird Cosmo Cricket Paper. The strips were adhered to a 4 1/2″ square of different paper from the same pack. After adding the faux stitching May Arts gingham ribbon was tied over the horizontal strip. The main image was adhered over the ribbon with dimensionals.
The sentiment is from JustRite stampers set Seeds of Kindness. It was stamped on Neenah Solar White with Tuxedo Black ink and cut with Spellbinders Tag die. The center was airbrushed with YR31. The sentiment was adhered under the bow with dimensionals. Champagne Kaisercraft Pearls finish off the card.
Here is a video for the visual learner:
[youtube]https://www.youtube.com/watch?v=988pTBT3L-Y[/youtube]
Thanks so much for stopping by! Have a wonderful day!
Hugs and smiles
Beate
16 Responses to “Video tutorial – Faux Stitching”
Sorry, the comment form is closed at this time.


Fantastic card! I love your use of the faux stitching and great tutorial, too.
~Lacey
http://www.stampandcreate.com
Beate I love all the trims/borders you’ve used, it really sets off the design. Gee wiz I have this stamp, I need to pull it out again! Beautifully colored!
Gorgeous card Beate!! Love them apples, and all the different stitches are great!
Gorgeous card Beate! Those apples look delicious! I love all the little detail you add like the paper piercing & the faux stitching 🙂
Gorgeous! Those apples are so vivid!
This is stunning, and your coloring is amazing!!
This is STUNNING Beate! Your coloring blows me away!!
thanks again for this tutorial Beate – this was something I had beenhaving trouble with. Love this card – it is a real beaut!!!
xo
tina
What a gorgeous card, Beate. Those apples look good enough to eat!!!!
Eine traumhaft schöne Karte liebe Beate, dieser Apfelkorb ist wunderbar, und Deine Gestaltung ist wie immer sssssoooo zauberhaft *schwärm*
Herzliche Grüße
von Anke
Beautiful work as always! LOve the look of stitching….faux or real! : )
Beate, this is beautiful! I love faux stitching!
so pretty, like your punched border, goes great with the circle die. I usually do faux stitching, I don’t have the patience to get out my machine, I could really use that piercing template though!
This is just fabulous, Beate! Such gorgeous coloring on that fruit! You know I LOVE paper piercing! 🙂 One more week! Yippee!
gorgeous coloring and such beautiful design! i think i need to try out some borderabilities!! you use them so beautifully in your design! LOVE this!!
Oh, neat! So that’s how you do that! 🙂 Thank you for sharing!