
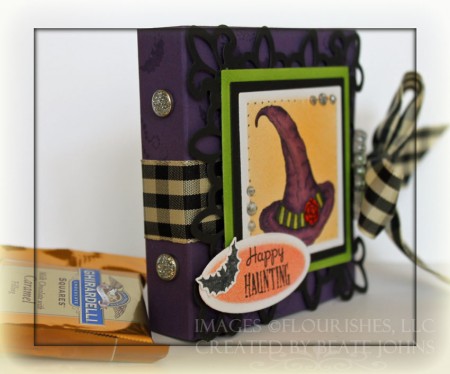
This is a little tea bag holder. Since I don’t drink tea, I wouldn’t give tea as a gift. So I filled it with Ghirardelli chocolate instead. Because….who doesn’t like chocolate (well…I did meet a few people that don’t like chocolate, but that’s just plain weird!). I created it as a sample for video tutorial for the tea bag holder tutorial.
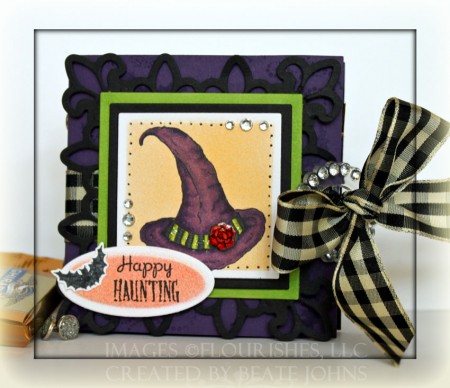
The holder base is a 3 1/2″ x 7 3/4″ piece of Eggplant Envy cardstock. It was stamped with the swirl and bats from Witching you a Happy Halloween set in Dusty Concord Distress ink. The inside sleeves were created out of My Mind’s Eye Boo to you paper, adhered to the center with Scor-Tape. Recollection glitter brads were added to reinforce the hold. May Arts black/cream gingham ribbon was tied around the holder with a gorgeous ribbon buckle (I got from a friend).
The witches hat from Witching you a Happy Halloween was stamped in Tuxedo Black Memento Ink on X-Press It Blending card and colored with Copic Markers (hat: V15, V17, V09, YG01, YG03, YG17, C5, C7 Rose: R17, R29, YR04). The image was cut and embossed with Classic Square Nestabilities and airbrushed with Marker YR04 . Glossy Accents was added over the rose, Stardust Stickles over the green stripes on the hat .
The square was layered on a slightly larger piece of Sour Apple cardstock. The edges were colored with YG03 before the image layer was adhered to it. A border was paper pierced and Silver Kaisercraft Rhinestones were added The bottom layer is a piece of Basic Black cardstock cut and embossed with the Fleur De Lis Pendant die.
The sentiment is from the same set. It was stamped in Tuxedo Black Memento Ink on Neenah Solar White cardstock that had been cut and embossed with Petite Oval Nestabilities. The oval was airbrushed first with Copic Marker R17, then with YR04. Another medium size bat was stamped, this time in Tuxedo Black Memento Ink on Neenah Solar White, cut out, ran through my Xyron 1.5″ Create-a-Sticker and adhered to the upper right hand corner of the sentiment panel.
Here is a video for the visual learner:
[youtube]https://www.youtube.com/watch?v=FpklUm0Sy24[/youtube]
Beate
12 Responses to “Video Tutorial on SCS – Tea bag holder”
Sorry, the comment form is closed at this time.


![[youtube]https://www.youtube.com/watch?v=FpklUm0Sy24[/youtube]](https://beate.splitcoaststampers.com/files/2010/10/FFLCWitchingyouteabagsidesh.jpg)
LOL I don’t really drink tea or eat chocolate…so I’m double weird 😉 hehe!
Love this little holder…it’s cute!! Seems quick and easy to do. Can’t wait to be moved so I can REALLY stamp again! I’ve got so many things from you bookmarked I could spend the entire month doing Beate tutorials!! Thanks for sharing girl!
Beate.. this is soo cute. We don’t do tea or coffee either so I usually pass up these kind of tutorials but something made me watch. probably because you are so very creative.. and I love the Chocolate idea! Thanks for sharing what you do!
Bev
Very cute!!
Love this idea! I will be back later today to watch your video. I pride myself on watching all of yours….I always learn from them and you make everything look like “I” could do it!
Have a wonderful day!
Love your chocolate idea, this is just too cute!
Great tutorial Beate–as usual! I love tea, but I love your chocolate idea too! I cannot wait to try this one out!
So Awesome! I thought it was a book! HA!
What a wonderful project – I love the idea of using chocolate! It would be fun to make one labeled “emergency purse supply” or something in that vein! Gorgeous coloring and embellishing!
beautiful project. really love it when you do special projects like this! =) off to watch the video!
Hi Beate, I really enjoyed this video; you make this look so fun and really easy! Thank you!
Kathy
Beate this is just fabulous!!! What a gorgeous and clever gift giving idea!!! 🙂
Oh I just love this Beate!! I love the image, colors and design!! What a perfect gift. I may have to try this.