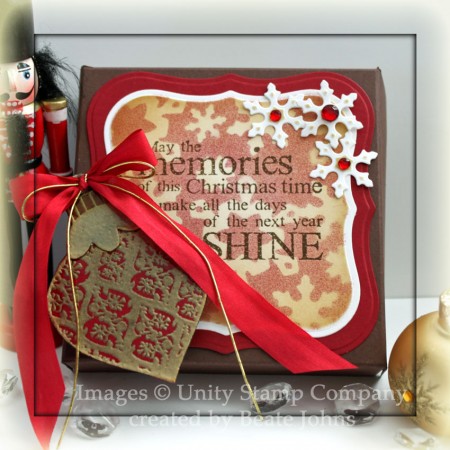
Today’s Tutorial was created by Jenny Gropp. She shows us how to create sturdy magnets as a gift idea. I placed my sample on a pizza box created to match.
The pizza box was created out of Chocolate chip card stock and layered with a piece of Cherry Cobbler card stock, cut and embossed with the largest Label 1 Nestabilities die. A piece of Neenah Solar White card stock was cut with a size smaller die, layered with snowflake die cuts from Create-a-Flake 2 and the Snowflake Borderabilities Petite and airbrushed with Copic Marker R89. With the die still over the card stock, I sponged it with first with Antique Linen all over, then on the edges with Vintage Photo Distress ink. The sentiment is from Unity’s Embellished Season and was stamped in the center with Walnut Stain Distress Ink.
I airbrushed Copic Marker R89 over a piece of Neenah Solar White card stock, stamped the ornament (also from Embellished Season) over it with Embossing inkand embossed it with Gold embossing powder. The card stock was adhered to a piece of cardboard that had been backed with Black card stock and cut out. The edges were colored with my black Copic Marker and a strong magnet was adhered to the back. Glossy Accents was added over the entire ornament.
Once the ornament was completely dry, a double bow out of red silk and gold cord was adhered to the top of the ornament. It was secured to the box with a magnet strip. Three small snowflakes were cut and embossed with the Snowflake Borderabilities Petite die out of Neenah Solar White card stock. They were topped with Red Kaisercraft Rhinestones.
Here is a video for the visual learner:
[youtube]https://www.youtube.com/watch?v=6BHSZ52UsbU[/youtube]
Thanks so much for stopping by! Have a wonderful day! Hugs and smiles
11 Responses to “Holiday Blitz Tutorial – Day 3 – Holiday Magnets”
Sorry, the comment form is closed at this time.


Gorgeous! Looks like I have some catching up to do with your blog! Can’t wait to get back stamping again…fun tutorials!
This is such a cute ornament magnet! I love it.
This is so cute!! I like the idea of making the pizza box to hold the magnet. One of these days I’ll be able to start making some of these Holiday ideas (just as soon as the kids are done with their school projects that are overtaking my work area!)
Love your embossed ornament and pretty snowflake background. 🙂
Hi Beate! Great tutorial – a brilliant idea for people you’d like to give something to for Christmas (more than a card) but not anything big! One question, why did you use white cardstock airbrushed, and not just start with red cardstock? Thanks again!
Liebe Beate,
herzlichen Dank für dieses wunderbare Video, Dein Magnet schaut sehr, sehr hübsch und die ganze Box ist ein Traum.
Herzliche Grüße
von Anke
Absolutely stunning!
Beate this sweet – what a great gift. TFS
xo
tina
What a great idea! Your box is beautiful, and how much fun that the magnet can be removed and used elsewhere! Love it!!!
so pretty! i got that border die because of your gorgeous project using it!! =) thanks for the inspiration and enabling! =)
so pretty and great idea to add the glossy accents to make it shine!