
Today’s tutorial on Splitcoaststampers was written by the awesome Colleen Schaan. It’s a great way to use the Copic Airbrush system and blending solution for a Bleached out look.
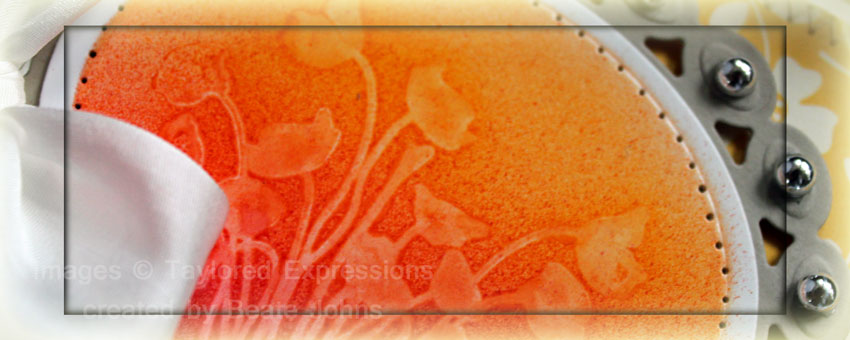
For my sample I started by cutting Glossy White cardstock with Classic Oval Nestabilities die. The oval was airbrushed first with Copic Marker R27, then YR18 and the top with YR14. The flower image from Taylored Expressions Summer Afternoon stamp set was spritzed with Blending solution and stamped on my airbrushed background. The image was layered on piece of Kraft cardstock cut and embossed with a Beaded Oval Nestabilities die. The image layer was paper pierced.
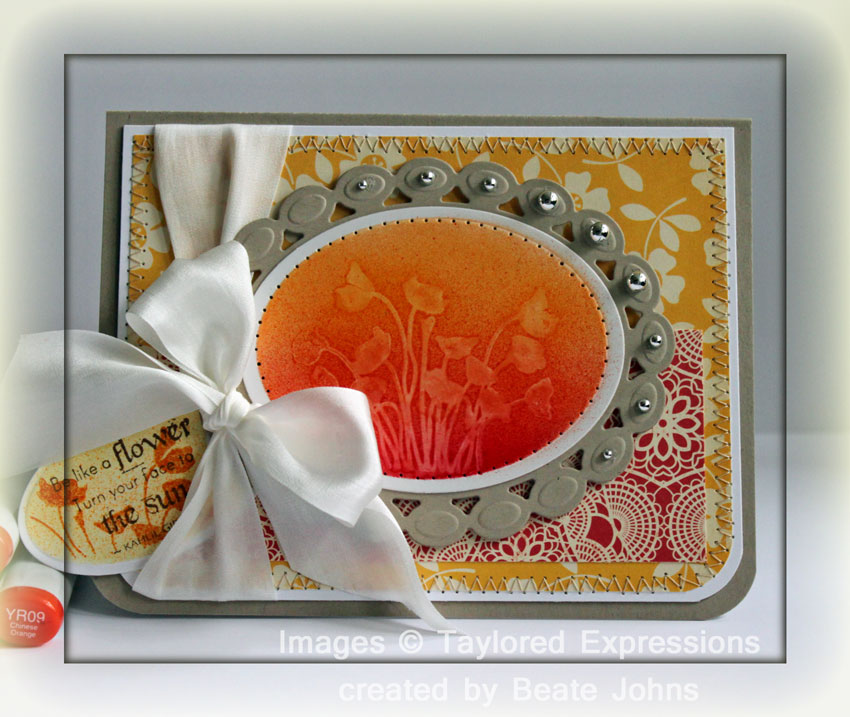
For the layout I used CPS current sketch. I just flipped it and used ribbon as one of the layers. A 2″ x 4 3/4″ strip of Thrift Store October afternoon paper was adhered to a 4″ x 5 1/4″ piece of Seaside October Afternoon paper. The bottom corners were rounded before the layers were stitched to a 3/16″ bigger piece or Solar white cardstock, which bottom corners were rounded as well.
May Arts Silk Ribbon was tied around the layers vertically before the image layers were adhered to it with dimensionals. Silver Recollections Pearls were adhered to the right hand side of the beaded oval. The layers were adhered to the card base, a 5 3/4″ x 9″ piece of Kraft cardstock folded in half.
The sentiment is also from the Summer Afternoon set. It was stamped with Rich Cocoa Memento ink on a piece of White cardstock, cut and embossed it with a retired Spellbinders die and airbrushed it lightly with Y15 and Y17. The image from the main panel was used again over the sentiment. It was inked with Spiced Marmalade Distress Ink, stamped off once and then stamped on the sentiment panel. The sentiment tag was adhered underneath the ribbon.
Thanks so much for stopping by. Have a wonderful day!
Hugs and smiles
Beate
14 Responses to “Tutorial on SCS – Colorless Blender Bleaching”
Sorry, the comment form is closed at this time.


This is FABULOUS girlie! LOVE the colors and this technique ROCKS!!!
How pretty, love the colors and the papers, the flowers are so cute! HUGs
So pretty! Love the colours!
What a cool technique. LOVE the rich warm colors you used.. This is beautiful.
I love this airbrushed technique, Beate. Your card is so lush!! My favourite colours, as well x
How neat! What a pretty card!!
this is such a beautiful card and a technique I would love to try, but don’t have an airbrush system… this is a good reason for me to invest in one! thanks for sharing this beauty.
~ Pam
love the beautiful warm colors. beautiful card, Beate!
Thanks for another use for my air brush….and I love it. I do have a question or an inference….these lovely cards with all the bows and buttons aren’t meant to be mailed, right? I’ve read about the bubble wrap in the envelope, etc. but being practical the cards are for giving to in-person people. …right? I do love the buttons and bows.
Beautiful technique! Can’t wait to try that!!! Your card is gorgeous!
oh my is that ever pretty and just love the stamping on the sentiment tag!
wowww ! very beautiful card i love it !
Hugs
You got a really great website. I have been here reading for about 50 mins. I am a newbie and your articles are helpful for me.
WOW was für eine traumhaft schöne Karte *schwärm*
Sonnige Grüße
von Anke