
The current JustRite Stampers Challenge is easy. Make a Christmas Card or Tag. The winner of the challenge will receive two sets of die sets from the JustRite store, three honorable mentions will oone die set! SWEET!!!
For my creation I started out stamping the biggest stamp from Musical Notes in Rich Cocoa Memento Ink on Classic White cardstock. One was cut out and embossed with the second largest Label 20 Nestabilities die, the other with the third largest die. The ribbon and ornate embellishments of the image were colored with Copic Markers (R24, R27, R29, YR21, YR23, YR24) before both labels were sponged with Vintage Photo Distress ink. A sentiment from the Christmas Nested Frames was stamped in Rich Memento Ink in the center of the smaller label before that layer was adhered to the larger label with dimensionals.
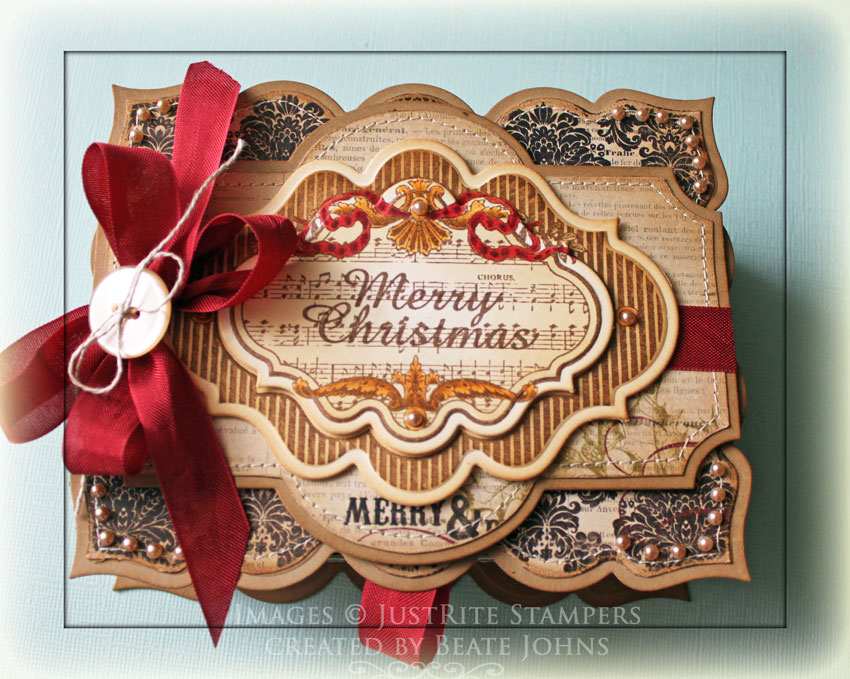
A piece of MME Lost & Found Christmas was cut and embossed with a Label 21 Nestabilities die. The edges were sanded and then cut at the embossed line. A piece of Kraft cardstock was cut and embossed with the same die. The edges of both the cardstock and paper layers were sponged with Vintage Photo Distress ink before the layers were stitched on top of each other.Red Seam Binding (Stampin’ Up!) was tied around the layers. The bow was topped with a button, tied on with Linen Thread.
Another piece of Lost & Found Christmas paper was cut and embossed with the second smallest Grand Label 23 Nestabilities die. The edges were sanded and cut off at the embossed line. A piece of Kraft cardstock was cut and embossed with the same die. The edges of both the cardstock and paper layer were sponged with Vintage Photo before the layers were stitched together. The sentiment layers were adhered to this layer with dimensionals. Cream Baby Bling Pearls finish off this section.
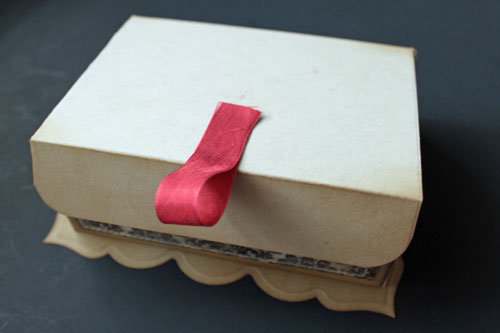
Now I had to decide if I should make it into a card and just cut a base for it, of into something else. I thought it would look great as a box. I took pictures while making the box for step by step instructions. If you are interested how I made this, click on more.
Thanks so much for stopping by!
Have a wonderful day!
Hugs and smiles
Supplies:
- Two pieces of cardstock, cut and embossed with the second smallest die of the Grand Label 23 Nestabilities dies
- Scor-Pal, or other Scoring Tool
- Scor-Tape, or other Strong Adhesive
- Seam Binding, or ribbon
- 7 3/4″ x 11″ piece of Cardstock
- Corner Rounder
Step 1:
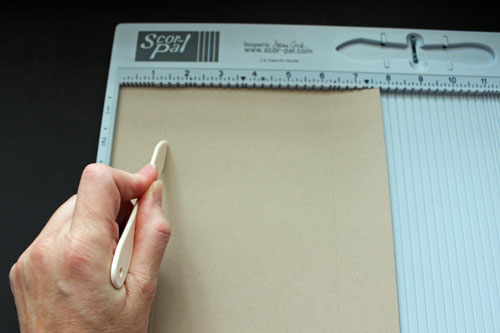
Score your 7 3/4″ x 11″ piece of cardstock on the 7 3/4″ side at 1 1/2″ and 6 1/4″.
Step 2:
Turn your cardstock and score the 11″ side at 1″, 4 1/2″, 6″ and 9 1/2″.
Step 3:

Prefold all your score lines.
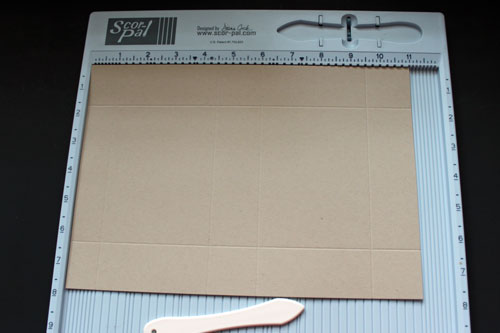
Step 4:
Cut away the outer panels from the 1″ side as well as the connected 3 1/2″ wide panel.Cut the horizontal fold lines in to the vertical lines to create glue tabs for the box.
Hint:
I cut my glue tabs in an angle so the edges don’t show when taping the box together.
The edges of my lid fold (1″ x 4 3/4″piece) were rounded.
Step 5:
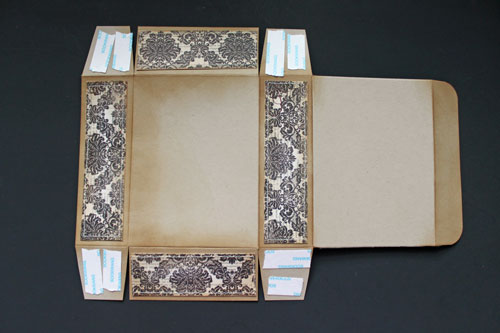
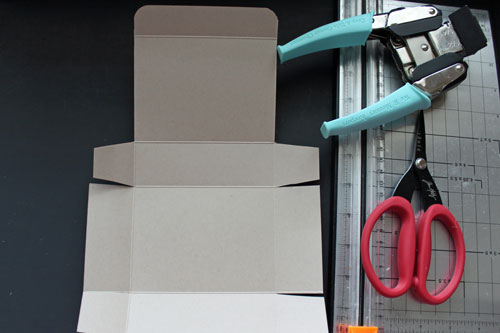
Flip box base over. Decorate your panels and add Scor-Tape to your glue tabs.
Step 6:
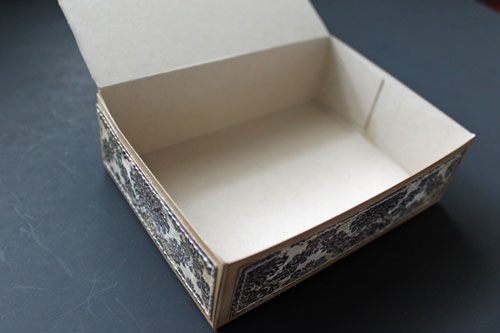
Take the adhesive liner off your glue tabs and adhere box together.
Step 7:
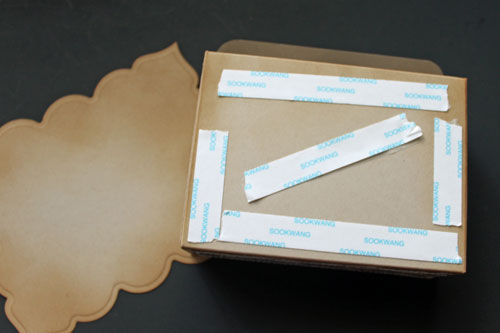
Add adhesive on the bottom of the box.
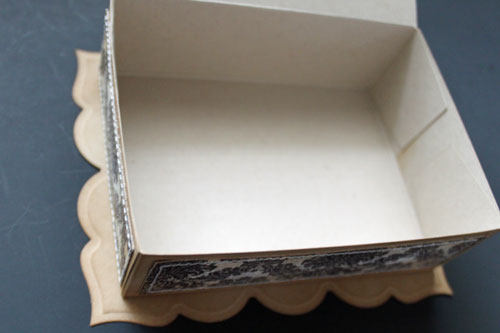 Adhere box to one of your Label 23 die cut cardstock pieces.
Step 8:
A piece of seam binding was adhered on the center edge of the lid.
Step 9:
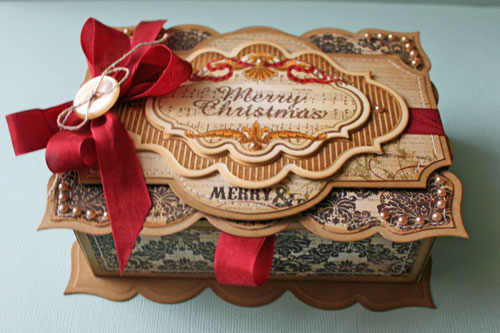
Decorate your second Grand Label 23 die cut and adhere to box top.
Add a link to this post if you create a box using this tutorial. I would love to see yours!
Beate
30 Responses to “JustRite Stampers Merry Christmas Box”
Sorry, the comment form is closed at this time.


Oh Beate this is so beautiful … I adore it
Hi Beate, This is a gorgeous, stunning box!!!! Love the lid, this will be an awesome keepsake for some lucky recipient! Thanks for taking the time to show the “how to make it!”
LOVE this one girl! You rock at all the little boxes. I need to make some for Collin’s teachers for the holidays. 🙂
Hugs~
Hello!
This is wonderful! I love this made into a box! Thank you for the great tutorial and wishing you a lovely Sunday!
Hugs,
Barbara Diane
WOW Beate, always beautiful & functional to. I love that Label 23. I have to start a collection of Grands. Oh, do you use the Grand callibar for the Grands or do you use the BigShot? Thank you for sharing. ;0)
Traci Lord xo
Wow Beate, this is so elegant & oh so beautiful!!! I love it…great job!
Holy Shnikies!!!! This is breathtakingly gorgeous!!! And what a fabulous tutorial…I plan to make some of these!!! Thank you so much for sharing!!
This is GORGEOUS!
that is so pretty and different – love it
This is gorgeous, Beate! What beautiful design. Thanks so much for the inspiration and wonderful tutorial.
Wow wow wow…….. Beate this is just stunning! I love the colors. I always love to make unique packaging for my gifts!! Who ever gets this box is truly getting a beautiful treasure.
Gorgeous, Beate. All those layers look so rich and stunning. Love that new JustRite stamp.
Gorgeous box! What a wonderful way to house a treasure – anything presented in this box is sure to be regarded as one! Love the design of the box and the papers you chose, lovely.
Oh wow! This is GORGEOUS!
This is awesome…..thank you so much for the tutorial…..
Beate, this is just stunning.
Oh wow that is quite the Gorgeous box, This is the coolest layering of dies, they work so perfectly together and such great stamping…. Love the pop the seam binding gives too!!
Your box is absolutely gorgeous. I haven’t seen Grand Label 23 die before and definitey going to have to get it. Thank you for sharing your talent Beate.
Oh Beate ~ How beautiful this is…I have a sister who is having a birthday very soon and would love to make this box to put a gift in it. Just hope I have time to get it done in time…Thank you for always sharing your beautiful 3-D creations…you always inspire me when I visit! Hope your Holidays are going well with you and yours!!!
WOW WOW WOW eine traumhaft schöne Box *schwärm*
Herzliche Grüße
von Anke
this is gorgeous! so beautiful and classy. love the layering on the cover, too. fabulous work as always, Beate!
Oh my little goodness! This box is so lovely, you don’t even need to put a present in it! Thanks for the great tutorial! Can’t wait to try one myself!! You are the BEST!
Gorgeous, Beate — I love all the dies you combined to make this beautiful box!
Again, stunning. I love the tutorial. Thank you!
Beate this is soo beautiful!!! I wish I had the labels 23 and 21 so I could make one like it. You are soo talented!!!
Wow, this is an incredibly gorgeous box! Thanks for giving the construction details, and congratulations on your win!
Wow, this is just so CLASSY & SOPHISTICATED. I absolutely ADORE it!
Hugs,
Naomi
This card is so classey! I fell in love with this set the moment my eyes set on it. You have done a superb job with all your color choices. Beautiful!
[…] St. Patrick’s Day Explosion Box by Kristin CourtneyMini Amsterdam: Christmas boxes – Yet another successful viralThe Big ShotFrench Country & Lots of FUN Techniques!JustRite Stampers Merry Christmas Box […]
is this the display you used for your dress form bookmarks?