
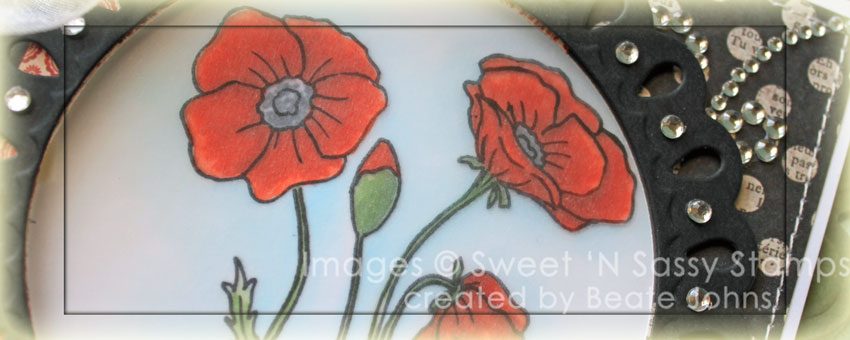
Wednesday’s tutorial on Splitcoaststampers was written by the wonderful Holly McMillen. She showed us how to create a Frosted Window look. For my video sample I chose the Sweet ‘n Sassy Stamp set called Poppies & Greetings. The image was stamped twice in Tuxedo Black Memento Ink, once on Neenah Solar White cardstock, once on Vellum paper. Both were colored with Copic Markers( cardstock: Poppies: R08, R27, R39 Leaves: G21, G24, G28 Poppies Center: C7, C10 Sky: B0000, B000 Vellum: R05, G21, C5). The vellum image was adhered over the cardstock with dimensionals.
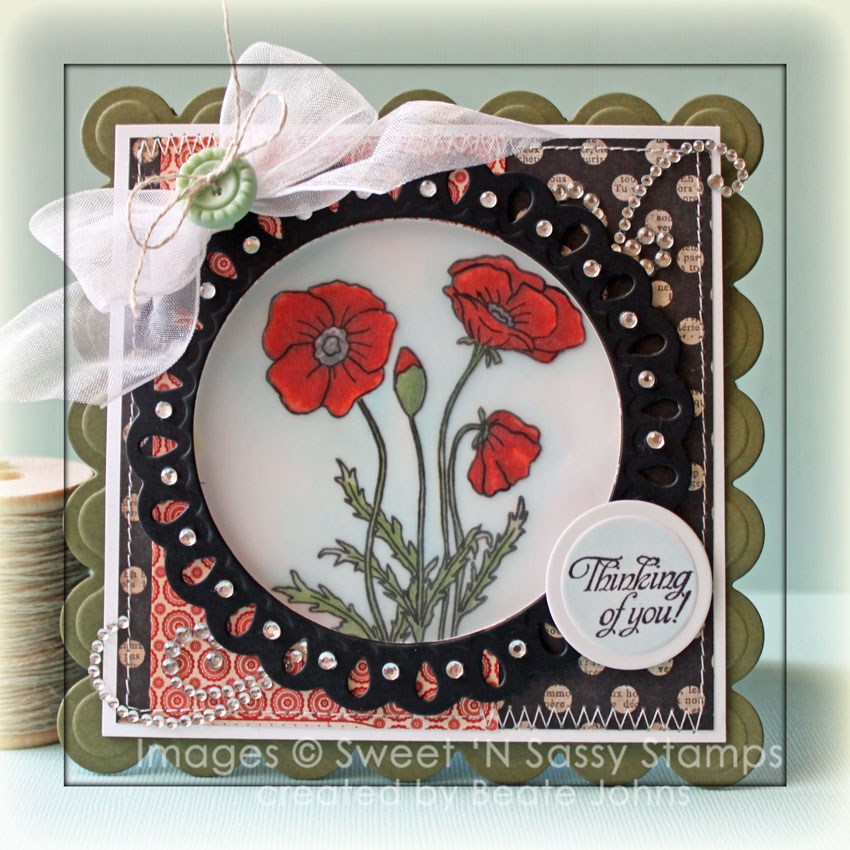
A 2 1/4″ x 4 1/4″ strip of MME Lost & Found Union Square Patterned Paper were adhered to a 4 1/4″ square of the same paper pack. The layers were stitched to a 3/16″ bigger piece of Neenah Solar White cardstock and a window was cut into the center with a Standard Circle Nestabilities die. The image was adhered behind the window.
A frame was cut with the largest Tear Drop Circle and a Standard Circle Nestabilities die out of black cardstock. The frame was adhered around the window and Baby Bling Rhinestones were added to the frame. Parts of a Finesse Rhinestone Swirl were adhered to the upper right and lower left corner of the layers. A bow was tied out of White Organdy ribbon and adhered to the upper left hand corner.
A sentiment from Poppies & Greetings was stamped in Tuxedo Black Ink on a piece of Solar White cardstock, cut and embossed with a Standard Circle die. The raised part was colored with Copic Marker B0000. The layers were adhered to the card base, Always Artichoke cardstock cut and embossed with a Grand Scallop Square Nestabilities die.
Here is a video for the visual learner:
[youtube]https://www.youtube.com/watch?v=xvT48jfPBOI[/youtube]
Thanks so much for stopping by! Have a wonderful day!
Hugs and smiles
|
|
|
|
|
|
|
|
|
|
|
|
Beate
14 Responses to “Tutorial on SCS – Frosted Window”
Sorry, the comment form is closed at this time.


Thank you for another fab tutorial and such a beautiful creation, Beate:)
Gorgeous card Beate! Love the pretty image, the coloring… such a neat technique! Loved your tutorial on SCS! Enjoy your weekend! :o)
Always so BEAUTIFUL Beate! Thank yo for the video! ;0)
This is beautiful Beate. I love Poppies and you did an amazing job with this technique. 🙂
Hugs~
Wow – this is truly fabulous – what a great way to use the stamp with the Spellbinders dies – it is delicious!
Beate, that card is so pretty. Thanks for the tutorial, I loved seeing you put it all together. I can’t wait to try it. I know I have some vellum paper somewhere!
So very happy about this video Beate!! Just coming by to visit you has given me some hope of getting back into the craft that I have loved for so many years. Loved your tiddily winks card too. In fact, I am using it as an idea for my granddaughter’s 1st birthday next week. And my DD’s Birthday is the week after and now I am thinking of using this video for her card. You just may be the ONE who can get my mojo back. Hugs and Thanks ~ V
Gosh, that is so beautiful beate!
This looks like a fun technique!! Love your card, Beate!! So gorgeous!! The poppies look lovely, love the patterned papers you used & the black teardrop frame makes the image really pop. {hugs}
How beautiful, Beate! You really did an amazing job combining the elements… Such a gorgeous design. LOVE the video showcasing this technique.
I love your tutorials. I always learn so much.
Beautiful image & bow. Love the bling around the tear drop circle.
Beate, you have inspired me to add the grand nesties to my collection. I missed it somewhere… do you attach these to a plain circle or square? Do you have a tutorial somewhere showing us how to made these beautiful shapes? You do such a wonderful job! Thanks for the inspiration!!!!
Looooooove this!!! I’ve PINNED it!! 🙂