
This week’s hostess is Silke and she created another sketch for us. Of course I had to use one of the new sets again. First I was thinking to use one of the new bookplates instead of the star, but I couldn’t find my new die. Turned my craft room upside down…not sure where it went. So I changed my plan and used the smaller of the Magnolias images.
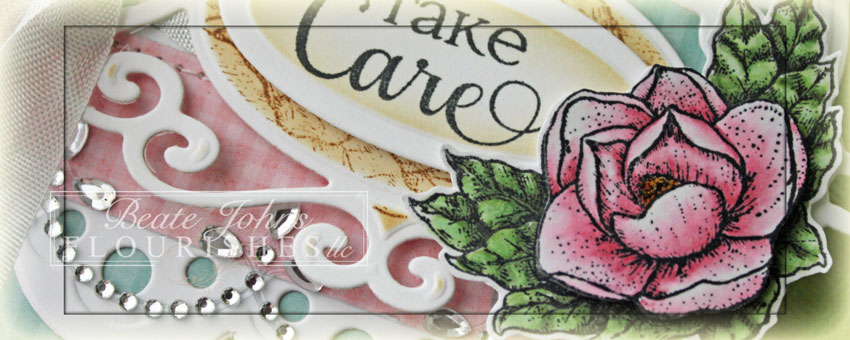
The image was stamped twice in Tuxedo Black Memento Ink on white cardstock. On one image I colored the leaves and colored the rose gray, on the other I colored just the rose and colored it pink and cut the rose out (Copic Markers: RV81, RV85, G40, G82, G85, T3). The rose was adhered to the colored leaves with dimensional adhesive and Goldrush Smooch Glitz was added in to the flower center.
(FYI: I colored the bottom rose gray, so in case it shows a little, it will look like a shadow. If you look at the close up image, you can see the gray peeking through just a bit.)
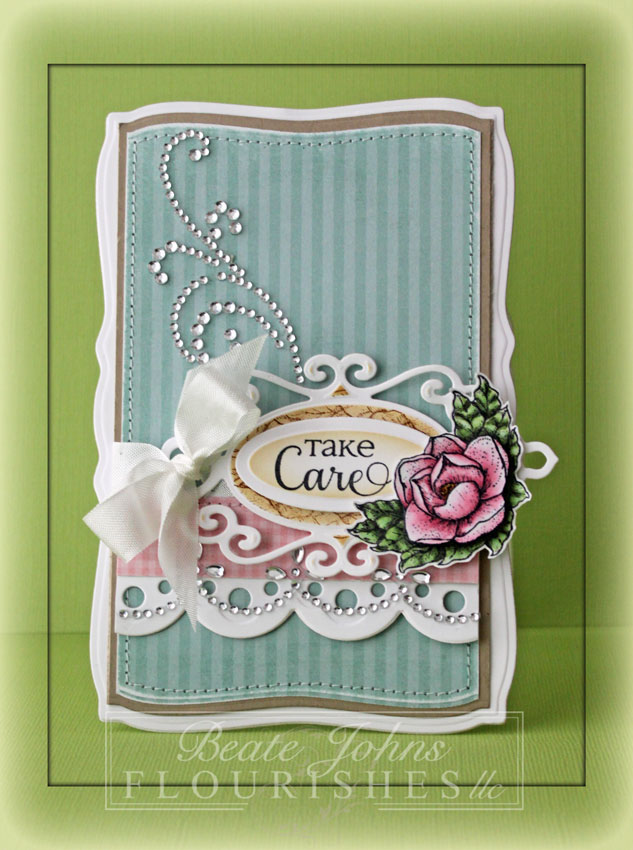
A card front and the card base were cut and embossed with the largest of the Curved Rectangles dies. The card front was adhered to the card base so the curved rectangle shape looks complete.
Matching layers were cut out of Kraft cardstock as well as a piece of My Mind’s Eye Dolled Up paper. The top and bottom of each layer was cut with the edge of the Curved Rectangle die to match the shape of the card. These layers were stitched together.
White cardstock was cut and embossed with a Fancy Tag 2 die. The center was sponged with Vintage Photo distress ink and the edges of that center were stamped with the leave border of Magnolias, also in Vintage Photo ink. Another piece of white cardstock was cut and embossed with the smallest of the Petite Oval Nestabilities, sponged first with Antique Linen, then very lightly at the edges with Vintage Photo ink. A sentiment from the same set was stamped in the center of that oval with Tuxedo Black Memento ink. The oval was adhered to the Fancy Tag die cut with dimensionals.
A strip of white cardstock was cut with Classic Scallop Edgeabilities and a 1″ wide strip of Dolled Up paper was adhered above the scalloped strip. The strips were adhered to the stitched layers. Seam binding was threaded through one of the openings on the left hand side of the Fancy Tag die cut. The sentiment layers were adhered to the right hand side of the card base, slightly above the horizontal strips and the seam binding was tied into a bow. Parts of a Finesse swirl and part of a Fancy Waves! Border bling finish off the card.
Check out my fellow Timeless Tuesday Challenge Members for more inspiration:
Cindy Haffner
Heather Jensen
Maki Jones
Mona Pendleton
Silke Ledlow
Tammy Hershberger
and March Guest Designer Meredith MacRitchie
Thanks so much for stopping by! Have a wonderful day!
Hugs and smiles
Beate
41 Responses to “Timeless Tuesday – A Sketch”
Sorry, the comment form is closed at this time.


Very pretty card, I love the stitching and the colors on this.
Hi! Beate. Beautiful and elegant card! Love it.
God Bless 🙂
STUNNING Beate!!~
This is so pretty, Beate. Fantastic design and I beautiful scallops and bling. I love your coloring on the flower, but was a little confused about why you colored the bottom image gray. I’ve seen where people have done that, but what’s the logic behind it, since you can’t see it anyway???
Hello!
This is lovely! Beautiful layout and I love what you have done with the rhinestones! Wishing you a happy day today!
Hugs,
Barbara Diane
Gorgeous Beate! I hope you find your new die. It probably got stuck in with another one, or something like that. Hugs, Jess
Oh my this is just gorgeous! How do you cut a card base with the die?
By the way, I rc’vd my wonderful package of Bling from you…I’m going to have so much fun with it!!! Thank you again!!
Lovely card. The Nesties treatment is super and the bling just brings out everything.
It’s gorgeous! Love the soft colors and the bling makes it pop.
This is such a beautiful clean design-as always your colors are wonderful
I really do not want to say simple but for you it is some what simple but your card is just stunning. Love the way you are using the spellbinders die, thanks for some great ideas!
Patricia
Another stunning card!
Beautiful and classy!
Lovely way to use this sketch… the magnolia is beautiful!
WOW! This is SO stunning, Beate! Love that magnolia image…definitely one of my new favourite stamp sets from Flourishes…and that bling is GORGEOUS, too!
Hugs,
Naomi
Beate, love the pink coloring of your magnolia. I also have another blog to get inspiration for use of Spellbinder dies. Love my Spellbinders and Flourishes images!!
Beautiful Beate! Love that pretty Magnolia and the way you used that SB die. 🙂
Hugs~
Wow! Beautiful! I love the simple striped background, and the layered border behind the image. Of course, the image is gorgeous!
So pretty Beate! That little rose is oh so pretty and love the ornate framed sentiment!
I love this Beate!! So elegant and beautiful! Pretty Magnolia color too.
Very soothing card Beate. I especially like the elongated shape of it.
HOLY SMOKES…..this is pure elegance and gorgeousness Beate! Fabbo take on the sketch! Hugs ~S~
So Pretty!!! I love the card base shape and layers….gotta check that out…tfs
Beautiful, Beate! Love the scallops and the gems along the border!
such a pretty card.
stamping sue
http://stampingsueinconnecticut.blogspot.com/
This is stunning – so pretty and elegant!
SMACKING FORHEAD! Now why it is that I’ve never thought of coloring the base of layer grey for a shadow effect?!! BRILLIANT!
Gorgeous, Awesome coloring of the flower, beautiful papers and I just love the bling, especially with the die cut border, neat layering on the sentiment tag!
Such inspiring work, Beate! I love the elements and colors you used. Definitely want to case the gorgeous card.
This is so lovely Beate. I particularly adore the way you put the card together … awesome!
Lovely card – I especially like the colors together! On a side note, any idea why I can see images in my email updates anymore? There are a few bloggers that I get updates from that don’t have images anymore (so not just you, but not all updates either!).
Very pretty – Love the whole design with the rhinestone flourish to set it off!!!
A stunning card Beate. I love soft turquoise/teal with pink and white, they always create such a clean and fresh card.
Linda x
love love how you colored the flower. you make it come to life, Beate! gorgeous work as always!
Was für eine entzückende Karte, unglaublich schön.
Liebe Grüße
von Anke
Your sketch card is so beautiful Beate, and I love the dies you’ve used! The bing is the most perfect accent!!
Oh Beate, this so beautiful! I love your colouring, and what a fun shaped card!!
Gorgeous, Gorgeous card!! Your colouring always amazes me… I am in awe! I hope you’ll find the bookplate die – I know what’s it’s like hunting all around for one craft supply. I’m still missing the stamp set I’m looking for, and hoping it’ll turn up soon 😉 Happy Friday to you!! {hugs}
beautiful. Nice interpretation of the sketch
Gorgeous flourish and bling Beate!
Beautiful, Beate! I love the magnolia image and your coloring! Blessings! Kathy