
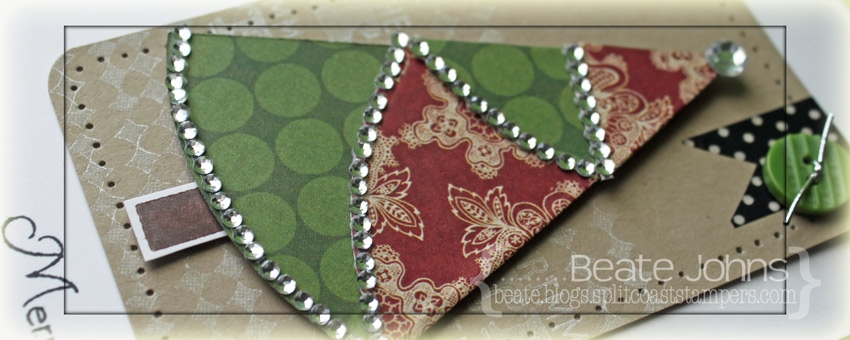
I created a quick tutorial on how to fold half circles into a Christmas tree for today’s tutorial on Splitcoaststampers. I started out by cutting a circle out of Teresa Collins Christmas Cottage with the smallest of the Grand Circle Nestabilities die. The circle was cut in half, folded and decorated with rhinestones.
A stamp from the Lollipop Treat stamp set was stamped in Jumbo Java VersaMagic Ink on Neenah Solar White cardstock. It was cut out and adhered under the tree.

The upper right and lower left corner of a 3″ x 5″ piece of Kraft cardstock were rounded. The bottom was stamped with a background stamps from the Lollipop Treat set and a sentiment from Document It – December in Moonlight White Brilliance Ink. The edges were pierced before the Christmas tree was adhered with foam adhesive squares.
A piece of black polka dotted Washi Tape was adhered to the top right corner of the kraft cardstock. It was topped with a button, tied on with silver cord. The layer was adhered to the card base, a 3 1/2″ x 11″ piece of white cardstock. A sentiment from Christmas Ornaments was stamped to the lower right edges of the card with Tuxedo Black Memento Ink.
Here is a video for the visual learner:
[youtube]https://www.youtube.com/watch?v=7u8oJd3g384[/youtube]
Thanks so much for stopping by! Have a wonderful day!
Hugs and smiles
|
|
Beate
24 Responses to “Holiday Blitz Tutorial on SCS – Folded Christmas Tree”
Sorry, the comment form is closed at this time.


This is beautiful Beate! Thank you so much for the tutorial.
Elaine Allen
Super cute! Love the bling lights. 🙂
Hugs~
Hi! Beate. Beautiful job.
God Bless 🙂
Hello!
Oh I love this little tree – I had to make one right away while watching your tutorial! I will be using this wonderful and fun accessory on so many Holiday projects! So sweet and so simple to make – something that when done earns the comment “How cute is that!” – ! Love it! We have a beautiful sunshine day here in this part of WI – I wish you the same!
Hugs,
Barbara Diane
I never would have guessed that awesome tree was one half of a circle!! How creative, Beate!! It looks so fabulous blinged up with gems!! What a gorgeous card!! Have a great day 🙂
Lisa
A Mermaid’s Crafts
Fabulous, Beate!! Love the bling accents:) x
Oh my gosh!!!! Is that easy or what. I love these trees and have struggled to make them and it’s so simple. Thanks!!
This is genius, Beate! Such an adorable little tree! Thank you!
I just saw this tree fold lately, looks fun. Great CAS design and I love all the jewels!
Clever as ever Beate! So simple and so effective! x
So clever!! Very pretty card!
Waw I love your card Beate. Such cute christmas tree and I just love how you decorated it. Thank you for the tutorial. Hugs! Mojca
Outstanding as usual Beate!
I love this Beate! You’ve got the best designs 😀 Thank you for the tutorial which I will try!!!
This is so gorgeous! Love the layout. Thanks for the tutorial!
Outstanding, Beate!
What a fabulous tutorial, Beate! Thanks for sharing this great idea! Your card is gorgeous! Love it! Hugs
Get out! This is gorgeous! I’m loving those folded trees and now that you’ve done a video I’ll be able to try! LOL! LOVE the added bling and the fabulous layout!!!
love how you decoeated the tree and the cute tab, thanks for sharing the tutorial, that looks alot easier than others I’ve seen
can’t believe how easy it is to make the tree! such a pretty card and love the subtle stamped background, too. thanks for sharing, Beate! hope you have a wonderful weekend! =)
Thanks for the video. The tree is such a cute idea.
Cute tree and love the rounded corners effect 🙂
[…] sketch for November prompted me to try yet another technique I’d found through Beate at Splitcoast Stampers and I made it into a Christmas Card for my stash – I’ve made a start on the ones for next […]
I love when you can see both sides of double sided paper! No waste of pretty paper! Perfect!