
Today’s tutorial on Splitcoaststampers is written by the wonderful Susan Roberts. She shows us how to create a flower by cutting and melting ribbon pieces. It’s perfect for winter, when my hands seem to be cold all the time. 🙂
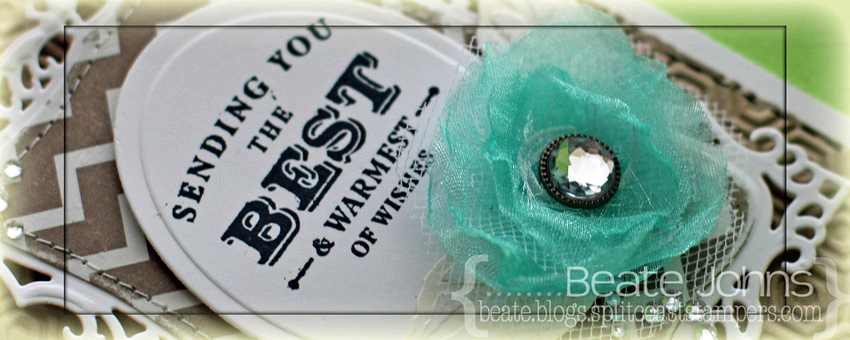
For my sample I used ribbon and tulle bought at Hobby Lobby. Both were cut with the two smallest Blossom Nestabilities® dies, heated and stuck together with a decorative brad.
A sentiment from Simon Says Stamp Apothecary Labels was stamped in Tuxedo Black Memento Ink on Neenah Solar White cardstock that had been cut and embossed with the second largest of the Classic Oval SM Nestabilities® dies.
Two pieces of Fancy Pants Country Boutique Paper were cut and embossed with the single leaf dies from the Bitty Blossoms Shapeabilities® die set. The leaves were sanded before they were adhered under the ribbon flower, who was in turn adhered to the lower half of the sentiment oval.
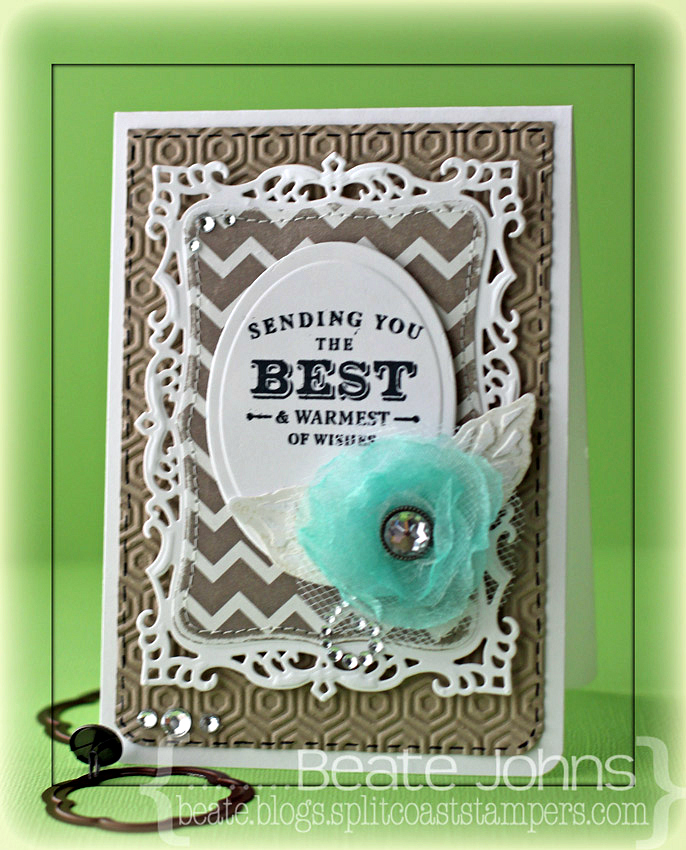
Another piece as well as more Neenah Solar White cardstock was cut and embossed with the second largest Decorative Label Eight Nestabilities® die. The patterned paper was sanded and cut on the embossed edge before it was stitched to the white die cut. The sentiment panel was adhered to the center of the fancy panel with foam adhesive squares.
The bottom corners of a 3 1/2″ x 5 1/4″ piece of Kraft cardstock were rounded and a faux stitched border was added with a black gel pen. The layer was then embossed with the So Trendy M-Bossabilities ® folder. It was adhered to the card base, a 3 3/4″ x 11″ piece of Solar White cardstock, folded in half with the bottom corners rounded. Rhinestones finish off the card.
Here is a video for the visual learner:
[youtube]https://www.youtube.com/watch?v=ajo7y88Rf3Q[/youtube]
Thanks so much for stopping by! Have a wonderful day!
Hugs and smiles
|
|
Beate
36 Responses to “Tutorial on Splitcoaststampers – Crinkled Ribbon Flower”
Sorry, the comment form is closed at this time.


Beautiful flower Beate!
God Bless 🙂
oooh…this is gorgeous!!! Love this idea and great video! Beautiful card!
hugs,
M
Beautiful card! I will have to try this technique when I get a chance. I just love flowers and this is so pretty!
Thanks so much for the video. And thanks for answering my email yesterday. I don’t have a Silhouette either. Loved your card. You always make things look so easy.
I bought some fabric specifically to make flowers like these. You’ve inspired and reminded me to go and make some! Thanks so much.
Oh Beate, this is gorgeous!! Every single detail is fabulous, from the embossing to the stunning flower!! I can’t wait to watch your video to see how it’s done!! The colors are beautiful…the blue of the flower just pops against the background!! Amazing and inspirational as always!! Happy 12/12/12 🙂
Lisa
A Mermaid’s Crafts
Love this idea and great video! Beautiful card!
Beautiful card and fabulous instructions. Thank you for sharing Beate!
Gosh – life is so busy just now that although I read the Inkling in my inbox I didn’t make time to fully check out the tutorial. Now I know I have to!! It’s pretty cold in my attic room at this time of year, LOL, so some extra heat and a pretty flower to show for it sounds just great. That pale aqua is just gorgeous against the kraft.
This is downright GORGEOUS girl! Wow! LOVE that pop of colour and especially because it’s aqua!!! I don’t own any tulle….can you believe that? LOL I MUST now go to the LSS. hehe!
Pretty card and great tutorial….dittos on the tweezers….LOL
so pretty, love the pop of color the flower gives and such pretty use of the framing dies and embossing folder
This is so beautiful and I love this flower!
Beautiful card, Beate! That flower is so feminine and soft – can’t wait to watch the video! Thanks for always sharing your magic with us 🙂 Hugs…
I will have to go look in my fabric stash (small that it is) for tulle and try this with the flower die I have. thanks for the idea.
stamping sue
http://stampingsueinconnecticut.blogspot.com/
Very pretty, I’m sure I’ll have some ribbon pieces I could try this with. Easy and pretty!
Such a beautiful card! I love that shade of blue/green with the kraft and white. Thanks for the great tutorial on the flower…always fun to learn how to make a new one!
Pretty flower. Thanks for the video.
Thanks for the video – I’m gonna try this!
Beautiful flower. Thanks for the video.
A very striking card, Beate – that flower is amazing!!
beautiful flower and card. I have used satin to do the same thing. makes gorgeous flowers. thanks for the tutorial, too.
love that you describe your projects AND include a video. That’s a lot of work but i appreciate it
Love the tutorial! Great Idea. Thank you 🙂
Your flower is soooo soft & feminine. Will have to try it! Super tutorial.
Love how you layer things. Also love the dies you used. thanks as always for sharing.
Beate, this is gorgeous! I did not know that you could die cut tulle, but I am sure going to try it after seeing your gorgeous flower!
The video is great. I like the look of the flower.
Love the flower may get brave and try it…….
Great card! Love the flower! Will have to give it a try!
love the texture heating creates. beautiful flower and card!
This technique sure makes a beautiful flower. I can’t wait to try the technique. Thanks for sharing.
Love the video tutorial Beate! Thanks for sharing. As always, you come up with the most beautiful ideas. I also love the dies you’ve used!
I’ll have to try this Beate! I like cutting from dies and never thought to use ribbon and make my own flowers. Great idea!
Gorgeous card, Beate. Thank you for the tutorial video x
“Gorgeous flower! It is light and airy yet still adds plenty of dimension. I must try this!