
This week I picked the Paper Clip Bookmark for the Tutorials from the Archives for the Newsletter.
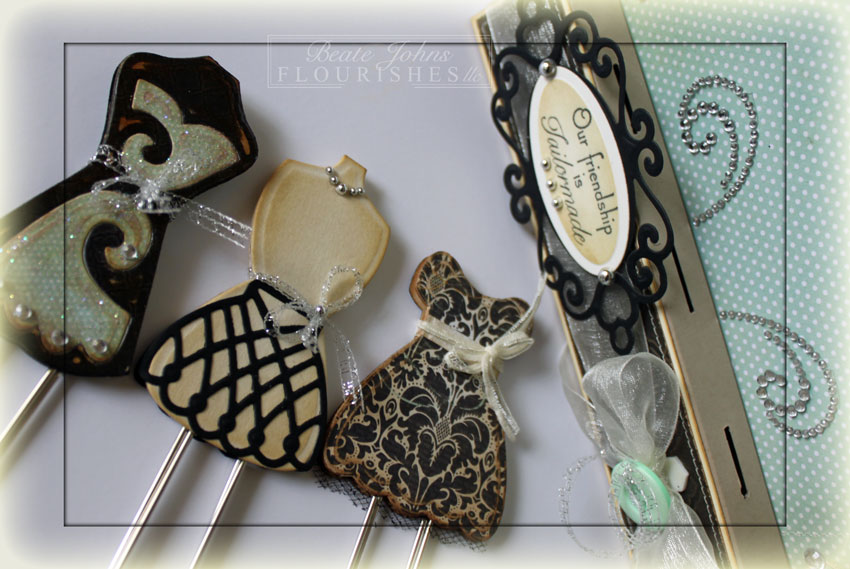
I started with cutting thin coasters with Spellbinders gorgeous new Dress Form dies. (You can purchase them at now at Crafters Home stores or starting in February everywhere.) I LOVE these new dies and had to use them as soon as I got them.
Two of the dress forms were layered with MME Lost & Found 2 Sunshine Paper, one with part of the fourth dress form die, cut and embossed from black cardstock. The patterned paper layers were first sanded, then sponged with Vintage Photo Distress ink.
Jumbo Paperclips were adhered on the back of one of the dress form with Glossy Accents, before a second one cut and layered the same was adhered over it with dimensionals. I had purchased the Paper clips a couple of years ago at Walmart.
The pieces had been dressed up with Silver half Pearls (Recollections, Michaels), May Arts Silver Curling ribbon and thin beige ribbon, Stardust Stickles as well as Baby Bling Rhinestones.

I decided to create a box with a backdrop to show off the bookmarks. I started with a 5″ x 8 1/2″ piece of Kraft cardstock piece. The 5″ side was scored at 3/4″, 2 1/4″, 3″ and 4 1/2″. The 8 1/2″ side was scored at 3/4″ and 7 3/4″. Before the box was put together, I cut three 3/4″ slids about 1/16″ wide in the top of the box.
A 1 1/2″ x 7″ piece of Natural White cardstock was sponged with Vintage Photo Distress ink. The edges of a 1 3/8″ x 6 7/8″ piece of Sunshine paper were sanded, then sponged with Vintage Photo ink. The patterned paper was stitched to the sponged white cardstock before those were adhered to the box front.
May Arts Ivory Organdy Ribbon was tied around the box. The bow was topped with a button tied on with more silver curling ribbon. A sentiment from Flourishes Feminine Charms was stamped in Tuxedo Black Memento Ink on a piece of Natural White cardstock, cut and embossed with a Petite Oval Nestabilities die. The oval was sponged with Vintage Photo before it was adhered in the center of a piece of black cardstock that had been cut and embossed with a Fancy Tag 2 die.
For the backdrop I cut a piece of Sunshine paper with a Grand Label 23 Nestabilities die. It was stitched to a piece of Natural white cardstock, cut with the same die for more stability. The edges were first sanded, then lightly sponged with Vintage Photo. The Label was adhered behind the box and decorated with Rhinestones and Finesse Rhinestone swirls.
Here is a video for the bookmarks for the visual learner:
[youtube]https://www.youtube.com/watch?v=cnzBBDIVvIU[/youtube]
Thank you so much for stopping by! Have a wonderful weekend!
Hugs and smiles
Beate
15 Responses to “Video Tutorial on SCS – Paper Clip Bookmark”
Sorry, the comment form is closed at this time.


hehe…I came across this the other day on You Tube and loved it!!! Those dies are gorgeous and make beautiful bookmarks/paperclips!
Brilliant, as always, Beate!!! TFS!
Such a fabulous tutorial, Beate! I love these paperclip bookmarks, and I can think of a few people to make them for. Yours look fantastic! Thank You for the inspiration! Have wonderful weekend:)
Das ist zum verlieben süss! AMAZING! Bin hin und weg und würde das am liebsten in diesem Moment gleich nachbasteln. Es ist eine Freude den Video zu sehen. Ich finde diese Paperclips so umwerfend allerliebst und die Halterung dafür, die ist das i-Tüpfelchen. So süss… Beate, wie kannst du nur immer noch schönere Sachen machen? Das ist ja unglaublich!!! Ein riesengrosses Kompliment!
What a clever idea. I love the pretty dress forms. You are one talented girl. 🙂
Hugs~
Oh my gosh…these are so fabulous and pretty!! Great tutorial, Beate!! Thanks!!
These bookmarks are adorable and you are right the possibilities are just endless. Will have to keep this in mind. Love it.
These are just perfect and so very creative!
What a fabulous, fun gift! I WILL be making at least 2 — so cute!!
These are soooooooooo cute!! I love the idea. What a great gift! 🙂
I just LOVED this card-so much that I just HAD to buy the GRAND LABEL that you used. I just ordered my Grand Calibur after seeing all of the beauiful cards you have used it with-so just waiting for it and the new Label to arrive! Thanks for sharing all your great talent!
I am glad there is a tutorial video for this! It made my learning process fun and interesting. I just hope more instructional blogs would also have video instructions on them.
OMG was für ein wundervolles Werk *seufz* Unglaublich schön … zum Verlieben, ich bin hin und weg *schwärm*
Du bist ein GENIE !!!
Herzliche Grüße
von Anke
One word… LOVE. Can’t wait to make these for my co-workers.
FINALLY got time to make these adorable bookmarks! I don’t know what l liked better the bookmark of the cute stand! Thanks so much for the video — made it so much easier!! My co-workers are gonna love these! 🙂
Hi! Can anyone explain the making of thecstand a bit better? Thank u so much!