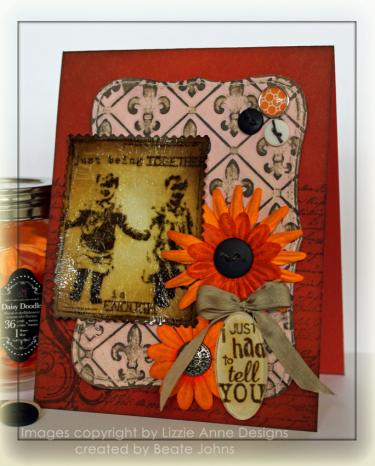
Today’s tutorial on SCS is for the Acrylic Distress technique I learned at Ranger U. If you follow my blog, you already know how to create the background from this post. I love the look this technique creates. For my sample I used the Color Combo from the Color Challenge on SCS a couple of weeks ago.
The card base was created out of a 4 1/4″ x 11″ piece of Dusty Durango cardstock. It was folded in half. The card front was sponged with Rusty Hinge, the edges with Walnut Stain. On the lower 2/3 I stamped a script from Mini Ornates in Walnut stain. The swirl on the lower left is from the same set.
For the background I cut a piece of Neenah Solar White with Label 8 Nestabilities and embossed it with the Fleur De Lis Cuttlebug Embossing Folder. It was painted with Shell Pink Acrylic Paint, sanded and then sponged with Walnut Stain ink. The background was then buffed with a slightly damp rag to take off the ink over the acrylic paint.
The main images is from Lizzie Ann Designs Lucky You. It was stamped in Walnut Stain ink on Neenah White cardstock, embossed with Walnut Stain Distress Embossing powder and cut out with Postage scissors. Then it was sponged with Old Paper, Vintage Photo and a hint of Walnut Stain. The entire piece was covered in Rock Candy Distress Crackle Paint.
The sentiment is also from the Lucky You set. It was stamped in Walnut Stain on Neenah White, sponged with Old Paper and adhered to an oval Fragment with Glossy Accents. A jump ring was adhered to the back and 1/4″ May Arts silk ribbon was tied to the top. The flowers are from Prima’s Daisy Doodles, the buttons from Stampin’ Up!’s neutral button collection, Making Memories and Basic Grey.
Here is a video for the visual learner:
[youtube]https://www.youtube.com/watch?v=cUcZDFnEcBI[/youtube]
Thanks for stopping by! Have a great day! Hugs and smiles
16 Responses to “Tutorial on SCS – Acrylic Distress”
Sorry, the comment form is closed at this time.


I loved this when I spied it in my email with the newsletter this morning! LOVe all the distressing-you are rockin’ it! fun card!
Very cool Technique Beate…love those colors, such a great vintage card!!
I love seeing all of your videos! This technique is awesome! I can’t wait to try it!
Very beautiful! I love how that cute little image came out! Thanks for sharing!
Another fab tutorial, Beate! The distressing is awesome… beautiful work!
Beautiful card and another fabulous technique I can’t wait to try!!!
Your Acrylic Distressing looks amazing on this, Beate…and that image is so very sweet too!!
BEAUTIFUL Beate!! Awesome technique! LOVe this!!
I swear Beate…and I am not kidding…this is one of the best tutorials…when I saw you use the sanding block and the Fleur De Lis just popped right up!!! The the walnut stain…WOW…what a great effect!!! No wonder you are Splitcoast Stampers Best!!!
Beate –
Thank you so much! I love this technique. Thank you taking the time to show us how to do it.
Elaine Allen
I like the technique so much. I think I should give this a try! Thanks!
Oh I just love this, Beate!! I must try in my book!! Thanks so much for the wonderful tutoral…this is one of my fav new cuttlebug folders!!
Great tutorial (I picked it up on SCS)! I have some of this paint coming and will give this technique a go next weekend. Thank you so much for sharing this idea and your gorgeous card!
very cool technique, love your kid image and tag too!
This is so cool! I look forward to other projects done using the acrylic daubers. I love the way you stretch me!!!
Such a neat background! I’m definitely going to have to try this!