

Today’s tutorial on Splitcoaststampers is for a basic technique: Paper Piercing. I know it’s not a fancy technique tutorial, but we didn’t have a tutorial for that technique yet. I love to use paper piercing to add an extra border to my images when it just needs a little something something.
For my sample I an image from Gina K. Designs Winter Wonderland stamp set. The image was stamped in Tuxedo Black Memento Ink on Neenah Solar White cardstock and colored with Copic Markers (C00, C1, BV20, BV21, R01, R02, R08, R29, G21, G24, G28). It was cut with Classic Circle Nestabilities, overstamped with the background script from the same set in Antique Linen Distress Ink and sponged with the same color.
The image was layered on piece of Basic Grey cardstock, cut and embossed with Lacey Circle Nestabilities. The edge of the circle was paper pierced.
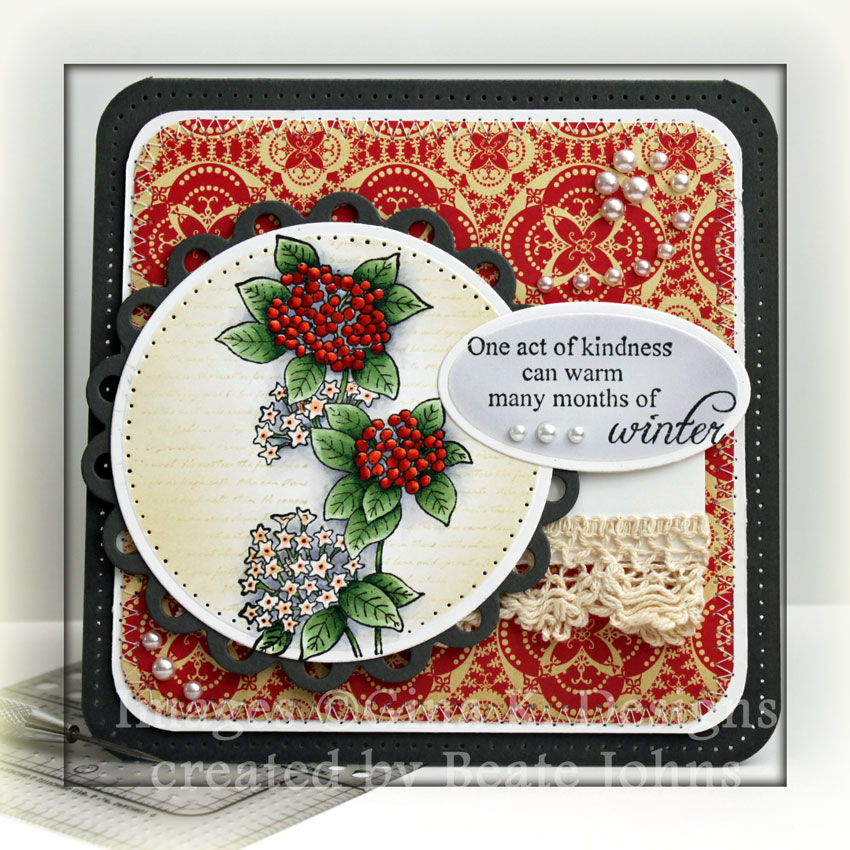
For my card layout I used CPS Sketch 199. The card base is a 5 1/2″ x 11″ piece of Basic Grey cardstock folded in half. The edges of the card front were sponged with Pumice Stone Distress Ink. All four corners were rounded with the W R Memory Keepers Cropadile Corner Chomper and the edges were paper pierced.
The edges of a 4 3/4″ square of Cosmo Cricket 1934 Paper (I LOVE that paper pack and need to order more) were rounded and the square was stitched to a 1/4″ bigger piece of White cardstock. Both layers were adhered to the card base.
Melissa Frances lace from the beige ribbon pack was adhered under a white cardstock strip and adhered to the right center of the layeres. The image circle was adhered over the strip with dimensionals.
The sentiment is also from Winter Wonderland Stamp set. It was stamped in Tuxedo Black Memento Ink on Neenah Solar White cardstock. The sentiment was cut and embossed with Petite Oval Nestabilities and airbrushed with Copic Marker BV20. Snow Kaisercraft Pearls finish off the card.
Here is a video for the visual learner:
[youtube]https://www.youtube.com/watch?v=7jZ31hY0bpE[/youtube]
Have a wonderful day! Hugs and smiles
Beate
29 Responses to “Tutorial on SCS – Paper Piercing”
Sorry, the comment form is closed at this time.


Beate this is beautiful. I love the tutorial.. Thanks so much for always bringing these to us because I am a visual learner. Great card..
Beate this is beautiful and your flower image is so dainty. Your coloring is wonderful.
Gosh, this is stunning! I love this creation. Beautiful coloring and design. Paper piercing is a wonderful technique and perfect for crafters like me who don’t sew. Thanks for showcasing this wonderful, underrated technique.
This is GORGEOUS, Beate! What fabulous coloring!
Gorgeous! I absolutely love the look of piercing but I rarely do it – I should make that a new goal!
This is so pretty!
You give such wonderful life to your projects with your coloring Beate. This is beautiful! Wonderful piercing and I love that lace!
Gorgeous card, Beate! I’ve been using this awesome technique ever since I saw the paper piercing curves tutorial on your blog in 2007. Thanks!
Beautiful card, Beate. Those flowers are jumping right off the page!
What a beautiful card, Beate! Love the stamps, and so perfect with the paper and design.
Beate, I LOVE the pretty script background behind your stamped image. I am totally using that idea. I have learned so much from you. I want to say Thank You for always sharing what you do. I know it has got to be time consuming, but for “the visual learner” like me…it has made my papercrafting life so much easier. 🙂
Hugs~
Heather
Another fabulous card with the most wonderful coloring! Love the background paper too with the addes swirl.
Thanks for the tutorial. I often pierce but haven’t done so in circles. Will try that one.
Have a great day!
Jose
Beate, this is beautiful. I love the background paper, so vintage. Love the swirl of pearls too.
What a cute card. I like the quote!
xx Tessa
Wow…you’ve really brought that GKD image to life with your gorgeous coloring, Beate!! I love the papers you’ve used as well as your fabulous piercing!! Awesome video!!
Beautiful, Beate! I have never been good at paper piecing, but you have totally inspired me with your tutorial! Thanks so much! 🙂 Hugs!!
This is stunning!!
Gorgeous, Beate!!! This is stunning! I remember learning this technique from you a long time ago and that’s how I STILL do it to this day! Love paper piercing…lol
TFS!!!
Great tips here, love the dimension you have on those berries, lovely coloring!
beautiful card..fantastic coloring and love the extra touch the peircing gives!
Oh wow Beate!! Your card is just stunning girl!! I so love your lace and the gorgeous layout!! 🙂 Thanks so much for sharing this fabby tutorial!! HUGS
Stunning card Beate! Gorgeous coloring and I love all the paper piercing! Adds such a nice touch 🙂
You may think that it’s a really simple technique but I’ve watch your video anyway and learned for the circle some tricks!! Thanks for doing that. I wish you a wonderful new year.
Pesc
I have always thought your amazing…excited to be on the same team with you. This card is over the tip gorgeous! Xoxo!
And again a fab tutorial (love the fact that you are left handed that makes it so easy for me being a left handed girl too;-))Thanks for the tip of how to paperpierce in a circle, never thought of that!
Thanks for sharing:-D
your coloring on the image is so beautiful. amazing dimensions! very pretty card, Beate!
Oh this is one of the prettiest most dimensional looking cards, your coloring is FANTASTIC, do you have a tutorial somewhere of how you did those flowers, they just POP off the page…
Thank you for ALL your inspirations!
Beautiful cards and wonderfully colored images! I so appreciate the tutorial about how to pierce a circle. Never occured to me (slap on the forhead) how to do this correctly! I guess I am very much a “visual learner” LOL!! If there was another tutorial completed previously I never saw it, so I am very happy I caught yours on SCS. Thank you!
Piercing on the cards adds a really sweet element. Your tutorial was very informative, especially for the curves on circles, etc. Thanks for the tips!