
For yesterday’s newsletter I picked the Triangle Tri-Fold card tutorial as the Tutorial you might have missed. For my sample for the video tutorial .
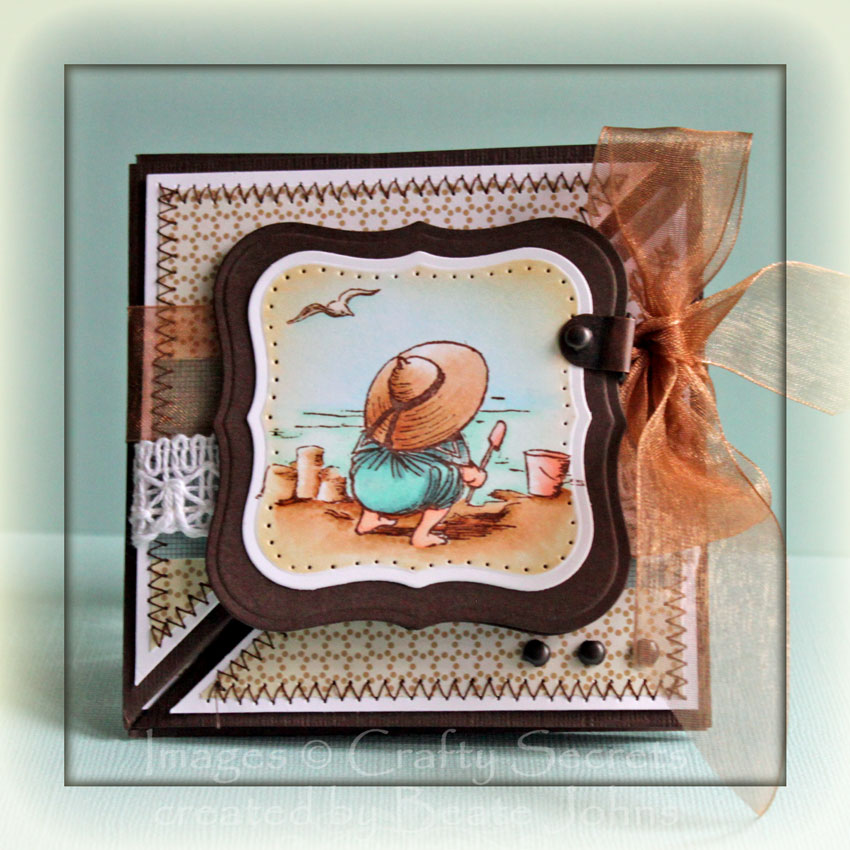
I stamped the image and the small sea gull in Rich Cocoa Memento Ink on Neenah Solar White cardstock. It was cut and embossed with Label 1 Nestabilities and colored with Copic Markers (Hat and Sand: E30, E31, E33 Dress: BG10, BG11, BG72 Skin: E50, E51 Bucket and Shovel: R11, R12 Ocean: G0000, G000, Goo Sky: B0000, B000, B00 Sea Gull: W2).
The label was first sponged with Antique Linen, then with Vintage Photo Distress Ink for an antique look. It was layered on Early Espresso cardstock cut and embossed with the next size up Label 1 die. The edges of the image layer were paper pierced.
The card base is a 4″ x 12″ piece of textured Early Espresso cardstock. It was scored at 4″ and 8″. The outer panels were scored diagonally. Next a 3 9/16″ piece of white cardstock was cut diagonally and topped with Fruehlingserwachen Whiff of Joy patterned paper. The paper was first cut into a 3 1/4″ square and topped with a 1 1/8″ wide strip of the same paper pack. Then the square was cut diagonally. The triangles were adhered to the bigger white triangles. Melissa Frances White Lace was adhered over the horizontal strip before the pieces were stitched with brown thread.
Three Copper Brads were added to the lower right of the right triangle before the layers were adhered to the card base. A Ribbon holder (retired Stampin’ Up! Hardware) was attached to the upper right hand side of the image layers and Gold May Arts Organdy ribbon was threaded through it.
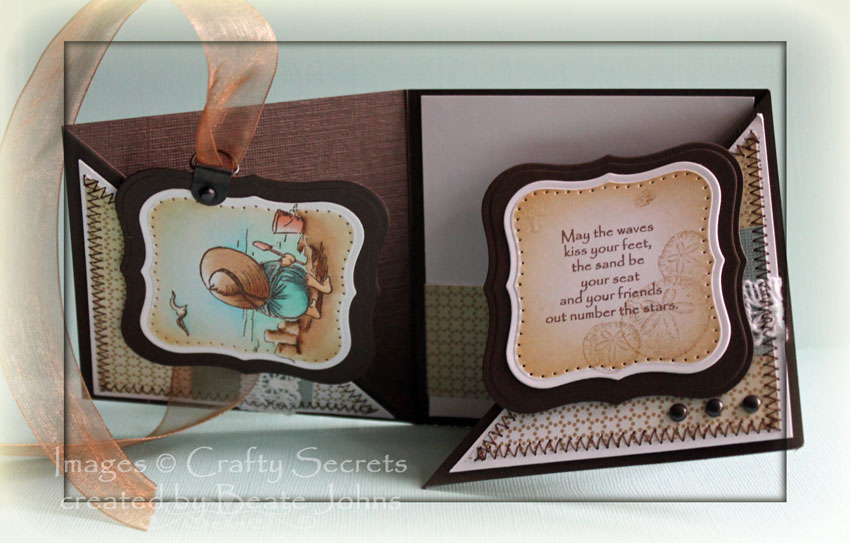
Another white and brown cardstock label were cut with the same dies as for the front. A sentiment from Seaside was stamped in Rich Memento Ink in the center of the label. The sand dollar images were inked up with Vintage Photo, stamped off once and then stamped onto the label. Just like the image layer, this layer was also sponged with Antique Linen and Vintage Photo distress ink.
For the center panel, a 1 1/8″ x 3 9/16″ piece of Fruehlingserwachen patterned paper was adhered to a white cardstock square.
The layers were folded down, then first the sentiment panel was adhered to the right side, the left side was opened just a bit, then placed over the sentiment panel. The image panel was adhered to the left side of the trifold. The card was tied shut with the Gold ribbon.
Here is a video for the visual learner:
[youtube]https://www.youtube.com/watch?v=vztWaX71TvQ[/youtube]
Thanks so much for stopping by! Have a wonderful day!
Hugs and smiles
Beate
20 Responses to “Video Tutorial on SCS – Triangle Trifold”
Sorry, the comment form is closed at this time.


I simply LOVE your videos Beate, you do such beautiful work! Thank you for all the inspiration you give us!
You make it look so easy and effortless in the videos… I LOVE them! This little card is simply adorable! I love the extra little hidden panel under the front panel. Fabulous idea! I am going to have to learn more about my sewing machine. You inspire me, girl!! *sigh* and your gorgeous coloring… makes me want to go take a trip to the beach (even in this coooold weather that’s we’re having in CA). lol! Beautiful work as always, my friend. Beautiful!
awww, what a pretty card Beate, love the cute image and your wonderful coloring…(always)… Thanks for all your hard work… and all the great inspirations…HUGs
Great card and video today Beate.Thank you for sharing all of your great tips.Your coloring is beautiful as always.
What a great card! Thanks for the fabulous tutorial. Of course I pretty much love every card or project that you do! wonderful.
I have been following your work for a long time and I love all that you do. I am so grateful for all the video’s that you share here for the visual learner. Lol. I didn’t think that I was one, because I can do measurements no problem, but when I started making special cards like the one you shared today, I realized how wrong I was! Lol. Your card today was beautiful and I so admire the design of the card. Some thing new for me to try! Thanks so much sweetie for the inspiration.
love love your video, girl! fabulous card! you colored that image sooooo beautifully! thanks for sharing!
Traumhaft schön liebe Beate, ich bin ja so begeistert, was für eine wundervolle Karte, ich liebe dieses Motiv.
Herzliche Grüße
von Anke
Oh Wow! This is a stunning card Beate. Gorgeous image coloured so beautifully and wonderful shaped card as well. Will pop back later to see the video as I am off in a moment for a hospital appointment.
hugs
Marion
Beate you are such a very busy lady! Lovin this card and will come back later to check out the video. I so enjoy all your videos, as they help me see exactly what you are talking about. I guess I am a visual learner!
You always amaze me.. this is fabulous. Sadly I have this stamp set and have never inked it up.. That will change now. Your coloring is fabulous.. Awesome Beate..
Yay!!! Another fab video tutorial. Thank you so much for this, Beate. AND, I LOVE the card! x
You know, this is one of the Crafty Secrets images I’ve always loved, but never bought this set…it’s just so sweet. Great idea using it in the triangle fold…such a great project Beate!
Beate-is there anything you can’t do?! 🙂 This is a fabulous tutorial – all of yours are so simply stated and explained so well! LOVE the card you did and I can’t wait to do one! TFS!
This is absolutely gorgeous!!! I just love it!
Beate, I love this technique!! Such a pretty card… love the colors/images you chose!
Oh WOW this is sooo WONDERFUL!!! Thanks so much for the fabulous tutorial..Your project turned out AMAZING!!
so pretty, love that image so nice and calming. Thanks for the tip on cutting the squares in half, no more bent corners YEA!! Love how you did the layering of your panels too!!
What a fun (and beautiful)card Beate!! Your video tutorials are always so easy to follow!!! TFS
[…] Kaisercraft Rhinestones finish off the card. I cased this card later to create a similar one as my sample for the Triangle Trifold Card Video tutorial. I liked how the image came out that […]