Beauty in the Spotlight! If you haven’t tried the Spotlight technique — the goal is to make just part of your image POP! For this fun-filled challenge, let’s use this technique and ‘spotlight’ only a portion of your image with color! Link up your Bringing Back Beautiful Challenge creation HERE to enter. If you upload to SCS, please use the keyword BBB11. You have until June 30th to enter! As we unveil our challenge for next month, we’ll share our True Beauties – those card makers who wowed us with this challenge! Winners will be featured on the Flourishes Blog and will receive a True Beauty blog button to display proudly on their blog!


Sorry my post comes up a bit late…..I totally missed that today is the first Monday of the month. I spend the weekend in the backyard, reading two out of a Trilogy of Fantasy books. Now I am on withdrawal. I have to wait until the last book is written (Wardstone Trilogy, if anyone is interested. If you liked the Sword of Truth and Wheel of Time series, you will like this one!)

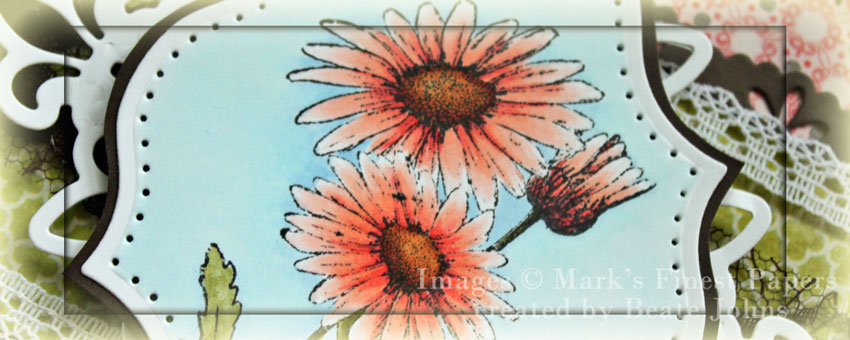
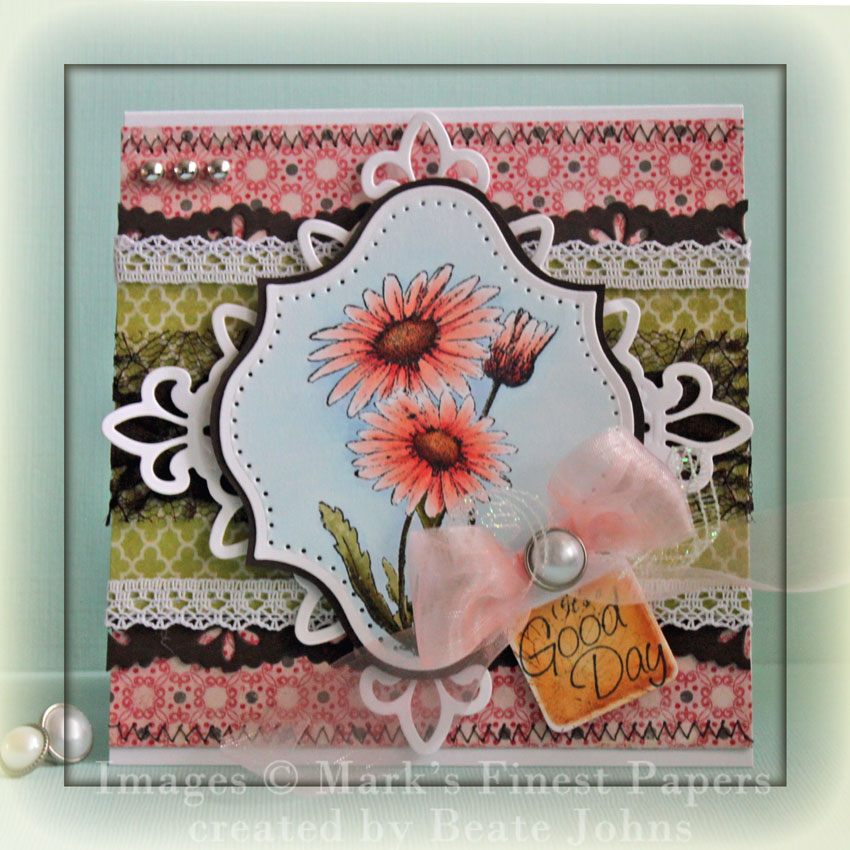
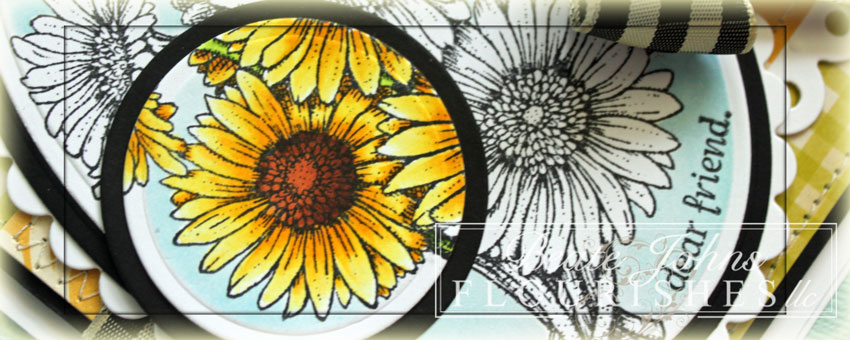
For my sample I chose still one of my favorite Flourishes sets, the Gerber Daisies. I stamped the image twice on Neenah Solar White cardstock with Tuxedo Black Memento ink. One image was cut and embossed with the second largest Petite Oval Nestabilities die, the second only partial with a Circle Nestabilities die.

The partial image was colored with Copic Markers (Y13, Y15, Y17, E97, E99, E29, YG01, YG03, YG17). The images were masked, the die put back in place and the outside of the daisies were sponged with Tumbled Glass Distress ink. Both shapes were layered on black cardstock, cut and embossed with the next size oval/circle die.

The circle layers were adhered to the oval ones before all layers were adhered to a White Scallop Oval layer, cut and embossed with the largest of the Petite Scallop Oval Nestabilities dies.

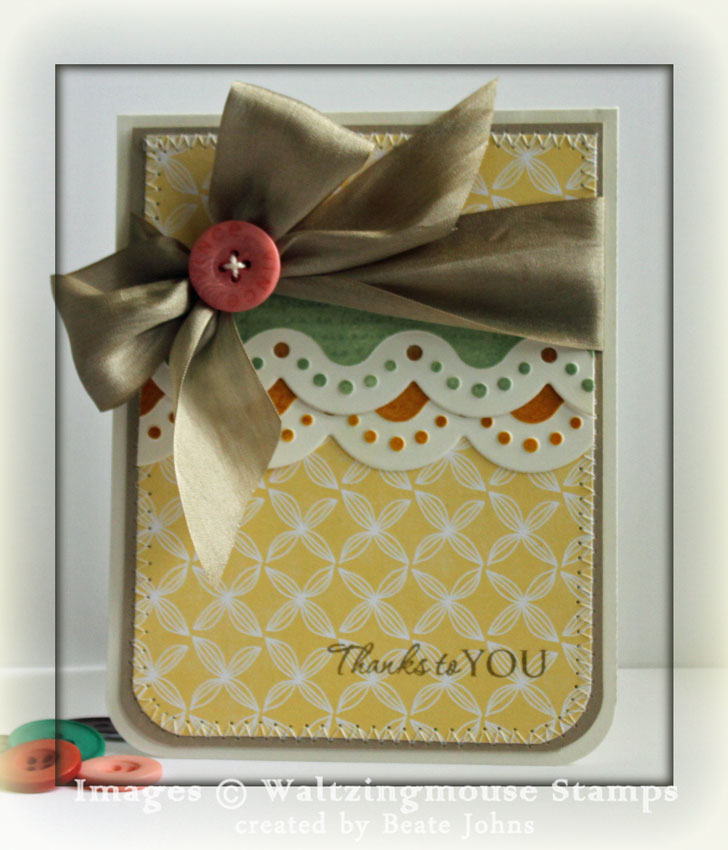
A 4″ wide strip of white cardstock was cut and embossed with one of the Classic Scallop Borderabilities dies and adhered stitched under a 2 1/2″ x 4″ piece of October Afternoon Thrift Shop patterned paper. A 4″ x 5″ piece of Weathervane paper was stitched to a 3/16″ bigger piece of black cardstock. The strip was adhered over these layers and May Arts Gingham Ribbon was tied around it.

The image layers were adhered to the layers with dimensionals. Since an additional layer for a sentiment would make this card look too crowded, I stamped dear friend ,also from the Gerber Daisies set, directly on the lower right hand side of the image oval.

A small border decoration was cut and embossed with one of  the new Parisian Accent dies out of black cardstock and adhered to the top right of the card. Snow Kaisercraft Pearls on the accent as well as under the spotlight portion of the image finish of the card front. Everything was adhered to the card base, a 4 1/2″ x 11″ piece of white cardstock folded in half, with dimensionals.


Check out what the rest of the design team has created!
Cindy
Heather
Julie
Kathy
Yvonne
Laura

Thanks so much for stopping by! I apologize for being so late today. With the kids last school day being tomorrow, Orthodontist appointments, house inspection and grocery shopping….I just couldn’t get it done. I can’t believe the packers are coming in three weeks. Or should I say I hope we get packers to come. We still don’t have an official date. Military…sigh!

Have a great evening.
Hugs and smiles

It’s time for another fun Waltzingmouse Sketch! For my sample I started by cutting two strips of Neenah Classic White cardstock with one of the Jumbo Scalloped Borderabilities die.


I sponged one of the strips with Bundled Sage Distress Ink, the other with Spiced Marmelade Distress Ink. Next I stamped a border strip from Text-It over each border with the same inks.

I picked the colors from this weeks Tuesday Trigger challenge. I love the soft colors and with the skirt being striped, I thought it fit this sketch perfectly.

The bottom corners of a 3 3/4″ x 5″ piece of Springtime Echo Park Paper were rounded and stitched to a 3/16″ bigger piece of Kraft cardstock. The bottom corners of the Kraft piece were rounded as well.

The scallop layers were adhered on top of each other on the upper part of the layers and  May Arts Taupe Silk Ribbon was tied around it.The bow was topped with a Coral button.

Everything was adhered to the card base, a 4 3/16″ x 10 3/4″ piece of Classic White cardstock folded in half. A sentiment from Fancy Phrases in Frayed Burlap Distress ink to finish off the card.

I hope you have time to play with the sketch and the Tuesday Trigger challenge. Have a wonderful weekend!
Hugs and smiles

I created this card in March for a Sketch Challenge on Splitcoast.  I started out with printing out the Happy Little Gnome on Neenah Solar White cardstock, cut it with a Small Label Nestabilities die and colored it with Copic Markers (Skin: E50, E51, E53, pants and hat: BG11, BG32, BG45, Shirt and Patch: Y32, Y17, YR15, YR18, hearts: R02, R05, Socks (E23, E25, E27, E29, Sky: B0000, B000, grass: YG11, YG13, YG17).

The image was layered on a piece of Canyon Brown cardstock that had been cut and embossed with a Jumbo Scallop Rectangle Nestabilities die. The edges of the image were paper pierced.

All the patterned paper used on this card are from the Fine and Dandy True Blue My Mind’s Eye Paper. The diagonally strip is 2 1/2″ wide. Two white strips were cut and embossed with the Eyelet Borderabilities die and adhered under the diagonal strip. The strip was adhered to a 4″ x 5 1/4″ piece of the same paper pack. The lower corners were rounded before decorative stitching was added.

Three buttons were stitched to the lower left of the layers before they were adhered to a card base, a 5 1/2″ x 8 1/2″ piece of Kraft cardstock, folded in half.

The sentiment is from Whimsy Treasured Moments Tickets. It was stamped in Tuxedo Black Memento Ink on a piece of Solar White cardstock, cut and embossed with Petite Oval Nestabilities and colored with Copic Markers YR30 and YR31. A small Cappuccino Twine bow on the side of the sentiment panel finish of the card.

Thanks so much for stopping by! Have a wonderful day.
Hugs and smiles

I created this challenge for Friday’s Free For All Challenge on Splitcoast. This week we were to create anything that grows in your garden or reminds you of springtime. I just got this Greet the Day with Gerber set from Mark’s Finest Papers and was eager to try it out.

I still had a Label 13 die cut from my the Double Embossing sample and stamped the image on that with Tuxedo Black Memento Ink. It was colored with Copic Markers (Flowers: R11, R12, R14    Leaves: YG93, YG95, YG97,    Sky: B41, B0000,    Center: E97, E99) and adhered to a piece of Canyon Brown cardstock, that was hand cut to a slightly bigger layer.

The edges of the layer were paper pierced. The layers were adhered to a piece of Neenah Solar White cardstock that had been cut and embossed with the Fleur De Lis Pendant die.

For the layout I used last weeks CPS sketch. The card base is a 4 3/4″ x 9 1/2″ piece of Neenah Solar White cardstock. Two 4 3/4″ long strips of Canyon Brown cardstock were cut and embossed with a Eyelet Borderabilities die and adhered underneath a 2 3/4″ wide strip of  Hazel Stella & Rose MME paper. The edges of the square were stitched, the edges of the horizontal strip topped with white lace (bought at Walmart), the center with May Arts floral lace.

The layers were adhered to the card base and the image was adhered to the layers with dimensionals. The sentiment is from the same set. It was stamped in Tuxedo Black Memento ink on a tag that had been cut with a retired die and was colored with Copic Markers (YR30, YR31, E97). The tag was topped with a Sheer pink bow topped with a Recollection brad. Silver Recollection pearls on the top right finish off the card.

Today’s Waltzingmouse sketch is a circular card. I LOVE round cards. They are so much fun! I created this card on Tuesday for Splitcoaststampers Color challenge. For those who know my purple dislike you will be surprised to read that I really liked this color combo. I actually made TWO cards for the challenge.

I started out by stamping one of the Holiday Label No.14 in Purple Hydrangea VersaMagic ink on Neenah Solar White cardstock. The sentiment is from Rescue Remedies Additions. It was stamped in Rich Cocoa Memento Ink in the center of the label. A decor from the Holiday Label No.14 was also stamped in Rich Cocoa Memento Ink underneath the sentiment. The label was cut and embossed with Label 14 Nestabilities dies. Chocolate Kaisercraft Pearls were adhered on the decor under the sentiment.

A 6″ x 12″ piece of  Kraft cardstock was folded in half, then it was cut and embossed with Grand Scallop Circle Nestabilities. Echo Park Springtime Paper was cut and embossed with Grand Classic Circle Nestabilities and stitched to a piece of Solar White cardstock, that had been hand cut into a slightly larger circle.

A 6″ long Kraft cardstock strip was cut and embossed with Fair Isle Borderabilities die and adhered over the point  where both Springtime papers overlap. White Silk Ribbon was tied over the layers vertically. The label was adhered over the ribbon with dimensionals.

White Kaisercraft Pearls were adhered to the upper left corner in form of a swirl. Three Recollection flowers were adhered to the upper right side of the sentiment panel. Everything was adhered to the card base with Scor-Tape.

I hope you have time to play along with the sketch! It is a fun one.

Thanks so much for stopping by! Have a wonderful day. I will be teaching a class at Simply Scrapbooks today. That will be fun!
Hugs and smiles

I created this card for Sunday’s Featured Stamper Challenge. Neva McMullen was the featured stamper last week. I picked this gorgeous card of hers to case. I love the flowers inside the heart and the trim on the bottom of the card. I combined this challenge with last week Mojo Monday challenge for the layout, with CR84FN for the colors and the Stamptacular Sunday challenge for the sentiment inspiration.

A 4 3/4″ long strip of Kraft cardstock was cut and embossed with Fair Isle Borderabilities and stitched to a 2″ x 4 3/4″ piece of For the Record Echo Park paper. Both strips were adhered to a 4 3/4″ square of October Afternoon Farm Fresh Paper. The layers were stitched to a 5″ square of Kraft cardstock. The bottom had been cut and embossed with the other Fair Isle Borderabilities die and the edges were sponged with Frayed Burlap Distress ink.

Solar White cardstock was cut and embossed with Lacey Circle Nestabilities die and topped with a piece of Cosmo Cricket Everafter paper, that had been cut and embossed with Classic Circle Nestabilities. The edges of the paper circle were paper pierced. May Arts Silk Ribbon was tied vertically around the layers and the circle was adhered under the bow.

Solar White cardstock was cut and embossed with the Classic Heart Nestabilities, sponged with Frayed Burlap ink and adhered to a piece of Kraft cardstock, cut and embossed with the Scallop Heart Nestabilities, that had been sponged with the same ink as well. The edges of the heart were also paper pierced. The bottom of the heart was stamped with an image from Verve Stamps Fabulous You set in Rich Cocoa Memento Ink.  Before the heart was adhered to the layers with dimensionals, part of a doily was taped to the lower right hand side of the heart.

The sentiment is also from Fabulous You. It was also stamped in Rich Memento Ink on a piece of Solar White cardstock cut and embossed with on of the Tag Trio dies. The tag was also sponged with Frayed Burlap ink and attached to the bow with iridescent May Arts Curling ribbon. Three Recollections flowers on the lower right of the heart finish off the card.

Thanks so much for stopping by! Have a wonderful day!
Hugs and smiles

I have some very exciting news. Not only did I order me a few Waltzingmouse stamps, but I was also invited to become a Waltzingmouse Mischief Maker. I get to play with Claire’s  sketches early. How fun is that? I love sketch challenges.

Today is my first official day as Mischief Maker. I used this sketch as my starting point to create my card for Thursday’s Way to Use it Challenge. We were to use Polka Dots on our card. A sketch and Polka Dots….through in Copic Markers and Spellbinders Dies and I am in heaven. 🙂


For my sample I picked the Stamp set Spring Baskets. I stamped first the Basket, then the Daffodils in Tuxedo Black Memento Ink on Neenah Solar White cardstock, cut and embossed the image with Classic Square Nestabilities dies and colored it with Copic Markers ((Bow: R20, R21, R22, Flowers: Y11, Y13, Y15, Leaves: YG01, YG03, YG17, Basket: E30, E31, E33, Background: BG0000, BG000, BG01, Ground: T0, T1, T3).

A piece of Kraft cardstock was cut into a frame with a Label 1 and a Classic Square Nestabilities die, sponged with Vintage Photo Distress ink and adhered over the image. The image layer was paper pierced.

A 3″ x 4″ piece of yellow polka dotted Modern Homemaker October Afternoon paper was adhered to a 4″ square of pink Ducks in a Row paper. The layers were stitched to a 4 1/4″ white square of cardstock. A 4″ long strip of white cardstock was cut and embossed with the Lattice Borderabilities die and adhered to to the upper edge of the yellow paper.

A small hole was punched in the center of left edge of the image layer. The image was adhered to the layers with dimensionals and pink silk ribbon was threaded through the hole and tied into a bow.

The sentiment is also from Spring Baskets. It was stamped in Tuxedo Black Memento Ink on a piece of Solar White cardstock that had been cut and embossed with Petite Oval Nestabilities die. The center of the oval was colored with Copic Markers BG0000 and BG000.  The sentiment was adhered to the layers with dimensionals and finished of with three tiny Recollections silver pearls. The layers were adhered to a 4 5/8″ x 9 1/4″ piece of Kraft cardstock folded in half.

After Wednesday’s tutorial was posted on Splitcaoststampers I had a lot of questions about how to cut a frame with Nestabilities. Because of that I created and posted a tutorial that day. So here is a video on creating frames with Nestabilities for the visual learner:

[youtube]https://www.youtube.com/watch?v=3G_-KNAx2jk[/youtube]

Thanks so much for stopping by! I hope you get a chance to try out the sketch! It’s an easy one. Have a great day!
Hugs and smiles

I know, I know….I never post more then once in a day. But I saw today’s Tuesday Trigger on Moxie Fab World and had to play and post right away. Today, it’s cold but the sun is shining and the inspiration image just made me smile.

I knew right away that I wanted to use Spellbinders Lattice Borderabilities for this  and keep it simple. Not an easy task for me.

My card base is a 4 1/4″ x 11″ piece of Kraft cardstock folded in half. The bottom corners were rounded.  White cardstock was cut and embossed with the Lattice Borderabilities and stitched to the bottom of a 2 1/4″ x 4 1/4″ piece of October Afternoon Thrift Store paper.

The scroll was cut with Sizzix Scribbles Swirls out of Sour Apple cardstock and airbrushed with Copic Marker YG95 for a little bit more depth. The swirl as well as two Recollection flowers were adhered under a Prima flower.

Before the Flower embellishment was adhered to the strip, I stamped a sentiment from Technique Tuesdays  stamp set : Simply You in Tuxedo Black Memento Ink on the lower left hand side of the strip.

I hope you are having a wonderful day. Here the sun is shining, the music is going and I am stamping. It IS a good day!
Hugs and smiles

Last Tuesday’s Color Challenge on Splitcoast was a tough one for me: Pacific Point, Wild Wasabi and So Saffron.

I decided to use an image from JustRite Stampers new Birdhouse set, that I had just received in the mail. I stamped the image in Tuxedo Black Memento ink on Neenah Solar White cardstock, cut and embossed it with Circle Nestabilities dies and colored it with Copic Markers (Green house: G40, G21, G24, Yellow House: Y21, Y23, W2, Blue House: B21, B23, B26, House bottoms: W00, W1, W2, Leaves: G21, YG63, YG67).

The image was layered several time. The bottom base is a piece of White cardstock cut and embossed with the largest Eyelet Circle Nestabilities die. It was topped with the sentiment circle. In it’s center was first a black cardstock circle and finally the image center.

A 4 3/8″ long white cardstock strip was cut and embossed with the Eyelet Borderabilities die. The strip was cut in half and adhered top and bottom to a 2 1/4″ x 4 3/8″ piece of Circa 1934 Cosmo Cricket patterned paper piece. That layered strip was adhered to a 4 3/4″ square of paper from the same paper pack. The top left and bottom right corner were rounded before the layer was stitched to a 3/16″ bigger piece of white cardstock.

May Arts black lace was adhered over the horizontal strip before White Organdy ribbon was tied over it. The bow was topped with a Cosmo Cricket Button. The card base is a 4 7/8″ x 9 3/4″ piece of Wild Wasabi, folded in half with to of the corners rounded. Snow Kaisercraft pearls on the top right and bottom left finish off the card.

Thanks so much for stopping by! Have a wonderful day!
Hugs and smiles

I created this card for last Sunday’s Featured Stamper challenge. Lori’s gallery was amazing to explore. Talk about gorgeous coloring and cards!!! She had used a lot of Mo’s Digital Pencil images. After already seeing Alice Wertz and others create gorgeous cards with them, I couldn’t help myself and ordered a few.

My inkjet printer made me angry. The images always smear a bit when I color them with Copics. So I bought a Laserjet printer at BestBuy on sale for $99. I will let you know how that goes.

For my card to case I picked Lori’s beautiful fairy card. I also picked a fairy from Mo’s, her Baby Fairy Yuriko.  I stayed in the pastel color group, just switched out her blues with pink. I kept her layout, but added some stitching, Border and Pearls to my case.

The image was printed out, cut and embossed the image with the largest Rectangle Nestabilities die and the Out of the Box Technique. It was colored with Copic Markers (Hair: E34, E37, E39, Skin: E50, E51, E53, Wings: Y13, Y15, Y17, Y38, W2, Flower Leaves: YG01, YG03, YG05, Bird: YG01, YG03, BG13, Y13, Y15, Y38, Dress: RV10, RV13, RV14, Ground: E33, E35, Background: BG10, BG0000) and layered first on a piece of Echo Park’s Life is Good paper, then on a 3 1/4″ x 4 1/8″ piece of Sour Apple Cardstock. The edges of the image layer were paper pierced for an extra border.

A 4″ x 4 3/4″ piece of Life is Good Echo Park paper was stitched to a 4 1/4″ x 5 1/2″ piece of Sour Apple, which had it’s bottom edge cut and embossed with the Petite Fair Isle Borderabilities dieAvocado Linen Ribbon was tied around the layers with a piece of May Arts Organdy tied in and topped with a button from my Mom’s stash.

The card base is a 4 5/8″ x 11 1/2″ piece of Textured Whisper White cardstock folded in half. Yellow Kaisercraft Pearls finish off the card.

Thanks so much for stopping by! Have a wonderful day!
Hugs and smiles

© 2012 fresh & fun Suffusion theme by Sayontan Sinha