It’s the first Monday of the month, which means it is time for the next Bring Back Beautiful Challenge.


Love is a beautiful thing, so let’s honor it in our card making! Use the color red, have a feel of romance, or adorn your creation with hearts – the choice is yours! Link up your Bringing Back Beautiful Challenge card here to enter. If you upload to SCS, please use the keyword BBB07. You have until February 28th to enter! As we unveil our challenge for next month, we’ll share our True Beauties – those card makers who wowed us with this challenge! Winners will be featured on the Flourishes Blog and will receive a True Beauty blog button to display proudly on their blog!

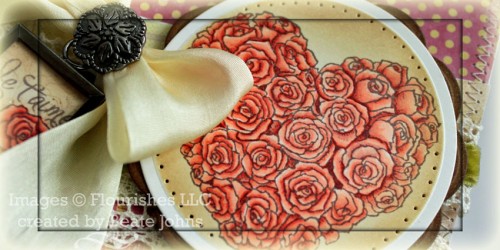
For my sample I chose the new Heart & Flowers stamp set. I used the Rose Heart and stamped it in Rich Cocoa Memento Ink on Natural White cardstock. It was cut and embossed with Classic Circle Nestabilities and colored with Copic Markers (R01, R02, R05). The edges were sponged with Antique Linen and Vintage Photo Distress Ink. It was layered on a piece of Kraft cardstock that had been cut and embossed with a large scallop circle Nestabilities die and sponged with Vintage Photo distress ink.

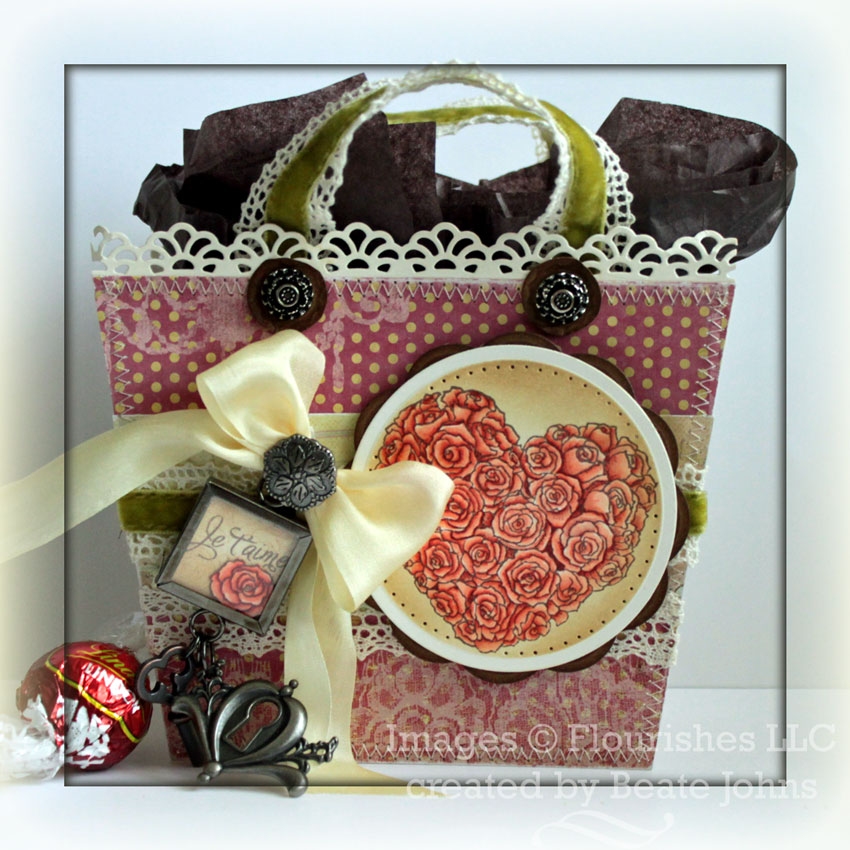
I stamped the sentiment from Hearts & Flowers in Rich Cocoa Memento Ink on a 7/8′ square of Classic White cardstock. The heart was inked with Vintage Photo Ink and stamped in third generation over the sentiment. The edges of the square were sponged with the same ink and entered in the 1″ square Memory Frame. I noticed I didn’t have 1″ Memory Glass, so I added a few more 7/8″ paper squares and added a 7/8″ square of Acetate to the front and back of the frame.

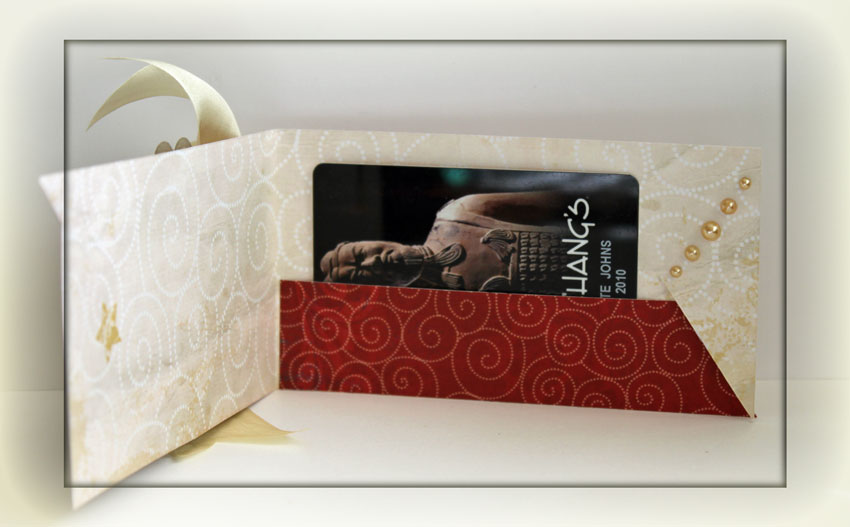
My project is a Genie bag. The base is a 4″ wide lunch bag. I cut it down to a 4″ square and created covers for the bag. The paper is from 7 Gypsies Victoria pack. The sides started out with a 4 1/4″ x 5 1/2″, then cut the sides in angles 5/8″ in. A piece of Classic White cardstock was cut with Faux Crochet Dienamics die and adhered on the upper edge of the sides.  May Arts Velvet ribbon was adhered over a horizontal strip of the same paper pack. The heart was adhered over the ribbon with dimensionals. A bow was tied out Ivory Silk ribbon from May Arts. It was topped with an Antique Brad from Stampin’ Up!

The sentiment frame as well as a key and charm from Tim Holtz Idea-ology line were attached to the bow with jump rings.

Two strips of the velvet lace ribbon were used as handles. They were adhered to the inside of the side pieces. Next small circles were cut out of Kraft paper, sponged with Vintage Photo ink and topped with smaller Antique Brads.

Here is a video for the visual learner:

[youtube]https://www.youtube.com/watch?v=y6h1XJRszYk[/youtube]

Be sure to check out the rest of the team by clicking on over to see…..


Thanks so much for stopping by! Have a wonderful day!
Hugs and smiles

I created a card for today’s Bring Back Beautiful Challenge. Sorry that it is a bit later.

For my sample I used the Pansy image from the Year In Flowers stamp set. It was stamped in Rich Cocoa Memento Ink on Neenah Natural White cardstock and colored with Copic Markers (R81, R83, R85, YG63, YG67). The cardstock was cut with Classic Oval Nestabilies and sponged with Antique Linen and Vintage Photo Distress Ink.

Another piece of Natural White cardstock was cut and embossed with the Beaded Oval Nestabilities and sponged with Vintage Photo Distress ink. The image was adhered to the beaded oval with dimensionals.

The card base is a 4 1/4″ x 11″ piece of Neenah Classic Cream cardstock folded in half. A 3 1/4″ x 3 13/16″ piece of Webster’s Pages Petite Pages was adhered to a 3 13/16″ x 5″ piece of Webster’s Pages paper. May Arts Lace was adhered underneath the horizontal strip and both layers were stitched to a 1/4″ bigger piece of Natural White cardstock.

I colored a piece of white May Arts Silk Ribbon with Copic Marker R83 and tied the ribbon around the horizontal layer. The sentiment is from Flourishes Tag Lines stamp set. It was stamped in Rich Cocoa Memento Ink on a tag cut with a retired Spellbinder die and sponged with Vintage Photo Ink. The tag was tied with Waxed Linen around the ribbon bow and topped with a button. Latte Kaisercraft Pearls finish off the card.

Be sure to pay a visit to the design team members to see what they cooked up with a vintage flair!

Have a wonderful day! Hugs and smiles

Happy New Year! I am sorry I have been quiet the last few weeks. First I had a cold, then a nasty migraine attack that lasted longer then usual and then we had a guest after Christmas. I hope to get back in the swing of things soon. Today I am posting the new Bring Back Beautiful Challenge from Flourishes, but I don’t have a sample yet. Maybe I get one posted later today or tomorrow.

The Beauty of Vintage: Take a trip back in time with this BBB challenge and show us some vintage beauty on your card or creation. Use a little lace, a vintage looking button or some decorative paper with an old time feel. Link up your Bringing Back Beautiful Challenge card here on the Flourishes blog using our linky widget to enter. If you upload to SCS, please use the keyword BBB06. You have until January 31st to enter! As we unveil our challenge for next month, we’ll share our True Beauties – those card makers who wowed us with this challenge! Winners will be featured on the Flourishes Blog and will receive a True Beauty blog button to display proudly on their blog!

Need a little more inspiration? Be sure to pay a visit to the design team members to see what they cooked up with a vintage flair!

  • Have a wonderful day! Hugs and smiles
  • For this month’s Bringing Back Beautiful Challenge, use beauty in stamping to create an accent piece for a table, a mantle, a decoration or any kind of home décor. ‘Tis the season for stamping and entertaining –so let’s see if you can create a match made in heaven by using both! Link up your Bringing Back Beautiful creation here to enter. If you upload to SCS, please use the keyword BBB05. You have until December 31st to enter! As we unveil our challenge for next month, we’ll share our True Beauties – those card makers who wowed us with this challenge! Winners will be featured on the Flourishes Blog and will receive a True Beauty blog button to display proudly on their blog!

    Make sure to check out the blogs of fellow challenge team members:

    Cindy Coutts
    Heather Jensen
    Kathy Jones
    Julie Koerber
    Yvonne Hagane

    For my sample I used the new Alleluia Angel stamp. I stamped it on X-Press It Blending Card! with Tuxedo Black Memento Ink and cut the image down to a 1 7/8″ square. It was colored with Copic Markers (Horn: YR21, YR23, E97, Skin: E50, E51, E53, Dress: Y32, Y35, Y38, E97, Hair: E25, E27, E29, Ribbon: R08, R27, R39, Wings: BV000, BV20, BV23). I added a 1 7/8″ square of patterned paper was adhered to the back of the image. It was then sandwiched between a 2″ square Frosted Memory Glass and a regular memory glass on the back and placed in a Memory frame.

    I ran some silver cord through the hanger and a Philosophy tag that I adhered to the top right of the image. I topped it with gold organdy ribbon tied into a bow and hit with a heat gun to antique it.

    As we enter into the busiest time of the card making season, we want to see how you use beauty and artistry and wrap it up with a bow… with ribbon! You don’t have to create a bow, just show us your favorite way to add elegance to your cards or creations with ribbon. Link up your card for the Bringing Back Beauty challenge here to enter.

    If you upload to SCS, please use the keyword BBB04. You have until November 29th to enter! As we unveil our challenge for next month, we’ll share our True Beauties – those card makers who wowed us with this challenge! Winners will be featured on the Flourishes Blog and will receive a True Beauty blog button to display proudly on their blog!

    Make sure to check out the blogs of fellow challenge team members:

    Cindy Coutts
    Kathy Jones
    Julie Koerber
    Michelle Woerner
    Yvonne Hagane

    For my sample I used Sweets of the Season. The image was stamped in Tuxedo Black Memento Ink on X-Press It Blending Card. It was colored with Copic Markers (Candy Cane: R20, R24, R29, C01, C00, Berries: R27, R29, R39, Leaves:  G24, G28, Bow: Y35, Y38, E97 and darker colors (used by Marianne to add more shading)and cut and embossed with Classic Circle Nestabilities. It was then layered first on a black card stock circle, then a piece of brushed gold card stock, cut and embossed with Eyelet Circle Nestabilities.

    A tag was cut out of Neenah Solar White card stock with a Spellbinders Tag die and airbrushed with Copic Marker B01. Green Kaisercraft Pearls were added to the top of the tag.

    I used Bo Bunny paper to create a Slit Latch Gift Card Holder. It’s today’s Holiday Blitz tutorial on Splitcoaststampers. It was created by Jane Matsumoto. I tied the bow with Cream Silk Ribbon and the help of my Bow-Easy. It was topped with one of the new Stampin’ Up! Buttons. Latte Kaisercraft Pearls on the upper edge of the slit gift card holder finish off my gift card holder.

    I changed the inside from the tutorial by adding a 1 1/8″ x 5″ strip to the bottom of the inside of the card holder instead of punching slits for the gift card. Just adhere the strip by adding adhesive to the left and bottom edge of the strip before you cut your slit. Once the slit is cut, add adhesive to the diagonal edge of the right side. The strip will hold your gift card and help make your holder a bit sturdier.

    Thanks so much for stopping by! I hope you have time to try out this fast and easy gift card holder and participate in the challenge. Using ribbon is definitely not a challenge for me. I LOVE ribbon.

    Have a wonderful day! Hugs and smiles

    As we get closer to the season of giving, let’s take the wraps off your creativity to come up with beautiful ways to gift give. Do you have a fun template for a beautiful box? Or, do you have a beautiful presentation for gift cards? Show us what you’ve got! Link up your Bringing Back Beautiful Challenge card here to enter. If you upload to SCS, please use the keyword BBB03. You have until October 30th to enter! As we unveil our challenge for next month, we’ll share our True Beauties – those card makers who wowed us with this challenge! Winners will be featured on the Flourishes Blog and will receive a True Beauty blog button to display proudly on their blog! 

    Make sure to check out the blogs of fellow challenge team members:

    Becca Feeken
    Cindy Coutts
    Kathy Jones
    Julie Koerber
    Michelle Woerner
    Yvonne Hagane

    For my sample I used the A2 Card Box tutorial on Splitcoast to create part of Rebecca’s teacher gift for Christmas. I love working ahead. I created 6 simple thank you cards with matching envelopes. I hope the teacher will be able to use them to give to other parents as thank you for their Christmas presents.

    The card base for each is a piece of 4 1/4″ x 11″ piece of Flourishes Classic White cardstock folded in half.  The big Winter Bouquet Image was stamped in Walnut Stain Distress Ink. The sentiment is from the same stamp set and was stamped with Walnut Stain into the lower right corner. A frame was embossed around the image with Classic Square Nestabilities. The envelopes were stamped with the smaller Winter Bouquet image in Antique Linen Distress ink.

    For the box front I stamped the Winter Bouquet again, this time in Tuxedo Black Memento Ink on Neenah Solar White cardstock and colored it with Copic Markers (Lily: R24, R27, R29, R39, YG63, YG67, Holly: R35, R37, R39, G21, G24, G28 Pine Cones: E33, E35, E37 Pine Branches: BG93, BG96 Berries: BV25, BV29, G20, G21, G24, bigger berry leaves: G94, G97 more greens: YG93, YG97, G94, G99). The image was cut and embossed with the Classic Square Nestabilities and then airbrushed with YR21. It was then layered on an Early Espresso cardstock piece that had been cut and embossed with Classic Scallop Square Nestabilities.

    The bottom of the box was created with Kraft cardstock, the top with Early Espresso cardstock.

    Two 4 1/4″ long strips of Flourishes Classic White cardstock was cut and embossed with Eyelet Borderabilities. They were stitched to a 3 1/2″ x 4 1/4″ piece of Holiday Webster’s Pages paper. A 4 1/4″ x 5 1/2″ piece of a different pattern of Holiday Webster’s Pages was stitched to a 3 /16″ piece of White cardstock. The smaller piece was adhered to the bigger one and Red Silk May Arts Ribbon was tied around the horizontal strip and topped with a brown button. The layers were then adhered to a 4 5/8″ x 5 7/8″ piece of Kraft cardstock which topped the box top.

    The sentiment is from Dove and Holly. It was stamped in Tuxedo Black Memento ink on Neenah Solar White cardstock. It was cut and embossed with Petite Oval Nestabilities and sprayed with YR21. It was cut down just a bit and layered on a Early Espresso cardstock cut and embossed with Spellbinders Fancy Tag dies. To finish off the box front, I added Latte Kaisercraft Pearls to the top right and bottom left corner.

    Here is a video on how to create this box for the visual learner:

    [youtube]https://www.youtube.com/watch?v=LKZiQhSYO5Q[/youtube]

     bbb-large.gif

    As the leaves start to change colors to usher in fall, we want to see your rustic beauty. Interpret this challenge however you like – want to use a little distressing? Want to use shades of rust? Want to use things that look aged or antiqued? You choose! Just make sure the end result has a rustic feel to it! Link up your Bringing Back Beautiful Challenge card here.

    If you upload to SCS, please use the keyword BBB02. You have until September 30th to enter! As we unveil our challenge for next month, we’ll share our True Beauties – those card makers who wowed us with this challenge! Winners will be featured on the Flourishes Blog and will receive a True Beauty blog button to display proudly on their blog!

    Make sure to check out the blogs of fellow challenge team members:

    Becca Feeken
    Cindy Coutts
    Kathy Jones
    Julie Koerber
    Michelle Woerner
    Yvonne Hagane

    fllcwreathofallseasonwide.jpg

    For my sample I used the Flourishes set Wreath of All Seasons and a sketch from a previous Flourishes challenge. I stamped the sunflower wreath in Tuxedo Black Memento Ink on Neenah Solar White cardstock. It was cut and embossed with Circle  Nestabilities and colored with Copic Markers (Flower leaves: Y17, YR15, YR14, Flower center: E97, E99, E08, E19, Leaves: G82, G94, G85, Wisteria BV01, BV02, background: custom color 1/5 YR31, 4/5 blending solution). The image was layered on a slightly bigger Chocolate Chip circle and a Chocolate Chip piece cut and embossed with  Spellbinders Fancy Tags.

    fllcwreathofallseasonfttc79.jpg

    The card base is a 4 1/2″ x 11 1/2″ piece of textured Chocolate Chip cardstock folded in half. A 2 1/4″ x 5 1/4″ piece of Weathervane October Afternoon paper was sanded and adhered to a sanded 4″ x 5 1/4″ piece of The Thrift Store October Afternoon Paper. The layers were stitched to a 4 3/16″ x 5 7/16″ piece of Whisper White cardstock. White May Arts Silk Ribbon was tied around the vertical strip before the main image was adhered with dimensionals.

    The sentiment is from the same set. It was stamped with Tuxedo Black Memento Ink on Neenah Solar White cardstock, cut with Petite Oval Nestabilities and airbrushed with Copic Marker BV02. To finish the card off Pearl Kaisercraft Pearls were colored with BV02 to match the rest of the card and adhered to the top right corner of the card.

    I hope you have time to play! Thanks so much for stopping by! Hugs and smiles.
     

    bbb-large.gif

    Flourishes is hosting a new monthly challenge starting today! It’s called Bring Back Beautiful. Today’s challenge is called “Beauty in Color”.

    As we kick off our Bring Back Beauty Challenge, we focus on one of the things that can evoke a lot of beauty in card making – COLOR! Pick your favorite medium – watercolor, colored pencils, markers, alcohol inks… the sky is the limit! Show off your color and join us! Link up your Bringing Back Beautiful Challenge creation here (link to post/thread) to enter. If you upload to SCS, please use the keyword BBB01. You have until August 31st  to enter! As we unveil our challenge for September, we’ll share our True Beauties – those card makers who wowed us with this challenge! Winners will be featured on the Flourishes Blog and will receive a True Beauty blog button to display proudly on their blog!

    Make sure to check out the blogs of fellow challenge team members:

    Becca Feeken
    Cindy Coutts
    Kathy Jones
    Julie Koerber
    Michelle Woerner
    Yvonne Hagane

    fllcswanlakepostagewide.jpg

    For the longest time I mostly used silhouette stamps because I didn’t think I could color. The more I play with my Copic Markers, the more fun I have and the more confident get. My challenge sample was also my sample for reworking the Faux Postage tutorial and shooting the Faux Postage Video tutorial. The small flower from Swan Lake was perfect for the Faux Postage Shape.

    I printed the Faux Postage Template out on Neenah Solar White Cardstock, cut my mask out of Tim Holtz Mask Sheets (I really love those for masks you want to re-use, e.g. die cuts or the postage mask), stamped the image with Tuxedo Black Memento Ink and colored the flowers in with Copic Markers (R21, R24, R29, G82, G85, G99, B000, B01). I trimmed around the template with Fiskars Postage Scissors and layered it first on a 3 3/8″ square of Basic Black cardstock, then on a Scalloped White cardstock piece, cut with Classic Square Nestabilities.

    fllcswanlakesearosepostageb.jpg

    The card base is a 4 1/2″ x 9″ piece of Basic Black cardstock folded in half. A 2″ x 4 1/4″ piece of Cherry Hill October Afternoon Patterned Paper was adhered to a 4 1/4″ square of Night Light Katie October Afternoon paper after the squares edges were sanded. The layers were stitched to a 4 3/8″ square of Neenah Solar White Cardstock.  May Arts Crochet Ribbon was adhered over the horizontal strip and Green May Arts Satin ribbon was tied around that.

    The Faux Postage image layers were adhered over the ribbon with dimensionals. The sentiment is from Flourishes Life Lines set. It was stamped in Tuxedo Black Memento Ink on Neenah Solar White cardstock and cut out with Petite Oval Nestabilities. The inner oval was colored with B0000 and B000 Copic Markers. Split Pea Kaisercraft Rhinestones finish off the image.

    fllcswanlakepostageinside.jpg

    The inside of the card was kept pretty simple. A 1 1/2″ x 4 5/16″ strip of Cherry Hill Patterned paper was cut and embossed with the Jumbo Scallop Petite Borderabilities and adhered to a 4 5/16″ square of white cardstock. Turquoise Cotton Ribbon was taped over the top edge of the patterned paper before the layers were stitched together and adhered to the inside of the card.

    Here is a video for the visual learner:

    [youtube]https://www.youtube.com/watch?v=eIRmhrms0kE[/youtube]

    Thanks for stopping by! Have a wonderful day! Hugs and smiles

    © 2012 fresh & fun Suffusion theme by Sayontan Sinha