Heather is the hostess for today’s Timeless Tuesday challenge. She wants us to be inspired by this photo:

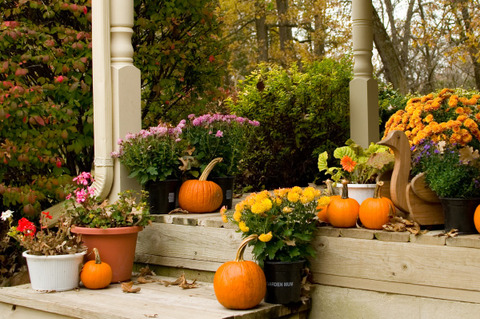
I picked the stairs and the gorgeous yellow/orange colors along with color of the steps. I had never created a Center Step card before and tought this would be a great time to try it out.

I created the card base out of a 5 1/2″ x 11″ piece of Kraft Cardstock. I cut and scored it just as  Frances showed us in this tutorial. I cut Neenah White cardstock to make slightly smaller layers for the center and side panels and topped those with My Mind’s Eye Lost & Found Two Sunshine patterned paper.

A 6 1/2″ wide strip of white cardstock was cut and embossed with Edgeabilities dies (Triple Scallop and Classic Petal). The strip was then sponged with Wild Honey Distress ink. The big flower head from Sweet Nature was stamped over in the same color. The strip was adhered to the lower part of the card.

For the center piece I cut a Kraft cardstock, more Sunshine paper as well as a piece of white cardstock with  Ornate Artisan Tags & Accents dies. The largest frame was sponged with Vintage Photo Distress ink. The Sunshine paper was sanded before it was adhered to the Kraftstock panel.

The white panel was sponged with Wild Honey Distress ink. A sentiment from Sweet Nature was stamped in the tags center with Tuxedo Black Memento Ink. The big flower head stamp was used again to add some texture to the sponged part of the tag. The tag was adhered to the card other layers with dimensionals.

To finish the card off two flourishes from the same die pack out of white cardstock. Again Wild Honey was used to sponge the cardstock. The flourishes were adhered to the thin side panel.

This card also works for today’s HYCCT challenge on SCS. That’s why there is no ribbon, rhinestones or pearls on it.

Please check out my fellow Timeless Tuesday Challenge Team members:

Cindy Haffner
Heather Jensen
Silke Ledlow
Tammy Hershberger

Bring Back Beautiful Members:

Mona Pendleton
Iwona Palamountain

October Guest Designer Rosemary Dennis

I hope you have time to participate in the challenges. Have a wonderful day!
Hugs and smiles

Today’s Hope you can Cling to Challenge is an inspiration challenge. Lee picked this fun cupcake photo as our inspiration piece.

As soon as I saw it I knew I wanted to try out my Wonky Rectangle dies on a circle card.

I started by cutting a piece of MME Lost & Found Two Blush paper with the largest of the Wonky Rectangle die and sanded the edges. Then I checked what kind of circle size I needed. The regular circles were too small, but the smallest of the Grand Circle Nestabilities seemed perfect. Another piece of Blush Paper was cut and embossed with that die and stitched to a slightly bigger piece of black cardstock, that had been hand cut.

A sentiment from Flourishes Zinnias stamp set was stamped in Tuxedo Black Memento Ink on a piece of Neenah Solar White cardstock that had been cut and embossed with one of the Fancy Tag three dies. With the die over the cut cardstock, the center of the tag was sponged and the Zinnia head of that stamp set was stamped over the lower left side with Spun Sugar Distress ink.

A hole was punched in the wonky rectangle and the stitched layers before the rectangle was adhered to the circle layers with dimensionals. White Organdy Ribbon was threaded through the holes, tied into a bow and topped with a Basic Grey Button and Linen thread. The sentiment layer was adhered over the rectangle with dimensionals.

The card base is Kraft cardstock (Stampin’ Up!) that was cut and embossed with one of the Grand Scallop Circle Nestabilities dies. After the layers were adhered to the card base, the card front was finished off with parts of a Finesse Pearl Swirl.

For the inside of the card another piece of white cardstock with matching patterned paper was cut and embossed with the same Circle die used for the front layers. Again the circle were stitched to a piece of black cardstock that had been hand cut in a slightly bigger circle. Another sentiment from the Zinnia set was stamped to the upper right edge of the patterned paper. Part of a pearl swirl finishes off the inside of the card.

I hope you have time to play! I can’t wait to send a big box of cards to the hospital at the end of the month.

Have a wonderful Sunday!
Hugs and smiles

It’s the first of October, that means it’s Breast Cancer Awareness Month. For the second year in a row Splitcoaststampers is hosting at least one challenge a day. We call it Hope You Can Cling To Challenges. We have sponsors and prizes….so head on over there and check it out. We work with a hospital in Austin and ask that all the cards made for the challenges will be sent to that hospital. Last year 2100 cards were sent to that hospital. We are hoping to beat that this year.

Today starts out with a bang and three challenges. Lori, Lydia and I are hostesses. I will blog about my challenge card later next week. Today I want to show you my entry for Lydia’s challenge. Her challenge is to use a pink animal somewhere on your card.

I decided to use Taylored Expressions Summer Afternoon stamp set for that. I started by stamping the frame image in Coffee Archival ink on Victoria Garden Echo Park Paper. It was cut out with a Classic Circle Nestabilities die, layered first on a slightly bigger white cardstock circle, then on a piece of Canyon Brown cardstock, cut and embossed with a Floral Doily Motif die.

A sentiment from the same set was stamped in Coffee ink on Neenah Solar White cardstock and cut and embossed with a circle die. The dragonfly stamp from that set was inked with the Ballerina Pink Watercolor Marker (Inkadinkado) and stamped on the upper right hand side of that sentiment panel. The circle was adhered with dimensionals in the center of the frame.

The card base is a 4 1/4″ x 11″ piece of Solar White cardstock folded in half. The lower corners were rounded and the upper half of the card was dry embossed with a Polka Dot embossing folder.

A 4 1/4″ long strip of canyon brown cardstock was cut and embossed with the border die from the Floral Doily Accents pack. It was stitched under a 3 1/2″ x 4 1/4″ piece of Victorian Garden paper. White Organdy ribbon was tied around the panel and topped with a button. The paper layer was adhered to the card base and the sentiment layers were adhered on top with dimensionals.

I hope you have time to play with us in these challenges. I hope to make at least 15 cards to send to the hospital.

Thank you so much for stopping by! Have a wonderful day!
Hugs and smiles

© 2012 fresh & fun Suffusion theme by Sayontan Sinha