Here is a sneak peek of my first challenge card for tonight. I will post the entire card when VSN begins at SCS tonight.

Starting at 5 p.m. EST tonight the Winter Wonderland Virtual Stamp Night will begin at Splitcoaststampers. From 5 until 9 p.m. on Friday and 1:00 to 10:00 p.m. on Saturday new challenges will be posted hourly with a Winter Wonderland theme. I hope to see you there later today.

During the Mini VSN a few of weeks ago, the first challenge was to create a card with an image of a warm clothing along with some felt on your card. I had just shot the video tutorial for the Pocket Card ,and had a finished pocket, that just needed an image to be finished off.

I stamped an image from the super cute There She Goes Clear Stamps Wonderful Winter Wishes set in Tuxedo Black on Neenah Solar White cardstock as well as a  patterned piece from Echo Parks Holly Jolly paper pack. The jacket was cut out of the patterned paper and shaded with Copic Markers ( R35, R37, R39). The image on the cardstock was cut and embossed with a Classic Circle Nestabilities die and also colored with Copic Markers (mitten and boots: G000, G00, G02 Skin: E0000, E00, E01, R20 Pants: E40, E41, E42 Snow: BG0000, BG000, B01 Hair: E97, E25 carrot: YR15, YR18). The jacket was adhered to the main image and the background was airbrushed with Copic Marker B02. The cloud that had been masked, was shaded with Copic Markers (W00, W0, W1).


The card base was created out of a 4 1/4″ x 11″ piece of cardstock, scored at 1 1/4″ and 5 1/2″. The four corners were rounded. A 3 3/4″ square of Holly Jolly paper was stitched to a 1/4″ bigger piece of whtie cardstock. A quarter of a paper doily was adhered to the lower left of the the stitched layers and three buttons were tied to it with Linen Thread.

Part of a Finesse Swirl was adhered over the buttons and more Rhinestones were adhered to the lower right corner. The layers were adhered to the card base. Before the flap was taped down, May Arts Organdy Ribbon was tied around it. Pink felt was cut with a small Heart Nestabilities die and stitched to the top of the bow.

The image circle was adhered to a piece of Solar White cardstock, cut and embossed with a Tear Drop Circle Nestabilities die. The layers were adhered to the card base with dimensionals.

The inside tag is a 3 1/2″ x 5″ piece of Solar White cardstock. The top corners were rounded and a 1 1/8″ wide strip of Holly Jolly paper was adhered to the lower half. A sentiment from the Wonderful Winter Wishes set was stamped above the strip with Tuxedo Black ink. Another pink felt heart was topped with a clear button and stitched to the tag with embroidery thread.

The card works great for this weeks DYSU Challenge, so I will be entering it there. It’s an easy challenge that I could enter all my cards into. Use ribbon. It would be harder for me if the challenge was NOT to use ribbon. LOL

Here is a video for the visual learner:

[youtube]https://www.youtube.com/watch?v=PrH-I8Op-O0[/youtube]

Thanks so much for stopping by! Have a wonderful day!
Hugs and smiles


Here is a card I made for one of last weeks VSN challenges. This challenge was to create a white card. We were allowed to add some color to the main image.

I chose the cute ice bear from Lawn Fawn’s Critters in the Snow. It was stamped in Tuxedo Black Memento Ink on a piece of Neenah Solar White cardstock cut and embossed with a Classic Oval Nestabilities die. The bear was shaded with Copic Markers (R00, R20, C00, No, N1) and the background was sponged lightly with Tumbled Glass Distress Ink. Smaller snowflakes from the Critter set was stamped in second generation on the background and the bottom was covered in Chunky Crystal Crafty Sparkles.

Another piece of white cardstock was cut and embossed with the next size up Classic Oval Nestabilities die. A 4″ x 5 1/4″ piece of Solar White cardstock was embossed with the Snowflake Embossing Folder. The edges of the embossed layer were stitched before the oval was adhered in the center. A 2″ x 5 1/4″ strip of white cardstock was scored with in 1/8″ increments with my Scor-Pal and adhered over the oval.

White organdy ribbon was tied around the horizontal layer and topped with a button that was tied on with iridescent curling ribbon. Snowflakes were cut out of Acetate and white cardstock with the Whimsy Snowflake die . Some snowflakes were added to the layers with white brads.

A sentiment from the Critters in the snow was stamped on a thin strip of white cardstock, formed in a banner and attached to the oval with a layered snowflake. Small pearls were added to centers of some of the snowflakes. The layers were adhered to the card base, a 5 1/2″ x 8 1/2″ piece of white cardstock, folded in half.

Thanks so much for stopping by! Have a wonderful day.
Hugs and smiles

I hadn’t played with MFT stamps for a while. So when I saw this VSN Mini challenge, I  got out Pure Innocence Snow Angel, stamped it in Tuxedo Black Memento Ink, once on Neenah Solar White cardstock and twice on small patterned Holly Jolly Echo Park Patterned Paper.

The image was colored with Copic Markers (bear: E55, E57, E59   Holly & Berries: R08, R17, R29, G02, G05  Hat rim: C2, C0, C00   Snow: B0000, B000). The scarf hat and mitten patterned paper pieces were shaded with G0000, G000, G00, the boots and coat with R02, R05, R08). Before the paper pieces were added to the main image, The image was cut and embossed with a Classic Circle Nestabilities die. Two cloud masks were added, the image was masked and the background was airbrushed with Copic Marker B02. The Clouds were shaded with Copic Markers W00, W0, W1.

The image layer was adhered to a slightly bigger Canyon Brown cardstock circle and then to a piece of Neenah Solar White cardstock, cut and embossed with the largest Tear Drop Circle Nestabilities die. Turquoise Baby Bling was added to the Tear drop circle.

A 2 3/4″ x 4 1/4″ piece of Holly Jolly paper was adhered stitched to a 4 3/4″ x 4 1/4″ Holly Jolly paper piece. A small strip of white cardstock was adhered to the top of the paper layers and brown May Arts Organdy Ribbon was tied around the horizontal layer. The bow was topped with a button, tied on with Linen Thread. The layers were adhered to the card base, a 4 1/4″ x 11″ piece of Kraft cardstock, folded in half. The bottom two corners were rounded.

A sentiment from Snow Angel was stamped on a piece of Solar White cardstock that had been cut and embossed with the smallest Petite Oval Nestabilities die. The center of the oval was colored with Copic Markers R000 and R00.

Thanks so much for stopping by! Have a wonderful day!
Hugs and smiles

Hello and welcome to Day Five of our November Rubber Die Release Showcase!

On Wednesday (16 November) Whimsy Stamps released this month’s rubber designs and new shapeology dies. From then until 23 November the Whimsy Stamps DT and Special Guests are showcasing these fabulous new stamps and dies with a daily mini blog hop.

Each mini blog hop has a new release prize hidden somewhere along the way and you have 24hrs to enter each prize draw.

To be entered into today’s mini blog hop prize draw, be sure to leave a comment on ALL of the DT’s posts listed below by 12.00PM EST tomorrow. All winners will be announced on the Whimsy Inspirations blog after 12.00PM EST on 23 November.

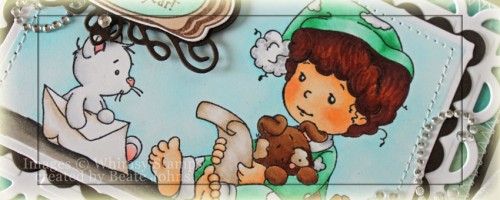
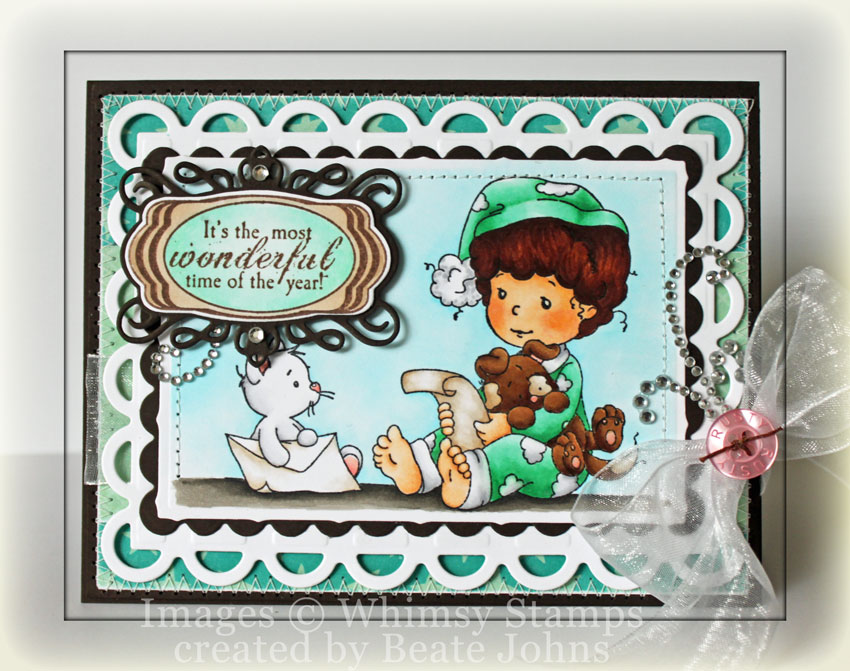
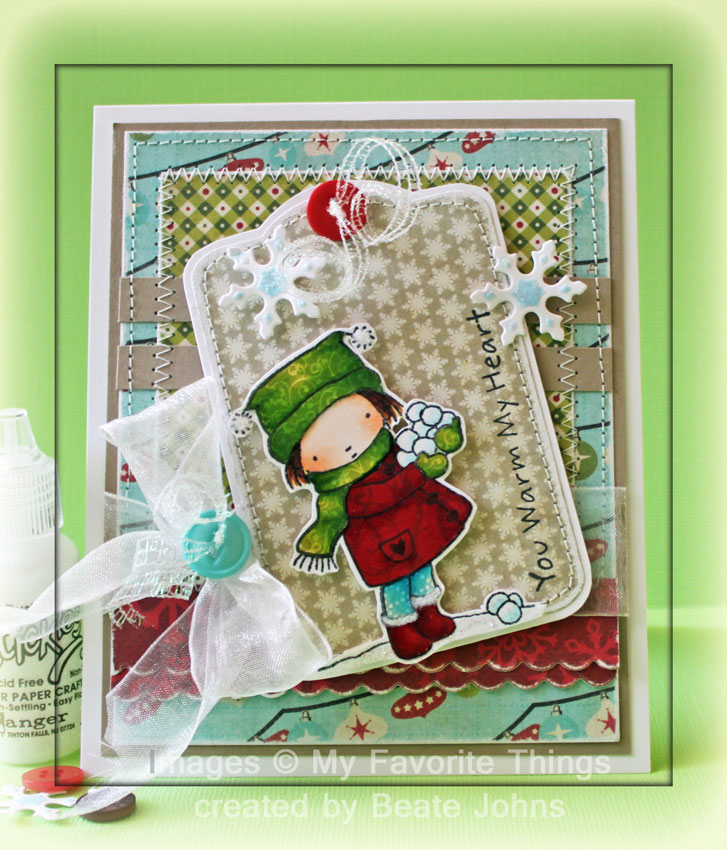
Here is another card I created it for one of the VSN challenges last week. I made with a newly released Wee Stamps called A Letter to me.

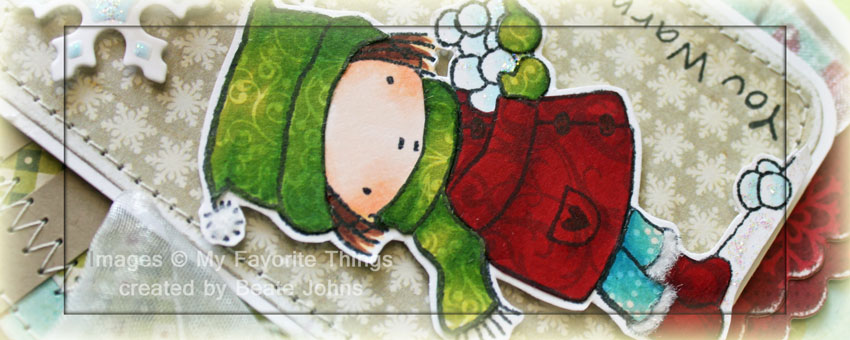
The image was stamped in Tuxedo Black Memento Ink on Neenah Solar White Cardstock. It was colored with Copic Markers ( (Jammies: G000, G00, G02, C00, N0, N1 Kitty: C00, N0, N1, R20, R21 Puppy: E55, E57, E59, E40, E42 Letter, Envelope: E40, E41, E42 Skin: E50, E51, E53 Hair: E99, E39, E29   Ground: W3, W5, W7) and cut out and embossed with the Spellbinders Scallop Frame die.

The image was airbrushed with Copic Marker B000 and stitched to a piece of Canyon Brown cardstock, cut and embossed with a Long Scallop Rectangle die. The layers were adhered to the rest of the Scalloped Frame.


A 2″ x 5 1/4″ piece of Holly Jolly Christmas Echo Park was adhered to a 4″ x 5 1/4″ piece of the same paper pack. The paper was stitched to a 4 1/4″ x 5 1/2″ piece of Canyon Brown Cardstock . White Organdy Ribbon was tied around the horizontal paper and a pink button was tied on with brown waxed Linen.

The image was adhered over the layers with dimensionals and all layers were adhered to a 5 1/2″ x 8 1/2″ piece of Canyon Brown cardstock, folded in half (so you don’t see the stitching and the ribbon on the inside of the card).

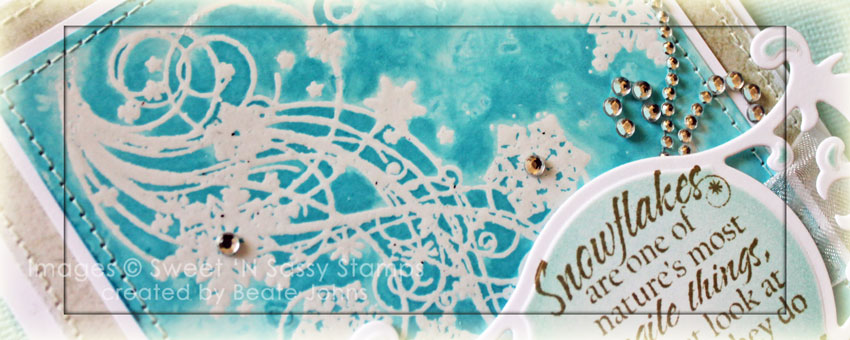
A sentiment from the new Winter Notables Stamp set was stamped in Tuxedo Black on Solar White cardstock. It was cut out and adhered to a piece of Canyon Brown cardstock cut with the new Elegant Notables die. Parts of  a Finesse Rhinestone Swirl and a couple Baby Bling Rhinestones finish off the card.

To take a peek at today’s fabulous new release creations, please click on the links below…

Debbie Eastman
Deb Routledge {Special Guest}
Ellie Stover
Erin Bailey
Simonne Clay
Stephanne Maraver
Sylvia Blum  

Remember that the entire new release is available to buy right now from the Whimsy Stamps store along with all your Whimsy favorites.

Thanks so much for stopping by! Have a wonderful day!
Hugs and smiles

One of last weekend’s VSN challenges was to create a card with the Salted Background Technique. That was the perfect time for me to create a a video for that technique.

I had received the newest order from Sweet ‘n Sassy Stamps latest release. I knew I wanted to use the gorgeous Snowflake Swirl image for that technique. I embossed the Swirl and a few snowflakes on a 3 1/2″ x 4 1/2″ piece of Glossy Cardstock Tumbled Glass Distress Re-inker was brushed over the cardstock, rock salt was sprinkled over it and the cardstock was misted with water. After the background dried, it was adhered to a 1/4″ bigger piece of Neenah Solar White cardstock.

A 4 1/4″ x 5 1/4″ piece of MME Lost & Found 2 Sunshine paper was sanded and the edges were stitched. The salted background layers were adhered to the paper.

A sentiment from the Snowflake swirl was stamped in Frayed Burlap on a piece of Neenah Solar White cardstock that had been cut and embossed with a Fancy Tags 3 die. The embossed parts were sponged with Tumbled Glass ink.

White Organdy Ribbon was threaded through the tag and tied around the layers. The bow was topped with a button that was tied on with silver curling ribbon.  The layers were adhered to the card base, a 4 1/2″ x 11″ piece of white cardstock folded in half. Baby Bling and parts of a Finesse Rhinestone swirl finish off the card.


Here is a video for the visual learner:

[youtube]https://www.youtube.com/watch?v=ULQ1XTRI304[/youtube]

Thanks so much for stopping by! Have a wonderful day!

Hugs and smiles

Here is another card I made for one of the VSN challenge. I combined it with last weeks MFT sketch. For my card I picked the Pure Innocence set called Snow Day. I stamped the image in Tuxedo Black Memento Ink on Neenah Solar White cardstock as well as different patterned paper from Echo Parks Season’s Greetings. The image and clothes pieces were colored with Copic Markers (jacket/boots: R17, R29, R39   Hat: YG21, YG25, YG17   Pants: B000, B12, B14    Hair: Y23, E25, E29    Skin: E0000, E00, E01) cut out and assembled.

A piece of Season’s Greetings paper was cut with MFT’s Tag die-namic die. The edges were sanded before the paper was stitched to a piece of Solar White cardstock. A sentiment from Snow Day was stamped on the right edge in Tuxedo Black Ink. The paper pieced image was adhered to the tag with dimensionals. Sugar Sparkly Fluff was added to the pom poms of the hat and the rims of the boot. Stardust Stickles was added to the snowballs.

Two 4″ long strips of Season’s Greetings were cut with the Small Scalloped Border Die-namics die, sanded and adhered to a 4″ x 5″ piece of the same paper pack.  a 3 1/4″ wide patterend paper was adhered on top of the blue paper and two 3/8″ wide Kraft strips were adhered to the papers before they were stitched to a 1/4″ bigger piece of Kraft cardstock.

White Organdy Ribbon was tied above the red strips and topped with a blue button, which was tied on with iridescent curling ribbon. Before the tag was adhered to the layers with dimensionals, a button was tied to the top with more curling ribbon.

Solar White cardstock was cut and embossed with a Snowflake Borderabilities die. The snowflakes were airbrushed with Copic Marker B02. The snowflakes were adhered to the layers with dimensionals. The airbrushed parts of the snowflake were covered with Stardust Stickles. Everything was adhered to the card base a 4 1/2″ x 11″ piece of white cardstock, folded in half.

Thanks so much for stopping by! Have a wonderful day.
Hugs and smiles

I created this card a while back for Lydia’s VSN challenge. The were to be inspired by the Texas flag. I used it’s color and layout of the flag to create my card.

The patterned paper is from Cosmo Cricket Odds & Ends Patterned Paper . The border die is from the Floral Accent die pack. The sentiment is from Verve’s Fabulous You. the sentiment was stamped in Rich Cocoa Memento Ink on Neenah Solar White cardstock. It was cut and embossed with a Fancy Tag Two die. The center was sponged with Antique Linen Distress ink and Baby Bling Pearls were adhered under the sentiment. The layer was adhered to a Fancy Tag 2 Nestaboard. Three little blue flowers were attached to the lower left of the sentiment panel.

Silk Ribbon was tied around the top layers and topped with a button. A pearl swirl was adhered to the upper right hand side. The layers were adhered to the  card base, a 4 1/4″ x 11″ piece of Kraft cardstock folded in half.

Thanks so much for stopping by! Have a wonderful Sunday.
Hugs and smiles

This weeks  “From the Archives Tutorial” was Faux Leather with Masking Tape. It was a challenge at the VSN last week and I thought I better give the tutorial a make-over before that.

Masking tape was adhered to a 3 1/2″ x 4 3/4″ piece of white cardstock, sponged with Vintage Photo Distress ink and embossed with clear embossing powder. A 2″ x 4 11/16″ strip of October Afternoon Campfire paper was ahdered over it before the layers were stitched to a  3/16″ bigger piece of white cardstock. Linen thread was wrapped around the horizontal layer and was topped with an October Afternoon button. Two more OA buttons were stitched to the top left screen, along with a button from my Mom’s creation.

The sentiment is from Waltzingmouse Stamps set Back in the Saddle. It was stamped in Brilliance Coffee Bean ink on white cardstock. It was cut and embossed with a classic Circle Nestabilities die. The center was sponged with Antique Linen Distress ink. The rodeo cowboy image from the same set was stamped in the center of the circle with Antique Linen ink. The image was layered on a piece of Canyon Brown cardstock, cut and embossed with a Beaded Circle Nestabilities die.

The layers were adhered to the card base, a 4 1/4  x 11″ piece of Sno cone cardstock . A border was paper pierced around the image layers.

Here is a video for the visual learner:

Thanks so much for stopping by! Have a wonderful day.
Hugs and smiles

Last week was a Mini VSN going on on Splitcoast. The first challenge was to create a card with a banner or pennant on it. That made me get out the MFT Ala mode All-Star image.

The image was stamped on Neenah Solar White cardstock in Tuxedo Black Memento Ink, cut and embossed with Classic Oval Nestabilities die and colored with Copic Markers (Shoes and Shirt: R24, R27, R39,    Pants: B12, B14,    Hair: YR31, E31, E33,     Flag: Y13, Y15, Y17, E23, E25, E27,     Grass: YG11, YG13, YG17). The Pennant was stamped again on My Mind’s Eye Six by Six Everyday Flair patterned paper, colored with Copic Markers Y13, Y15, Y17), cut out and adhered over the main image.

The image was masked, a couple of cloud masks were added and the oval was airbrushed with Copic Marker B04. The layer was adhered to a piece of black cardstock that had been cut and embossed with the largest Beaded Oval Nestabilities die. Silver Baby Bling Rhinestones from Want2Scrap were adhered between each beaded oval.

White cardstock was cut and embossed with the smallest of the small Petite Oval Nestabilities die. The oval was sponged with Scattered Straw Distress ink. A sentiment from the same set was stamped in Tuxedo Black Memento Ink. Silver Rhinestones were adhered underneath the sentiment.

The card base was cut and embossed out of Neenah Solar White cardstock with one of the Grand Label 11 Nestabilities die. The next smaller die was used to cut and emboss patterned paper from the MME 6×6 paper pack. White organdy Ribbon was tied around the patterned paper layers before the layers were adhered to the card base.  The image and sentiments layer were adhered to the card base with dimensionals.

Thanks so much for stopping by! Have a wonderful day!
Hugs and smiles

© 2012 fresh & fun Suffusion theme by Sayontan Sinha