I created this card back in March for a Way to Use it Challenge on Splitcoast. The challenge was to use Felt on your project.

I started by cutting two pieces of white felt with the Rolled Roses Die-namics die. A Daisy and leaves were cut out of yellow and green felt with the Upsy Daisy Die-namics dies. For the sentiment panel I cut a piece of Cork with the biggest of the Layered label Die-namics die. With the smallest of those label dies a piece of Neenah Solar White cardstock was cut. That smaller label was stamped with a sentiment from the Framed Greetings stamp set in Tuxedo Black Memento Ink. Small light green Hero Arts Pearls were adhered underneath the sentiment.

The card base is a 4″ x 12″ piece of Kraft cardstock folded in half. The bottom corners were rounded before a 1/4″ smaller piece of Echo Park Springtime paper was stitched to it. After the label and flowers were adhered to the card base, a white Pearl swirl was adhered above the sentiment panel to finish off the card.

Thanks so much for stopping by! Have a wonderful day!
Hugs and smiles

Last week I created a video for the Criss-Cross card tutorial. This is the sample I used for the video.

The card base was created out of Kraft cardstock. . Two 3 1/2″ x 4 3/4″ pieces of Echo Park Playground paper where cut diagonally. They were stitched to Neenah Solar White cardstock. A 3 3/4″ x 5″ piece of white cardstock had been cut diagonally as well.

The white cardstock for the belly band is 2 1/4″ wide, the orange Echo Park Playground paper 2″.  The strips were 11″ long and after stitching scored at 4 3/8″ and 9 3/4″. White May Arts Silk Ribbon was tied around the belly band.

The image is from the My Favorite Things One Sweet Chick. It was stamped on Solar White cardstock in Tuxedo Black Memento Ink and cut and embossed with a Classic Oval Nestabilities die.  The image was stamped again on the green patterned paper from Playground. The dress was cut out and adhered to the main image. It was colored with Copic Markers (Chicks: Y02, Y06, Y08, W1   Egg Shell: W00, W1, W2   Dress: YG21, W02   Shoes: E0000, E41, E42, E43, E44   Skin: E000, E01, E11   Hair: E33, E25, E29, E49   Heart in hair: YR15, YR09, R08   Grass: YG01, YG03, YG17, YG67   Sky: B0000, B000).

The image was adhered to a piece of Canyon Brown cardstock, cut and embossed with the one of a Scallop Oval Nestabilities and the edges were paper pierced. The sentiment is also from One sweet chick. It was stamped on Solar White cardstock and cut and embossed with a Petite Oval Nestabilities die. The embossed center was colored with Copic Marker B0000.

The insert of the card measures 4″ x 5″ piece of white cardstock. The top corners were rounded with my Corner Chomper.  A half circle was punched out of the orange Playground paper with a 1 3/8″ circle punch. It was layered on a half scallop circle cut out of Kraft cardstock.

A 1 3/8″ x 4″ strip of green patterned Playground paper was stitched to 1 9/16″ x 4″ piece of cardstock and adhered on
the lower end of the card insert. The single chick from the stamp set was stamped on Solar White cardstock, punched out with a 1″ circle punch and colored with Copic Markers. It was adhered to the right side of the strip to finish off the insert.

Here is a video for the visual learner:

[youtube]https://www.youtube.com/watch?v=5L0MzjqZ5sw[/youtube]

Thanks so much for stopping by! Have a wonderful day.
Hugs and smiles

As soon as I saw this darling image for the first time, I ran to the MFT store and ordered it right away. How cute can it get?

When  Jenn and decided to  cyber stamp yesterday, I knew it was the perfect time to get this set out. Okay..the brown isn’t quite orange….but it was an inspiration challenge. I like to take challenges as starting points to get me going and then…who knows where the card ends up. LOL

I stamped the image in Tuxedo Black Memento ink on Neenah Solar White cardstock and colored it with Copic Markers (Bee costume: Y13, Y15, Y17, E08, E07, E19,    Hair: N5, N7, N9,    Skin: E000, E01, E11,    sky: B0000, B000,    Wings: BG10, BG11). The image was cut out with a Classic Rectangle Nestabilities die. MME Stella & Rose Gertie Paper was cut with MFT’s Grass Die-namics die and adhered to the bottom of the rectangle. Stardust Stickles Glitter was added to the wings of the image.

Since I was using a My Favorite Things image I thought I would use the card sketch from their weekly sketch challenge for my card. I was struggling with it for a bit until a way to make the layers look right for me.

For the layers I used patterned paper from MME Stella & Rose Gertie and Mabel paper pack. The bottom layers along with some white Melissa Frances Ribbon were stitched to the card base, a 4 1/4″ x 10″ piece of Neenah Solar White cardstock, folded in half. The bottom corners were corner rounded.

The sentiment is from MFT’s Peek A Boo set. It was stamped on a piece of Solar White cardstock that had been cut and embossed with Petite Oval Nestabilities and colored with Copic Markers (Y00, Y11, Y13). Recollection flowers (with some added Stardust Stickles) and Recollection Rhinestone swirls finish off the card front.

We might be cyber stamping some more tonight. Check in on facebook and hang out with us. Hugs and smiles

Eva Doblias is hosting a Blog Linking party today. Create any project with a butterfly and link it back to her blog! How fun is that.

I created my card yesterday morning before heading to my class at Simply Scrapbooks. I think I might have fiddled with the card if I had a bit more time. Maybe some ribbon, maybe some pears….but I almost was late as it was finishing the card.  I had seen this purse on the Fossil website, the site for yesterday’s inspiration challenge, and created the background based on the purse. The layout is from a Sketch Challenge Iwona is hosting.

For the background I cut different pieces from Echo Park’s Springtime paper with Classic Oval and Circle Nestabilities, adhered them first to a 2 1/2″ x 3 3/4″ piece of Neenah Solar White cardstock. That was adhered to a piece of Canyon Brown cardstock that had been cut and embossed with Long Scallop rectangles before the edges of the Echo Park paper pieces were stitched for decoration.

A 3 3/4″ x 5″ piece of Springtime paper was stitched to a  3/16″ bigger piece of Canyon brown cardstock before it was adhered to the card base, a 5 1/2″ x 8 1/2″ piece of Solar White cardstock, folded in half.

One of the butterfly from My Favorite Things Inspired By Butterflies set was stamped in Walnut Stain Distress ink and then embossed with Walnut Stain Distress Embossing powder.The butterfly was cut out and adhered with dimensionals to the stitched panel.

The sentiment is also from MFT’s Inspired by Butterflies set. It was stamped in Walnut Stain ink on a 5/8″ wide strip of white cardstock. The strip was bend into a banner and adhered with dimensionals and Scor-Tape. A mini paper clip as added as embellishment.

Thanks so much for stopping by! I hope you have time to play! Who doesn’t love butterflies! Have  a wonderful Sunday!
Hugs and smiles

I created this card for one of the VSN challenges last weekend. For this one you should Mash two techniques together. I picked paper piercing and dry embossing.

For my image I chose one of Mo Manning’s little Fairies. She was printed on Neenah Solar White paper and cut and embossed with Petite Oval Nestabilities dies. The image was colored with Copic Markers (Dress: Y32, Y17, YR15, YR18,    underpants: R20, R21, R22,     Crown and Wand: Y11, Y13, Y15, W2,     Hair: YG21, YG23, YG25,     Skin: E50, E51, E53,    Background: BG0000, BG0000), layered on a piece of black cardstock cut with Scallop Petite Oval Nestabilities and the edges of the image were paper pierced. Clear Spica pen was used to add a subtle sparkle to her crown, wand and wings.

Two 3 3/4″ long strips of the yellow Echo Park Springtime paper were punched with a border punch from Stampin’ Up. They were adhered to a 3 3/4″ x 5″ piece of orange paper from the same paper pack with a piece of pink Springtime paper in between. The paper was dry embossed with Tim Holtz Retro Circles Embossing folder and stitched to a 3/16″ bigger piece of black cardstock.

1/2″ green silk ribbon was tied around the layers and topped with a Rhinestone Recollection brad. A sentiment from My Favorite Things Clearly Sentimental about you stamp set was stamped in Tuxedo Black Memento Ink on Neenah Solar White cardstock and cut and embossed with the small tag of the Tag Trio die set. It was tied to the brad with Iridescent May Arts Curling Ribbon.

The card base is a piece of 4 1/4″ x 11″ Pink Pirouette paper folded in half. Recollection Rhinestone swirls finish off the card.

Thanks so much for stopping by! Have a wonderful day.
Hugs and smiles

I absolutely adore this image from Mo’s Digital Pencil. It’s called Wonderful Day. It was so much fun to color. Usually I color my sky in really light colors, but Jenn suggested to try some darker colors to imitate Texas sky. I love how this turned out.

I printed the image out on Neenah Solar White cardstock and cut it with a Classic Square Nestabilities die. Next I colored her in with Copic Markers ( headband, pants cuffs: Y32, Y17, YR15, YR18, Jeans: B0000, B91, N3, Hair: E99, E19, E29, Shoes: N1, N3, N5, N7, Skin: YR0000, YR000, YR00, YR01, Shirt: YG23, YG25, YG67, R20, R21, R22, Ground: YG11, YG13, YG17, W2, Sky: B0000, B000, B01, B12, B14). The image was layered on a piece of Canyon Brown cardstock that had been cut and embossed with Classic Scallop Square Nestabilities.

Four 2 1/4″ squares were cut out of Echo Park Springtime Paper. On two of them one corner was rounded before they were stitched to a 4 3/4″ square of Canyon Brown cardstock. The two bottom corners were rounded as well.

May Arts Organdy Ribbon was tied around the center of the layers before the layers were adhered to the card base, a 5 1/4″ x 10 1/2″ piece of Textured Whisper White cardstock folded in half. Again the bottom corners were rounded.

The sentiment is from My Favorite Things Clearly Sentimental About You. It was stamped in Tuxedo Black Memento Ink on Solar White cardstock, which was cut and embossed with Tag Trio die.  Silver curling ribbon was used to tie the tag to the bow. Silver Recollection Pearls finish off the card.

Thanks so much for stopping by! Have a wonderful day.
Hugs and smiles

I had last week’s MFT Sketch laying on my desk since it was posted. I knew I wanted to make a card for it today! So when I saw the Technique Challenge on SCS I combined them along with MFT’s Guest Designer Challenge for February.

I started out stamping Jolinne (My Heart Sings) in Tuxedo Black Memento Ink on Neenah Solar White cardstock. I cut it out with  Circle Nestabilities and the Out of the Box technique and colored it with Copic Markers (Hair: E99, E39, E18, Skin: E0000, E00, E01, Pants: B91, B93, B95, Shirt: R81, R83, R85, Shoes: N0, N1, Ipod: N1, N3, N5, Board: E31, E33, E37, Coat: R27, R29, R39). The background was airbrushed with Copic Marker B91.

I piece of Cherry Cobbler cardstock was cut and embossed with Scallop Circle Nestabilities. The edges were colored with Copic Marker R39 to make it darker and match the image. The image was adhered to the scallop circle and the edges were paper pierced.  The layers were then adhered to a piece of Early Espresso cardstock that had been cut with the Dainty Lace Doily Dienamics die.

Today’s technique challenge is all about embossing. We are supposed to emboss a piece of paper first with an embossing folder, then heat emboss the raised image. I chose a 3 3/4″ x 5″ piece of October Afternoon Homemaker paper and embossed it with ProvoCraft’s Allegro Embossing Folder. Next I brayered over the raised images with Vintage Photo Distress ink and embossed those with Irisdescent Ice Embossing powder (Stampin’ Up!).

The bottom two corners were rounded with the W R Memory Keepers Cropadile Corner Chomper before it was stitched to a 3/16″ bigger piece of Early Espresso cardstock. Burgundy May Arts Organdy Ribbon was tied vertically around the layers. A Making Memory Brad was colored with Copic Marker E49 and attached over the ribbon.

Neenah Solar White cardstock was cut and embossed with a Tag die by Spellbinders. The sentiment from My Heart Sing was stamped in Tuxedo Black Memento ink over the tag. It was airbrushed with Copic Marker R83 and attached to the bow with Silver Curling Ribbon.

To finish off the card I added Silver Kaisercraft Rhinestones on the bottom corners and the sentiment tag.

Thanks so much for stopping by! Have a wonderful day!
Hugs and smiles

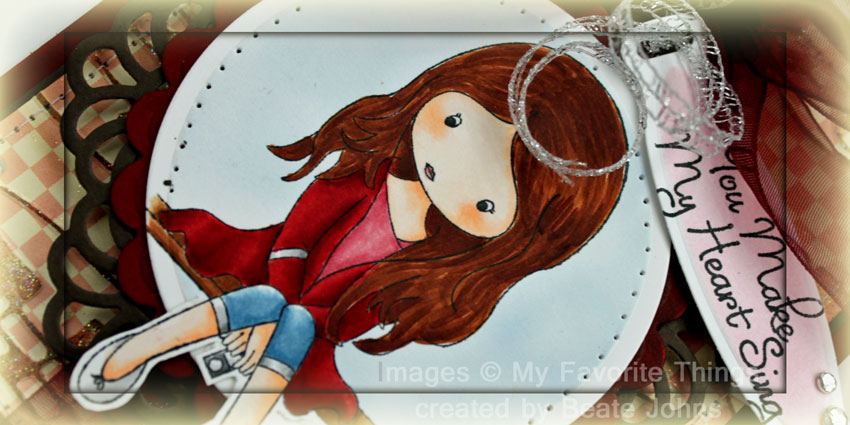
Today’s Featured Stamper on Splitcoast is Sue Walsh, aka Tillymint. Her gallery was so much fun to check out. Her coloring is gorgeous!!! I picked her Gifts Galore card as the card I wanted to case.

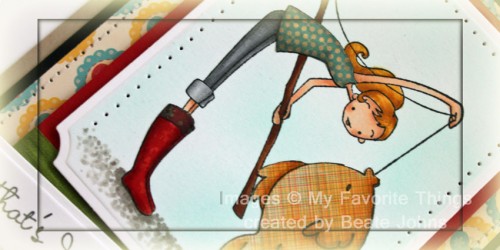
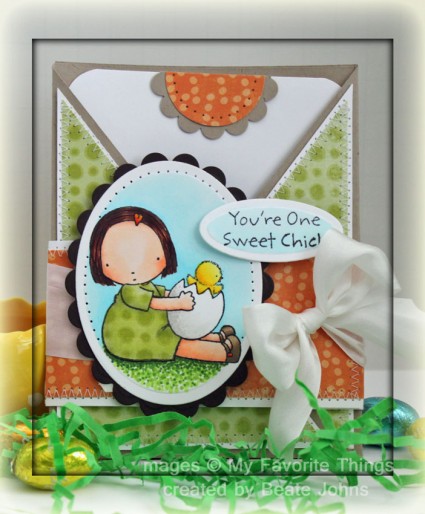
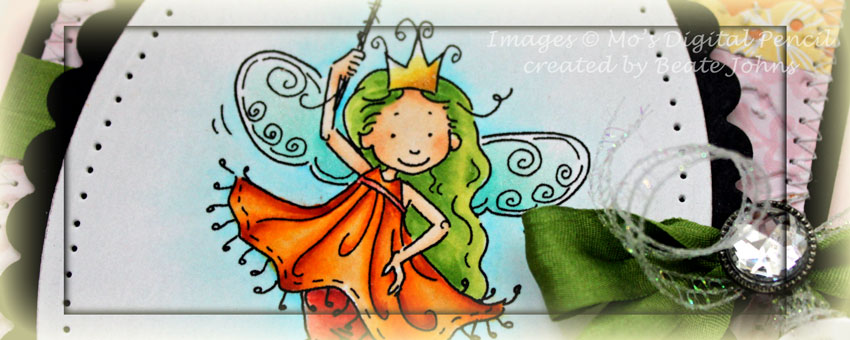
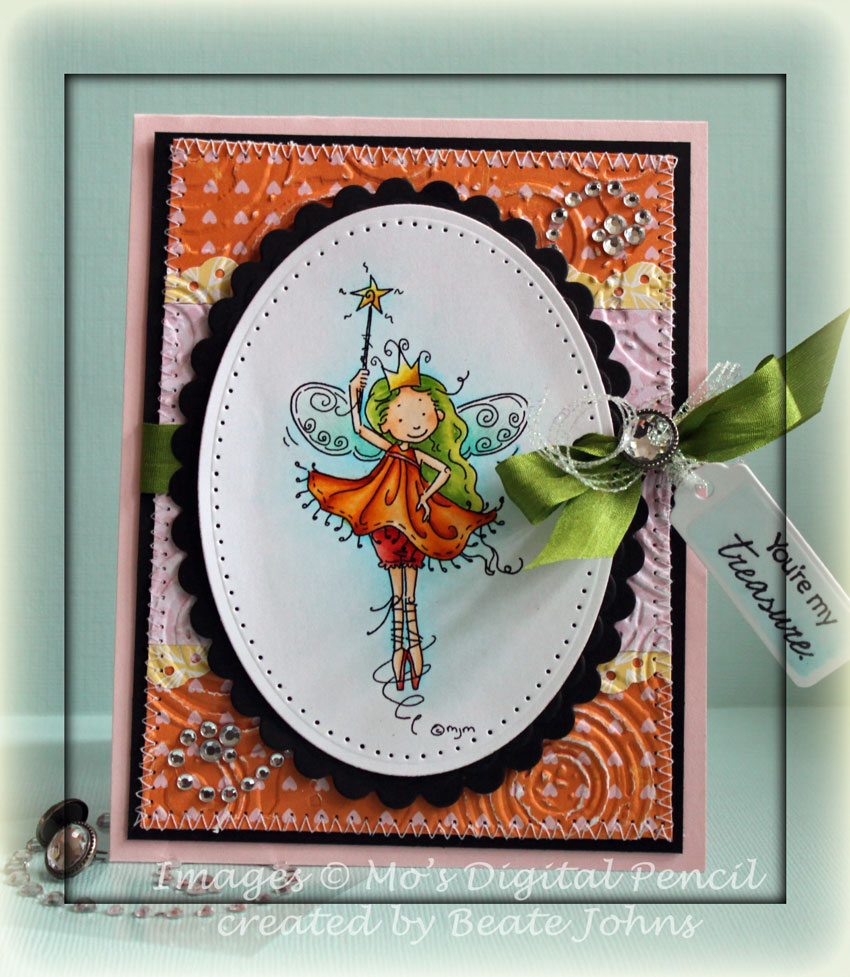
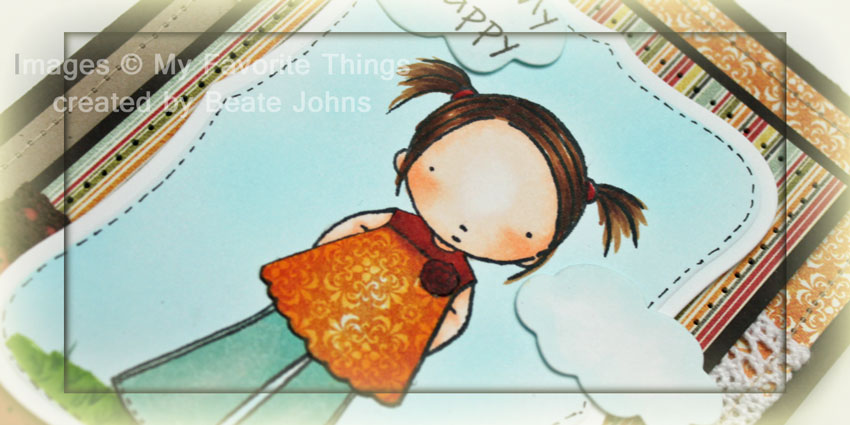
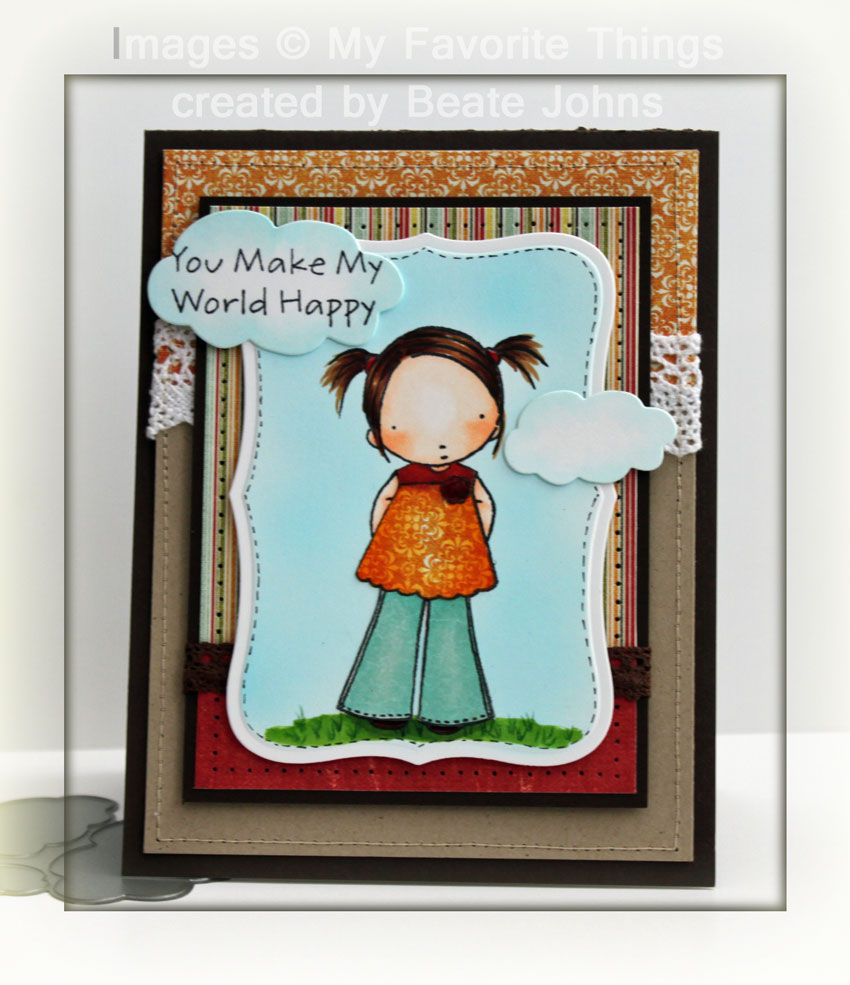
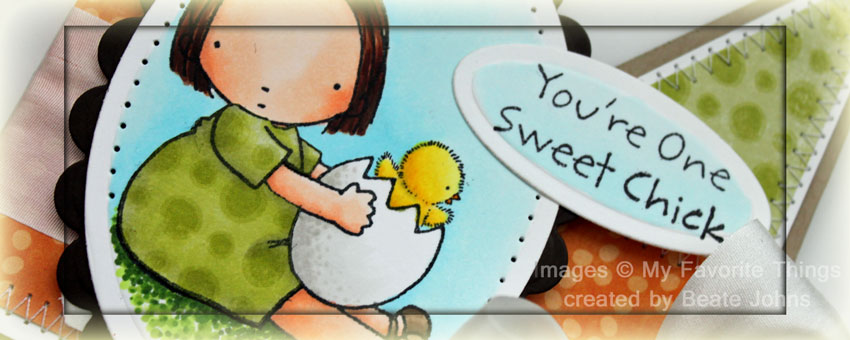
I started out with stamping the image from My Favorite Things Something Fishy in Tuxedo Black Memento Ink on a piece of Neenah Solar White cardstock, cut and embossed with the largest Large Label Die from Spellbinders.

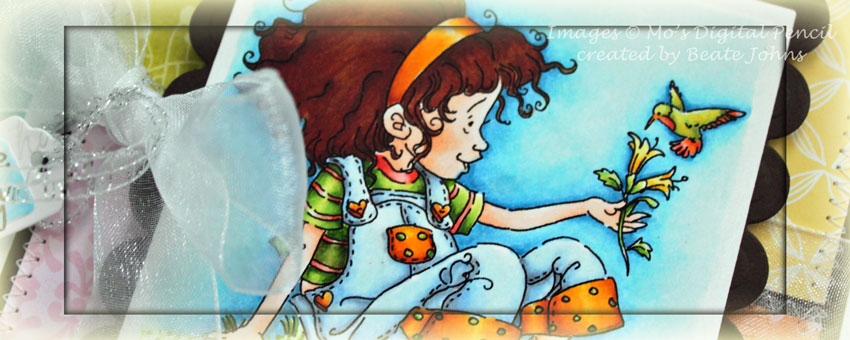
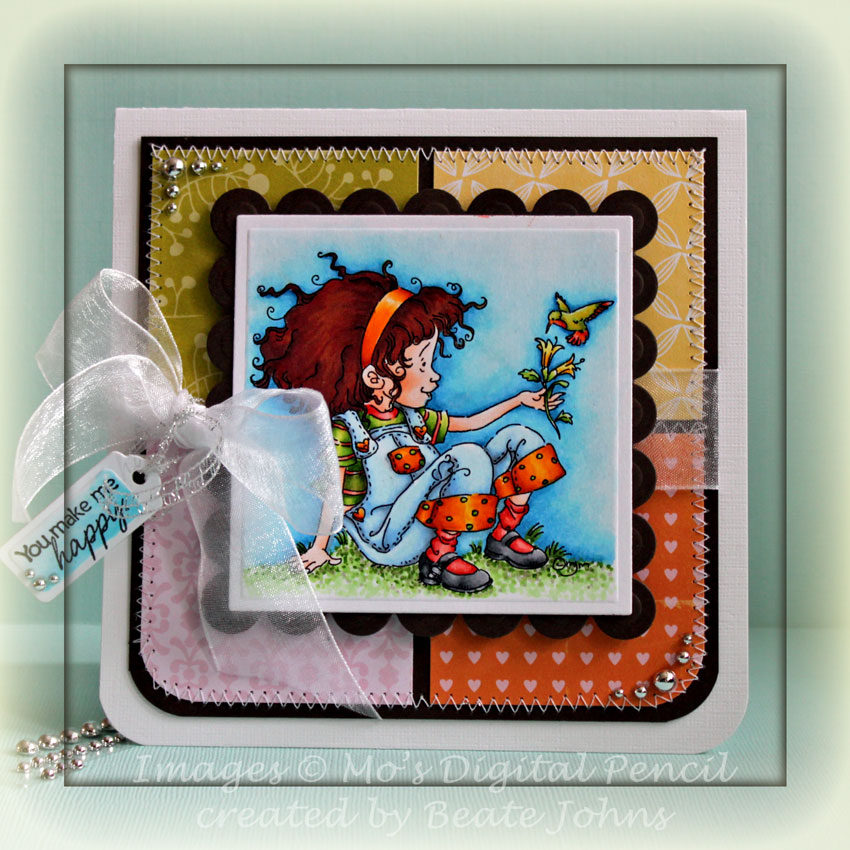
The fish, shirt and boots were paper pieced with paper from Cosmo Cricket Togetherness Paper pack. The rest of the image as well as the paper pieced pieces were colored with Copic Markers (Skin: E00, E01, E11, Hair: YR21, YR24, Boots: R24, R27, R39, Pants: N3, N5, N7, Shirt: N1, N3, Pole: E33, E35, E39, Ground: W1, W3, W4, W5). The background was airbrushed with Copic Marker BG32.

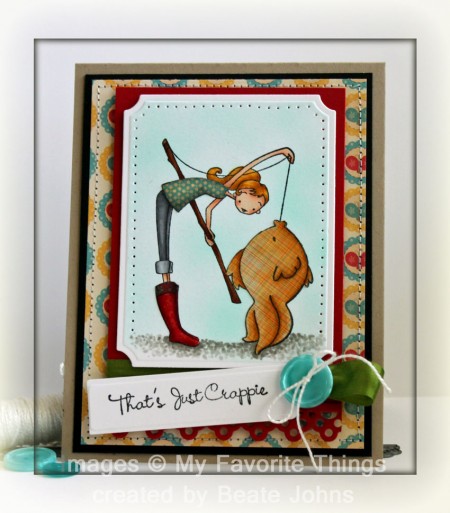
Three sides (all but the ground) were paper pierced before it was adhered to a 3 1/8″ x 4 1/4″ piece of red cardstock. A 3 1/8″ long strip of the same red cardstock was cut with MFT’s Dainty Lace Die-namics Border die and adhered right under the red rectangle.

The sentiment is from the same set. It was stamped in Tuxedo Black Memento Ink on a piece of Solar White cardstock, cut and embossed with a Spellbinders tag die. 1/2″ wide olive Silk Ribbon was taped around the bottom of the edge of the red layer. A little loop was tied off the right hand side with embroidery thread and topped with a Cosmo Cricket Button. The tag was tied around the ribbon along with the button.

The card base is a 4 1/4″ x 11″ piece of Kraft cardstock folded in half. A 3 3/4″ x 5″ piece of Togetherness paper was stitched to a 3/16″ piece of Basic Black cardstock before those layers were adhered to the card base. The image layers were adhered on top of that with dimensionals.

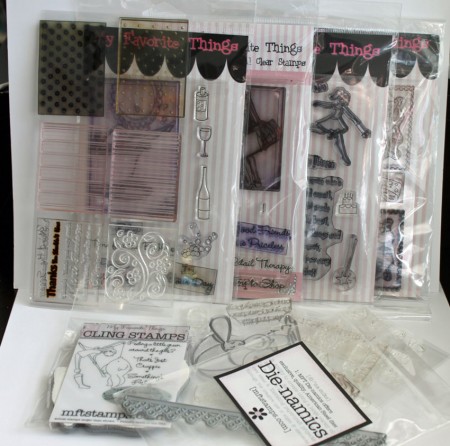
Now to the Fresh and Fun Freebies. I haven’t given away blog candy in quite a while. Last time I ordered from My Favorite Things, I goofed and ordered an extra Something Fishy as well as an extra Dainty Lace Die by mistake. I am adding a few older MFT sets (5 big sets, 3 small ones)  to the blog candy.

All you have to do to qualify to win is add your name to the Mr. Linky underneath. I will pick a winner on Tuesday around 6 p.m. EST.

Hint for visitors that don’t have a blog:

You can still sign up, just use the direct address for your splitcoaststampers member gallery (https://splitcoaststampers.com/go/username). Substitute the username in the url with your own username.

If you are not a member of Splitcoaststampers yet, it’s easy and free and you can find so much inspiration there. Click here to get started.

Thank you so much for stopping by! Have a wonderful day! Hugs and smiles

I created this card for last weeks My Favorite Things sketch challenge as well as one of the VSN mini challenges. The challenge was to paper piece an image and have at least two parts of the image paper pieced.

I chose the Pure Innocence stamp Being Cute is What I do.  I stamped the image with Tuxedo Black Memento Ink on Express It! Blending Card and cut and embossed with Label 8 Nestabilities. The image was stamped three times on Pink Paislee 365 degree paper. Once for the shirt, once for the pants and once for the rose on the shirt.

The main image as well as the paper pieces were colored with Copic Markers (Shirt: Y35, Y38, R27, Rose: R27, R39, pants: BG10, BG11, Hair: E35, E25, E29, Grass: YG25, YG17, Skin: E0000, E00, E01),  a border was doodled on the edge of the cardstock, the paper pieces adhered to the main image and the background airbrushed with Copic Marker BG01.

A 1″ x 3 1/8″ piece of 365 Degree paper was adhered over a 3 1/8″ x 4 1/4″ piece from the same paper pack.  The paper was adhered to a 3/16″ bigger piece of Canyon Brown cardstock. the edges were paper pierced and  Webster’s Pages trim was adhered over the horizontal strip. The image was adhered over it with dimensionals.

Clouds were cut with the Cloud Die-namics die. The edges were colored with Copic Marker BG. The medium sized cloud was used to hold the sentiment from the same stamp set. The medium and small cloud were attached to the image layers with dimensionals.

A 1 3/4″ x 3 15/16″ piece of 365 Degree paper was adhered to a 3 15/16″ x 5 3/16″ piece of Kraft cardstock. Lace was adhered over the horizontal layer and a border was sewn to the edges of the layer. The layers were adhered to the Canyon Brown cardbase, which was a created out of a 4 1/4″ x 11″ piece. The image layer was adhered to the card base with dimensionals.

For the inside of the card a 1″ x 3 15/16″ piece of the patterned paper was stitched to a 3 15/16″ x 5 3/16″ piece of Kraft cardstock. A border was stitched around the edges. Another sentiment from the stamp set was stamped to the largest of the clouds and adhered to the inside of the card with dimensionals.

Thanks so much for stopping by! Have a wonderful day! Hugs and smiles

For today’s “Tutorial from the Archive” in the Weekly Inkling I picked the Pull Treat Tutorial. It’s a great project to give away small treats on Valentine’s Day.

I stamped Pure Innocence‘s Bunch of Blossoms in Tuxedo Black Memento Ink on Neenah Natural White cardstock and cut and embossed it with Petite Oval Nestabilities. I stamped the girl again on October Afternoon Thrift Store paper, cut out the dress and shaded it with Copic Markers (E74, E77).

The rest of the girl was also colored with Copic Markers (Shoes: E74, E77, Ground: E70, E71, E73, E74, Flowers: R32, R35, Hair: YR31, Y26, E97, Butterfly: YR31, R32, R35) and the oval was airbrushed with Copic Marker B91. The dress was paper pieced over the colored image.  Stardust Stickles was added over the butterfly for some extra sparkle.

The Treat pouch base was created out of a 6″ x7″ piece of October Afternoon’s Daydream Paper, the Belly Band is the same paper (other side) measuring 2 1/2″ x 6″. May Arts Crochet Lace was wrapped around the bottom edge of the Belly Band.

The image was layered on a piece of Neenah Canyon Brown cardstock and adhered to the pouch with dimensionals. The hole for the ribbon was punched with Stampin’ Up!’s ribbon slot punch. The ribbon is Brown Organdy ribbon by May Arts. The bow was aged by heating it with my heat gun.

The sentiment is from the same stamp set. It was stamped on a tag cut with retired Spellbinder tag and airbrushed with Copic Marker YR31. A Recollection flower was colored with Copic Marker R32 and layered on top of a Prima Flower before both were attached over the tag. Recollection Rhinestone swirls finish off the Pull Treat.

Pull Treat Video Tutorial:

[youtube]https://www.youtube.com/watch?v=no-hDWEmcFE[/youtube]

Paper Piecing Video Tutorial:

[youtube]https://www.youtube.com/watch?v=aDQObTxqQjI[/youtube]

Thanks so much for stopping by! Have a wonderful day! Hugs and smiles

© 2012 fresh & fun Suffusion theme by Sayontan Sinha