Taylored Expressions is hosting a Holiday Hoopla today and I’m excited to be a part of it. You should have arrived here from Sankari‘s blog.  If you didn’t (or if you get lost along the way) you can head back to the beginning at Taylor’s blog for the full list of participants. There are 22 designers showcasing Christmas/Winter/Holiday stamps sets from TE with samples that include all sorts of projects from cards to gifts and beyond!  We want to inspire you to get your holiday crafting and card making into high gear!  Be sure to stick with me all the way to the end of the post to get a coupon code for 25% off holiday stamp sets at Taylored Expressions!


The set I’m showcasing is Tag You’re It. It’s great to create fast Christmas gift tags.

For my sample I wanted to show a quick and easy gift idea with Taylor’s Tag You’re Are It! stamp set. I stamped the Penguin tag in Tuxedo Black Memento Ink on Neenah Solar White cardstock. The image was cut out and colored with Copic Markers (YG61, YG63, R08, R27, R29, YR15).

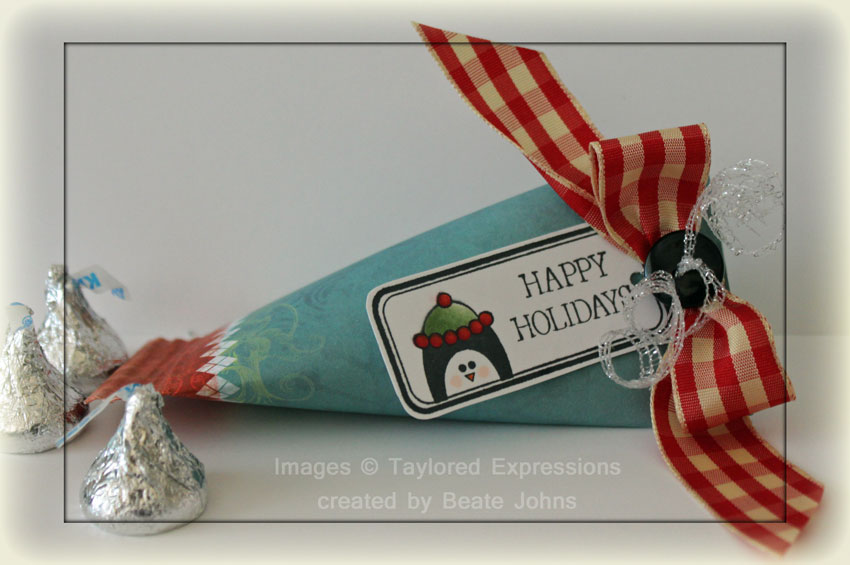
A sour cream container was created with a 4 1/2″ x 5″ piece of Bo Bunny Blitzen paper. A bow was tied with gingham ribbon with the help of the Bow-Easy. Curling Ribbon was used to tie the tag to the bow and the bow to the container.

Here is a video on how to create a sour cream container for the visual learner:

[youtube]https://www.youtube.com/watch?v=QsgcPQCTe8M[/youtube]

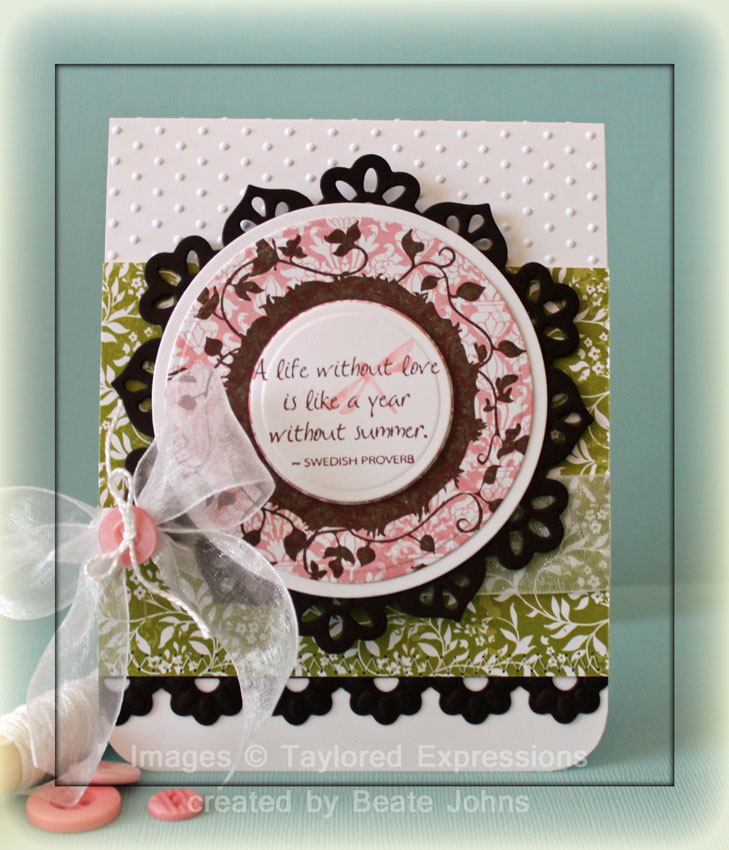
Creating for this hop caused to me to go back and look at some of my previous creations and I wanted to share one of those with you today too.  You can find it here.

Are you getting in the mood to stamp?  Be sure to check out Taylor’s 12 Days of A Handmade Christmas Video Series for lots of easy gift ideas.

Now, who loves a SALE? Use Coupon Code HOOPLA2011 to get 25% off the following holiday stamp sets (released in 2009 and 2010) at Taylored Expressions now through November 2:


Christmas Blessings, Enjoy!, From the Heart, Hangin’ Out –  At the North Pole, Holiday Wonder, Home Sweet Home, Keeping Tabs, Merry Little Cocktail, Penguin Pals, Season’s Sweetings, Sparkle & Cheer, Tag Treats , Tag You’re It, Take Note – Holidays , Wings of Joy, Winter Wonderland.

The coupon code is case sensitive. Follow these instructions to apply the discount to your order:


1. Add the desired stamp sets from the above list to your shopping cart.

2. Insert the coupon code into the Promotional Code box.

3. Click the Update Cart button.  Your discount should now be applied.

4. Proceed to checkout to finalize and submit your order.

Now hop on over to Danielle Lounds for the next sample. Thanks so much for stopping by! Have a wonderful day.
Hugs and smiles

It’s the first of October, that means it’s Breast Cancer Awareness Month. For the second year in a row Splitcoaststampers is hosting at least one challenge a day. We call it Hope You Can Cling To Challenges. We have sponsors and prizes….so head on over there and check it out. We work with a hospital in Austin and ask that all the cards made for the challenges will be sent to that hospital. Last year 2100 cards were sent to that hospital. We are hoping to beat that this year.

Today starts out with a bang and three challenges. Lori, Lydia and I are hostesses. I will blog about my challenge card later next week. Today I want to show you my entry for Lydia’s challenge. Her challenge is to use a pink animal somewhere on your card.

I decided to use Taylored Expressions Summer Afternoon stamp set for that. I started by stamping the frame image in Coffee Archival ink on Victoria Garden Echo Park Paper. It was cut out with a Classic Circle Nestabilities die, layered first on a slightly bigger white cardstock circle, then on a piece of Canyon Brown cardstock, cut and embossed with a Floral Doily Motif die.

A sentiment from the same set was stamped in Coffee ink on Neenah Solar White cardstock and cut and embossed with a circle die. The dragonfly stamp from that set was inked with the Ballerina Pink Watercolor Marker (Inkadinkado) and stamped on the upper right hand side of that sentiment panel. The circle was adhered with dimensionals in the center of the frame.

The card base is a 4 1/4″ x 11″ piece of Solar White cardstock folded in half. The lower corners were rounded and the upper half of the card was dry embossed with a Polka Dot embossing folder.

A 4 1/4″ long strip of canyon brown cardstock was cut and embossed with the border die from the Floral Doily Accents pack. It was stitched under a 3 1/2″ x 4 1/4″ piece of Victorian Garden paper. White Organdy ribbon was tied around the panel and topped with a button. The paper layer was adhered to the card base and the sentiment layers were adhered on top with dimensionals.

I hope you have time to play with us in these challenges. I hope to make at least 15 cards to send to the hospital.

Thank you so much for stopping by! Have a wonderful day!
Hugs and smiles

Today’s tutorial was created by Lisa Somerville. She shows us how to create these darling holders for Test Tubes. What a fun treat idea!!! I had to order me some test tubes right away after receiving the tutorial. Then I went shopping for more Halloween paper, found some glittery tulle and BAM…I was ready. 🙂

A label from Taylored Expressions Fright Night Favors was stamped in Jet Black Archival ink on a piece of Pink Paislee’s Phantom paper. The spider web from Toils & Trouble was stamped over the sides of the label with Shabby Shutter Distress ink. The caution/poison stamps are also from the Toils & Trouble set and were stamped in the center of the labels with Jet Black ink.

The labels were cut out, run through the Xyron machine and adhered to the test tubes. A small strip of glittery black tulle was tied above the labels to finish off the tubes.

The treat holder was created out of black cardstock. I started with a 4″ x 12″ piece of cardstock (instead of the 4 x 11″ as in the tutorial) because Taylor’s Test Tubes were a bit too long for the holder. The rest was done the same as the tutorial. I used a Classic Circle Nestabilities to cut the hole for the tube for a perfect opening (3/4″ circle punch was too small, 1″ too wide).

The mirror from Toil & Trouble was stamped in Jet Black Archival ink on Neenah Solar White cardstock, cut out and sponged with Antique Linen. Then it was stamped again on Phantom paper. The inner oval was cut out, a sentiment from Fright Night Favor was stamped in it’s center and the edges were sponged with Shabby Shuttter. The oval was adhered to the main mirror image and three Baby Bling Black Rhinestones were added to the bottom.

More tulle was tied around the holder and topped with a Halloween brad (last year Michaels). The sentiment panel was adhered next to it.

I hope you guys get to try this tutorial out. It makes the cutest treats. Thanks so much for stopping by! Have a wonderful day!
Hugs and smiles

I should just call the remake of those super old tutorials blast from the past. I wrote the original tutorial back in 2004. It definitely needed a make over! For my Burned Batik sample I chose Taylored Expressions Friendship Blooms stamp set. With it’s big branch and flowers it was just perfect for it.

Images from that set were stamped in Embossing ink on a 2 7/8″ x 3 7/8″ piece of Neenah Solar White cardstock. They were embossed and heated until most of the embossing powder melted away. Then the layer was sponged with Wild Honey, Broken China and Peeled Paint. A bigger sentiment from the set was stamped all over the panel before it was buffed with a piece of cloth. The layer was stitched to a piece of white cardstock that had been cut and embossed with the largest of the Lattice Rectangle Nestabilities dies (sorry, I can’t help myself! I LOVE that die!).

A sentiment panel was cut and embossed out of white cardstock with one of Spellbinders Fancy Tag Three dies. It was sponged with Wild Honey ink and a sentiment from the Friendship Blooms set was stamped in the center with Jet Black Archival ink.

Part of a black Rhinestone swirl was adhered to the upper right hand side before the sentiment panel was adhered with dimensionals. A big black rhinestones were attached on each side of the sentiment panel.

The corners of a 4 1/4″ x 5 1/4″ piece of Home Town Pink Paislee paper were rounded before the layer was stitched to the card base, a 4 1/2″ x 11″ piece of Textured Kraft cardstock folded in half. Each corner of the card base was rounded as well.

Here is a video for the visual learner:

[youtube]https://www.youtube.com/watch?v=3vGAxtRq6yM[/youtube]


Make sure to check out the new tutorial on Splitcoast today. Starla Nelson is showing us how to stamp on Metal.


Thanks so much for stopping by! Have a wonderful day!
Hugs and smiles

I created this card for last weekend’s VSN challenge called ARRRR. The challenge was to create a card with at least three things on there starting with an R. That made me think of the shoe house image from Taylored Expressions Cozy Cottages. It has a Roof! I used Red, round shapes, Rhinestones, Ribbon and the word Road in the sentiment.

I started the card by stamping the image in Tuxedo Black Memento Ink on Neenah Solar White cardstock. The image was cut and embossed with a Classic Circle Nestabilities die and colored with Copic Markers (Shoe: R22, R24, R27, R29, N0, N1, N3, N5, N7   Roof: E23, E25, E27, E29   Grass YG01, YG03, YG17).

Next I placed the circle die back over my image, added a few clouds cut with the Cloud Die-namic Die and airbrushed the sky with Copic Marker B02. The image was layered on a piece of black cardstock, cut and embossed with the next larger Circle Nestabilities die and the edge was paper pierced. The layers were then adhered to a piece of white cardstock that had been cut with the largest of the Eyelet Circle Nestabilities dies.

A 3 1/4″ x 4″ piece of Pebbles Happy Go Lucky patterned paper was adhered to a 4″ x 5″ piece from the same paper collection. The bottom corners were rounded before both layers were stitched to a 1/4″ bigger piece of black cardstock. May Arts Organdy Ribbon was tied around the strip before the layers were adhered to the card base, a 4 1/2″ x 11″ piece of Tempting Turquoise cardstock, folded in half.

A Recollection Rhinestone swirl was cut apart and cut and adhered to the upper right and the lower left hand corner of the card before the image was adhered over it with dimensionals. The sentiment is also from Crazy Cottages. It was stamped in Tuxedo Black ink on Neenah white cardstock and cut and embossed with a small Circle Nestabilities die. The inner part was colored with Copic Markers B0000 and Booo,

Thanks so much for stopping by! Have a wonderful day!
Hugs and smiles


We’re helping Taylor spread the word… she’s expecting a sweet little bundle of GIRL in September! I am so excited for her!

For my sample I decided to make Moka Jenn in a girly theme. You’ll also want to hop around to the rest of the blogs linked below as Taylor will be giving away one stamp set of your choice from the May release to a lucky commenter on one of the blogs! You have through Sunday, May 8th to leave your comments and the winner will be announced on Taylor’s blog on Monday!”

For my card I used the girl from Moka Jenn and the diaper bag from Bringing Home Baby on Neenah Solar White cardstock. The image was cut with Classic Circle Nestabilities and colored it with Copic Markers (Shirt/Diaper Bag: YG00, YG01, YG03   Pants: N0, N1   Shoes: E25, E29   Skin: E50, E51, E53   Hair: E25, E59, E49   Bag: YR31, YR23   Tissue, lamb: RV000, RV00, RV02    Ground: C5, C7, C9   Sky: B0000, B000, B01) .

The image was then layered on a piece of Canyon Brown cardstock, cut and embossed with one of the Floral Doily Motif dies.

The sentiment is also from Bringing Home Baby. It was stamped on Solar White cardstock, cut and embossed with a Fancy Tag 2 die and airbrushed with Copic Marker YR31.

A 5″ wide strip of white cardstock cut and embossed with the border die from the Floral Doily Accents. It was stitched to a 2″ x 5″ strip of Pebbles cardstock.  The two bottom corners of a 5″ square of Pebbles paper were rounded and stitched to a 3/16″ bigger piece of Canyon Brown cardstock.  The strip was adhered over the square and ivory silk ribbon was tied around it.

The image was adhered over the layers with dimensionals and everything was taped to the card base, a 5 1/2″ x 11″ piece of white cardstock, folded in half. Again the bottom corners were rounded. A Recollections Pearl swirl was cut apart and adhered to the card front.

Check out what my friends have done with Taylors new stamps:

Jami
Jenn
Joy
Lori
Sharon
Veronica
Taylor

Thanks so much for stopping by! Have a wonderful day!
Hugs and smiles

Today’s tutorial was a technique challenge recently. Joan Ervin, one of our Technique challenge hostesses, was kind enough to write the photo tutorial for Splitcoast.  I had fun creating this sample for the video tutorial.

The frame from Taylored Expressions New Beginnings was stamped in Walnut Stain Distress ink twice on Solar White cardstock. I cut it once by hand, once with Taylored Dies – Frame it Up 1.  A sentiment from the same set was stamped also in Walnut Stain ink in the center of the hand cut frame. The edge of that frame was paper pierced and adhered to the bigger frame with dimensionals.

A butterfly was stamped in Tumbled Glass ink on the light blue Springtime paper, cut out and adhered to the sentiment panel with dimensionals and Scor-Tape. Three Recollection silver pearls were adhered to the body of the butterfly. The wings were covered in Stardust Stickles.

The rose image is also from New Beginnings. It was stamped in Rich Cocoa Memento ink and was colored with Copic Markers (RV10, RV13, RV14, RV17). A branch is from TE’s Friendship Blooms stamp set.  It was stamped in Shabby Shutters ink, cut with the Leafy Branch Taylored Die and adhered partially under the smaller frame. The rose was adhered over the branch.

For the Bargello background I used Echo Park Springtime and Little Girl papers. It was down to 4″ x 5 1/4″ and the lower corners were roundedWhite Organdy Ribbon was tied around the middle before the layers were adhered to the card base, a 5 1/2″ x 8 1/2″ piece of Solar White cardstock, folded in half. Again the lower corners were corner rounded. Silver Recollection Pearls on the top left of the Bargello layer finish off the card.

Did you notice that I didn’t sew on this card? I wish I had. I think it’s missing the sewn edge. LOL

Here is a video for the visual learner:

[youtube]https://www.youtube.com/watch?v=CgoFY38BFtQ[/youtube]

Thanks so much for stopping by! Have a wonderful day.
Hugs and smiles

Last Monday the technique challenge on Splitcoast was to create a different shaped card. I had wanted to create a circle Easel Card for quite a while and the challenge was all the motivation I needed to get started.

I cut a piece of Neenah Solar White cardstock with the largest of the Classic Circle Nestabilities die, stamped the hill image from Taylored Expressions Hello Spring in Tuxedo Black Memento Ink and colored it in with Copic Markers (Sheep skin: N0, N1, N3,    Sheep Face: R00, R20,    Hooves: N5, N7, N9  Hill: YG01, YG03, YG17).

I masked the image with Eclipse Tape, covered the edges back up with my Circle die and airbrushed the sky first with the Chisel tip side of Marker B00, then switched to the brush tip of marker B04 and ever so slightly added stipple flecks with that. I had added some cloud masks at different points of the airbrushing. Those clouds were cut out of Tim’s Mask sheets with the Cloud Die-namics die. White cardstock was cut with the Picket Fence Border die and adhered to the bottom of the hill.

The image was adhered to Basic Gray cardstock, which was cut by hand into a slightly bigger layer. The edges of the image were paper pierced before the layers were adhered to a Scalloped circle cut out of with the smallest of the Sour Apple cardstock Grand Scallop Circle Nestabilities dies.

A Sour Apple cardstock strip was folded in half and and a base was cut with the same Scallop circles. One of the circles was folded in half and the card top was adhered to one half of the folded side. The bottom/inside of the card was decorated similar then the top.

The sentiment is from the same stamp set. It was stamped in Tuxedo Black Memento ink on Solar White cardstock. It was cut into banner form and tied to the fence on the bottom of the page with Lemondrop Twine. Three Recollection Flowers over Little Boy Echo Park paper finish off the card.

Thanks so much for stopping by! Have a wonderful day! Hugs and smiles

Click on more if you want to see a couple of pictures on how to create a circular Easel card.

Continue reading »

For this weeks Tutorial from the Archives in the Weekly Inkling I chose Cambria‘s darling Tiny Treat Basket. I had seen Taylored Expressions Hello Spring set when it came out next week and thought that set would be perfect for the basket. The set and the beautiful new fence die. Boy did I have fun creating this sample.

To start out with the basket was created out of a 5″ square of Neenah Celery Cardstock.  I used Echo Park Little Boy Paper to decorate the sides of the basket. The fence was cut out of Neenah Solar White cardstock and adhered to the bottom of each of my patterned paper pieces. The handle was created with White Crinkled Ribbon (May Arts) and tied together with Lemon Drop Twine.

I searched everywhere to find round candy that is wrapped not in pouches, but still in a circular shape. What’s up with York for wrapping them differently now? Thank goodness Pearson is still wrapping them the good old fashioned way.

To decorate the patties I punched scallop circles (Stampin’ Up! Punch) out of Celery cardstock and another pattern from Echo Park’s Little Boy collection. I adhered the paper over the cardstock to give it more stability. A chocolate piece was adhered between two scalloped pieces. In the center of the top I adhered a 1 3/8″ black cardstock circle.

Next I inked up each image of the train stamp individually with my Tuxedo Black Memento Ink Dew Drop and punched them out with the 1 1/4″ circle punch (also Stampin’ Up!).  The images were colored with Copic Markers ( Bunny and Sheep: N0, N1, N3, R00, R20, R21,   Carrot: Y17, YR15, YR18, YG01, YG03, YG17,    Bird: Y13, Y15, Y17,    Eggs: Y17, YR15, YR18,   Boo, B01, B04,   R00, R20, R21,   YG01, YG03, Y15, Y17    Bird Wagon: Y13, Y15, Y17,    Flowers: Y17, YR15, YR18, E99, E37,  R00, R20, R21, Bo0, B01, B04, Y17, YR15,  Flower Wagon: Y15, Y15, YR15) and adhered over the black circles.

Here is a video for the visual learner:

[youtube]https://www.youtube.com/watch?v=EDahfzhs-5k[/youtube]

Thanks so much for stopping by! Have a wonderful day!
Hugs and smiles

Today’s tutorial on Splitcoaststampers was written by the awesome Colleen Schaan. It’s a great way to use the Copic Airbrush system and blending solution for a Bleached out look.

For my sample I started by cutting Glossy White cardstock with Classic Oval Nestabilities die. The oval was airbrushed first with Copic Marker R27, then YR18 and the top with YR14. The flower image from Taylored Expressions Summer Afternoon stamp set was spritzed with Blending solution and stamped on my airbrushed background. The image was layered on piece of Kraft cardstock cut and embossed with a Beaded Oval Nestabilities die. The image layer was paper pierced.

For the layout I used CPS current sketch. I just flipped it and used ribbon as one of the layers.  A  2″ x 4 3/4″ strip of Thrift Store October afternoon paper was adhered to a 4″ x 5 1/4″ piece of Seaside October Afternoon paper. The bottom corners were rounded before the layers were stitched to a 3/16″ bigger piece or Solar white cardstock, which bottom corners were rounded as well.

May Arts Silk Ribbon was tied around the layers vertically before the image layers were adhered to it with dimensionals. Silver Recollections Pearls were adhered to the right hand side of the beaded oval. The layers were adhered to the card base, a 5 3/4″ x 9″ piece of Kraft cardstock folded in half.

The sentiment is also from the Summer Afternoon set. It was stamped with Rich Cocoa Memento ink on a piece of White cardstock, cut and embossed it with a retired Spellbinders die and airbrushed it lightly with Y15 and Y17. The image from the main panel was used again over the sentiment. It was inked with Spiced Marmalade Distress Ink, stamped off once and then stamped on the sentiment panel.  The sentiment tag was adhered underneath the ribbon.

Thanks so much for stopping by. Have a wonderful day!
Hugs and smiles

© 2012 fresh & fun Suffusion theme by Sayontan Sinha