Today’s tutorial on Splitcoast is for the Herringbone technique. It’s a  great way to get rid of your small patterned paper strips. For my sample I used an the Itty Bitty Unity image called Roly Poly Winter Joy. I had it colored since the CHA Supershow. It had been stamped with Tuxedo Black Memento Ink on Neenah Solar White cardstock and colored with Copic Markers (not sure about the colors, sorry). The image was cut and embossed with a Petite Oval Nestabilities die. It was adhered to a piece of Canyon Brown cardstock, cut and embossed with a Scalloped Petite Oval Nestabilities die. The edges of the image oval were paper pierced.

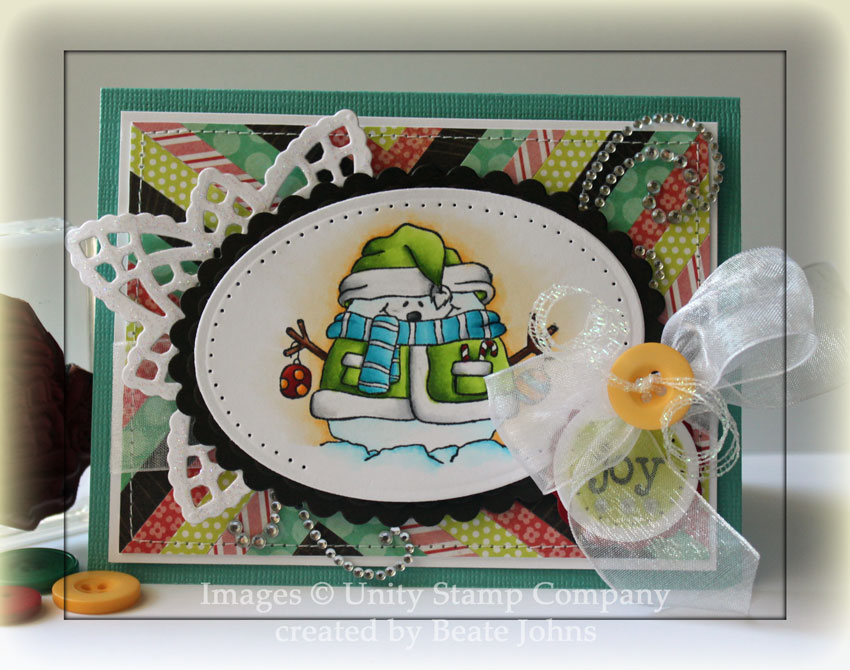
The Herringbone background was created with MME Lime & Twist Life of the Party patterned paper. It measured 3 1/2″ x 4 3/4″. It was stitched to a 3/16″ bigger piece of Neenah Solar White cardstock. White Organdy Ribbon was tied around the layers. A Basic Grey button was tied over the bow with Iridescent Curling Ribbon.

A piece of white cardstock was cut and embossed with a Lace Doily Accent die. It was adhered behind the image layers were before those were adhered to the Herringbone layers with dimensionals. The Lace Doily die cut was covered with Stardust Stickles. A sentiment from the Roly Holy set was stamped in Tuxedo Black on a piece of white cardstock cut and embossed with a Classic Circle Nestabilities die. The inner part was airbrushed before the circle was adhered to a piece of Cherry Cobbler Cardstock cut and embossed with a Scallop Circle die. The edges of the sentiment circle were paper pierced before it was adhered under the bow.

The card base is a 5 1/2″ x 8 1/2″ piece of Core’dinations cardstock folded in half. The layers were adhered to the card base and parts of a Finesse Rhinestone swirl finish off the card front.

Here is a video for the visual learner:

[youtube]https://www.youtube.com/watch?v=AMbHmMdUTC8[/youtube]

Thanks so much for stopping by! Have a wonderful weekend!
Hugs and smiles

The  last Hope You can Count on Challenge last month was hosted by Lydia. She challenged us to disguise our style. For me that meant creating a one layer CAS card….because those are the hardest for me to make. I combined it with Monday’s CAS challenge, which was a color challenge: Chocolate, Ivory and Red.

I embossed the card front of my 4 1/4″ x 11″  Neenah Solar White cardstock card base with Stampin’ Up!’s Framed Tulip Embossing Folder. An image from Unity’s Confessions:  I Luv Unity stamp set was stamped in Rich Cocoa Memento ink once in directly on the card, once on MME Lime & Twist Life is a Party Patterned Paper. The flower stems on the card base were colored with Copic Markers G21 and G24. The flower heads on the patterned paper were colored with R08, R27, R39, cut out and adhered to the card base.

A reverse mask was cut for the card and the center was airbrushed with Copic Marker E31. A sentiment from I Love Unity was inked first with Antique Linen Distress ink, then the word unity was inked again with Rich Cocoa Memento ink before it was stamped at the bottom of the flower image.

Want2Scrap Rhinestones and parts of a Finesse Swirl were used to finish off the card. Thanks so much for stopping by!
Have a wonderful day!

Today’s new tutorial on Splitcoast is written by Christine Okken. She shows us how to create a gorgeous box with Grand Label 4 Nestabilities dies.

For the “From the Archives” tutorial of the newsletter I picked the Ghosting technique. I created the original tutorial back in 2006. It needed a makeover bad! I started out by cutting a piece of Glossy Cardstock with the second largest of the Label 1 Nestabilities dies. Putting the die back over the cardstock, I stamped the script background panel from Unity’s Store Kit Naturally You in Versamark all over my label. After the ink dried (hit it with a heat gun), I sponged Faded Jeans Distress ink over the panel.

A flower from Moments in Bloom was stamped in the center of the label with Jet Black Archival Ink.

A piece of black cardstock was cut and embossed with the largest of the https://shrsl.com/?~18ub and the image label was adhered to that. A piece of Solar White Neenah cardstock was cut and embossed with one of the Fleur De Lis Accent dies and sponged with Faded Jeans Distress ink. A sentiment from Moments in Bloom was stamped in it’s center with Jet Black Archival ink.

A strip of 1 1/4″ x 5″ piece of The Girls Paperie Kitch Paper was adhered to a 2 1/4″ x 5″ strip from the same paper line. Both were adhered to a 5″ square of the same paper line and stitched to a 1/4″ bigger piece of black cardstock. Gold Organdy Ribbon was tied around the layers. The bow was topped with a Recollection rhinestone brad. The layers were adhered to a 5 1/2″ x 11″ piece of of Neenah Solar White cardstock, that had been folded in half.

Silver Rhinestones and a darling little butterfly from Want2Scrap finish off the card.

Here is a video for the visual learner:
[youtube]https://www.youtube.com/watch?v=D9pQ3UCedc0[/youtube]

Thanks so much for stopping by! Have a wonderful day!
Hugs and smiles

P.S.: I got my sewing machine back. It was so worth to get it serviced. It purrs like a kitten again and sews like a new machine! My stamp room is now complete!


My last sample for CHA is another Circle Easel card.

The card base was cut out of Imperial Core’dination cardstock with Grand Scallop Circle Nestabilities die.

The images ware from Unity’s  City of Love. They were stamped in Tuxedo Black Memento Ink on a piece of Neenah Solar White cardstock, cut and embossed with Grand Circle Nestabilities. The image was colored with Copic Markers (N0, N1, N3, Y13, Y15, Y17, R27, R39, YG03). The image was masked and airbrushed with Copic Marker B02.

For the inside of the card a piece of white cardstock along with some Echo Park Playground paper were cut with a Grand Circle Nestabilities die. Between the patterned paper and the white cardstock a piece of black cardstock adhered, that had been cut and embossed with a Scalloped Borderabilities die.

Thanks so much for stopping by! Have a wonderful day!
Hugs and smiles

Today is the first day at the CHA Supershow.  Splitcoast will have a booth there and for a couple of hours each day, I will be demoing samples that focus on Grand Nestabilities dies and Copic Markers. You know that I love both. I hope everyone will like the samples I created for the show.

Here is one of the samples I will be showing:

The card base and Webster’s Pages patterned paper were cut and embossed with Grand Label 4 Nestabilities dies. The card base was scored so that the points of the ends of the card base. The patterned paper was cut apart. The center was adhered to the inside, the points tosides of the gate fold card.

The sentiment is from Unity’s Webster’s Pages Every Moment Stamp set. It was stamped in Jet Black Archival Ink on Neenah Solar White cardstock. The sentiment was cut out with one of the Petite Oval Nestabilities dies. The oval was sponged with Antique Linen Distress ink. The image from the same set was stamped to the lower right with Antique Linen before the oval was adhered to a piece of black cardstock, cut and embossed with a Scallop Petite Oval Nestabilities die.

The gatefold card was tied shut with May Arts Silk ribbon. The oval layer was adhered over the ribbon with dimensionals. To open the card the ribbon can just be slid off.

Have a wonderful day! Hugs and smiles

Today’s ATU challenge is a sketch! I used the sketch and the colors from this weeks Tuesday Trigger (check blog post below for image) to create my card. For my sample I used stamps from  last May Kit of the Month stamp set. I started by rounding the bottom corners of a 3 3/4″ x 5″ piece of Solar White cardstock.

The background label was stamped three times on the lower bottom of the layer with Tumbled Glass Distress ink. A sentiment from the kit was stamped on the lower right hand side with Tuxedo Black Memento ink.

On the upper half of the layer I stamped the banner in black ink. The banner was stamped again on three different pattern of October Afternoon’s Fly A Kite paper and the banner pieces were paper pieced to the main layer. Caribbean Twine was adhered over the banner.

The layer was stitched to the card base, a 4″ x 10 1/2″ piece of Kraft cardstock folded in half. The bottom corners were rounded as well. A button from Buttons Galore and More was threaded with Lemon Drop Twine and adhered over the sentiment to finish off the card.

I hope you have time to play! It’s a fun sketch. Check out the other challenge blog team members for more inspiration:

Have a great weekend!
Hugs and smiles

I haven’t participated in Friends with Flair for way too long.I created this card for last week’s Free For All Challenge on Splitcoast.  When I saw the challenge, I knew right away I wanted the house stamp from Little Whispers. I had just gotten it in the mail with my last order and was itching to try it out.

My card base is a 5 1/2″ x 8 1/2″ piece of Kraft cardstock folded in half. Snow cap Adirondack Acrylic paint was applied directly with the dabber it comes with. The image was stamped over the white paint with Jet Black Archival ink. After the ink dried, Red Pepper and Citrus paint was used to add a bit of color.

A wavy border was stitched around the edge of the card and May Arts Gingham ribbon tied around the upper edge. The ribbon was topped with a red button to finish it off.

Unity Flair!

If you don’t already get Unity’s Kit of the Month, check it out. This month, like every month, it is super cute and an incredible value. You can find out more about it here.

Thank you so much for stopping by. Check the Unity blog to see who else is participating in today’s Friends with Flair blog hop. Have a great weekend! Hugs and smiles

Sara Henton was sweet enough to ask me if I would like to play along this month in the All Things Unity Challenges. I LOVE challenges and Unity stamps, so the answer was a no brainer. Heck, yes! LOL

Today’s challenge is called Button Up!  The sponsor for this month challenges is Buttons Galore and More. They send us each one of their button assortments. The buttons came in a clear plastic container. I filled them in an empty Marmalade jar. The lid had been colored first with Gesso, then with Juniper Adirondack  Paint Dabber. I cut out the label for the buttons, ran it through my Xyron and stuck it on the jar. A small strip of fabric tied around the top of the jar finish it off.

I love using buttons on my cards and quite frequently use three or four on a card. But since this is a button challenge, I thought I would add a LOT of buttons on one card.

A 3 1/2″ square of fabric was stitched to a piece of Solar White cardstock that had been cut and embossed with Classic Scallop Square Nestabilities. A sentiment from Unity’s Store kit Naturally You was stamped in the center with Rich Cocoa Memento ink.  Quite a few buttons were stitched to the bottom of the layers with Lemondrop Twine as well as white embroidery Floss.

A piece of sea green Faux Suede May Arts ribbon was adhered under another button that was stitched to the upper right hand corner of the squares. The layers were adhered to the card base, a 4 1/4″ x 8 1/2″ piece of Canyon Brown cardstock, folded in half.

For the inside of the card I cut another piece of cardstock with the same scallop square die that was used on the front. The background stamp from Moments in Bloom was stamped in the center with Tumbled Glass distress ink. A strip of the same fabric used in the front was stitched to the square.

Another sentiment from Naturally you was stamped in the center of the layer with Rich Cocoa Memento ink and more buttons were added.

I hope you have time to join us in this challenge! Thanks so much for stopping by! Have a wonderful day!
Hugs and smiles

Did you know that Unity has their own challenge blog now? How cool is that. They are hosting a monthly challenge. This month is to called Fashion Forward. Since I didn’t have any dress stamps from Unity, I pulled out an the Kit of the Month from April last year and used the thread spools from that set.

I stamped the image in Tuxedo Black Memento Ink on Neenah Solar White cardstock and cut and embossed with Classic Circle Nestabilities. The image was colored with Copic Markers ( R00, R11, R12, R14, BG11, BG32, BG13, YG00, YG01, YG03, YG06, E50, E51, E55, E57, E59, T1, T3, T5, YR30, 1/5th YR31, YR31), adhered to a piece of Cameo Coral cardstock which was cut with pinking scissors.

I joined Pinterest yesterday and got addicted really fast. I saw this project (you have to be logged in to view it). I pulled the fabric that I have at home out and created a little bag.

I stitched on a few buttons, stamped a sentiment from the same Kit on the bag with black Palette Ink and stitched seam ribbon on the upper edge of the bag so it could be tied shut.

I hope you have fun to play the Unity challenge with me! If you need an invite to Pininterest let me know and I’ll invite you. But I warn you! It’s highly addictive and you can’t blame me when the day just gets away from you!

Hugs and smiles

I created this card for a Way to Use it challenge. Kim challenged us to use Silhouette stamps. The layout is from a CPS sketch.

I stamped the birds from Unity’s Brave Girls on a 1 7/8″ x 4 3/8″ piece of Classic Cream Cardstock with Midnight Black Brilliance ink. The image was layered on a piece of Canyon Brown cardstock, that had been cut and embossed with Long Rectangle Scallop Nestabilities. The edges of the layer were paper pierced.

A 2″ x 4″ strip of Cosmo Cricket Early Bird Paper was stitched  to a 4″ x 5 1/4″ piece of the same paper pack. May Arts Gingham ribbon was tied around the vertical strip before the layers were adhered to a 5 1/2″ x 4 1/4″ card base out of Canyon Brown cardstock.

A half circle of Early Bird paper was adhered under the lower right of the image layers before those were adhered to the card with dimensionals. Pewter Kaisercraft Pearls were adhered to the half circle.

The sentiment is also from the Brave Girl set. It was stamped on a piece of Cream cardstock, cut and embossed with one of the Labels Trio set from Spellbinders. A Pewter Kaisercraft pearl on each side of the label finish off the card.

Thanks so much for stopping by! Have a wonderful day.
Hugs and smiles

© 2012 fresh & fun Suffusion theme by Sayontan Sinha