I created this card a while back for Lydia’s VSN challenge. The were to be inspired by the Texas flag. I used it’s color and layout of the flag to create my card.

The patterned paper is from Cosmo Cricket Odds & Ends Patterned Paper . The border die is from the Floral Accent die pack. The sentiment is from Verve’s Fabulous You. the sentiment was stamped in Rich Cocoa Memento Ink on Neenah Solar White cardstock. It was cut and embossed with a Fancy Tag Two die. The center was sponged with Antique Linen Distress ink and Baby Bling Pearls were adhered under the sentiment. The layer was adhered to a Fancy Tag 2 Nestaboard. Three little blue flowers were attached to the lower left of the sentiment panel.

Silk Ribbon was tied around the top layers and topped with a button. A pearl swirl was adhered to the upper right hand side. The layers were adhered to the  card base, a 4 1/4″ x 11″ piece of Kraft cardstock folded in half.

Thanks so much for stopping by! Have a wonderful Sunday.
Hugs and smiles

Today’s tutorial on Splitcoaststampers is on how to create rolled ribbon flowers. They are fun and easy! For my sample I rolled a flower out of May Arts Yellow Silk ribbon. It was adhered to a piece of Neenah Solar White cardstock that had been cut and embossed with a Beaded Oval Nestabilities die and topped with a Sage Green Pearl from Want2Scrap.

Two leaves were cut and embossed out of Cosmo Cricket Odds & Ends paper with one of the Foilage dies. The leaves were sponged with Peeled Paint Distress Ink and adhered under the ribbon flower.

The card base was cut with the second smallest Scallop Oval Grand Nestabilities die out of Neenah Solar White cardstock. Another single piece of white cardstock was cut with the same die.

A small strip of white cardstock was cut and embossed with a Parisian Accent die. It was adhered under a strip of Cosmo Cricket Odds & Ends paper. The strip was adhere two other pieces of the same paper pack. The layers were cut and embossed with the second smallest Oval Grand Nestabilities die. The layers were stitched to the single scallop oval layer before that was adhered to the card base.

The second largest Scallop Heart Nestaboard piece was painted with White Crackle Paint. After it dried a sentiment from Verve’s Kind Words was stamped over the cracked area with Black Acrylic paint. It was then embossed with UTEE. I saw this cool technique over at Shelley Hickox blog. She is an amazing artist. Once it cooled down, I added a Rhinestone Heart Nestabling to it’s edge. The heart was adhered to the card base and topped with the ribbon flower.

Here is a video for the visual learner:

[youtube]https://www.youtube.com/watch?v=e3NHFX9yd5U[/youtube]

Thanks so much for stopping by! Have a great day.
Hugs and smiles

Today’s challenge over at LaLa Land Crafts is to create a Christmas card. Easy enough with the darling images from the company. I chose the Sunny Christmas Luka image. I stamped him in Tuxedo Black Memento Ink on Neenah Solar White cardstock and colored it with Copic Markers (Shirt and Hat: R08, R27, R39  hat rim: N0, N1   Shorts: B41, B45   Bag: E42, E43, E44   flip flops: N1, N3, N5   Gifts: YG01, YG03, YG17, Y13, Y15, Y17   Skin: E50, E51, E53   Hair: YR31, E33, E37) It was cut out. The edges were colored with N3.

A frame was cut and embossed out of black cardstock with the biggest of the small Classic Squares and the largest Lacy Square Nestabilities die. A piece of MME Fly A Kite Lime Twist Paper was cut to fit behind the frame and an edge was sewn to it. White Organdy Ribbon was tied around the patterned paper before the frame was adhered over it.

A 2″ x 4 3/4″ piece of the same paper pack was adhered to a 4 3/4″ square of the MME Out of the Blue Paper. the layers were stitched to a 1/4″ bigger piece of black cardstock.

The card base was cut and embossed with a Grand Scallop Square Nestabilities die out of light green Core’dinations cardstock. The stitched layers were adhered to the card base. The image layers were adhered to the card base with dimensionals.

The sentiment is from Verve’s Winter Mitten stamp set. It was stamped on a piece of Solar White cardstock and cut and embossed with a Classic Circle Nestabilities die. The small heart is from the same stamp set. It was stamped in Barn Door Distress ink , outlined with a Copic Multiliner, cut out and adhered to the sentiment with a dimensional. The heart as well as the holly berries were topped with Glossy Accent.

A Want2Scrap Rhinestone swirl was added above the sentiment panel. Baby Bling Rhinestones on the sentiment panel as well as on the lower right corner of the frame finish off the card.

Thanks so much for stopping by! Have a wonderful day!
Hugs and smiles

For the last weekly Inkling I reshot the Tapestry Tutorial and posted it as the “From the Archive” tutorial. For my new sample I used Verve Stamps Great Friend stamp set. Instead of pigment inks I used Distress ink to sponge the background with. I love that they stay wet long enough not only to create a beautiful blended background, but also to emboss the entire background.

The colors I picked for sponging my background were Wild Honey, Fired Brick and Peeled Paint. The flowers from Great friend were stamped in Snowcap Adirondack Pigment ink.

The background was adhered to a card base cut and embossed out of Neenah Solar White cardstock with the largest of the Lattice Rectangle dies.  My sentiment panel was cut and embossed with one of the Fancy Tag Two dies and sponged with Wild Honey Distress ink. The sentiment was stamped in Tuxedo Black Memento ink. The layer was  adhered to the matching Nestaboard.

A black Rhinestone swirl was adhered to the upper left hand corner before my layered sentiment panel was adhered to the card base.

Here is a video for the visual learner:

[youtube]https://www.youtube.com/watch?v=4aUbj4v0DRY[/youtube]


Thanks so much for stopping by! Have a wonderful day!
Hugs and smiles

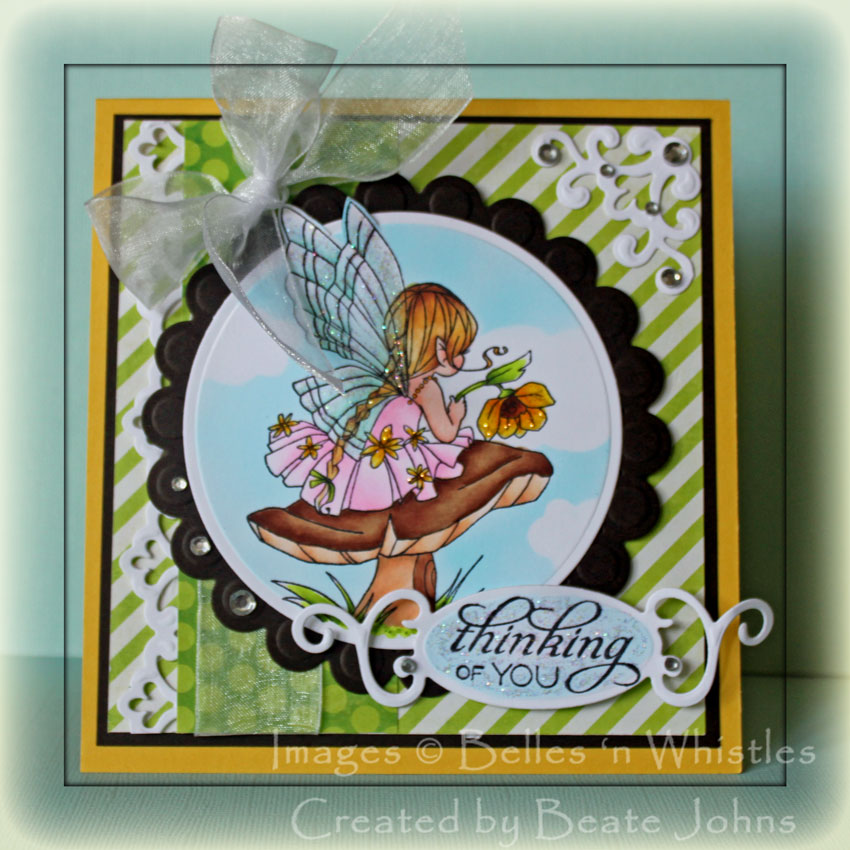
A little while ago I was lucky enough to win one of the new Fairy Belles ‘n Whistles stamps as blog candy. I was so excited. I love Fairies! A few days ago a friend of mine came over just to color and I finally got my new stamp dirty.

I stamped the image on Solar White cardstock with Tuxedo Black Memento ink. It was cut out with a Circle Nestabilities die and the Out of the Box Technique and colored the image with Copic Markers (Mushroom: E30, E31, E33, E35, E37   Dress: RV000, RV00, RV10     Wings: BG0000, BG10, BG11    Flower: Y13, Y15, Y17, E97, E99, E29  Leaves and grass: YG01, YG03, YG17   Skin: E000, E01).

The fairy was covered with a mask cut out of Eclipse Tape, the Circle die was added again and a few cloud dies cut with the Cloud Die-namics die were added. The sky was airbrushed with Copic Marker B01. The circle was adhered to a piece of Canyon Brown cardstock, cut and embossed with the largest Beaded Circle Nestabilities die.

A 5″ strip of white cardstock was cut and embossed with one of the Parisian Accent dies. The strip was adhered to a 1 3/4″ x 5″ strip of MME Lime Twist Fly A Kite patterned paper. The strips were adhered to a 4 3/4″ x 5″ piece of the same paper pack. White Organdy Ribbon was tied around the vertical strips.

The layers were first adhered to a 3/16″ bigger piece of Canyon Brown cardstock, then to the card base, a 5 1/4″ x 11″ piece of yellow cardstock (SU, new color) folded in half. The image layer was adhered to the card with dimensionals.

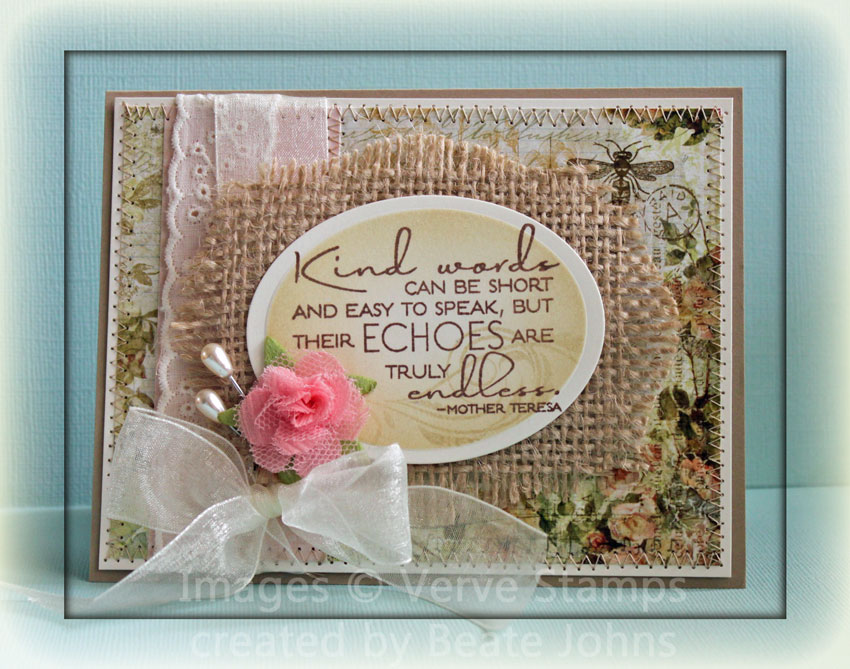
Another die from the Parisian Accent pack was used to cut and embossed a small corner embellishment. It was adhered to the top right of the card.  The sentiment is from Verve’s Kind Word Stamp set. It was stamped in Tuxedo Black Memento Ink on Solar White cardstock, cut and embossed with one of the Fancy Tag dies and colored with Copic Marker B000o.

The sentiment panel was adhered to the lower right of the image. Silver Kaisercraft Rhinestones were adhered to the Beaded circle, the sentiment panel and the corner decoration.

To add some sparkle to the card, Stardust Stickles was added to the sentiment oval as well as the Fairy Wings. Yellow Stickles was added to the yellow flowers on the dress as well as to the flower the fairy is holding. Silver Kaisercraft Rhinestones finish off the card.

This month Inspiration Emporium Challenge is to use Stickles or Sparkly Fluff on your project. You have until the end of the month to enter the challenge for an opportunity to win a $50 shopping spree at IE.

Have a wonderful day!
Hugs and smiles


P.S.: I am not sure how often I will post this June. The reality of prepping for the move is setting in. I have to prep for my June tutorial, June class, get the house ready for the mover and prep for CHA. It feels a bit overwhelming all over sudden. I wish I had a time machine and could fast forward to when we are settled in Oklahoma already.

I created this card for the Mini VSN Friday week before last. It was the first challenge that day and we were to use Fabric on our card. Since it was a pirate VSN, I thought I would use Burlap I had bought last month and hadn’t used yet.

I cut burlap with a Label 18 Nestabilities die and used it as a background for my sentiment label. Natural White cardstock was cut and embossed with Classic Oval Nestabilities dies. The sentiment from Verve stamp set was stamped with Kind Words Rich Cocoa Memento ink. The oval was sponged with Antique Linen Distress ink. A swirl from the stamp set Blessings was stamped over the sentiment in the same color.

A 1 1/2″ x 3 7/8″ strip of Pink Paislee Butterfly Garden paper was adhered to a 3 7/8″ x 5″ piece of the same paper pack. The layers were stitched to a 1/4″ bigger piece of Natural White cardstock.  A piece of retired Websters pages trim was adhered over the vertical strip before white May Arts Organdy ribbon was tied around both the paper and lace trip. The layers were then adhered to the card base, a 5 1/2″ x 8 1/2″ piece of Kraft cardstock, folded in half.

The image layers were adhered to the card base with dimensionals. A Prima Flower and two decorative pearl pins finish off the card .

Thanks so much for stopping by! Hugs and smiles


I created this card for Sunday’s Featured Stamper Challenge. Neva McMullen was the featured stamper last week. I picked this gorgeous card of hers to case. I love the flowers inside the heart and the trim on the bottom of the card. I combined this challenge with last week Mojo Monday challenge for the layout, with CR84FN for the colors and the Stamptacular Sunday challenge for the sentiment inspiration.

A 4 3/4″ long strip of Kraft cardstock was cut and embossed with Fair Isle Borderabilities and stitched to a 2″ x 4 3/4″ piece of For the Record Echo Park paper. Both strips were adhered to a 4 3/4″ square of October Afternoon Farm Fresh Paper. The layers were stitched to a 5″ square of Kraft cardstock. The bottom had been cut and embossed with the other Fair Isle Borderabilities die and the edges were sponged with Frayed Burlap Distress ink.

Solar White cardstock was cut and embossed with Lacey Circle Nestabilities die and topped with a piece of Cosmo Cricket Everafter paper, that had been cut and embossed with Classic Circle Nestabilities. The edges of the paper circle were paper pierced. May Arts Silk Ribbon was tied vertically around the layers and the circle was adhered under the bow.

Solar White cardstock was cut and embossed with the Classic Heart Nestabilities, sponged with Frayed Burlap ink and adhered to a piece of Kraft cardstock, cut and embossed with the Scallop Heart Nestabilities, that had been sponged with the same ink as well. The edges of the heart were also paper pierced. The bottom of the heart was stamped with an image from Verve Stamps Fabulous You set in Rich Cocoa Memento Ink.  Before the heart was adhered to the layers with dimensionals, part of a doily was taped to the lower right hand side of the heart.

The sentiment is also from Fabulous You. It was also stamped in Rich Memento Ink on a piece of Solar White cardstock cut and embossed with on of the Tag Trio dies. The tag was also sponged with Frayed Burlap ink and attached to the bow with iridescent May Arts Curling ribbon. Three Recollections flowers on the lower right of the heart finish off the card.

Thanks so much for stopping by! Have a wonderful day!
Hugs and smiles

Glenda Wyatt has a big challenge anniversary today and asked a few stamping friends to participate. You can find a list of all participants on her blog. The challenge today is easy. All you have to do is create a project with RED in it and post a link to the entry on Glenda’s blog. Easy, Peasy. I hope you can play along. She is offering a chance to win some blog candy.

For my project I created a Explosion Box. A 7 1/2″ square of Red Riding Hood Square was stamped with the Border stamp of Verve’s Artful Elegance Stamp set in Aged Mahogany Distress ink. The cardstock was scored at 2 1/2″ and 5″ on both sides. Each outer square was scored diagonal. The edges the cardstock as well as the scored lines were sponged with Aged Mahogany ink.

The sides were decorated with a medallion stamped in Tuxedo Black Memento Ink on Neenah Solar White cardstock, cut with Circle Nestabilities and sponged with Tattered Rose Distress Ink.

For the lid Kraft cardstock was cut and embossed with the largest of the Lacey Square Nestabilities die. Next the edges of the square were scored at 3/4. The lid was first layered with a sponged piece of Red Riding Hood cut with a smaller Lacey Square Nestabilities die, then a piece of Pretty of Pink cardstock, then a white piece of cardstock cut and embossed with the smallest Lacey Square die, stamped with different stamps from Artful Elegance in Tuxedo Black Memento Ink and sponged with Victorian Velvet ink.

For the center of the inside of the box I sponged a white square of cardstock with Tattered Rose ink and stamped a sentiment from Hearts on Fire in Tuxedo black Memento Ink. It was adhered to a piece of Kraft cardstock cut and embossed with the second smallest Lacey Square Nestabilities die.

Here is a video for the visual learner:

[youtube]https://www.youtube.com/watch?v=ATG0SZyyrlw[/youtube]

On a personal note I am excited to announce that I will be on the new Inspiration Emporium Design team. I order most of my supplies from there and Ellen Hutson‘s store, so it was exciting when they asked me. This will be fun.

Have a wonderful day! Hugs and smiles

Sorry I have been so quiet. It’s cold here and snowy. That makes me want to snuggle up at the couch, not stamp. Weather like this makes me so lazy!

Yesterday’s tutorial on Splitcoast was for a Swinging Z-Fold Card.  I used the new Nested Heart dies from Spellbinders and Verve’s Glad Tidings along with Bo Bunny patterned paper I picked up at my LSS to create this card.

The Heart was cut and embossed out of Neenah Solar White cardstock and sponged with Stormy Sky Distress Ink and the snowflake were stamped with Walnut Stain Distress Ink. The snowflakes were cut out and topped with Recollection brads. Silver Kaisercraft Rhinestones were added to the heart.

White May Organdy Ribbon was tied around right hand side of the card and hit with the heat gun to antique. I added  a Maya Arts Trinket pin through the bow. It helps keep the card shut by holding the heart down.

Here is a video for the visual learner:

[youtube]https://www.youtube.com/watch?v=E-jwI94d05g[/youtube]

Today starts the third annual Holiday Tutorial Blitz on Splitcoaststampers. It starts off with a tutorial for a Treat Box card written by Melanie Schulenberg.

For my treat box card I used Chocolate Chip card stock. Mary Brown came over on Friday and we stamped together. We switched Melanie’s box up just a bit by adding an extra flap on the top of the box so you can open and close it. To do that, just add another 1/2″ to the width of your cardstock. Then cut everything away from that but at the 1 1/2″ for the box top. Add a score line there and corner round the ends. We figured after working for so long on a treat box, it would be nice if you didn’t have to rip open the box to get to the goodies.

Hint: Bette told me she had a hard time with the measurements on the template. Here is how I cut and scored. Start with a 7″ x 12″ piece of cardstock. Score the 7″ side at 1/2″, 1 1/4″ and 6 1/4″.  Flip and score the long side at 3 1/2″, 7″, 8 1/2″, 9 1/4″, 10 3/4″ and 11 1/2″.

Now flip your cardstock back to the 7″ side and cut on the 1/2″ score line all the way to the 9 1/4″ score line. Leave the 1 1/2″ flap and then cut the last 1 1/4″ off. This will be the lid for your box. On the 1 1/4″ score line cut all the way up to the 8 1/2″ score line and then the last 1/2″. That part you fold in. Repeat this cut on the 6 1/4″ line. Cut the lines on the flaps so you can fold the box in and you are ready. (I hope that makes sense without pictures. Just print out the template, draw the extra flap on it and mark the lines on there with the measurements I gave you. That’s what I did.)

My window was cut and embossed with one of the Fancy Tag dies  from Spellbinders. On the back I added a piece of Acetate to make sure my chocolate would stay inside and not fall out.

For the pocket card part I used Good Cheer and Very Merry October Afternoon Paper , May Arts crochet lace as well as the new Nested Mitten dies.  The sentiment is from Verve’s Christmas is in the air. It was stamped in Rich Cocoa Memento Ink on a tag cut with another Spellbinders die. The tag was then sponged with Tumbled Glass Distress ink.

For the back of the pocket I cut and embossed Very Merry October Afternoon Paper. It was adhered to a 3 3/8″ x 4 7/8″ piece of Vanilla card stock. the edges were stitched and the top of the mitten was cut so I could slip a gift card into it.

I hope you have time to try out the new tutotrial! Check back tomorrow for a new project. Thanks so much for stopping by! Have a Happy Halloween! (My kids already went Trick or Treating on Friday. Very strange that we had to do that on Friday instead of today!)

Hugs and smiles

© 2012 fresh & fun Suffusion theme by Sayontan Sinha