For yesterday’s Product Review, I created a tutorial for the Faux Dry Embossing Technique. I thought that technique was perfect for the Xyron Create-a-Sticker.

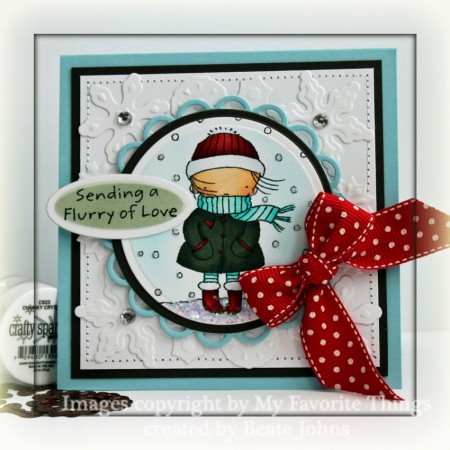
A 4″ square of Neenah Solar White cardstock was stitched to a 3/16″ bigger piece of Early Espresso cardstock. More Neenah Solar White cardstock was cut with the smaller snowflake dies from Create-a-Flake 1 and Create-a-Flake 2. The snowflakes were run through the Xyron machine and adhered to the white cardstock square.  The layers were adhered to a 4 5/8″ x 9 1/4″ piece of Berrylicious cardstock folded in half.

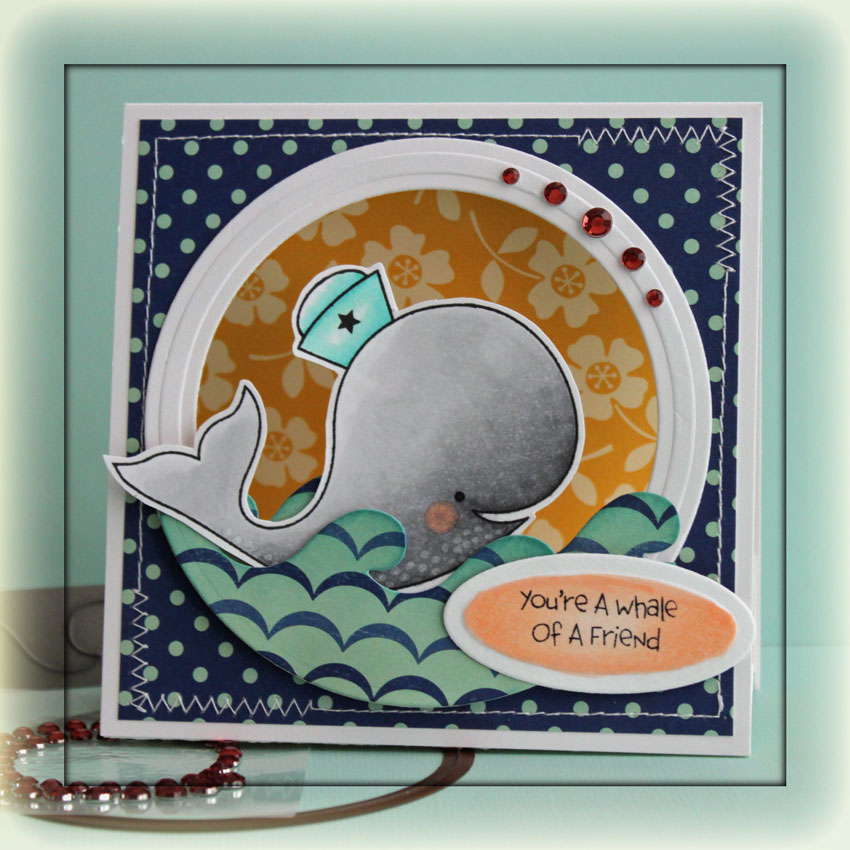
The image is from My Favorite Things Flurries of Love. It was stamped in Tuxedo Black Memento Ink and colored with Copic Markers (Hat, boots and coat trimR24, R27, R29, R39, Scarf: BG11, BG13 Scarf: BG93, BG96, Skin: E51, E53, R20). It was cut with Classic Circle Nestabilities, airbrushedwith Copic Marker BG000 and layered on a piece of Berrylicious cardstock cut and embossed with Lacey Circle Nestabilities. Fine glitter was added over the falling snowflakes, Chunky Crystal Crafty Sparkles over the snow on the ground.

The sentiment is from the same set. It was stamped on Neenah Solar White Cardstock in Tuxedo Black Memento Ink, cut and embossed with Petite Oval Nestabilities and airbrushed with Copic Marker BG93. To finish off the card front a bow out of Polka Dotted grosgrain ribbon (retired Stampin’ Up! ribbon) was added to the lower right corner of the image and Silver Kaisercraft Rhinestones in the center of the big snowflakes.

Here is a video for the visual learner:

[youtube]https://www.youtube.com/watch?v=fHpFALpExW0[/youtube]

Thanks so much for stopping by! Have a wonderful day!
Hugs and smiles

For today’s product review on SCS we got to play with Xyron’s 1.5″ Create-a-Sticker. I really like using this nifty tool for adhering smaller die cut shapes.

For this sample I used the Xyron Create-a-Sticker to add adhesive to two 1/2″ circles as well as a strip of cardstock cut with My Favorite Things Jumbo Ric Rac die. I ran both the ric rac and the circles through the Xyron, took off the liner and covered them in Primrose Glass Glitter.

The image is from My Favorite Things Merry Kissmas. It was stamped in Tuxedo Black Memento Ink on Xpress it Blending card and colored with Copic Markers (hat: C1, C3, C5, RV13, RV15, RV17 Scarf: BG11, BG32, BG13 Skirt: E41, E42, E43, E44 Stockings: E40 Skin: E0000, E00, R20 Branch: E27, E29). The image was cut and embossed with Square Nestabilities and airbrushed with Copic Marker  BG000. It was layered first on a piece of Bermuda Bay cardstock cut and embossed with the next size square Nestabilities, then on a piece of black cardstock, cut and embossed with the Fair Isle Pendant die.

The card base is a 5″ x 10″ piece of Core’dination cardstock folded in half. A 4 1/4″ square of Mitten Weather paper was stitched to a 3 1/6″ bigger piece of Basic Black cardstock before that was adhered to a 1/4″ bigger piece of White cardstock.

The sentiment was stamped on Neenah Solar White cardstock in Tuxedo Black Memento Ink, cut with Petite Oval Nestabilitiesand airbrushed with Copic Marker BG11. A White Linen Ribbon bow topped with a Recollections glitter brad and a few silver Kaisercraft Rhinestones on the top left  corner finish off the card front.

Here is a video for the visual learner:

[youtube]https://www.youtube.com/watch?v=wUWa_VdBifI[/youtube]

fllcpeachesacherriesic244wi.jpg

Today’s tutorial on Splitcoast is how to use Copic Markers along with Prismacolor Pencils. It will give you a slightly different look then coloring only with Copic Markers or only with Prismacolor Pencils. It’s great for people that just started buying Copics, but already have wax based pencils.

My image is from Flourishes Peaches and Cherries was stamped with Black Soot Distress Ink on Neenah Solar White cardstock. The image was colored with Copic Markers(YR12, YG25, E55, B000). Then the shading was created with Prismacolor Pencils (924, 946, 917, 1032). The pencil shading was blended with Blending Stumps and Gamsol. The image was cut with Label 2 Nestabilities. A frame was doodled with Copic Multiliner 0.3.

fllcpeachesandcherriesic244.jpg

The card base is a 4 1/4″ x 10″ piece of Espresso cardstock (Stampin’ Up!) folded in half.  A strip of Weathervane October Afternoon paper cut with the Scalloped Scallop Die-namics die and taped to the lower half of a 3 3/4″ x 4 1/2″ piece of a different Weathervane paper. Both paper were sandedbefore they stitched to a 4 15/16″ x 4 11/16″ piece of Whisper White cardstock. Natural Linen Ribbon and Melissa Frances Lace were layered over the horizontal strip before the image was adhered to the card base with dimensionals.

I love this sentiment. It’s from the peaches set and was stamped in Black Soot ink on Neenah Solar White cardstock. It was cut with Classic Circle Nestabilities and colored with B0000 Copic Marker.  A green Basic Grey Button with a tiny strip of striped May Arts ribbon on the top right of the image finish off the card.

Here is a video for the visual learner:
[youtube]https://www.youtube.com/watch?v=kcTq2SSSc3E[/youtube]

Thanks for stopping by! Have a wonderful day!
Hugs and smiles

tcpwaleoftimetentwide.jpg

Remember a few month back, SCS Technique Lover challenge was to create a tent card. That was such a cute idea, I thought it would be nice to have a tutorial for it in our resource section. So that’s the tutorial I wrote for Splitcoast today.

For my image I picked The Cat’s Pajama’s new set called A Whale of a Time. I stamped the cute big guy in Tuxedo Black Memento Ink on the new Xpress it paper from Copic. I received a few sheets at CHA and can’t wait to order more. It blends as well as the Neenah cardstock, but the ink doesn’t feather as much. Good stuff!

The whale was colored with Copic Markers (N0, N1, N3, N5, BG11, BG13, E01) and cut out. I saw Leigh O’Brien add little spots of texture on the bottom of the whale and I thought that was a cute idea. I totally cased that from her. To add those little dots, just hold your Blender Pen down a bit. The clear solution of the pen will “push” the colored ink away….leaving small white dots. For more texture tips with Copic Markers check this tutorial on SCS.

tcpwhaleoftimetent.jpg

My card base is a 4 1/4″ x 8 1/2″ piece of Neenah Solar White cardstock folded in half. A 4″ square of Seaside October Afternoon paper (my 1/2 stack is almost gone….I need it to be available in stores so I can get more!!!) was stitched to the card front and a window was cut with Classic Circle Nestabilities. Next I cut and embossed  a frame with Circle Nestabilities and adhered it over my window. Waves were cut with the new Wave CutUps die out of Seaside October Afternoon paper, then cut to match my window and adhered to the lower part of the frame. My sweet Whale was taped in between my waves.

The sentiment is from the same set. It was stamped on Neenah Solar White cardstock with Tuxedo Black Memento Ink and cut out with Petite Oval Nestabilities. The inner part of the die cut was colored with E01 and E00 Copic Markers. Lippy Red Kaisercraft Rhinestones finish off the card.

Here is a video for the visual learner:

[youtube]https://www.youtube.com/watch?v=XmYe-ktM5YE[/youtube]

Thanks so much for stopping by! Have a wonderful day
Hugs and smiles

Today’s tutorial is for a quick and cute gift idea, a grungeboard bracelet. I saw Alli Gower wear one during Ranger U and I knew I had to share this cool idea with you.

grungeboardbracelet2bj.jpg

My sample measures 1 1/2″ in width and was cut out of Swirl Grungeboard. It was painted with Pool Adirondack Paint Dabber, sanded and sponged with Walnut Stain distress ink. To soften it up, I added Pearl Adirondack Paint Dabber over it. The closure of this bracelet is a hinge fastener.

The flower was cut with Tim’s Tattered Floral Die. It was colored with Sunset Orange Paint Dabber, the edges darkened with Red Pepper Adirondack Paint. It was sewn on to the bracelet and topped with a Basic Grey Button.

Here is a video for the visual learner:

[youtube]https://www.youtube.com/watch?v=n_9GigWPHOY[/youtube]

mftspongedcloudwide.jpg

Here is another sample made with the cloud stencil from My Favorite Things. I cut stencils out of Mask Sheet, adhered them to a 3 1/2″ x 4 3/4″ piece of Neenah Solar White cardstock and sponged the entire piece of Tumbled Glass Distress Ink.

mftspongedcloudtree.jpg

Two strips of October Afternoon Thrift Store patterned paper were cut with the Scalloped Scallop Border die and adhered on the bottom of the cloud layer. I stamped the tree from Grow Love Plant a Tree. with Black Memento ink once on Neenah Solar White cardstock, once on October Afternoon patterned paper. I cut them out, layered them on top of each other and colored the tree trunk with Copic Markers (E27, E29). Next I layered it on a 1/4″ bigger piece of Chocolate Chip cardstock and sewed around the edges. Then it was adhered first on red cardstock, then on a 4 1/4″ x 11″ white card base.

To dress up the card a bit, I outlined the clouds with Starlit Stickles. Tiny Twinkles were adhered to the tree with Mono liquid glue.

mftspongedcloudinside.jpg

I kept the inside of the card very simple. I just added a strip of October Afternoon that had been cut with Scalloped Scallop Border die.

Here is a video for the visual learner:

[youtube]https://www.youtube.com/watch?v=GXh8MenPcU8[/youtube]

P.S.: Happy Mother’s Day!!! Have a wonderful day! Hugs and smiles

sadimensionalflowerwide.jpg

If you read my blog, you have already seen my grunge flower tutorial, that I learned at Ranger U from Tim Holtz. Today’s tutorial on SCS is the same flower. I called it dimensional flowers since they also work with patterned paper and with a bit more effort (in rolling the edges) with cardstock.

sadimensionalflowersmallbj.jpg

For my flower I adhered dictionary pages to grunge paper before I cut the flowers with Tattered Floral Alteration Die. The die cuts were sponged with Wild Honey and Fired Brick Distress inks.

The sentiment is from the stamp set Good Thought. It was stamped in Jet Black Archival Ink on Neenah White cardstock. It was cut out with Nestabilities Label 2 dies. I left the die on and stamped the swirl from Mini Ornates in Shabby Shutter on the top left and bottom right. Then I sponged over the cardstock in the same color.

The layout for this card is from last week’s sketch challenge on SCS. My small squares measure 1 15/16″ and are from Tim Holtz Retro Grunge Paper Pack. They were adhered to a black scallop square cut with Stampin’ Up!’s scallop square die. Each edge was stamped in Jet Black Archival ink with the sewing stamp from Spring Sprung.

Here is a video for the visual learner:

[youtube]https://www.youtube.com/watch?v=hIe-bYvlw58[/youtube]

ladcrackledtogetherwide.jpg

Today’s tutorial on SCS is for the Acrylic Distress technique I learned at Ranger U. If you follow my blog, you already know how to create the background from this post. I love the look this technique creates. For my sample I used the Color Combo from the Color Challenge on SCS a couple of weeks ago.

ladcrackledtogetherbeate.jpg

The card base was created out of a 4 1/4″ x 11″ piece of Dusty Durango cardstock. It was folded in half. The card front was sponged with Rusty Hinge, the edges with Walnut Stain. On the lower 2/3 I stamped a script from Mini Ornates in Walnut stain. The swirl on the lower left is from the same set.

For the background I cut a piece of Neenah Solar White with Label 8 Nestabilities and embossed it with the Fleur De Lis Cuttlebug Embossing Folder. It was painted with Shell Pink Acrylic Paint, sanded and then sponged with Walnut Stain ink. The background was then buffed with a slightly damp rag to take off the ink over the acrylic paint.

The main images is from Lizzie Ann Designs Lucky You. It was stamped in Walnut Stain ink on Neenah White cardstock, embossed with Walnut Stain Distress Embossing powder and cut out with Postage scissors. Then it was sponged with Old Paper, Vintage Photo and a hint of Walnut Stain. The entire piece was covered in Rock Candy Distress Crackle Paint.

The sentiment is also from the Lucky You set. It was stamped in Walnut Stain on Neenah White, sponged with Old Paper and adhered to an oval Fragment with Glossy Accents. A jump ring was adhered to the back and 1/4″ May Arts silk ribbon was tied to the top. The flowers are from Prima’s Daisy Doodles, the buttons from Stampin’ Up!’s neutral button collection, Making Memories and Basic Grey.

Here is a video for the visual learner:

[youtube]https://www.youtube.com/watch?v=cUcZDFnEcBI[/youtube]

Thanks for stopping by! Have a great day! Hugs and smiles

jffglittertreewide.jpg

Last week I redid the Glitter Puzzle tutorial. At Ranger U, we got to play with a lot of Stampers Anonymous as well as Just For Fun Rubber stamps. I fell in love with this tree  from Just For Fun Stamps and had to it right away.

jffglittertreebeate.jpg

My card base is a 4 1/4″ x 11″ piece of Dusty Durango cardstock folded in half.  The card front was sponged with Rusty Hinge, then stamped with the script and swirl from Mini Ornates in Walnut Stain Distress ink. The edges were sponged with Walnut ink.

For the main image I adhered a double sided adhesive sheet to cardstock, then cut it with Nestabilities Label 8. The glitter background was created with Martha Stewart glitter. The tree was stamped with Black Stazon. The sentiment was stamped with Walnut Stain ink on Neenah Solar White cardstock. It was punched out with a label punch from Stampin’ Up! It was sponged with Rusty Hinge and a bit of Walnut Stain Distress inks. The May Arts striped ribbon was attached with a Jump Ring through a Washer.

Here is a video for the visual learner:

[youtube]https://www.youtube.com/watch?v=5KN4b04GJ3s[/youtube]

Thanks so much for stopping by. Have a wonderful day! Hugs and smiles

wvlistenheartgrungeflowerwi.jpg

Here is the tutorial for the grunge flower I posted yesterday.

Step 1: 

grungerosestep1.jpg

Cut three six petal flowers out of grunge paper that had been embossed with Cuttlebug’s Divine Swirls Embossing Folder. I used Tim ‘s Tattered Floral Alteration Die. The flowers were sponged first with Stream Adirondack , then with Chipped Sapphire Distress ink. Next they were stamped with Jet Black Archival Ink and stamps from the sets Going Somewhere and Mini Muse.

Cut the first flower between petals to the middle of the flower.

Cut one petal off the one flower and two petals of the other. Keep the extra pieces.

 Step 2:

grungerosestep2.jpg

Roll each petal betwen your fingers to shape the petal.

Step 3:

grungerosestep3.jpg

Add adhesive on the right petal next to the cut.

Step 4:

grungerosestep4b.jpg

Fold the petal left of the cut over the right one and press down. To hold in place while drying, I use a paper clip.

Step 5:

grungerosestep5a.jpg

Repeat step three and four with your five petaled flower.

grungerosestep5b.jpg

As well as with your four petaled flower.

Step 6:

grungerosestep6a.jpg

On your two petaled piece, roll the right panel down like all your other petals. Add adhesive to the back of your left panel.

grungerosestep6b.jpg

Roll the left panel over the right creating a cone. Hold cone together while glue dries either with wire wrapped around it or a clothes pin.

Let all pieces dry. Five minutes should be enough.

Step 7:

grungerosestep7a.jpg

Cut a hole on the bottom of your four petaled cone.

grungerosestep8a.jpg

Step 8:

grungerosestep8b.jpg

Repeat step 7 with the five and three petaled cone.

Step 9:

grungerosestep10a.jpg

Poke a hole through your two petaled cone.

grungerosestep10b.jpg

Thread a wire through the hole. Center the flower cone on the wire. Fold the wire ends together.

Step 10:

grungerosestep9.jpg

Roll the edges of your single flower petal inward, like a gate fold card. Cut the bottom off and slide into your two petaled cone.

Step 11:

grungerosestep11a.jpg

Add adhesive on the edges of the center of the three petaled cone.

grungerosestep11b.jpg

Thread your two petaled piece into your three petaled cone.

Step 11:

grungerosestep12.jpg

Repeat step 10 with your four and five petaled cone to finish your flower.

I shot the video for the grunge flower with the bigger die flowers of Tim’s die. I forgot to show to add glue to the inner cones before assembly. Sorry about that. Here is the video for the visual learner:

[youtube]https://www.youtube.com/watch?v=F9kW-wqKE1Y[/youtube]

Thanks so much for stopping by! Have a wonderful evening! Hugs and smiles

© 2012 fresh & fun Suffusion theme by Sayontan Sinha