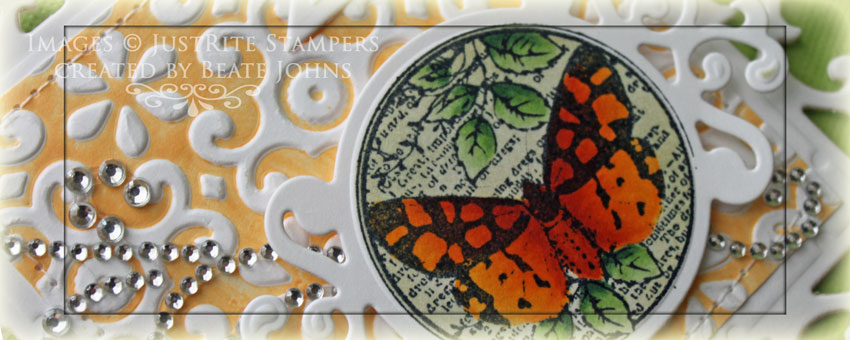
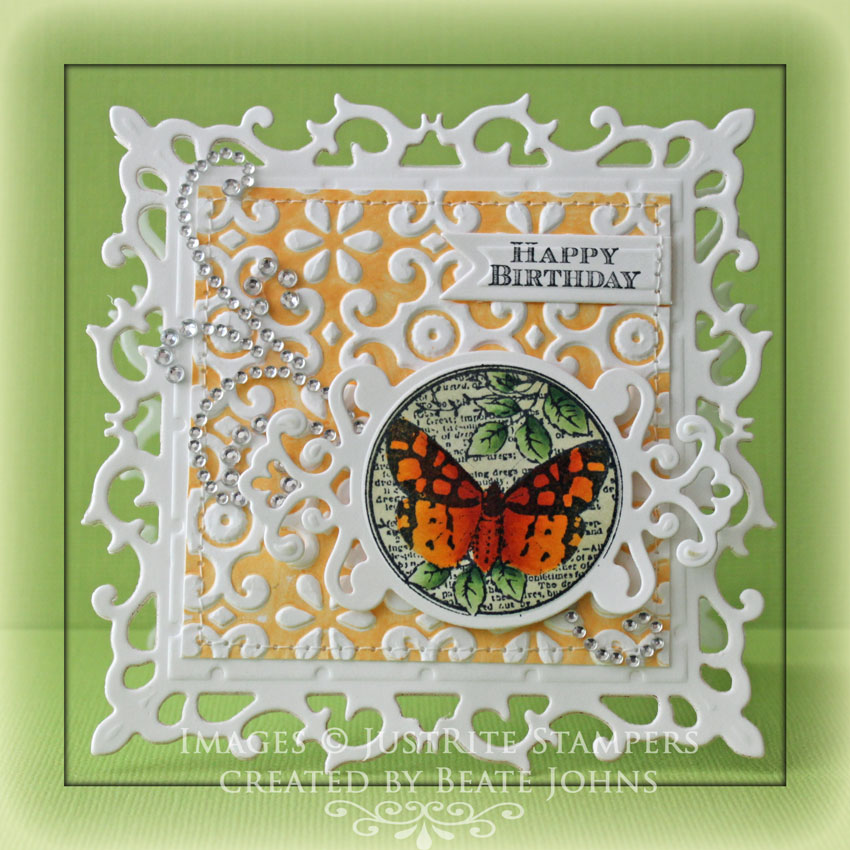
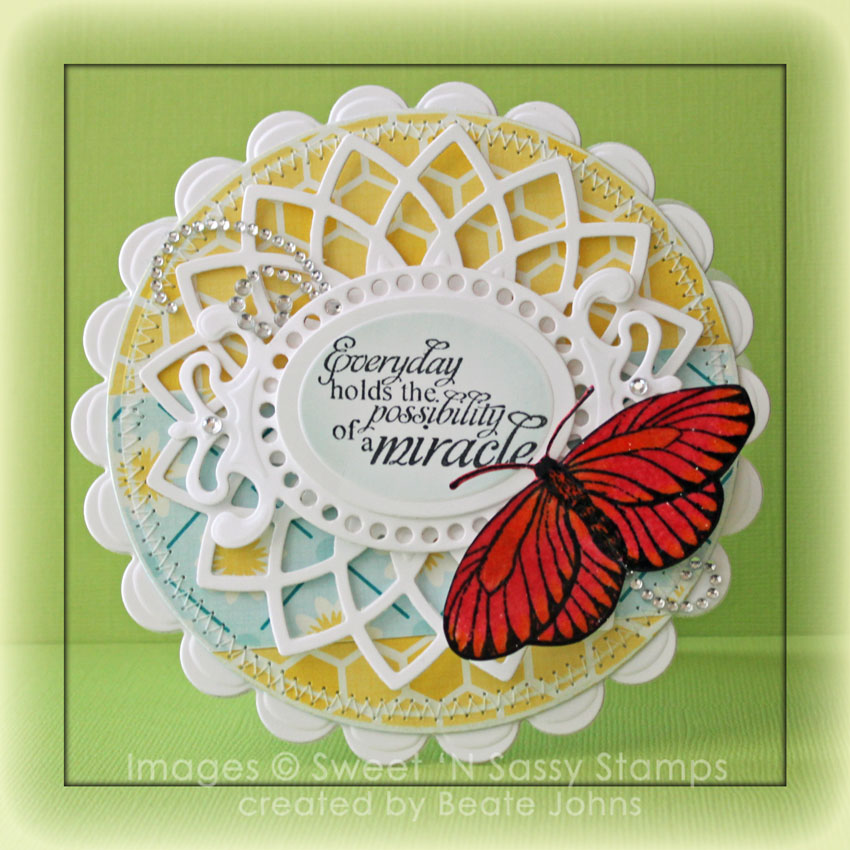
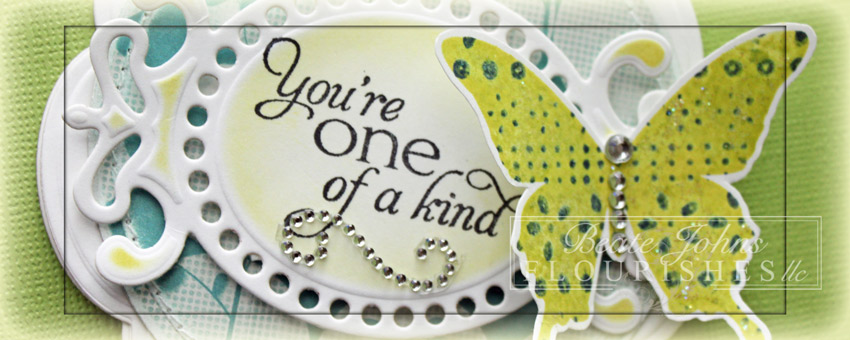
Yesterday’s tutorial on Splitcoast was written by the wonderful Susan Roberts. She created a fun tutorial on how to use embossing folders and solid shape stamps. For my sample I used the butterfly image from Fanciful Flourishes and one of my favorite M-Bossabilities folder called Flower Fun.

The butterfly was inked with Pear Tart Memento Ink, the embossing folder with Chipped Sapphire Distress Ink. The butterfly was pressed into the inked embossing folder before it was stamped on Neenah Classic White cardstock. The image was cut out and the wings were brushed with Frost Smooch Glitz.

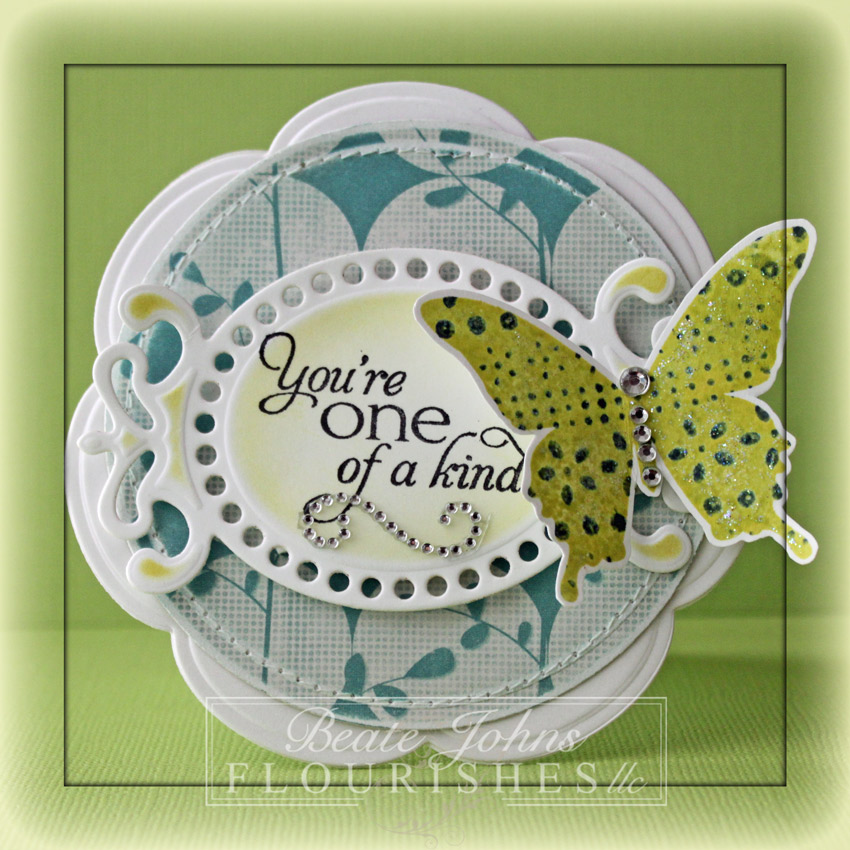
A sentiment from Flourishes new Magnolia set was stamped in Tuxedo Black Memento Ink on a piece of white cardstock, cut and embossed with a Fancy Tag 3 die. The embossed part was sponged with Pear Tart ink.  The butterfly was adhered to the right hand side of the sentiment panel. Rhinestones from a Baby Bling and Sleek Strips Silver Rhinestones strip were used for the body of the butterfly. Part of a  Fancy That! Border Bling was added underneath the sentiment.

A piece of MME On the Bright Side Two patterned paper was cut and embossed with a Standard Circle Nestabilities die. The edges were sanded and stitched before the it was adhered to the card base, which was cut out of Solar White cardstock with the largest Blossom Nestabilities die.

Here is a video for the visual learner:

[youtube]https://www.youtube.com/watch?v=dBPQWnIi2mE[/youtube]

Thanks so much for stopping by! Have a wonderful day.
Hugs and smiles

I’m a day early with a very special birthday surprise….tomorrow is my dear friend Korin Sutherland’s birthday! A group of her friends are getting together today for a fun early birthday party, since tomorrow is the fantastic April Release Blog Hop for Sweet ‘n Sassy Stamps, and we didn’t want to take the spotlight from that. After all, our sweet girl deserves her OWN day in the spotlight! So please join us as we celebrate Korin’s birthday a little early! After all – you can never have too much celebration, can you?!?!

For my project I used the Sweet ‘n Sassy Rose Cottage image. It was stamped in Tuxedo Black Memento Ink on Neenah Solar White cardstock and colored with Copic Markers (Y13, Y 15, Y17, YR15, YR18, YG11, YG13, YG17, BG0000, BG000, BG01) and cut and embossed with a Classic Square Nestabilities die.

Two butterflies were stamped, colored and cut out and adhered over the main square. Frost Smooch Glitz was added over the butterfly. The square was adhered to a card base, cut and embossed with the Lace Doily Motif die out of Solar White cardstock.

A little while ago I shot a video about the Basic Blending techniques with Copic Markers.

[youtube]https://www.youtube.com/watch?v=0CbZKf4LRjY[/youtube]


Below is the whole birthday party train….prepare yourself for some fantastic cupcakes and ice cream from these talented ladies!!

And feel free to leave Korin some early birthday love, either on her blog, her Facebook page, or the Sweet ‘n Sassy Stamps Facebook page!

Thanks so much for stopping by! Have a wonderful day!
Hugs and smiles

Today a new product review was posted on Splitcoaststampers. It is for Spellbinders new M-Bossabilities embossing folders. Needless to say I love them (what Spellbinders product do I not love?). To show off the folders, I created a quick and easy tutorial on how to create a Faux Letterpress look.

The background was created with the new Elegance M-Bossibilities folder. It was inked with Cantaloupe Memento Ink andNeenah Solar White cardstock was embossed with the folder. It was cut down to a 2 15/16″ square, which was then stitched to a piece of Solar White cardstock, cut and embossed with the largest of the Fleur De Lis Square Nestabilities dies. The card base was cut out of the same cardstock with the same die and the card front was adhered on top.

An image from JustRite Stampers Botanical Butterflies was stamped in Tuxedo Black Memento Ink on a piece of white cardstock, cut and embossed with a Parisian Accent die. The image was colored with Copic Markers (Butterfly: Y17, YR15, YR18    Leaves: G40, G43, G46) and sponged with Old Paper Distress ink. The image layer was adhered to the lower right of the card base with dimensionals.

A sentiment from Fleur De Lis Label 20 stamp set was stamped in black on white cardstock that had been cut and embossed with a Nested Lacey Pennants die. Parts of a Finesse Rhinestone Swirl finish off the card. I made this card into a birthday card I can enter it into JustRite Stampers current Birthday Bash Challenge.  You still have an entire week to enter the challenge for a chance to win JustRite stampers stamp sets.

Here is a video for the visual learner:

[youtube]https://www.youtube.com/watch?v=45XWgbAOKqw[/youtube]

Today’s tutorial on Splitcoaststampers was written by Joan Boardee. She shows us how to use both Copic Markers and Distress Inks to color an image.

For my sample I used Sweet n’ Sassy Everyday Miracles. I stamped the butterfly in Black India Ink on Neenah Classic White cardstock. Part of the image was colored with Copic Markers Y15 and Y17. Next Worn Lipstick Distress Ink was applied directly with the ink pad. The image was misted with water. After the paper dried, the image was cut out and embossed with clear embossing powder.

Three pieces of Solar White cardstock were cut and embossed with a Lotus Pendant die, a Fancy Tag 3 die and a Classic Oval Nestabilities die. A sentiment from the Everyday Miracles was stamped in the center of the the Classic Oval die cut and the edges were sponged with Tumbled Glass Distress Ink. The oval was adhered over the Fancy Tag die cut and that was adhered to the Lotus die cut.

Pieces of Echo Park Country Drive Patterned Paper were cut and embossed with the smallest Grand Circle Nestabilities die. The edges were sanded and stitched before the layers were adhered to a scallop circle card base, cut and embossed with Grand Scalloped Circle Nestabilities die. A couple of Baby Bling Rhinestones and parts of a Finesse Rhinestone Swirl finished off the card.

Here is a video for the visual learner:

[youtube]https://www.youtube.com/watch?v=f_1dAy-D5dU[/youtube]

Thanks so much for stopping by! Have a wonderful day.
Hugs and smiles

There is a new product review on SCS today. We got to play with Design Memory Crafts Mixed Media Sampler (Faber-Castell products). After checking their blog and finding this cool card, I wrote a tutorial for the technique for SCS. My sample is a lot more subdued then Jill Foster‘s, but I still like it. Those Pastel Pencils are a lot of fun.

I started by cutting a piece of black cardstock with a Classic Square Nestabilities die. Flowers from Verve’s Great Friend were stamped in Embossing Ink and embossed with silver embossing powder. The flowers were colored with PITT Pastel Pencils and the edges were smudged with a white gelato stick.

The card base was embossed with the Elegance M-Bossibilities folder and the image panel was adhered over it with dimensionals. A piece of Solar White cardstock was cut and embossed with a Tailor-Made Classic Keyhole die. A sentiment was stamped over it in Tuxedo Black Memento Ink and the right edge was cut straight. It was adhered to the lower right hand side of the image. It was topped with a black button, tied with Lemondrop twine.

Here is a video for the visual learner:

[youtube]https://www.youtube.com/watch?v=4hBX8RSC9EQ[/youtube]

Thanks so much for stopping by! Have a wonderful day!
Hugs and smiles

Yesterday’s tutorial on Splitcoaststampers was written by Dina Kowal. She showed us how to create a word card. It’s a very fun and easy project, perfect for showing off your patterned paper.

My card base was created out of a 3 1/2″ x 10 1/2″ piece of Neenah Solar White cardstock. It was scored at 3 1/2″ and 7″. My letters were cut out of MME Lost and Found Market Street Patterned paper. The paper edges were sanded and stitched. On top of the I and the bottom of the U an image from Verve’s Because of you was stamped in Rich Cocoa Memento Ink.

I recently got the red and yellow Mixed Media Sampler from Faber-Castell and was itching to try the aquarelle and pastel pencils from those sets. I used the red aquarelle and yellow pastel pencil to color the flower on the U and blended it with an embossing pen (I really need to get a new blending pen. Mine was dry).

A sentiment from the Because of you was stamped in Rich Cocoa Ink on a piece of Solar White cardstock, cut and embossed with the second smallest of the Label 21 Nestabilities die. The inner part was sponged with Antique Linen Distress ink and part of the flower image was stamped over it in the same ink. The sentiment was adhered to the lower part of the heart and topped with a butterfly, cut and embossed out of Kraft cardstock with one of dies from the Wonderful Wing Shapabilities set. Rhinestones on the flower, butterfly and lower part on the I finish off the card.

Here is a video for the visual learner:

[youtube]https://www.youtube.com/watch?v=qvhXs-xjzpQ[/youtube]

Thanks so much for stopping by! Have wonderful day!
Hugs and smiles

I thought it would be nice to have a video for the Acetate Box Tutorial. It’s a great project to dress up Valentine’s treats.

The finished box measures 2″ wide, 2″ deep and 3 1/2″ wide. Because it’s so little, there isn’t much room to decorate. The patterned paper strip are from  Echo Park Little Girl Patterned Paper. One edge was cut with the Stampin’ Up! Scallloped Edge Punch.

A tiny tag was cut with MFT’s Notched Tag die out of Neenah Solar White cardstock. Two small hearts were cut with dies from the same stamp set/die combo out of Little Girl paper as well as red cardstock. The hearts were adhered to the tag and a sentiment was stamped on it with Tuxedo Black Memento ink. Silver curling ribbon was tied into a double bow and adhered on top of the tag.

Here is a video for the visual learner:
[youtube]https://www.youtube.com/watch?v=HCfWNFyfkRU[/youtube]

Thanks so much for stopping by! Have a wonderful day.
Hugs and smiles

Remember this box from last week?

I wrote a tutorial for Splitcoast for that box and it came out today. Check here for step by step instructions on how the box was created.

Here is a video for the visual learner:

[youtube]https://www.youtube.com/watch?v=ShIz7gS_-jk[/youtube]

Thanks so much for stopping by! Have a wonderful day
Hugs and smiles

Today’s tutorial on Splitcoaststampers is created by Monique Trappeniers. She shows us how to create a Six Fold Card. I used the technique to create a sample for today’s Whiff of Joy Challenge, which is to use Charms or Bling. Since I love Bling, I went with Bling.

I started by stamping Henry with Heart in Tuxedo Black Memento Ink on a piece of Neenah Solar White cardstock with Tuxedo Black Memento Ink. The image was cut and embossed with a Standard Circle Nestabilities and colored with Copic Markers (Henry: E30, E31, E33, E00, E93, E95   Heart: YG21, YG23, YG17   Ground: W3, W5, W7   Sky: B0000, B000). The circle was adhered to a piece of brown cardstock, cut and embossed with a Lacy Circle Nestabilities die. The edges of the image circle were paper pierced.


The card base was created out of textured Espresso cardstock and decorated with Echo Park Victoria Garden Patterned Paper. The card base measures 4″ square when folded. I cut a 3 3/4″ square of white cardstock and a 3 1/2″ square of patterned paper. Pieces of a Finesse Rhinestone Swirl were adhered to the top left and bottom right of the card front and brown Organdy ribbon was used to tie the card shut. The image layer was adhered to one part of the card front with dimensionals.

A sentiment from Elisabeth Bell Accessories and Sentiments was stamped in Tuxedo Black Memento ink on a piece of Solar White cardstock, cut and embossed with the smallest Petite Oval Nestabilities die.  The center was colored with Copic Marker B0000 and the sentiment was adhered to the lower left of the image circle.

When you open the diagonal panels, you will find two horizontal strips that were also lined with Victoria Gardens paper. You fold those layers down…

to unveil the inside panel of the card. The front horizontal strip has two little gatefold doors that can be unfolded as well.

Here is a video for the visual learner:

[youtube]https://www.youtube.com/watch?v=r-fPo9_tNXM[/youtube]

Thanks so much for stopping by! Have a wonderful day!
Hugs and smiles

Today’s tutorial on Splitcoast is written by Patty Bombyk. She shows us how to create a unique card fold she calls Double Dutch fold. It’s like a mix of a vertial card and a gatefold.

(Since I thought this tutorial would run last week, I made it a Christmas card. So bear with me and allow me to show you another Holiday card.) For my video tutorial sample I used the adorable Uru and Bird image from Whiff of Joy. The image was stamped with in  Tuxedo Black Memento Ink on Neenah Solar White cardstock, cut out with a Classic Square Nestabilities die and colored with Copic Markers (Hat, Shirt and Bird: R12, R14, R27, R29, E09   Star and dots on Shirt: Y15, Y17, E97   Shoes and Shirt: E55, E57, E59   Leggings and Ribbon: YG13, YG17, YG67, C0, C2   Bird House: E21, E23, E25, E27   Background: BG0000, BG000, BG01). The square was stitched to a slightly smaller square cut and embossed out of  Canyon Brown cardstock before the layers were adhered to a piece of Kraft cardstock, cut and embossed with a Label 15 Nestabilities die.

My card base was created out of Kraft cardstock. The bottom two corners were rounded. MME 12 Days of Christmas patterned paper was used to decorate the panels. A bow out of gold organdy Ribbon was topped with a red button, tied on with iridescent curling Ribbon and adhered to the lower right corner of the image. The image was adhered to the top part of the card with dimensionals.

A sentiment from Whiff of Joy’s Seasonal Greetings. was stamped in Tuxedo Black in on Solar White cardstock and cut and embossed with the smallest Petite Oval Nestabilities die. The embossed center was colored with Copic Marker BG0000, BG000. The sentiment was adhered to the lower right corner of the card front. Rhinestones from the 72 Count Rhinestone pack finish off my card front.

The inside of the card is kept simple as always. A slightly smaller piece of white cardstock, stitched with matching paper from the front and voila….done.

Here is a video for the visual learner:

[youtube]https://www.youtube.com/watch?v=6gUK5AsUO6s[/youtube]

Thanks so much for stopping by! Have a wonderful day!
Hugs and smiles

© 2012 fresh & fun Suffusion theme by Sayontan Sinha