Search Results : crafty Secrets

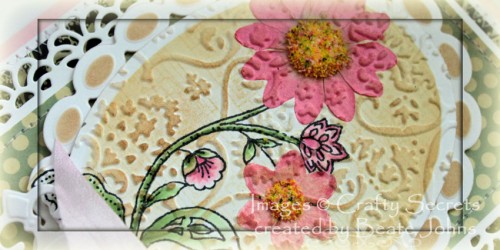
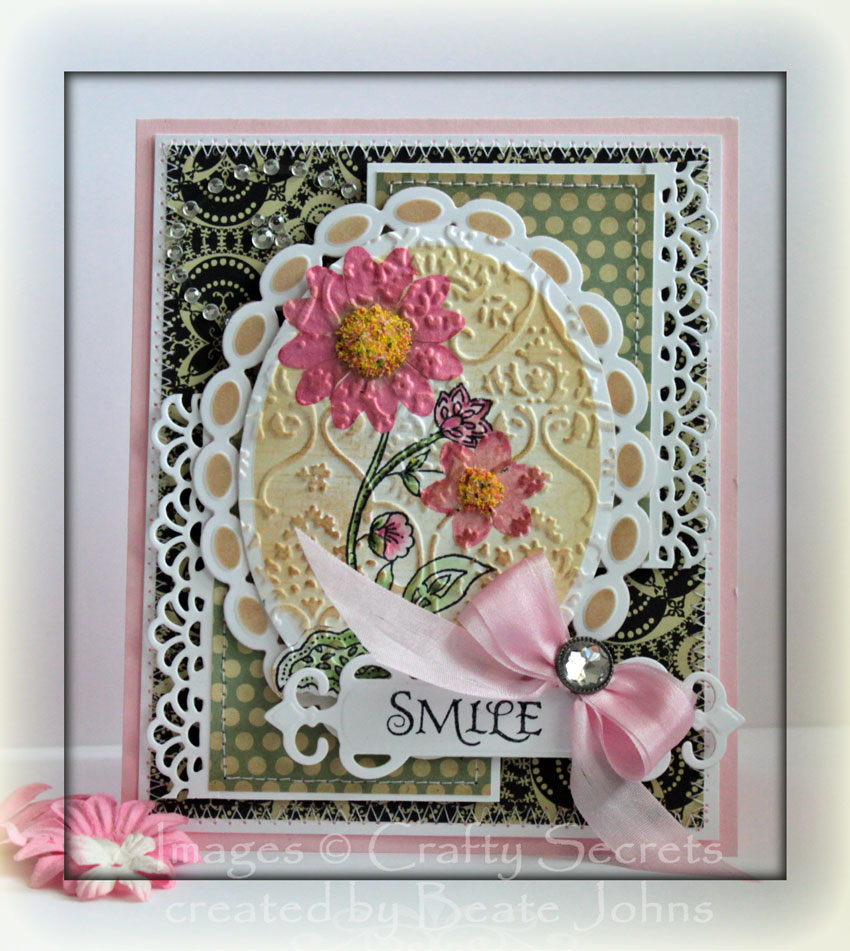
I created this card for a color challenge back in February while cyber stamping in with Jenn one night. I started out with a stamp from Crafty Secrets Floral Art. It was stamped in Tuxedo Black Memento Ink on Neenah Solar White cardstock, cut and embossed with a Classic Oval Nestabilities die and colored with Copic Markers (Flowers: RV10, 13, 14, YR12, Yr15, E33, E25, RV000, RV10, Berries: RV19, RV69, Leaves: YG11, YG13 + YG01, YG03, YG17, Background: BBV0000, BV31, BV23).  It was layered on a piece of black cardstock, cut and embossed with Classic Scallop Oval Nestabilities die and the edges of the image of the image were paper pierced.

A 2″ x  3 3/4″ piece of light pink Echo Park Springtime paper was adhered vertically  to a 3 3/4″ x 5″ piece of pink paper from the same collection. A 2″ x 5″ green piece of the Springtime paper was adhered horizontally over both layers.  All corners but the top left were rounded before the layers were stitched to a 3/16″ bigger piece of black cardstock, after Melissa Frances White Lace was taped over the horizontal layer.. The matching corners were rounded as well.

May Arts Gingham ribbon was tied around the vertical layer and topped with a Pearl Recollection Brad. Before the image was adhered to the layers with dimensionals, half of a doily was adhered under it.

All layers were adhered to the card base, a 5 1/2″ x 8 1/2″ piece of Solar White cardstock folded in half. Again three of the four corners were rounded. Snow Kaisercraft Pearls finish off the card.

Thanks so much for stopping by! Have a wonderful time.
Hugs and smiles


Here is another card I created during the February VSN on Splitcoast. The challenge was to create a card picturing your dream. That was easy for me. I LOVE summer time and I LOVE the beach. So here is my take on that challenge.

I had the gorgeous Seaside set from Crafty Secrets at home for a while, but hadn’t inked it up yet. It was perfect for my challenge card. I stamped the image with Rich Cocoa Memento Ink on Neenah Solar White cardstock. The rope as well as a sentiment from that set were stamped underneath the image. It was cut and embossed with Label 1 Nestabilities and colored with Copic Markers (Dress: BG72, BG75, Hat and Sand: B30, B31, B33, Ocean: G0000, G000, Sky: B0000, Bucket: R21, R22, Skin: E50, E51). The edges of the label were sponged first with Antique Linen, then with Vintage Photo Distress ink.  The image was layered on a piece of Canyon Brown cardstock, cut and embossed with the next size die and the edges were paper pierced.

A 2″ x 4 1/2″ piece of Fruehlingserwachen Patterned Paper was adhered to a 4 1/2″ square of the same paper pack. White lace (bought at JoAnn’s) was layered over the bottom of the horizontal layer and everything was stitched to a 3/16″ bigger piece of Solar White cardstock. Gold May Arts Organdy ribbon was tied above the lace. A sea horse charm was tied to the bow before the bow was topped with a Recollections brad.

The layers were adhered to the card base, a 5″ x 10″ piece of Canyon Brown cardstock folded in half. Soft Pink Kaisercraft Rhinestones finish off the card. I cased this card later to create a similar one as my sample for the Triangle Trifold Card Video tutorial. I liked how the image came out that much.

Thanks so much for stopping by! Have  wonderful day!
Hugs and smiles

I created this card for the video tutorial for Faux Linen. I had just received the Crafty Secrets Birds at Home set and was itching to try it out.

I started out with a piece of Glossy Cardstock and stamped the notes from Artsy Banners in Jet Black Archival ink. After the ink dried, the cardstock was sanded and sponged with Vintage Photo Distress ink. The swirl from Birds at Home was stamped in Vintage Photo ink. After everything dried, the cardstock was sanded again.

The bird cage, bird and hanging rod were stamped in Jet Black Archival ink and embossed with clear embossing powder.

A frame was cut out of Canyon Brown cardstock with Fleur De Lis Squares and Classic Square Nestabilities dies and adhered over my Faux Linen piece.

A piece of Natural White Neenah cardstock was cut with a Fleur De Lis Accent die as well as with the smallest of the Petite Oval Nestabilities dies. The dies were left on and both pieces were lightly sponged with Vintage Photo distress ink. The oval was also stamped with the swirl from the bird set in second generation Vintage Photo distress ink as well as the sentiment in Jet Black Archival ink. The oval was adhered to the frame to the upper left hand side of the frame.

A 2 1/4″ x 4 3/4″ piece of Graphic 45 Once Upon a Springtime paper was adhered to a 4 3/4″ square of the same paper pack. Beige lace from Melissa Frances Beige Ribbon Collection was adhered under the horizontal strip before the layers were stitched to a 3/16″ bigger piece of Natural White cardstock.

Ivory Silk Ribbon was dyed with Vintage Photo Re-Inker  and tied around the horizontal layer.  The layers were adhered to the card base, a 5 1/4″ x 10 1/2″ piece of Canyon Brown cardstock folded in half. Latte Kaisercraft pearls finish off the card.

Here is a video for the visual learner:

[youtube]https://www.youtube.com/watch?v=ojCUUGxsLI8[/youtube]

Thanks so much for stopping by! Have a wonderful day!
Hugs and smiles

We are back home in Ohio. Ohio greeted us with a horrible rain storm and of course….gray skies. It was WONDERFUL to lay at the white beach at Destin, staring at turquoise water and blue skies. I miss living there a lot! Hopefully Oklahoma City will be nicer to us then the Ohio weather is. I miss seeing blue skies every day. Two more month…

I created a card this morning for yesterday’s Clean and Simple Rule of Third challenge as well as today’s Color challenge Certainly Bashful Breezes.

I started by stamping the thank you sentiment and double butterfly image from Crafty Secrets Sew Special in Rich Cocoa Memento ink on Neenah Solar White cardstock, that had been cut and embossed with a Classic Circle Nestabilities die. The image was colored with Copic Markers (Butterflies: YR21, 1/5th YR31, YG21, YG23, 2/3rd BG72, BG72, BG75    Background: B0000, B000). The layer was stitched on a piece of Canyon Brown cardstock, cut and embossed with one of the new Floral Motif Spellbinders dies.


The card base is a 4 1/4″ x 11″ piece of Solar White cardstock folded in half. The bottom corners were rounded with my Corner Chomper.

A 1 3/4″ x 4″ piece of Early Bird Cosmo Cricket Paper strip was stitched to a 4″ square of the same paper pack. The bottom corners were rounded and May Arts Organdy ribbon was tied around the strip before the layers were adhered to the card base.

The image layer was adhered to the card with dimensionals. Stardust Stickles over the the butterflies and a Recollections Pearl swirl finish off the card.

Thanks so much for stopping by! Have a wonderful day!
Hugs and smiles

Today’s tutorial on Splitcoast is written by the wonderful Joanne Basile and it’s for a Paper bag book. I didn’t have time before leaving on vacation to make one, but I hope you check it out. I hope to make one when I get back from Florida with new beach pictures! 🙂

For the “From the Archives” section I decided to shoot the video for the Stamping with Bleach tutorial. I had just gotten the new Crafty Secrets Love You Mother stamp set in the mail. I love this set and decided to use the Mother/child image for the technique.

I started by cutting a piece of Kraft cardstock with Classic Circle Nestabilities dies. The background stamp was stamped in Frayed Burlap Distress ink all over the Circle, while the die was still on the cardstock. Next the circle was sponged with the same ink. The mother/child image was inked with bleach and stamped in the center of the circle. I cleaned the stamp right away after stamping with bleach. I was wondering if I could use clear stamps for this technique and was a little worried about using this darling image. But it worked out great.

The circle was stitched to a piece of Canyon Brown cardstock, cut and embossed with the new Spellbinders Parisian Motifs die. Blush Kaisercraft Pearls were were adhered to the left and right to Recollection flowers.


a 4 3/4″ piece of Vanilla cardstock was cut and embossed with one of the Parisian Accent dies and adhered under a 2 3/4″ x 4 3/4″ piece of Once Upon a Springtime Graphic 45 paper. The layers were adhered to a 4 3/4″ square out of the Baby 2 Bride Graphic 45 collection. The layers were stitched to a 3/16″ bigger piece of Canyon Brown cardstock.

Another piece of Brown cardstock was cut and embossed with the corner die from Parisian Accents and adhered to the upper right cover. May Arts Silk ribbon was tied around the horizontal layer before the layers were adhered to a card base, a 5 1/4″ x 10 1/2″ piece of Textured Vanilla cardstock.

The image layers were adhered to the card base with dimensionals and a few more Blush Kaisercraft pearls were added to the corner die cut to finish off the card.

Here is a video for the visual learner:

[youtube]https://www.youtube.com/watch?v=X6mCkdfamUw[/youtube]

Thanks so much for stopping by! Have a wonderful day!
Hugs and smiles

For last Wednesday’s Newsletter I updated the Bleached out Image Tutorial on Splitcoaststampers. For the new sample I used one of my favorite Crafty Secrets stamps, the Roses.

I stamped the image in Black Soot Distress ink on Kraft cardstock and embossed with clear embossing powder. Next I used a brush to apply bleach over the image. The bleached cardstock turned a light yellow.

Once the bleach dried, the image was colored with Copic Markers (Y21, Y32, G21, G24, G28). The cardstock was cut with a Grand Circle Nestabilities die and stitched on a piece of Vanilla cardstock, cut and embossed with a Grand Scallop Circle Nestabilities die.

A 3″ x 5 1/4″ piece of Hometown October Afternoon Paper was adhered to a 5 1/4″ square of the same patterned paper (other side). The layer were stitched to a 3/16″ bigger piece of Vanilla cardstock. May Arts Ivory Silk Ribbon was tied around the horizontal paper strip.

The layers were adhered to the card base, a 5 3/4″ x 11 1/2″ piece of Kraft cardstock, folded in half. The image layers were adhered to the card base with dimensionals. Latte Kaisercraft Pearls finish off the card front.

Here is a video for the visual learner:

[youtube]https://www.youtube.com/watch?v=JMViatZt_DA[/youtube]

Thanks so much for stopping by! Have a wonderful day!
Hugs and smiles


P.S.: I am not sure if I get a post ready for tomorrow. The last few days I have been prepping like crazy for my next class at Simply Scrapbooks this Saturday. I am also trying to work ahead for next week! We are going back to Florida for a week during the kids spring break! We can’t wait!  To be warm without a space heater or lots of layers of clothing…..To feel the sun warming your skin while lounging on the beach…..HEAVEN!

On Thurday I made a card without line stamps and Copic Markers. I haven’t done that in a long time. I just love to color and have a hard time not to use it on my cards.

I made this card for Thursday’s Way to Use it Challenge as well as with the sketch from last weeks Waltzingmouse Sketch challenge.  I started with cutting Tissue paper with the Blossom Spellbinders die and stamping them with Crafty Secrets Artsy Banner stamp in Vintage Photo distress ink.  An Antique Brad was put through all layers and the edges were sponged with Vintage Photo ink.

A heart was cut and embossed out of Classic White Neenah cardstock with Spellbinders Classic Heart die. The edges were sponged with Vintage Photo distress ink and the sentiment from Crafty Secrets Sweet Kids was stamped in the center with Rich Cocoa Memento Ink.  The heart was layered on a piece of Neenah Canyon Brown cardstock that had been cut and embossed with Scallop Heart die. The edges of the sponged heart were paper pierced.

A 3 1/2″ square of Graphic 45 Once Upon A Springtime was stitched to a 3/16″ bigger piece of Canyon Brown cardstock, after it’s upper corners were rounded. Melissa Frances lace from the Beige Ribbon collection was adhered to the bottom of that layer and the heart and flower were attached to it with dimensionals.

A 3 3/4″ x 5″ piece of Once Upon A Springtime paper was stitched to a 3/16″ bigger piece of Canyon Brown paper before the layers were adhered to the card base, a 4 1/2″ x 11 1/2″ piece of textured Kraft cardstock folded in half.

Latte Kaisercraft Pearls finish off the card. Thanks so much for stopping by! Have a wonderful day.
Hugs and smiles

Today’s tutorial on Splitcoast is written by Anne Harada. It is called Faux Pressed Flowers.

For my sample I started out by stamping a stem stamp from Crafty Secrets new Art Blooms stamp set in Tuxedo Black Memento Ink on Neenah Solar White cardstock. I was cut with the Out of the Box Technique and Classic Oval Nestabilities die. Next I masked the stem and stamped over the image with the note border from Artsy Banner in Antique Linen Distress Ink.

The image was colored with Copic Markers (G40, G82, G85, RV32, RV35) and the oval was sponged first with Antique Linen, then with Vintage Photo Distress Ink. Prima Flowers were adhered over the stem, then the entire oval was embossed with ProvoCraft’s Textile Texture Embossing Folder. Next I sponged some more Vintage Photo Ink over the embossed part of the oval. Citrus Crush  Flower Soft was added in the center of my Prima Flowers.

The oval was adhered over another piece of Neenah Solar White cardstock, that had been was cut and embossed with Beaded Oval Nestabilities die and sponged with Vintage Photo ink.

I created the card following the Midnight Madness Sketch challenge from last week. For the card base  a 4″ x 5″ piece of Circa 1934 Cosmo Cricket patterned paper was stitched to a 3/16″ piece of Neenah Solar White cardstock. Two 2″ x 2 7/8″ piece of Circa 1934 paper were stitched to 3/16″ bigger piece of white cardstock.  Two 2 7/8″ long strips of white cardstock were cut with the Faux Crochet Border Dienamics, adhered to the rectangle pieces before those were taped to the bigger layers.

The layers were adhered to the card base, a 4 1/4″ x 11″ piece of Pink Pirouette cardstock folded in half.  Recollections Rhinestone swirl was adhered to the upper right corner. Another piece of Solar White was cut and embossed with Spellbinders Fancy Tag dies. One of the sentiments from Art Blooms was stamped on it with Tuxedo Black Memento Ink.

A pink silk bow was tied with the Bow Easy and topped with a Recollection Rhinestone brad. It was adhered to the upper right side of the sentiment panel to finish off the card front.

Here is a video for the visual learner:

[youtube]https://www.youtube.com/watch?v=ecfSfwNJSKo[/youtube]

Thanks so much for stopping by! Have a wonderful day! Hugs and smiles

I created this card for yesterday’s sketch challenge on Splitcoast. I started out with stamping this darling image from Crafty Secrets Sweet Kids in Tuxedo Black Memento Ink on X-Press It! Blending card and coloring it with Copic Markers (Umbrella: R00, R01, R02, N3, N5, N7 Grass: G20, G21, G24 Flower stems: G24, G28 Dress: Y11, Y13, Y15, W1 Flowers: BV11, BV13 Hair: Y21, Y26, Y28, Skin: E00, E02, Stockings: E0000, E00).

The image was cut and embossed with Classic Square Nestabilities and airbrushed with Copic Marker B21. The image was then layered on a piece of black cardstock, cut and embossed with Scallop Square Nestabilities.

All patterned papers used were from Webster’s Pages Petite Papers. First a 4 1/4″ x 5 1/2″ piece was stitched to a Neenah Solar White card base. The black with white polka dot paper measures 2 3/4″ x 3 3/4″ and was adhered to the card base.

Next is a 2 7/8″ x 4 1/2″ piece of Neenah Solar White cardstock strip. On each side a white strip was added that had been cut with (what is becoming my favorite border die) the Faux Crochet Border die.  A sentiment from Sweet Kids was stamped on the bottom of the vertical strip with Tuxed Black Memento Ink.

The small blue paper strip measures 1 1/4″ x 3 5/8″. The bottom border was paper pierced, then a strip of May Arts White Organdy Ribbon was tied around the strip. It was topped with a Pink Paislee brad. Sparkly Silver ribbon was tied around it and curled around the brad.

Recollection Rhinestones swirls in the top left and bottom right corner as well as some Silver Kaisercraft Rhinestones finish off the card.

Have a wonderful day! Hugs and smiles

Two images I colored made it in the 2011 Copic Catalog. I am sooo stinking excited. The name of the stamp sets weren’t listed, so I thought I better do it here.

The first image is from Crafty Secrets Roses Stamp set. It was stamped on Express It! Blending Card in Tuxedo Black Memento ink and colored with Copic Markers. I didn’t write down the colors and I colored the images back in September, but I think the colors were R27, R29, R39, R89, BG93, BG96, BG99.

I love this Rose image. It is sooo much fun to color!

I love Crissy Armstrong’s Fairy images from Kraftin’ Kimmie Stamps. For my second image I chose the Bird Fairy. Again the image was stamped in Tuxedo Black Memento Ink and colored with Copic Markers. I am sorry, but I really don’t recall all the colors used on the Fairy. I know there were quite a lot.

Wait until you see the rest of the artwork in that catalog. I can’t believe my images made it in. All the other artwork is hand drawn and colored and really takes your breath away. Copic added each artist’s name and blog address to their page.

Have a wonderful day! Try to stay warm. It’s snowing here …. again. Just the thought of shoveling snow AGAIN makes me sigh. Both boys are home sick with colds. Winter is so not my season and living this far North is definitely not for the Johns’ family! 6 more months….

Hugs and smiles

© 2012 fresh & fun Suffusion theme by Sayontan Sinha