Search Results : round tab punch

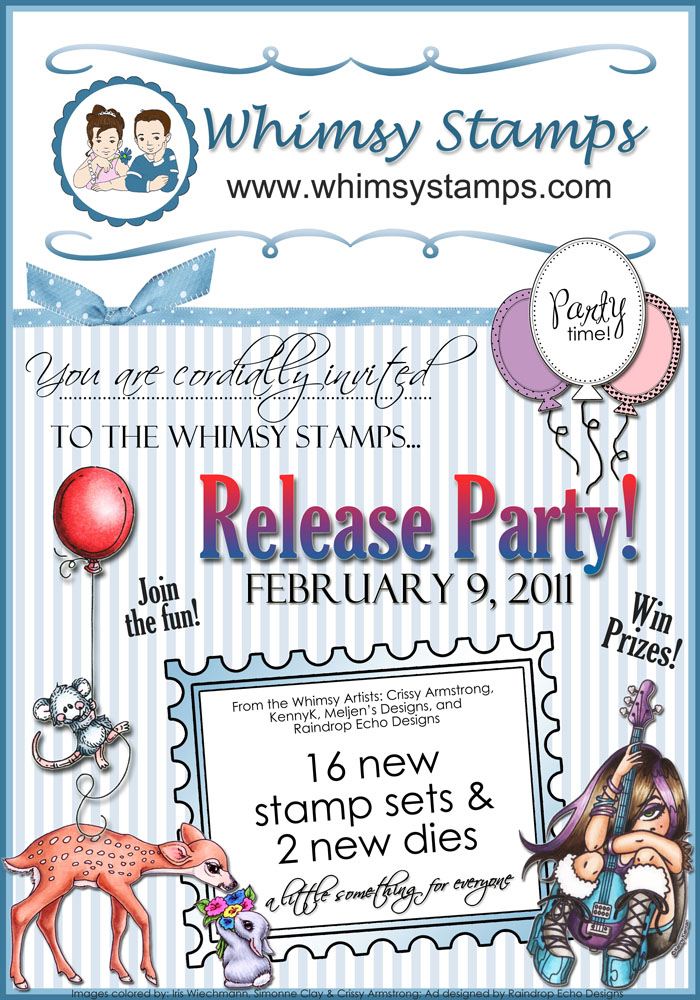
Hello and welcome to the Whimsy Stamps February new rubber release BLOG HOP! SIXTEEN gorgeous new Whimsy Stamps and two new dies are being released today! They are available to buy right now from the Whimsy Stamps store along with all your Whimsy favourites.

If you would like to participate in the hop and you didn’t arrive here from Tracy’s blog, please CLICK HERE to return to the beginning of the hop at Chris’s blog.

The hop starts today (Wednesday February 9th at noon EST) and ends on Wednesday, February 16th at 12 noon (EST).

For this hop we have 6 different prize draws – with two grand prizes at the beginning and end of the very end of the hop, but there are also 4 mini candy stops throughout the hop! I’m not going to tell you where they are, so you’ll just have to keep on hopping to find them! *wink*

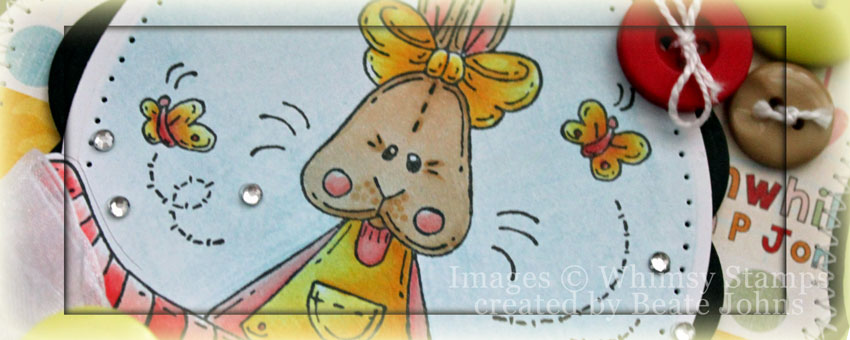
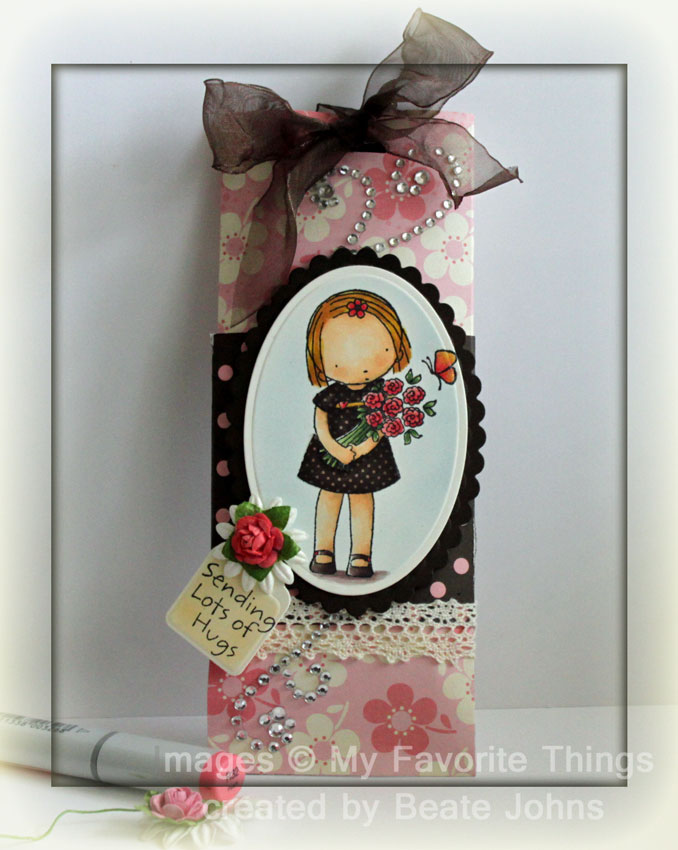
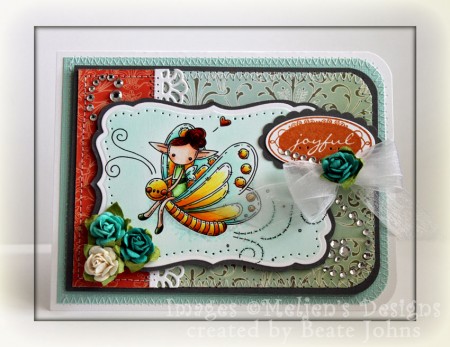
For my sample I used Meljen’s Spring Sitter Bunny. I stamped it in Tuxedo Black Memento Ink on Express It! Blending card, cut it with Circle Nestabilities dies and the Out of the Box Technique and colored it with Copic Markers (Shirt: R20, R21, R22, Stockings: R20, R21, R22, R24, R27, R29, shirt: Y11, Y15, Y19, fur: E30, E31, E33, Butterflies: R21, R22, Y19 Y15, Grass: G40, G82, G85).

The image was airbrushed with Copic Marker B52, layered on a piece of black cardstock that had been cut and embossed with a Large Scallop Circle Nestabilities die. The edges were paper pierced and Silver Kaisercraft Rhinestones were added to the image.

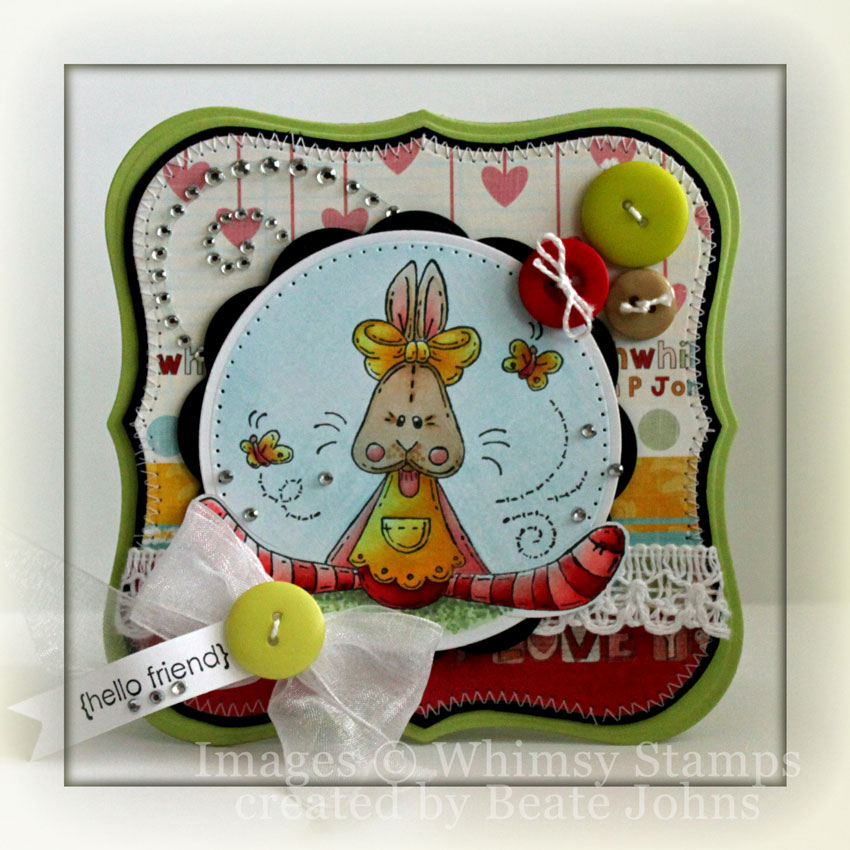
For the card base as well as the smaller layers I used Label 1 Grand Nestabilities dies.  The card base was cut out of Sour Apple cardstock. Fancy Pants Love Birds patterned paper was cut with the next smaller die and stitched to a slightly bigger hand cut black cardstock layer. Melissa Frances lace from the White ribbon pack was adhered around the layers before the image was adhered with dimensionals.

The sentiment is from the Friendship Ticket Sentiment set. It was stamped on a thin strip of white cardstock in Tuxedo Black Memento Ink . The left corner was punched with a square punch to create the edge, three small silver Rhinestones were added underneath.

May Arts Organdy Ribbon was tied into a bow with the Bow Easy. The bow was topped with a Basic Grey button and the sentiment strip was adhered underneath the button. Three more Basic Grey buttons were threaded with white embroidery floss and adhered to the upper right hand side of the image.

A Recollections Rhinestone swirl on the top left of the corner finish off the card front. Next on the blog hop is Crissy Armstrong! Have fun blog hopping and good luck on winning one of the prizes.

Have a wonderful day! Hugs and smiles

Splitcoast’s sketch challenge this week was a great sketch based on one of Jenna Barber’s cards. I had downloaded a few of Melissa’s (Meljen’s Designs) images and was itching to try out this darling fairy. After coloring the image, I ordered me two more of these sweet fairies in the Whimsy Stamp store. I bet you will see those here soon.

I printed her out on Neenah Solar White cardstock, cut the image with Label 17 Nestabilities die and colored her with Copic Markers (skin: E0000, E00, E01, E02, Hair: YR15, YR18, E18, Shirt: YG11, YG13, YG17, YG67, G28, G29, Butterfly: Y13, Y15, Y17, YR12, YR16, YR18, BG10, BG11, BG13). The image was layered on Basic Grey cardstock (Stampin’ Up!)  and cut freehand for an extra layer. The edges of the label were paper pierced.


The card base is a 5 1/2″ x 8 1/2″ piece of Neenah Solar White cardstock. The right hand corners were rounded with W R Memory Keepers Cropadile Corner Chomper. A 4″ x 5 1/4″ piece of Core’dinations cardstock was stitched to the card base after the right hand corners were rounded as well.

A 3 1/2″ long strip of White cardstock was cut with the Faux Crochet Die-namics die and stitched to a 1 1/4″ x 3 3/4″ piece of Cosmo Cricket Everafter Patterned Paper. The layers were adhered to a 3 1/2″  x 4 3/4″ piece of Everafter Paper.  That was stitched to a 1/4″ bigger piece of Basic Gray cardstock.

The sentiment is from Whimsy Stamps Oval Snippets. It was stamped in Rusty Hinges Distress ink and punched out with Stampin’ Up!’s oval punch. The oval was layered on a piece of Basic Gray cardstock, punched with the scallop oval punch.

Recollections Rhinestone swirls were adhered underneath the sentiment as well as on the top left and bottom right of the top layers. The image was adhered to the card base with dimensionals. Three Recollections flowers were twisted together and adhered to the lower left hand side. Organdy ribbon was tied with the Bow-Easy and topped with another Recollection flower before it was adhered to the bottom of the sentiment.

Thanks so much for stopping by! Have a wonderful day! Hugs and smiles

For today’s post I created a One Sheet Box, so I could shoot a video for this technique.  It’s another great way to give away little treats for Valentine’s Day and the box is made really easy and fast.

To decorate the box I stamped the new Tilda with a small gift in Tuxedo Black Memento Ink on Neenah Solar White cardstock. It was cut and embossed with a Petite Oval Nestabilities die and colored with Copic Markers (Skin: E00, E01, E11, Hair: E99, E39, E18, Skirt and Socks: R81, R83, R85, R89, Shirt: N0, N1, N3, Shoes: N3, N5, N7, Tag: E30, E31, E33, Ground: E31, E33, E35, Background: B0000, B91).

The image was adhered to a piece of Black cardstock that had been cut and embossed with a Petite Scallop Oval Nestabilities die. The edges of the image oval were paper pierced.

The box base was created out of a sheet of October Afternoon Ducks in a Row patterned paper, that had been cut down to 8 1/2″ x 11″.

Two 3 3/4″ strips of white cardstock were cut with MFT Faux Crochet Dienamics Border die and adhere to the edge of the middle panels of the box. Two holes were punched in the upper edge of the back middle panel with my Crop-a-dile. May Arts white Organdy Ribbon was tied through it.

The image was attached to the box front with dimensionals. Curling Sparkling Silver Ribbon was tied around the bow and twirled around the back of a paint brush to wind it up a bit.

A tag was cut and embossed out of Neenah Solar White cardstock and the sentiment was stamped on it with Tuxedo Black Memento ink. A bit of color was added with Copic Marker B0000. It was tied to the bow with the Curling Silver ribbon. The slot on the left of the tag was covered with a Recollections flower that had been colored to match with Copic Marker R81.

Here is a video for the visual learner:

[youtube]https://www.youtube.com/watch?v=M24jWiq47Jc[/youtube]

Thanks so much for stopping by! Have a wonderful day!
Hugs and smiles

For today’s “Tutorial from the Archive” in the Weekly Inkling I picked the Pull Treat Tutorial. It’s a great project to give away small treats on Valentine’s Day.

I stamped Pure Innocence‘s Bunch of Blossoms in Tuxedo Black Memento Ink on Neenah Natural White cardstock and cut and embossed it with Petite Oval Nestabilities. I stamped the girl again on October Afternoon Thrift Store paper, cut out the dress and shaded it with Copic Markers (E74, E77).

The rest of the girl was also colored with Copic Markers (Shoes: E74, E77, Ground: E70, E71, E73, E74, Flowers: R32, R35, Hair: YR31, Y26, E97, Butterfly: YR31, R32, R35) and the oval was airbrushed with Copic Marker B91. The dress was paper pieced over the colored image.  Stardust Stickles was added over the butterfly for some extra sparkle.

The Treat pouch base was created out of a 6″ x7″ piece of October Afternoon’s Daydream Paper, the Belly Band is the same paper (other side) measuring 2 1/2″ x 6″. May Arts Crochet Lace was wrapped around the bottom edge of the Belly Band.

The image was layered on a piece of Neenah Canyon Brown cardstock and adhered to the pouch with dimensionals. The hole for the ribbon was punched with Stampin’ Up!’s ribbon slot punch. The ribbon is Brown Organdy ribbon by May Arts. The bow was aged by heating it with my heat gun.

The sentiment is from the same stamp set. It was stamped on a tag cut with retired Spellbinder tag and airbrushed with Copic Marker YR31. A Recollection flower was colored with Copic Marker R32 and layered on top of a Prima Flower before both were attached over the tag. Recollection Rhinestone swirls finish off the Pull Treat.

Pull Treat Video Tutorial:

[youtube]https://www.youtube.com/watch?v=no-hDWEmcFE[/youtube]

Paper Piecing Video Tutorial:

[youtube]https://www.youtube.com/watch?v=aDQObTxqQjI[/youtube]

Thanks so much for stopping by! Have a wonderful day! Hugs and smiles

Today Whimsy Stamps is releasing 6 new rubber stamps and sets, a new collection of exclusive designer papers, and a new metal die collection! 1 new Crissy Armstrong set of vintage holiday designs, 2 super cute new Meljen’s Designs rubber stamps, and 3 new sentiment sets by Raindrop Echo Designs including a fun calendar background stamp and some new Letter Seals. Designer Paper created by Ann Vento and Crissy Armstrong which coordinate with all of our holiday rubber stamps. And a new ticket die to make punching out all your ticket sentiments quick and easy!  

The Whimsy DT is holding a new release blog hop to showcase all of these new holiday stamps, papers, and die. Be sure to hop along with us for a chance at prizes and then a grand prize at the end of the hop! Lots of wonderful creations to see and fun to be had! If you are coming from Chris Olson’s Blog you are right on track. Make sure you visit Lori Pachkowsky‘s blog next. She is a prize stop and you could win the Winter Seal set there.

Like I said, I really like the new Peace on Earth set from Whimsy Stamps. For my card, I stamped the candle image in Tuxedo Black Memento Ink on Natural White Neenah cardstock. The image was cut and embossed with Classic Oval Nestabilities and colored with Copic Markers (Candle: YR21, YR23, YR24, E97,  Wax: YR20, YR21 Flame: YR12, YR14, YR18, Leaves: G21, G24, G28, Ground: E40, E41, E43). I punched a 1” circle out of a Post-It Note, placed the mask over my candle and airbrushed that area with Copic Marker YR20. Next the Nestabilities die was placed over the cardstock and the background was airbrushed with Copic Marker B93.

Natural White Neenah cardstock was cut and embossed with the largest of the Beaded Oval Nestabilities die and sponged first with Fired Brick, then lightly with Walnut Stain Distress Ink. The main image was adhered over the Beaded Oval Nestabilities with dimensionals.

The card base is a 5 ½” x 8 ½” piece of Cherry Cobbler cardstock folded in half. The card front was sponged with Aged Mahogany ink.  A 1” x 3 ¾” was adhered vertically over a 3 ¾” x 5” piece of Webster’s Pages Patterned Paper. Both paper pieces were stitched to a 4” x 5 ¼” piece of Neenah Natural White cardstock.

A Mini Mister was filled with a bit of Vintage Photo Distress Ink Refill and water. I spritzed a piece of Natural color Seam Binding until it was completely wet and then added a few drops of Vintage Photo Distress Ink refill directly on the binding. The binding was dried and tied around the paper layers.

A heart was cut and embossed out of Cherry Cobbler cardstock with Nestabilities new Nested Hearts. The heart was sponged with Fired Brick Distress ink. Next the die was placed back over it and the embossed parts were sponged with Walnut Stain distress ink. The entire heart was embossed several times with clear embossing powder.

The sentiment is also from the Peace of Earth set. It was stamped on Neenah Natural White cardstock, cut and embossed with Classic Circle Nestabilities and airbrushed with Copic Marker B93. I pierced a small hole on top of the circle as well as the heart and tied it around the ribbon with gold cord. I used the same gold cord piece to tie a button from my Mom’s collection to the ribbon. Latte Kaisercraft Pearls were adhered to the lower left corner to finish off the card.

Thanks so much for stopping by! Have a wonderful day! Hugs and smiles

craftysecretsfairyenchantin.jpg

Check out this darling little fairy. She is from Crafty Secrets Fairyland set. She was stamped in Tuxedo Black Memento Ink on Neenah Solar White cardstock. The image was cut with Classic Oval Nestabilities, colored with Copic Markers (E0000, E00 skin, Y23, Y26 hair, B21, B00, wings, R30, R32, R35 dress) and airbrushed with Copic Marker Y21. The image was layered on a black piece of cardstock cut and embossed with the second largest of the Crowned Oval Nestabilities. Each crown piece was topped with a Rhinestone from Stampin’ Up!.

craftysecretsfenchantingcro.jpg

A 2 3/4″ wide cardstock strip was cut and embossed with Kaleidoscope Borderabilities and adhered under a 1 3/4″ x 2 3/4″ strip of Cherry Hill October Afternoon Paper. The strips were adhered to the left hand side of a 3 3/4″ x 5″ piece of Material Girl Cosmo Cricket Paper, which was stitched to a 1/4″ bigger piece of Basic Black cardstock.  Melissa Frances white lace was taped on the Cherry Hill strip. A hole was punched over the lace and blue silk ribbon was tied around it. The main image was adhered over the end of the lace with dimensionals.

The sentiment is also from Fairyland. It was stamped in Tuxedo Black memento Ink on the lower left hand side. More Stampin’ Up! Rhinestones on the lower left and upper right hand corner finish off the card.

craftysecretsfenchcroinside.jpg

The inside of the card is kept very simple, like all my cards. I just can’t leave them empty anymore. They feel naked if they are not tied into the card front with matching paper.

Thanks for stopping by! Have a wonderful day! Hugs and smiles

fllcspringbouquetf4a24wide.jpg

Flourishes posted a challenge last week called Kids Play. You were to create a card inspired by child’s play. Since I wanted to use flowers, I figure I could be inspired by “Ring Around the Roses”. I stamped the Spring Bouquet with Tuxedo Black Memento Ink on Neenah Solar White cardstock and colored it with Copic Markers (R30, R32, R35 (Peony), R01, R02, R14 (Sweet Peas), BV02, BV04, BV13 (Lilacs), B21, B23 (blue flowers), G21, G24, YG67 (leaves), Y15, Y0000 (glow) ). The image was cut out with Petite Oval Nestabilities and layered on a piece of Black cardstock cut with the Scalloped Edge Frame from Spellbinders.

fllcspringbouquetf4a24take2.jpg

Because of the size of the main image, the card base was made a bit bigger. It was created out of a 4 3/4″ x 12″ piece of Core’dinations Cardstock folded in half. A 4 1/8″ x 5 3/8″ piece of Oh La La My Mind’s Eye paper was stitched to 4 3/8″ x 5 5/8″ piece of Wshiper White cardstock. White Silk Ribbon from May Arts was tied around the upper half of the layers before they were adhered to the card base with dimensionals.

The sentiments is also from Spring Bouquet. It was stamped on Neenah Solar White cardstock with Tuxedo Black Memento Ink and cut and embossed with Spellbinders Double Ended Tags. Yellow Kaisercraft Pearls finish off the card front.

fllcspringbouquetinside.jpg

As always the inside of the card is super simple. I just can’t leave it completely blank. It looks so “naked” to me. The punch used on the black cardstock is from Stampin’ Up!. The My Mind’s Eye paper strip measures 1 1/2″ x 4 3/8″.

As you can tell from my latest posts I really enjoy playing with my Copic Markers. I will be coloring in the Dick Blick Store in Columbus the coming Sunday (08/15th) from 11:00 a.m. to 2:00 p.m. If you live close by, I would love for you to come by and hang out with me! I am very excited Marianne asked me to demo for customers in the store. How cool is that!

Thanks so much for stopping by! Have a wonderful day!
Hugs and smiles

unitybravegirlgluewide.jpg

Today’s tutorial on Splitcoast is written by Roni Johnson. It’s for the Distress Glue technique. For my sample I cut a square with Classic Square Nestabilities, added Tacky Glue, let it dry and then sponged it with Weathered Wood and Stormy Sky Distress ink. The square was layered on a black Fair Isle Pendant.

unitybravegirldistressedglu.jpg

A 4 1/2″ square of Webster’s Pages paper was stiched to a 4 11/16″ square of black cardstock. A 4 1/2″ strip of Neenah Solar White cardstock was cut with the Lattice Borderabilities and adhered to the lower half of the square. A hole was punched in the lower right hand side of my main image before it was adhered to the card front with dimensionals. Pink Satin Ribbon was tied through that hole and around the layers and topped with a button. My card base is a 5″ x 10″ piece of Textured Old Olive cardstock folded in half. The layers were attached to the card base with dimensionals.

The butterfly lady (or as Jenn and I call her “Frida”) is from the Unity set Brave Girl. It was stamped in Black Soot Distress Ink on Neenah Solar White cardstock and colored with Copic Markers (c9.jpge0000.jpge01.jpgyg93.jpgyg95.jpgy28.jpge35-copy.jpgyr21-copy.jpgyr23.jpg). White Opal Liquid Pearls were added to her dress and a Kaisercraft Pearls Pearl as her earring. The butterfly wings were colored with the clear Spica Pen for a subtle shimmer. She was cut out and adhered to the square with dimensionals.

unitybravegirlglueinside.jpg

The inside of the card is pretty simple. I used the left over strip (1 1/2″ wide) from the Webster’s Pages paper from the front, cut it down to 4 1/2″ and adhered it to a 4 1/2″ Solar White square. The square was stitched to a 4 11/16″ basic black cardstock piece before it was adhered to the inside of the card.

Here is a video for the visual learner:
[youtube]https://www.youtube.com/watch?v=yK_SHszRwo4[/youtube]

Thanks so much for stopping by! Have a wonderful day! Hugs and smiles

fllccalendarset2wt276wide.jpg

Here is a card I created a while ago for a Way to Use it Challenge. We were to use embossing on our card. I already had the center piece colored and cut so I first dry embossed with one of Stampin’ Up!’s new Embossing Folder (Mary Brown was here for a visit and brought it over to play with). Then the raised part of the strip was covered with Versamark and embossed with Clear Embossing Powder.

The main image is from Flourishes Calendar Set #2. It was stamped in Tuxedo Black Memento ink on Neenah Solar White cardstock and colored with Copic Markers (B91, R24, R27, YG03, YG25, YR16, YR18). The image was cut with Label 9 Nestabilities. With the die still over the cardstock, the image was airbrushedwith Copic Marker B000.

fllccalendarset2wt276tigerl.jpg

The card base is a 4 1/4″ x 11″ piece of Early Espresso cardstock folded in half. 3 3/4″ wide Webster Pages patterned paper was stitched to a 3 15/16″ x 5 3/16″ piece of Whisper White paper. Espresso Satin ribbon was tied around the layers horizontally. The 2″ x 4 1/2″ piece of Riding Hood Red paper was stitched with brown thread and adhered over the ribbon with dimensionals.

The sentiment is from Flourishes Tag Lines. It was stamped in Tuxedo Black Memento Ink on Neenah Solar White cardstock. It was cut out with Petite Oval Nestabilities and airbrushed with Copic Marker YR16.  Three Pearl Kaisercraft Pearls on the top right finish off the card front.

fllccalendarset2wt276inside.jpg

The inside of the card is very basic. A small strip of Riding Hood Red cardstock was punched with Martha Stewart Deco Shell Border punch and a strip of Webster Pages patterned paper was stitched to it.

Thanks so much for stopping by! Have a wonderful day! Hugs and smiles

mfpf4a16owlbirthdaywide.jpg

I made this card for one of the Free For All Challenges last month. We were to create a card with a window in the front. I recently had gotten some stamps from Mark’s Finest papers and decided to use this sweet owl from the stamp set Owl Be There.  It was stamped in Walnut Stain Distress ink on Neenah Solar White cardstock and cut out with Petite Oval Nestabilities.  The flower center of the owl was colored with Copic Markers (Y21, YR21, YR23). An orange Rhinestone was adhered in the center of the flower.  It was layered on a Old Olive piece of cardstock that had been cut with Label 10 Nestabilities and stamped with a stamp from the Background Fun Stamp Set in Forest Moss Distress ink. A 1/4″ frame was cut out of Chocolate Chip cardstock with Petite Oval Nestabilities and sponged with Walnut Stain Distress ink.

mfpf4a16owlbirthdaybeate.jpg

The card base is a 4 1/4″ x 11″ piece of Deepest Mahogany cardstock folded in half. An oval window was cut into the card front with Petite Oval Nestabilities. A 3 3/4″ x 5″ piece of Cosmo Cricket Early Bird Paperwas layered with a 2 3/4″ x 3 3/4″ piece of patterned paper out of the paper pack. A border was cut out of white cardstock with Lattice Borderabilities. It was adhered over the top of the paper strip. the two punch outs of the border were taped to the top left and right corners of the card front. Split Pea Rhinestones topped those off. The layer was stitched to a 3 15/16″ x 5 3/16″ piece of Whisper White cardstock. An oval was cut through those layers before they were adhered to the card front.

A frame was cut out of Old Olive cardstock by layering a Petite Oval into a Label 10 Nestabilities. The edges of the frame were sponged with Peeled Paint Distress Ink. The frame was stamped with the Cracked background stamp from the Background Fun Stamp Set. A bow made with Mahogany Satin Ribbon adhered to the frame with a glue dot. More Split Pea Rhinestones were adhered to the top of the frame as well as the bottom right of the card front.

The sentiment is from Owl Be There. It was stamped in Walnut Stain Distress Ink on Neenah Solar White cardstock, cut out with Petite Oval Nestabilities and sponged with Dried Marigold Distress Ink. It was adhered to the card front with dimensionals.  

mfpf4a16owlbirthdayinside.jpg

For the inside of the card a 1 3/4″ x 3 15/16″ piece of Early Bird patterned paper was stitched to a 3 15/16″ x 5 3/16″ piece of Whisper White cardstock. The main image along with it’s layers was adhered in the center so you can see it to the window of the card front.

Thanks so much for stopping by! Have a great day! Hugs and smiles

© 2012 fresh & fun Suffusion theme by Sayontan Sinha