Hi everyone,

Sorry I am so quiet. It’s always hard for me to get back into my stamping rhythm after being on vacation. I think I will give myself until next week, when the kids start school again before I start stamping again. I had a wonderful time in San Antonio over the Holidays and have re-read some of my favorite book series (check one of my pages for more info on my favorite books).

I do have a post coming up on Saturday. I hope you know that Spellbinders has a Blog hop going on this week showing off soon to be released dies.

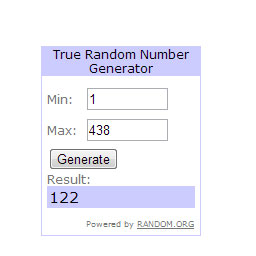
Random.org picked #122 as the winner for my latest blog candy. That’s Rebekka with this comment:

Rebekka says:

I just love your blog Beate :) . Thanks for a chance at this wonderful prize. Have a Happy New Year!:)


Rebekka, please email me with your mailing address and I will get the goodies out to you.

Thanks to everyone who left a comment. I hope you have a great weekend! Hugs and smiles

I had a post on the Spellbinders blog yesterday featuring a Happy New Year’s card. I hope you had time to check it out and if not, go and hop on over there and tell me what you think. I am in love with Glimmer paper and stars recently.

Thanks so much for stopping by! Have a wonderful day!
Hugs and smiles

P.S.: Today’s new tutorial on Splitcoaststampers is written by Sabrina Friel for a Flip Down Stack card. I hope you have time to check that out as well.

Happy New Year! I hope you had a wonderful and save New Years Eve!

I am excited to be guest designing for Technique Tuesday this month with Ali Edwards newest set called Be Mine. For my card  I started with a 3″ x 5″ piece of Neenah Solar White cardstock. The heart from the set was stamped in Tuxedo Black Memento Ink on the left hand side and colored with Copic Markers (YR09, R24, R29, R39). A sentiment was stamped on the lower right hand side.

Two pieces of Washi Tape were adhered to the upper left side and the bottom corners were rounded. The layer was adhered to a slightly bigger piece of Kraft cardstock. Two buttons were tied to over the washi tapes with silver cord.  The layers were adhered to the card base, a 3 1/2″ x 11″ piece of white cardstock, folded in half, with foam adhesive squares. Rhinestones finish off the card.

Thanks so much for stopping by! Have a wonderful day!
Hugs and smiles


Welcome to the Seasons Givings Blog Hop!  This hop is going to be a little bit different, in the fact that every single person on the list below, is giving something away.  All you need to do, is go to their blog, and leave a comment.  Really, really easy.  Now grab a cup of coffee, or tea, or maybe some hot chocolate, whatever your favorite is, and start hopping.
Here is to starting off the year 2013 in a fun way!

Paper Crafts magazine

Kelly Marie Alvarez/Lawn Fawn

Unity Design Team

Avocado Arts

GinaK Designs

Latisha Yoast

Lee Murphy

Laurie Schmidlin

AJ Otto

Michelle Woerner

Jocelyn Olson

Cindy Lawrence

Amy Tsuruta

Jessie Rone

Karen Baker

Lori Tecler

Jodi Collins

Kim Kesti

Tosha Leyendekker

Lisa Henke

Tonya Dirk

Ann Cox

Jimmi Mayo

Cristal (Pinky) Hobbs

Vera W. Yates

Jennifer Gallacher

Lisa Hetrick

Emily Leiphart

Lori Craig

Melody Rupple

Kim Hughes/Paper Smooches

Lynnette Kauffman

Beate Johns

Ashley Marcu

Becky Olsen

Jessica Diedrich

Alice Wertz

Joanne Basile

Carolyn King

Teri Anderson

Isha Gupta

Melissa Mann

Lydia Fiedler

Beth Pingry

Jaclyn Miller

Glenda Wyatt

Julia Stainton

I am giving away a retired background and regular stamp set from JustRite Stampers as well as the Eyelet Pendant die set from Spellbinders Paper Arts (retired set).
To enter in the drawing for this prize, just leave a comment under this post. Tell me what you do with your retired supplies, or with sets you haven’t used in a long time. Do you keep collecting or do you purge like me? I will pick a winner on the January 3rd with the help of random.org. Thanks so for stopping by!
Happy New Year! Hugs and smiles
P.S.: I am so sorry! I posted this a day early! I apologize. The other blogs will post tonight at midnight.

It’s my turn to share on the Spellbinders blog today. The topic this week is sparkles. Now that was an easy one for me. Rhinestones, Brilliance ink and Glimmer Paper.

I hope you have time to check it out and tell me what you think. Have a wonderful day!
Hugs and smiles

Today’s tutorial on Splitcoaststampers is written by the amazing Eva Doblias. She shows us how easy it is to use Twinkling H2O’s. She couldn’t create a video, so I shot one showing how to use the paints to create a watercolor wash background.

I started by stamping snowflakes from Verve’s Glad Tidings in VersaMark ink on a 3″ x 5″ piece of white cardstock.  They were embossed with white embossing powder before I used blue and purple Twinkling H2O’s for the waterwash. Once the paper dried, I stitched the edges of that layer.

A piece of white cardstock was cut with the Vintage Oval Frame die and the stamp with the same name was stamped over it with Starlite Black Brilliance Ink. A sentiment from Glad Tidings was stamped in the center.

Silver glimmer paper was cut and embossed with the two smallest dies from Spellbinders Create-A-Flake Four, layered on top of each other and connected with a Recollections brad (Michaels). The snowflake was adhered to the right hand side of the sentiment layer. Rhinestones from a Sleek Strips Silver Rhinestone package were added underneath the sentiment. The sentiment layer was adhered to the lower left of the background layer before the background was adhered to the card base. Part of a Finesse Rhinestone Swirl finishes off the card.

Here is a video for the visual learner:

[youtube]https://www.youtube.com/watch?v=oSWBfnl_wSo[/youtube]

Thanks so much for stopping by! Have a wonderful day!
Hugs and smiles

My card today is super easy. I started with a 4″ x 11″ piece of Neenah Solar White cardstock. It was folded in half and the bottom left corner was rounded. One corner of a 2 1/2″ x 5 1/4″ piece of Echo Park’s Holly Jolly Christmas paper was rounded before the edges were sanded. The layer was adhered to the left hand side of the card front.

I have had the Taylored die Merry for a while and had to use it before Christmas is over. I like it a lot. I cut two Merry’s out of Red Devil Fourz Bazzill cardstock and one of silver glimmer paper. They were adhered to the lower part of the card base. Three tiny rhinestones were added on the Y of the bottom Merry.

Next I cut and embossed silver glimmer paper and Red Devil cardstock with the two small dies from the 2012 Snowflake Pendant Shapeabilities® die set. The snowflakes were adhered to the upper right hand side of the card front and topped with rhinestones. A paper piercing edge along the paper strip above the sentiments finish off the card.

I want to wish you a Merry Christmas. I hope you have a wonderful time with friends and family! Have a wonderful day!
Hugs and smiles

While I have nothing new to share, I have some exciting news. Simon Says Stamp is featuring two of my cards on their blog today. I hope you have time to check it out and say hi.

Thanks so much for stopping by! Have a wonderful day!
Hugs and smiles

I have another post on the Spellbinders blog today. I hope you have time to check out the entire card. It works great for the current Simon Says Stamp challenge, which is to create a Christmas project.

Thanks so much for stopping by!  I don’t know how much I will be posting over the weekend and next week! I wish you all a wonderful Christmas. Hopefully you get to spend it with loved ones!!!
Hugs and smiles

I am back with another cute Tiddly Inks image called Cocoa Wishes. It was printed out on Neenah Solar White cardstock. It was cut 3 1/2″ wide and the image was colored with Copic Markers (Skin: E50, E21, E33, R20   Hair: E13, E15, E19, E18   Jeans: B91, B93, B95, B97   Ear Muffs/shirt/bird: YR09, R24, R29, R39    Cup: E40, E41, E42, E43  ).

Two pieces of  3 1/2″ wide strips of Carta Bella’s Winter Fun patterned paper were adhered above the image and the edges were stitched. The layers were adhered to the card base a 3 1/2″ x 11″ piece of Kraft cardstock, folded in half. The bottom corners were rounded and a piece of red washi tape was adhered on the the paper strips on top.

A sentiment from Snowflake Letters Mini seals was stamped in Tuxedo Black Memento Ink on a piece of white cardstock, cut and embossed with a Standard Circle Nestabilities die. A red button was tied on with a silver cord before the sentiment circle was adhered with foam adhesive squares. A few snowflakes were cut and embossed out of silver glimmer paper with Snowflake Borderabilities dies and adhered to the card to finish it off.

Thanks so much for looking! Have a wonderful day!
Hugs and smiles

© 2012 fresh & fun Suffusion theme by Sayontan Sinha