Search Results : round tab punch

mftsummertslidewide.jpg

Today’s tutorial on Splitcoast is written by new tutorial writer Kim Score. She shows us a different kind of slider card. I created my sample with My Favorite Things Sunshiny Day. The image was stamped with Tuxedo Black Memento Ink on Neenah Solar White cardstock. It was colored in with Copic Markers (E000, E01, E11, YG25, YG17, R24, R29, Y17, YR16, BG07,  BG09). the image was cut with Label 13 Nestabilities. It was layered on a slightly bigger piece of Basic Black cardstock and hand cut around it. The background was airbrushed with Copic Marker B00.

mftsummertslidebeate.jpg

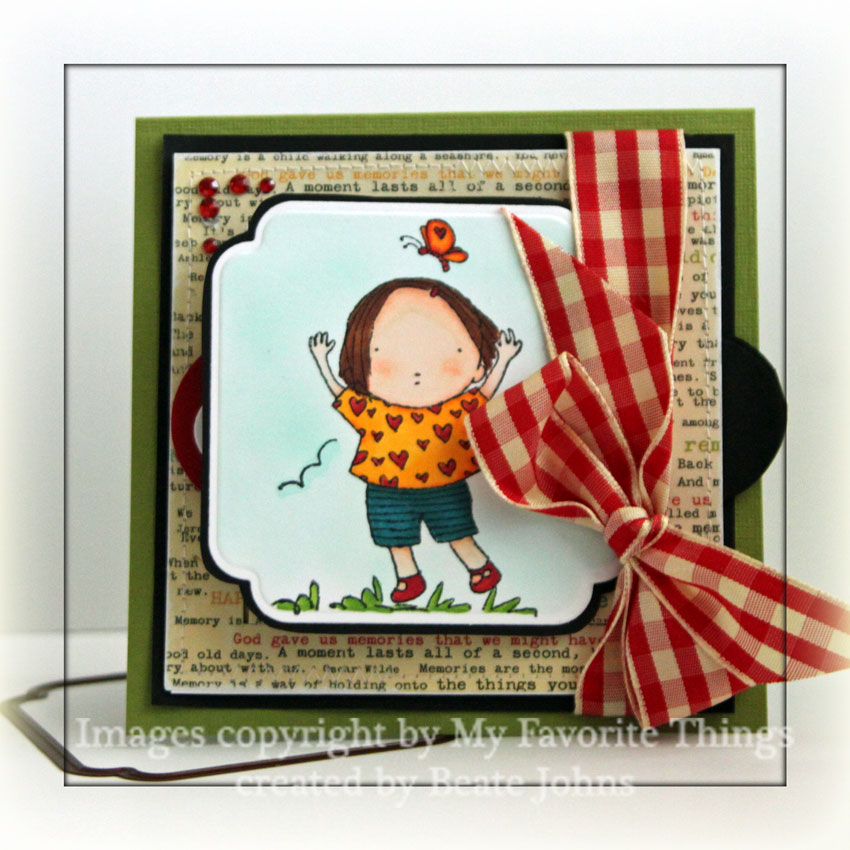
The card base is a 4 5/8″ x 9 1/4″ piece of Textured Old Olive cardstock folded in half. The edges of a  4″ square of  Thrift Store October Afternoon Paper were sanded and stitched to a 4 1/4″ black cardstock square. Red Gingham Ribbon was tied around the right side of the layers. Red Rhinestones were added to the top left corner.

mftsummertslideopen.jpg

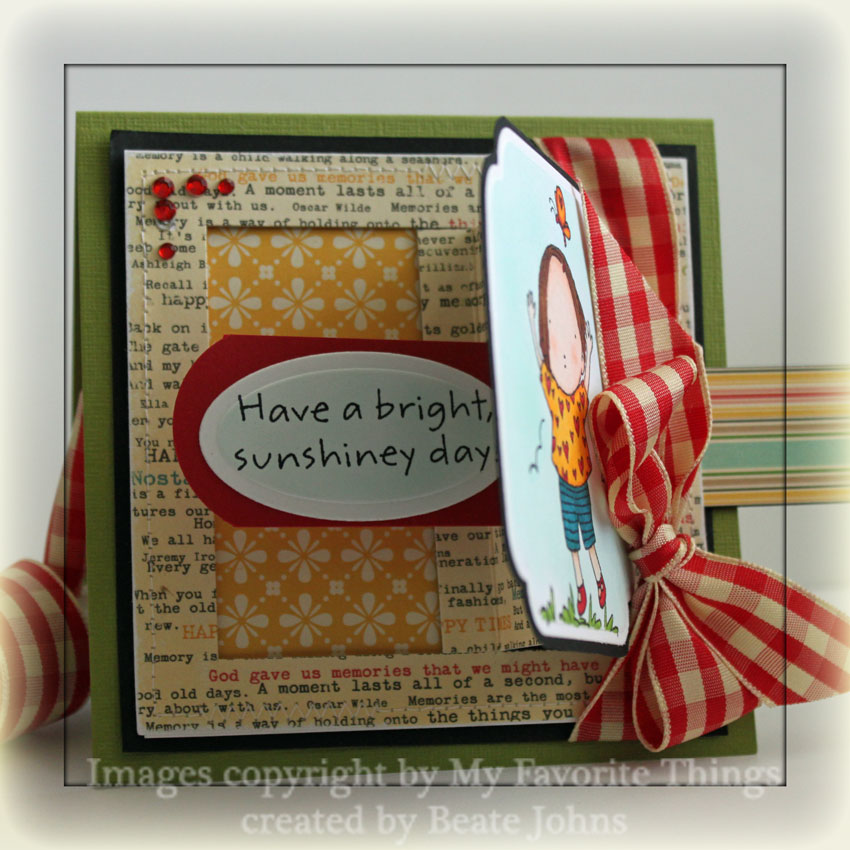
When pulling on a tab on the right, the image lifts up and a hidden message appears. The sentiment is from the same stamp set and stamped on Neenah Solar White cardstock in Tuxedo Black Memento Ink. It was cut with Petite Oval Nestabilities and the inside was colored with Copic B00.

Here is a video for the visual learner:
[youtube]https://www.youtube.com/watch?v=Jdqh_Z6rR8Q[/youtube]

Thanks so much for stopping by. Have a great day! Hugs and smiles

Video library - Tools/Products

[youtube]https://www.youtube.com/watch?v=g_WMkAN1rwg[/youtube]

[youtube]https://www.youtube.com/watch?v=3G_-KNAx2jk[/youtube]

[youtube]https://www.youtube.com/watch?v=6XFtZFgmvy4[/youtube]

[youtube]https://www.youtube.com/watch?v=wwfMTNNaKOY[/youtube]

[youtube]https://www.youtube.com/watch?v=IMDUq3GgzQE[/youtube]

[youtube]https://www.youtube.com/watch?v=ACSO17fXUpQ[/youtube]

[youtube]https://www.youtube.com/watch?v=wXVA0Lerphk[/youtube]

  • Flower Soft Snow Globe

[youtube]https://www.youtube.com/watch?v=z3TTvqf5JsQ[/youtube]

  • Inkadinkado new Ink Pads

[youtube]https://www.youtube.com/watch?v=kP9hi8eR7ns[/youtube]

[youtube]https://www.youtube.com/watch?v=L5GVsJnzg0Q[/youtube]

[youtube]https://www.youtube.com/watch?v=Pfd7CLRMyDk[/youtube]

[youtube]https://www.youtube.com/watch?v=IX_QZWyEzcY[/youtube]

[youtube]https://www.youtube.com/watch?v=TGAk9fGkEq8[/youtube]

  • Scallop Rectangle with Scallop Border Punch

[youtube]https://www.youtube.com/watch?v=2s8pgs2dVek[/youtube]

[youtube]https://www.youtube.com/watch?v=8NWFZ-x9WAk[/youtube]

[youtube]https://www.youtube.com/watch?v=wUWa_VdBifI[/youtube]

 vervestarstruckencausticwid.jpg

When I played with my Encaustic Wax I made quite a few backgrounds. It is such a great technique! Here is another card I made with one of the backgrounds.

For this background I think I used yellow, red, black and white wax. I cut the background with Circle Nestabilities. It was layered first on a black, then on a white cardstock circle. I stamped the sentiment and star from Verve’s Starstruck in Jet Black Archival Ink.

vervestarstruckencausticbj.jpg

The card base is a 4 3/4″ x 9 1/2″ piece of Dusty Durango cardstock folded in half. The edges of a  3 15/16″ square of textured Basic Gray cardstock were punched with the Ticket Corner punch. It was stitched on a 4 1/8″ square of Basic Black cardstock and then adhered to a white cardstock square measuring 4 5/16″. The corner of both bigger squares were also punched with the ticket corner punch.

The image layers were adhered to the center of the squares and Silver Kaisercraft Rhinestones were placed around the circles.

vervestarstruckencausticins.jpg

For the inside of the card I stamped a 1 3/8″ x 3 3/8″ strip of Dusty Durango with Rusty Hinge Distress ink and the big star image from the set. It was layered on a small black scallop strip and stitched to a 3 3/8″ square of Whisper White. That was then layered first on a basic black then a basic gray cardstock square.

I cut a small circle out of the same background with Circle Nestabilities, layered it on a slightly bigger black circle and stamped the You’re a Star from the Starstruck set in it’s center with Jet Black Archival Ink.

Thanks for stopping by! Have a great day! Hugs and smiles

mftappleforyoucc272wide.jpg

For a Color Challenge on SCS I used this cute Pure Innocence stamp: Apple For you. I stamped her in Tuxedo Black Memento Ink on Neenah Solar White cardstock and colored her in with Copic Markers (C1, E00, E02, R20,  E43, E44, E47, BV23, BG00, B93, YG03, YG17, R29, R59, Yr21, Y28). It was cut out with Label 3 Nestabilities. I left the die on the cardstock and airbrushed the background with Copic Marker YR21. The apple, hair clip and little heart on the jumper were covered with Glossy Accents. The image was first layered on a slightly bigger piece of Chocolate chip cardstock that had been sponged with Walnut Stain Distress ink, then on a Classic Square Rectangle Nestabilities die cut out of Real Red cardstock (sponged with Fired Brick).

mftappleforyoucc272beate.jpg

The card base is a 4 1/4″ x 11″ piece of Real Red cardstock folded in half. The edges of the card front were sponged with Fired Brick.  A 3 3/4″ x 5″ piece of Fancy Pants All Fall patterned paper was sanded and stitched to a 3 15/16″ x 5 3/16″ piece of Kraft cardstock that had been first sponged with Walnut Stain, then sanded to let the cardstock peek through for an aged look. A strip of cork was cut with the Jumbo Scallop Die-namic die  and stitched to a 2″ x 3 3/4″ piece of All Fall paper.

The sentiment was stamped in Tuxedo Black Ink on the same patterned paper used as background and cut with Petite Oval Nestabilities. May Arts ribbon was tied to a bow and topped with a My Mind’s Eye button. The card was finished off with Black Rhinestones.

mftappleforyoucc272inside.jpg

For the inside of the card I adhered a red jumbo scallop border under a 1 3/8″ x 3 15/16″ piece of All Fall Paper. The paper was sanded, then stitched to a 3 15/16″ x 5 3/16″ white cardstock piece. To finish it off I punched a 3/4″ cork circle (Yep, you can punch those cork sheets) and stitched it to the card with brown waxed linen.

Thanks for stopping by! Have a wonderful day! Hugs and smiles

jffwildfloweralcoholwide.jpg

This is a card I just gave up on. I made it for a color challenge on SCS. I really liked the center piece, but I just couldn’t finish the card in a way that I was happy with . For the center piece I added a few drops of Gold Metallic Alcohol ink fixative on my craft sheet. Then I added Wild Plum, Butterscotch and Rust Alcohol Ink close by and then topped it with Blending solution. I dropped a piece of Glossy cardstock glossy side down into the mix and twisted it.

Once the background was dry I stamped the Wildflower from Just For Fun Stamp with Jet Black Archival ink. I cut the image out with Classic Circle Nestabilities. It was layered on a slightly bigger black cardstock circle.

jffwildfloweralcoholcc271.jpg

The circles were layered on So Saffron Designer Paper that had been cut with Label 1 Nestabilities, that had been stitched to a slightly bigger black layer in that shape. A Kraft Taffeta bow was attached with a glue dot on the left hand side of the image. A small butterfly was punched out of Dusty Durango cardstock with a Martha Stewart Butterfly punch. It was sponged with Rusty Hinge Distress ink, adhered to the center piece and topped with Gold Liquid Pearls.

The card base is a quite big. I kept on adding layers because it just didn’t quite look right. I ended up having a 4 7/8″ x 9 3/4″ piece of Basic Black cardstock as card base. It was topped with a 4 1/2″ square of Dusty Durango cardstock that was sponged with Rusty Hinge Distress ink. On top of that is a 4 3/16″ Kraft cardstock square. The edges were distressed.

The sentiment is from Flourishes Tag Lines stamp set. It was stamped on Jet Black Archival ink. It was cut with Petite Oval Nestabilities and layered on a sponged Dusty Durango scallop oval. To tie in the Gold Liquid Pearl on the butterfly, I added a few more on the sentiment.

jffwildfloweralcoholinside.jpg

For the inside I used the same layers as on the card front. I swapped out the So Saffron Designer paper for So Saffron cardstock. I ran out of that paper. I stamped the Wildflower image in Rusty Hinge on the right hand side and added another butterfly.

Thanks so much for stopping by. Have a wonderful Memorial day! Hugs and smiles

fllcginghamstrawberrieswide.jpg

I haven’t played with my Flourishes stamps in a long time. Saturday I had time to play and color and I picked the gorgeous Strawberries set. I used to not like coloring too much, but the more I use my Copics the more fun it is.

The big strawberries image was stamped on Gina K.’s Pure Luxury Ivory cardstock with Tuxedo Black Memento Ink and colored it with Copic Markers (R20, R22, R24, R29, YG63, YG67, G07, E31, E33, Y21, Y35, Y38, T3). The image was cut with Large Label Nestabilities and airbrushed with Copic Marker B000. Stardust Stickles was added in the center of the strawberry blooms and Glossy Accents was applied over the strawberries. The image was layered on a black scallop rectangle that had been cut with Rectangle Nestabilities.

fllcginghamstrawberriesfron.jpg

The card base is a 5″ x 10″ piece of Gina K.’s Pure Luxury Ivory cardstock folded in half. A 4 1/4″ strip of Ivory cardstock was cut with the scalloped scallop Die-namics die and adhered underneath a  2 5/8″ x 4 1/4″ strip of October Afternoon Fly A Kite Paper.  The strip was adhered to a  4 1/2″ square of the same paper pack. The square was stitched to a 4 11/16″ black cardstock square.

The sentiment was stamped on Ivory cardstock with Tuxedo Black Memento Ink. It was punched out with the large oval punch (Stampin’ Up!) and layered on a red scallop oval cut with the scallop oval punch. Around the edge of the ivory oval a thin border of Startdust Stickles was added. Underneath the sentiment two black buttons were adhered. 1/2″ wide ivory satin ribbon was tied into a bow, topped with a black button and adhered to the bottom right of the image.

savervefernwisheswide.jpg

Jenn was supposed to come over this weekend. We had planned on attending Wendy Vecchi classes in Indianapolis. But Texas is having bad weather and her flight was cancelled. I didn’t feel like driving to Indi without Jenn, so I stayed home and stamped. I made this card for yesterday’s Inspiration Challenge at SCS

ic232fernbamboolaminedishes.jpg

I picked these dishes as my inspiration pieces. I really liked the neutral color combo of the dishes and thought that it would translate into a great card.

savervefernwishesic232front.jpg

I stamped the weed image from Nature’s Moments first in Snow Cap Adirondack ink, then in Sepia Archival ink on the right side of a 3 1/2″ square of Kraft cardstock. The edges of the square distressed, then the square was stitched to a distressed 3 11/16″ square of White cardstock.

An oval was cut out of Kraft cardstock with Petite Oval Nestabilities. On the right hand side I stamped the weed image in Snow Cap Adirondack ink. The sentiment is from Verve’s Wishing you stamp set. It was stamped on Sepia Archival ink. The oval was layered on a slightly large scallop oval. It was cut out of Chocolate chip cardstock. The edges of that layer were sponged with Walnut stain distress ink. I punched a small circle on the left hand side of the oval layer with the Crop-a-Dile. Organdy Ribbon was tied through the hole around the layers.

The card base was cut out of Core’dinations Chocolate Box cardstock with the Scalloped Square Big Shot Die. The next layer was a 3 15/16″ square of Chocolate Chip cardstock that had been sponged with Walnut Stain Distress ink.

savervefernwishesic232insid.jpg

For the inside of the card I used the same cardstock squares as on the front. I stamped the image again on the Kraft layer with Sepia ink on the right hand side. I stamped the second part of the sentiment on a white scallop oval that had been cut with Nestabilities.

Thanks for stopping by! Have a wonderful day! Hugs and smiles

jffsflowertriplechallengewi.jpg

I made this card for three different challenges. It feels so good to be back participating in the challenges. I made this card for yesterday’s Free for All Challenge on Splitcoast, Just For Fun Stamps Color Challenge and Our Craft Lounge’s Sketch challenge.

I started by stamping Just For Fun Stamps Queen Anne’s Lace in Jet Black Archival Ink on Neenah Solar White cardstock. The image was cut out with Label 8 Nestabilities and sponged with Wild Honey, Faded Jeans and Peeled Paint Distress inks while the die was still placed over the cardstock. Highlights were added with a white gel pen. It was adhered to a scalloped rectangle that I cut to the size I needed with the Long Scallop Rectangle Nestabilities.

jffsflowertriplechallengebj.jpg

The card base is a 4 1/4″ x 11″ strip of Neenah Solar White cardstock folded in half. A 3″ x 3 1/2″ square of Pink Paislee’s 350 Degree paper was distressed, sponged with Wild Honey and adhered to a 3 3/4″ x 5″ piece of paper from the same paper pack. Then the layers were attached to a 3 15/16″ x 5 3/16″ piece of Basic Black cardstock.

White May Arts Lace was wrapped around the layers. A small hole was punched on the right side of the image and white organdy ribbon (Michaels) was tied through it.  Five Pearl colored Kaisercraft Pearls were added to the top right of the image. To balance everything out I added the sentiment on the lower left.

The sentiment is from OCL’s Life Is stamp set. I thought the script of that set would go Fabulous with the image. It was stamped in Jet Black Archival ink on Neenah white cardstock and cut out with Petite Oval Nestabilities. I sponged Wild Honey over it while the die was still over the cardstock.

jffsflowertriplechallengein.jpg

For the inside of the card I stamped the Queen Anne’s Lace in Faded Jeans Distress ink on Baja Breeze cardstock. The edges of the layer were distressed and sponged with Tumbled Glass Distress ink. It was stitched to a 3 15/16″ x 5 3/16″ piece of Basic Black cardstock and adhered to the inside of the card.

I hope you have a great weekend! Thanks for stopping by. Hugs and smiles

sa3dnaturesmomentswide.jpg

Sorry I have been so quiet this week. There hasn’t been a lot of stamping for me. The kids are home on spring break. Plus I started watching Bones on Netflix. Now I am hooked. I really like the characters on the show. Thank you for everyone wishing me a Happy Birthday yesterday.  I had a great day!

This week’s Tutorials you might have missed in the weekly inkling was 3D stamping. Lynn Mercurio wrote a great tutorial for SCS last year. Here is the card I created for the video tutorial.

sa3dnaturesmomentbeate.jpg

My card base is a 4 1/4″ x 11″ piece of Neenah Solar White cardstock folded in half. Pink Paislee’s Bayberry Cottage paper was sanded and taped together to a 3 3/4″ x 5″ layer. Chocolate Satin Ribbon was tied around the area where the paper overlapped. The layer was stitched to a 3 15/16″ x 5 3/16″ piece of Chocolate chip cardstock that had been sponged with Walnut Stain Distress Ink.

For the main image I cute an oval out of Baja Breeze cardstock with Petite Oval Nestabilities. I sponged the edges with Stormy Sky distress ink and stamped with the script from Mini Ornates. The flower/weed from Nature’s Moments was first stamped in Stormy Sky, then in Snow Cap Adirondack ink. The oval was layered first on a Chocolate Chip oval (sponged with Walnut Stain), then on a white callop oval.

All brads used were from Recollections. The sentiment is also from Nature’s Moments. I inked it partly with Walnut Stain, stamped it on white cardstock and punched it out with the large oval punch from Stampin’ Up!. It was sponged with Shabby Shutter Distress ink and part of the weed was stamped on the right hand side of the oval with Stormy Sky. The oval was layered on a Styled Silver hardware piece from Stampin’ Up!

Here is a video for the visual learner:

[youtube]https://www.youtube.com/watch?v=3M0phAg6Mts[/youtube]

ocldt07rockcandybutterflywi.jpg

For yesterday’s OCL sketch challenge I got out my new set In Flight. It is so pretty.

I started by cutting an oval with Petite Oval Nestabilities out of Solar White Neenah cardstock. I sponged it with Wild Honey, Peeled Paint , Fired Brick and Vintage Photo Distress Ink. I scribbled Glossy Accents over part of the oval and pressed a piece of a page from a dictionary page over the glue and let dry. Then I ripped the rest of the page off and sponged over the library piece. Last I covered the entire oval in Rock Candy Distress Stickles.

Next I stamped the dotted background and swirls over the oval in Jet black Archival ink. I also stamped the big  background in the upper center of the cardstock. I stamped it again on grunge paper. I cut it out, sponged it with Peeled Paint and Chipped Sapphire and then added Peeled Paint and Broken China Distress Stickles.

ocldt07rcbutterflybeate.jpg

The card base is a 4 1/4″ x 11″ piece of Ruby Red cardstock. The edges were sponged with Aged Mahogany Distress ink and the bottom corners were rounded. A  3 3/4″ x 5″ piece of Laundry Line Designer Paper was stitched to a 3/16″ bigger piece of Basic Black cardstock.

The horizontal layers started out as 7/8″ x 4 1/4″ piece of White cardstock. They were sponged and stamped. The black piece was punched with the Martha Stewart Deco Shell Border Punch. The sentiment was stamped in Jet Black Archival ink and punched out with Stampin’ Up!’s large oval punch. The edges were sponged first with Wild Honey, then with Aged Mahogany Distress inks. Tiny Tinkles were added as a flight tail behind the Butterfly.

The 1/2″ wide Silk ribbon started out in ivory. It was sponged first in Vintage Photo, then with Aged Mahogany. The dotted background was stamped all over the ribbon. After it dried it was tied into a bow with Bow-Easy and attached to the card with glue dots.

Thank you for stopping by. Have a wonderful Easter weekend! Hugs and smiles

© 2012 fresh & fun Suffusion theme by Sayontan Sinha