Random.org picked #71.

That is Dannette Ruger with this sketch inspired card.

wsc35-winner-dannette-ruger.jpg

You can see more of Dannette’s work on her blog Dannie’s creative outlet.

Thanks again for everyone that entered the challenge.

You all inspire me so much with your great takes on the sketches.

I am running out of goodies to send. So I will just send a card to each winner. I hope you will still participate in the challenges. I love to see your work.

Check out what Jennifer sent me.

rak-0218-jennifer-buck.jpg 

I couldn’t believe my eyes when I opened her box!

Wow! It’s beautiful! It came Friday, just in time to show it off at my workshop on Saturday.

Jennifer, it’s beautiful and I LOVE it! Thank you so much. What a gorgeous way to show off the rub ons!!!

You can see more of Jennifer’s wonderful work on her blog, The Buck stamps here.

friendship-blooms-stitch-an.jpg

I just can’t get away from the  red/pumpkin color combo! I LOVE the way it looks.

Here the card base is a 5 1/2″ x 8 1/2″ piece of Real Red cardstock folded in half.

The edges of the 4″ x 5 1/4″ piece of Basic Black cardstock were punched with the ticket corner punch. So were the edges of the 3 3/4″ x 5″ piece of Pumpkin Pie cardstock.

That layer was stamped with the swirl stamp from Friendship Blossom as well as one of the small flowers of the flower row. I paper pierced the edges of this layer and added white gel pen lines to complete the faux stitched look.

I layered the 1 1/2″ x 4 1/8″ piece of Old Olive Prints Designer Paper on a 1/4″ bigger piece of Black cardstock and added faux stitched line with the Argyle stamp from All in a Row.  5/8″ red grosgrain ribbon was tied around that layer.

The flower was stamped in Real Red on Pumpkin Pie cardstock and cut out. Next I added more Pumpkin Pie color with my Aqua Painter and white highlights with the gel pen. I stamped the small flower I used on the background on Whisper White cardstock, cut it out, taped it in the middle of the flower and topped it off with a black brad.

The sentiment is from Fundamental Phrases and was stamped in Black on White cardstock. I stamped the swirl stamp from Friendship Blooms  in Pumpkin Pie ink under it and punched it out with the 1 1/4″ circle punch. It was layered on a 1 3/8″ circle punch and a red scallop circle. For added detail I stamped the swirl stamp in red on white cardstock and cut out only the tiny red flower. I added it to the swirl sentiment circle with a black brad.

Last I added three 1/4″ red circles on the top right of the Pumpkin Pie layer with black brads in their center.

rak-0215-jennifer-langton.jpg

Jennifer Langton sent Rebecca this adorable card.

I am afraid I didn’t take the best of shots of this card.

You can see more of Jennifer’s work on her blog Doodleblog.

lots-of-thoughts-berry-than.jpg

This card was the one of workshop projects last Saturday.

The card base is a 4 1/4″ x 8 1/2″ piece of Purely Pomegranate.

It was layered with a ticket corner punched 4″ Chocolate Chip square followed by a 3 3/4″ square of Pretty in Pink.

A 1 3/4″ x 3 3/4″ strip of Berry Bliss Designer Paper was taped to the bottom of the Pretty in Pink layer and 5/8″ Chocolate grosgrain ribbon was tied around it.

We stamped the saying from Lots of Thought in Chocolate Chip on Shimmery White cardstock and punched it out with the 1 3/8″ circle punch. That was layered on a Pomegranate scallop circle and adered with dimensionals.

 I had to have one simple project to start the workshop with. Besides this card and the Flower bag we also made my Faux Shaving cream card (Kind thoughts), but not with that technique, but with Poppin’ Pastels. We added the red accents on the butterfly with the Versamarker.

Everyone had a blast and almost all of them will be back next Saturday for Stamp camp.

rak-0208-charmaine-ikach-re.jpg

Charmaine sent this incredible cute card to Rebecca wishing her a speedy recovery!

Like I said…I made some amazing friends through stamping.

Charmaine is definitely one of them.

Thank you so much! Rebecca is loving all the cards she has gotten. They are all lined up on her dresser.

Sorry! I didn’t scrap all week! I do have something to share with you though.

Last weeks sketch challenge on SCS was easy peasy for me. A square card!!!

sc163.jpg

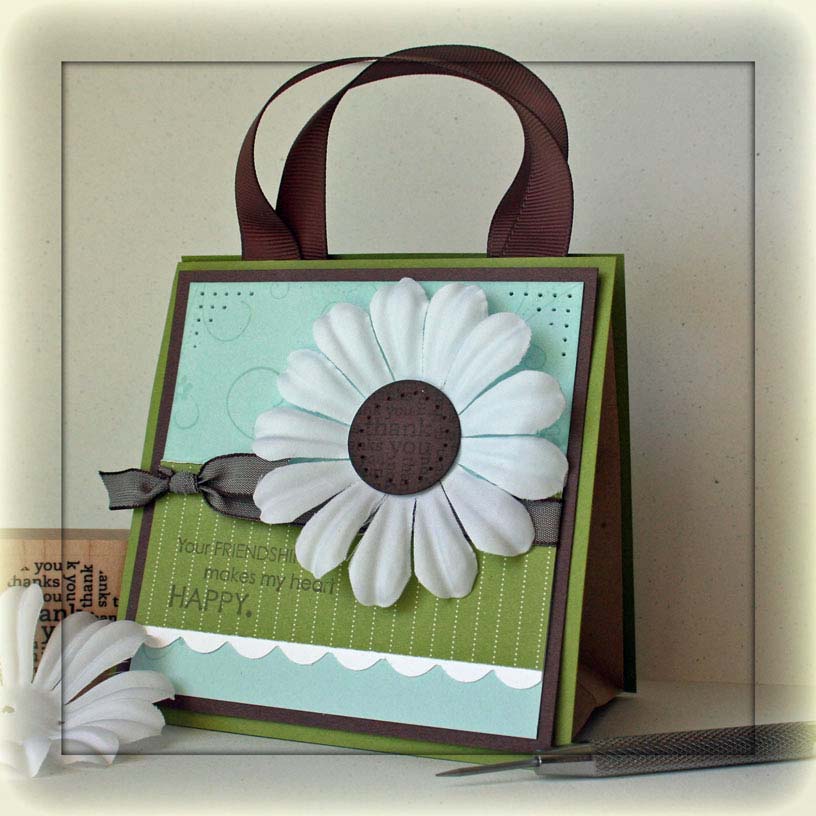
Surprise, surprise….my card base is a 5″ x 10″ piece of Chocolate chip cardstock folded in half.

Next was a 4 3/4″ ticket corner punched piece of Shimmery White cardstock followed by a 4 1/2″ piece of Soft Sky Prints Designer paper.

The top square consists of a 2 3/4″ paper pierced  and ticket corner punched square of  Certainly Celery Prints Designer Paper adhered to a 1/4″ bigger piece of Chocolate Chip cardstock.

I tied yellow ribbon from the Fairy Tale Ribbon Originals.

time-for-you-always-bench.jpg

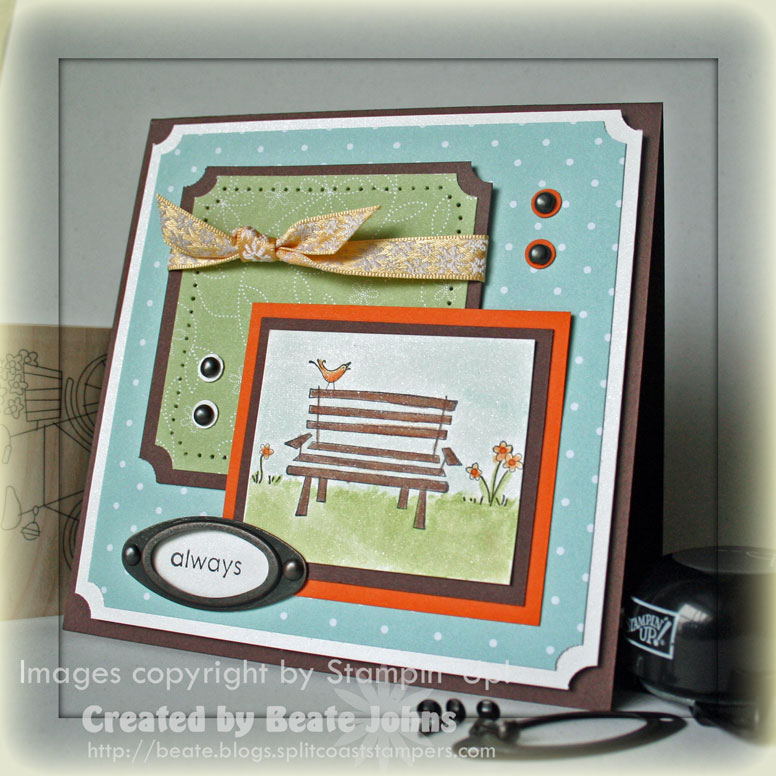
The main image is from the set Time for You out of the Occasional Mini catalog.

I stamped it in black Stazon on a 2″ x 2 3/8″ piece of Shimmery White cardstock.

Next I inked up just a few of the flowers from the basked of the bike image from the same set. I doodled the stems and some grass with my black Micron pen. Then I colored the image with Chocolate Chip, Certainly Celery, Apricot Appeal, Pumpkin Pie and Soft Sky classic inks and Aqua painter.

I layered the main image first on a 1/4″ bigger piece of Chocolate Chip, then on a 3/8″ bigger piece of Pumpkin Pie cardstock.  I inked up only the word always from the sentiment with black Stazon, stamped in on Shimmery White cardstock, punched it out with the small oval punch and added it to the card with an oval frame from the Aged Copper Hodgepodge Hardware kit.

To tie in the hardware, I added a few more brads with 1/4″ cardstock circle washers.

rak-0207-jules.jpg

Jules sent me this great card along with her great Valentine cards.

You can see more of Jule’s great work on her blog Need to Stamp.

My sweet neighbor Cheryl is hosting a workshop for me this morning. All of her friends are new to stamping, so I kept the projects easy. I still wanted the projects to wow them.

My 3D project for today is a covered lunchbag, aka. geniebag.

friendship-blooms-perfectly.jpg

I have little mini kraft lunchbags (4″ width) I got years ago from Debbie Fisher.

She in turn got it from her pharmacy.

I cut them down to a 4″ square.

4 1/4″ Old Olive squares were taped to the front and back of the bag with Sticky Strip.

Next I cut two 8″ strips of 5/8″ Chocolate grosgrain ribbon and stapled them to the bag and Old Olive layer.

I stamped the swirl stamp from Friendship Blooms in Soft Sky on the upper half of two 3 3/4″  Soft Sky cardstock squares and sponged the edges.

Next I scalloped a 1″ x 3 3/4″ strip of Whisper White cardstock and adhered it under a 1 1/2″ x 3 3/4″ strip of Old Olive Prints Designer Paper. A piece of Chocolate Taffeta ribbon was tied around the top of the designer paper and the big flower from the Pretties kit was adhered to the right of the square with a big glue dot. I stamped the sentiment from Friendship Blooms in Chocolate Chip on the right side of the designer paper.

For the center of the flower I stamped the thank you stamp from Perfect Timing in Chocolate Chip on Chocolate Cardstock, punched it out with the 1″ circle punch and sponged and paper pierced the edges.

I taped the Soft Sky square to a 1/4″ bigger Chocolate chip square and paper pierced the top corners. Last I attached those layers to the Old Olive square.

I hope they like it! Have a great day! Hugs and smiles

Pam Downs is such a sweet person! I always love when I get to meet her at Stampin’ Up! events.

rak-0208-pam-downs.jpg

Pam sent me this super cute card!

She also sent a card for Rebecca to wish her a speedy recovery.

I am so blessed to have made such wonderful friends through stamping.

Thank you, Pam!

rak-0208-pam-downs-rebecca.jpg

© 2012 fresh & fun Suffusion theme by Sayontan Sinha