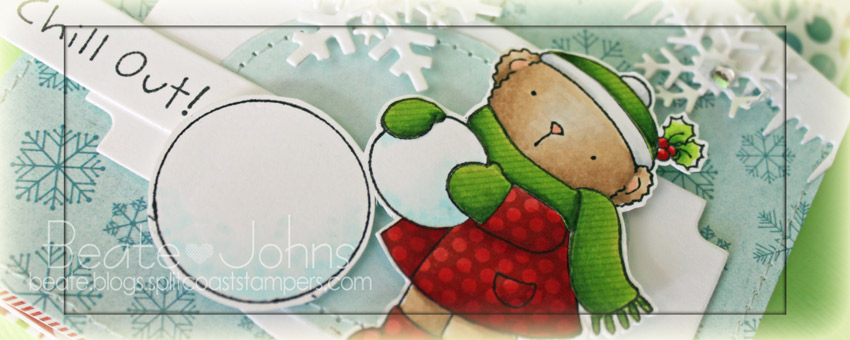
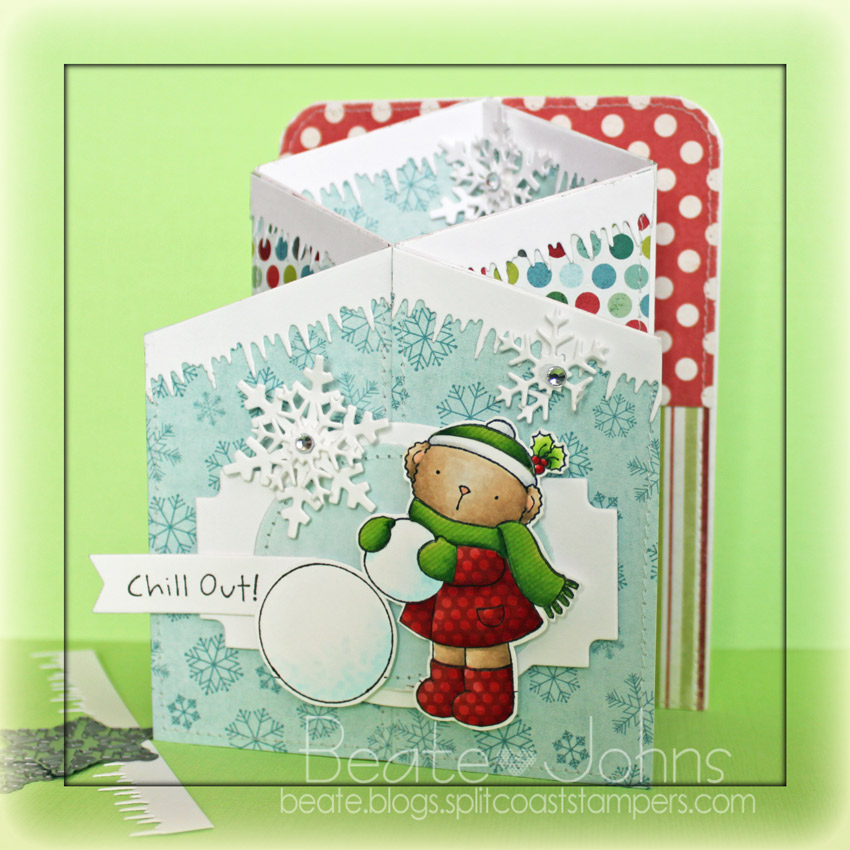
Today’s tutorial on Splitcoaststampers was created by the wonderful Shelly Hickox. She shows us how to use die cuts and turn them into 3d images. What a great idea! I had to try it out right away. Her sample is vintage prefection, so I tried to go a different route and see if it would work for a different style as well.

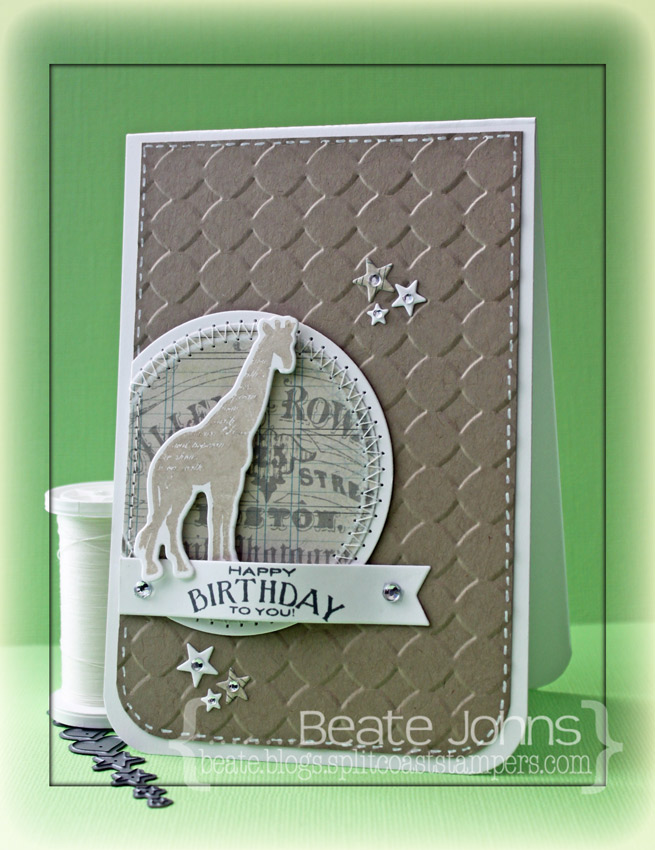
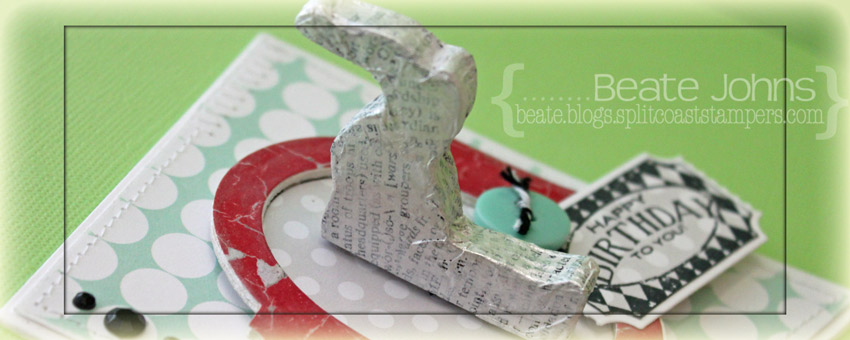
I used the elephant die from My Favorite Things Circus Spectacular and cut it 7 times out of light-weight coasters. The elephants were cut down adhered to each other with Beacon 3 in 1 Craft Glue. Once it was dry it small pieces of dictionary page pieces were adhered to the elephant with Glue N’ Seal. Once it was dry, Pearl Acrylic paint was added over it.

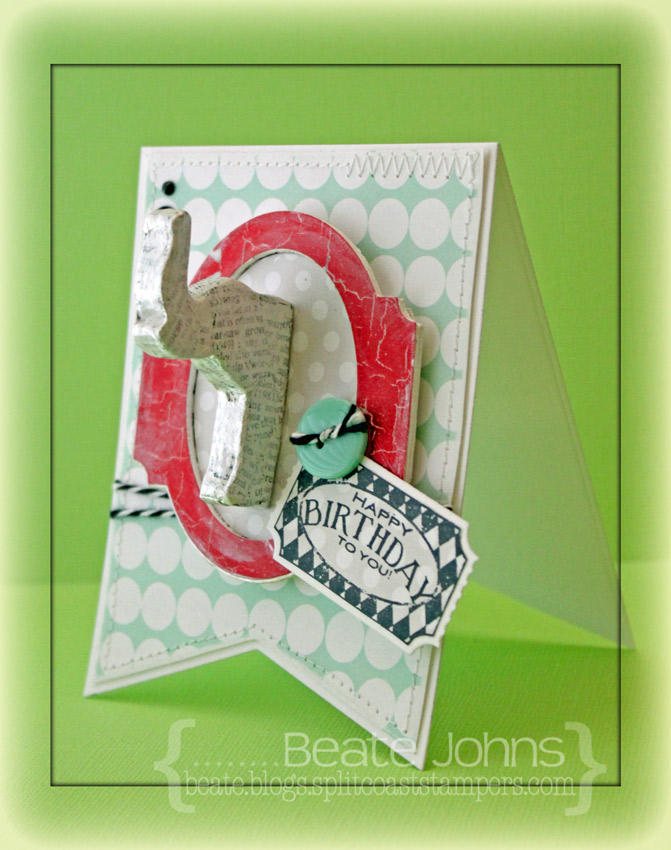
A frame was cut twice out of light weight coasters with the Vintage Cameo die. A piece of Fancy Pants The Good Life patterned paper was cut with the same die, adhered to the frame. The edges were painted with Acrylic Pearl Paint. Another piece of The Good life paper was adhered behind the frame and the elephant was adhered in the middle.

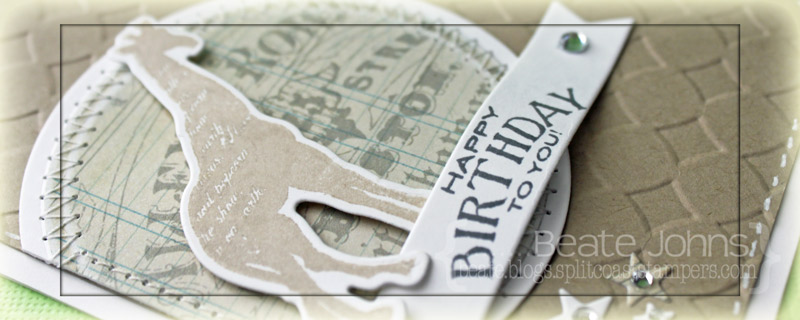
The card base was cut out of Neenah Solar White cardstock with the largest Stax Jumbo Fishtail Banners. More The Good Life paper was cut with the same die, sanded and cut down. The edges were stitched, Beetle Black doodlebug twine was tied around the layer before it was adhered to the card base.

A sentiment from Circus Spectacular was stamped on more The Good Life paper with Tuxedo Black Memento Ink. It was cut out and layered on Solar White cardstock, cut and embossed with the Ticket Strip Die-namics die. It was adhered on the left side of the frame and topped with a button to finish off the card.

Thanks so much for stopping by! I hope you have time to check out Shelly’s amazing tutorial and sample.
Hugs and smiles

Today I am sharing a CAS card I created a while back, when I was playing with the Pazzles electronic die cutter. I think I am getting old. I really prefer dies and a regular die cutting machine over electronic ones and messing with sticky mats.

The focal point here is a speech bubble cut with a Say What Die-namics die out of Neenah Solar White cardstock. It was stamped in Jet Black Archival ink with a sentiment and frame from the Say What stamp set.

The card base is a 3 1/2″ x 11″ piece of Solar White cardstock. The bottom corners were rounded and a thin border was drawn with a Copic Multiliner.  A strip of black polka dotted Washi Tape was adhered to the center of the card and a kraft cardbstock tag (cut with the Pazzles) was adhered slightly askew over it. A strip of Heart and Clouds Washi Tape and Tiny Hearts Washi Tape were adhered underneath the black one before the speech bubble was adhered over those with foam adhesive squares.

Twine was tied through the tag hole and the three dots stamp from Say What was stamped in black on the bottom right of the tag. Three rhinestones from Sleek Strips Silver Rhinestones finish off the card.

Thanks so much for stopping by! Have a wonderful day!
Hugs and smiles

I created a card last month for a featured stamper challenge on Splitcoaststampers.  I had picked this card to case, mostly because I had just gotten MFT’s Hexagon dies and wanted to try them out. I cut Neenah Solar White cardstock the larger strip. I cut slightly smaller pieces out of Carta Bella’s Merry & Bright patterned paper. The patterned paper pieces were fed through a Xyron sticker maker and adhered to the larger white strip.

The card base is a 3 1/2″ x 11″ piece of Patina Bazzill Cardstock, folded in half. The bottom right corner  was rounded. The hexagon strips were adhered to the left hand side of the card. More white cardstock was cut with MFT’s Let it Snowflake and Framed Greetings die.

A sentiment from Seasonal Sentiments was stamped in Red VersaMagic ink was stamped on the Framed Greeting die cut and adhered on the lower right card base.  The snowflake were sprinkled over the card and topped with rhinestones from a Sleek Strip Silver Rhinestone to finish off the card.

Thanks so much for looking! Have a wonderful day!
Hugs and smiles

P.S.: Today’s tutorial is written by my wonderful colleague and friend Lori Craig. She is showing us how to create colored glass.

I created a quick tutorial on how to fold half circles into a Christmas tree for today’s tutorial on Splitcoaststampers.  I started out by cutting a circle out of Teresa Collins Christmas Cottage with the smallest of the Grand Circle Nestabilities die.  The circle was cut in half, folded and decorated with rhinestones.

A stamp from the Lollipop Treat stamp set was stamped in Jumbo Java VersaMagic Ink on Neenah Solar White cardstock. It was cut out and adhered under the tree.

The upper right and lower left corner of a 3″ x 5″ piece of Kraft cardstock were rounded. The bottom was stamped with a background stamps from the Lollipop Treat set and a sentiment from  Document It – December in Moonlight White Brilliance Ink. The edges were pierced before the Christmas tree was adhered with foam adhesive squares.

A piece of black polka dotted Washi Tape was adhered to the top right corner of the kraft cardstock. It was topped with a button, tied on with silver cord. The layer was adhered to the card base, a 3 1/2″ x 11″ piece of white cardstock. A sentiment from Christmas Ornaments was stamped to the lower right edges of the card with Tuxedo Black Memento Ink.

Here is a video for the visual learner:

[youtube]https://www.youtube.com/watch?v=7u8oJd3g384[/youtube]

Thanks so much for stopping by! Have a wonderful day!
Hugs and smiles

I created this card as an entry for MFT’s November Guest Designer contest. I started by cutting Kraft cardstock with the Peek-a-Boo Squared Die-namics die.  The layer was stamped with the smallest diamond background from Distressed Diamonds stamp set with Moonlight Brilliance ink.  Winter blues Whimsy paper was adhered behind the openings and the edges were pierced.

The bottom corners of a 2 1/2″ x 3 7/8″ of Winter Blues paper were rounded and adhered to a 4″ square of white cardstock with rounded corners. Silver curling ribbon was tied around the top of the paper layers with a button before all layers were adhered to the card base, a 4 1/4″ x 8 1/2″ piece of Patina Bazzill Cardstock with rounded corners. The peek-a-boo layer was adhered to the card base with foam adhesive squares.

Neenah Solar White cardstock was cut with the two smaller dies from Let it Snowflake die-namic dies, stacked and topped with a rhinestone from a Sleek Strips Silver Rhinestones. Two small snowflakes were cut out white cardstock as well. The snowflakes were adhered to the panels that didn’t have the tree .

Another piece of white cardstock was cut with a Fishtail Flag Stax and a sentiment from Seasonal Sentiments was stamped in Rocket Red Gold Brilliance Ink. It was adhered in the center of the card.

Thanks so much for stopping by! Have a wonderful day!
Hugs and smiles

P.S.: Today’s Holiday Blitz tutorial on Splitcoaststampers is written by Cindy Hall. She shows us how to create a darling telescoping snowman card. I hope you have time to check it out!

I created this card for a Featured Stamper challenge last month. Cheryl has such a wonderful gallery, I wanted to case another card of hers. This time I chose this CAS washi tape card.  I created my Washi Tape strips out of Tissue Stock from Canvas Corp. I cut strips in different sizes.

The biggest strip was stamped with the the smallest diamond images from Distressed Diamonds stamp set in Pear Tart Memento Ink. The thin strip was stamped with the snowflake background from Christmas Ornaments in Bahama Blue Memento Ink.  The last strip was sponged with Pear Memento Ink and stamped with a background stamp from By the Numbers in Jet Black Archival ink.

The card base is a 3 1/2″ x 11″ piece of textured Whisper White Stampin’ Up! cardstock folded in half. The bottom corners were rounded. A line was scored at 3/4″ on the bottom. Then the Faux Washi tape strips were adhered with a Xyron glue stick. Another line was scored right above the tissue strips, as well a partial strip 1/8″ under the lower score line.

A sentiment from Merry Kissmas was stamped on the right hand side partially on, partially off the highest tissue paper strip.  Neenah Solar White cardstock was cut with the two largest Let it Snowflake die-namic dies. They were stacked with foam adhesive squares and topped with a button.

Thanks so much for stopping by today! Have a wonderful day!
Hugs and smiles


P.S.: Today’s Holiday Blitz Tutorial on Splitcoaststampers was written by the wonderful Clare Buswell. She is showing how to create a pierced Luminaria.  I hope you have time to check it out!

I created this card last week for the CAS challenge on Spitcoast, the CAS-ual Friday challenge and that week’s CAS(E) this Sketch!. I started by cutting three leaves with the new MFT Falling Leaves Die-namic dies out of 7 Gypsies Conservatory paper. The edges of the leaves were sponged with Vintage Photo Distress Ink, layered together with foam adhesive squares and tied on top with black embroidery thread.

The bottom right and top left of a  3″ x 5″ piece of Teresa Collins Spring Fling patterned paper were rounded, the edges were sanded and the paper was stitched to a 1/8″ bigger piece of black cardstock. The layers were adhered to the card base, a 3 1/2″ x 11″ piece of Kraft cardstock folded in half.

A sentiment from the new Falling Leaves stamp set was stamped in Jet Black Archival ink on the bottom right of the card. The leaves were adhered to the upper right hand side of the card. Black Baby Bling Rhinestones were adhered above and underneath the leaves to finish off that card.

Thanks so much for looking! Have a wonderful day!
Hugs and smiles

Today’s tutorial on Splitcoast is written by the wonderful Stacy Morgan. She is showing us how to create little treat holder that look like Hershey’s Kisses. I shot the video and create a Halloween treat holder…What else but a Halloween project can I showcase today, right?

I started by cutting two hearts out of Kraft cardstock with the largest of the Classic Heart Nestabilities dies. They were first stamped with the smallest Distressed Diamonds background in Cloud White VersaMagic Ink. Once that dried, I stamped the star banner from Primitive Pumpkins over it in Jet Black Archival ink.

A pumpkin was cut out of Neenah Solar White cardstock with one of the Primitive Pumpkin Die-namic dies, and one of the pumpkins was stamped over it in Tea Leaves and Pumpkin Spice VersaMagic Ink. Lizard Bazzill Textured Cardstock was cut with the Flourish Die-namics die. The flourish and the pumpkin were adhered to the treat holder front and a button was tied to the pumpkin with silver cord.

A sentiment of the Primitive Pumpkins set was stamped in Jet Black Archival Ink on a white strip of cardstock and tied on to the Hershey’s Kiss with more silver cord.


Here is a video for the visual learner:

[youtube]https://www.youtube.com/watch?v=gpXJFFNNEfo[/youtube]

Thanks so much for stopping by! Have a wonderful Halloween!
Hugs and smiles

I created this card for last week’s Inspiration challenge.  For my sample I chose this darling stuffed giraffe.  The color scheme for this card came from last week’s  Ribbon Reel Challenge.  The sketch is from the current CASE study challenge.

I started by cutting a piece of Neenah Solar White cardstock with the giraffe die from MFT’s Spectacular Circus stamp and die set. The matching giraffe stamp was stamped over it in Wheat VersaMagic ink. A piece of Pink Paislee Portfolio patterned paper was cut and embossed with a Standard Circle Nestabilities die. The edges were sanded before the circle was stitched to a slightly bigger white cardstock circle.

A 3 1/2″ x 5 1/4″ piece of Kraft cardstock was embossed with the Simplicity M-Bossabilities folder. The bottom corners were rounded and a the edges were faux stitched with a Signo white gel pen. The layer was adhered to the card base, a 3 3/4″ x 11″ piece of white cardstock folded in half before the partial circle was adhered to the left hand side. The giraffe was adhered to the circle with foam adhesive squares.

One of the sentiment from Circus Spectacular was stamped in Gray Flannel Memento ink on a piece of white cardstock, cut with one of MFT’s Sentiment Strips die-namics die. One of the sides was cut straight and the sentiment was adhered underneath the circle with Scor-Tape on the edges and two foam adhesive squares on top of each other in the center.

Stars were cut out Solar White cardstock as well as the same paper that was used for the circle with SimonSaysStamp exclusive Holiday Shapes die. The stars were adhered to the card and topped with rhinestones. A rhinestone on each end of the sentiment strip finishes off the card.

Thanks so much for stopping by! Have a wonderful day!
Hugs and smiles

Yesterday’s new tutorial on Splitcoaststampers was for the Concertina or Cascading Card. Cherie Franklin is the author, I shot the video.  For my sample my main image is from MFT’s darling Snow Angel stamp set. The image was stamped in  Tuxedo Black Memento Ink on  Neenah Solar White cardstock. It was colored with Copic Markers (Green: YG01, YG03, YG17    Red: R20, R22, R24, R29   Fur: E41, E42, E43    Snow: B0000, B000   Ear/Nose: R20, E40)  and cut out.

It was also stamped in My Mind’s Eye Winter Wonderland paper (red paper) and Carta Bella Merry & Bright patterned paper. The paper pieces were shaded with Copics, cut out, run through my Xyron and adhered to the cardstock image.

Winter Wonderland patterned paper was used to decorate the card sides.  The top corners were rounded and the top of the slanted pieces were topped with Solar White cardstock that was cut with Icicle Border Die-namics die.  The two larger Layered Label dies were used to create layers to place my image on.

More white cardstock was cut with the two smaller dies from Let it Snowflake die-namic dies, stacked and topped with a rhinestone from a Sleek Strips Silver Rhinestones.  Last I stamped a sentiment from Snow Angel on a piece of cardstock with a sentiment strip die.

Here is a video for the visual learner:

[youtube]https://www.youtube.com/watch?v=Whpy-eDRcac[/youtube]

Thanks so much for stopping by! Have a wonderful day!
Hugs and smiles

© 2012 fresh & fun Suffusion theme by Sayontan Sinha