It was my turn to share a Savvy Saturday Video on the Spellbinders blog yesterday. I usually don’t scrapbook, so this weeks theme “Grand Layouts” was a bit nerve racking for me. I hope you have time to check out the page and let me know what you think.

Thanks so much for stopping by! Have a wonderful weekend!
Hugs and smiles

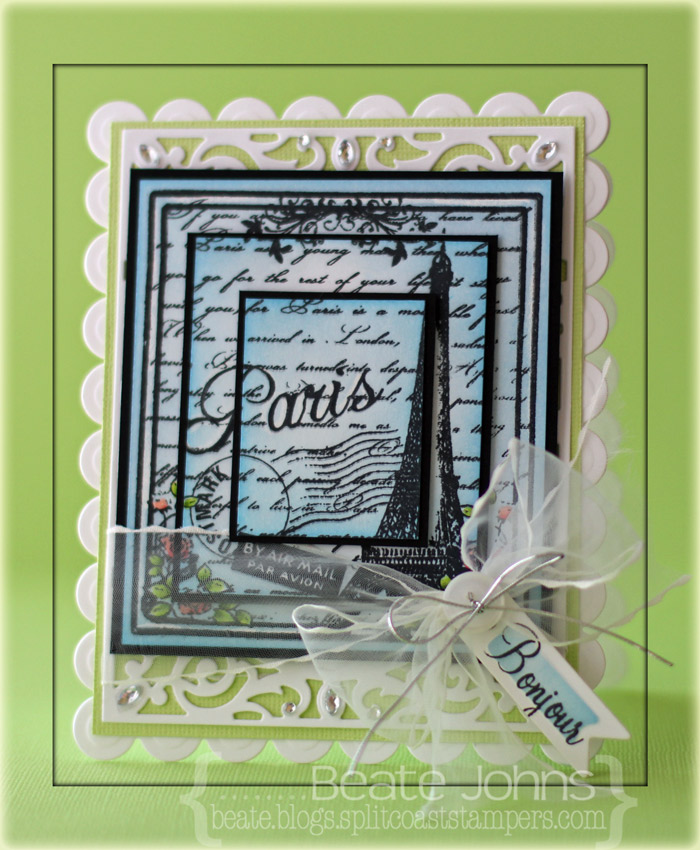
I created this card for Imagine Crafts.  We were to create a card with a theme, picking one of the new Kaleidacolor pad names as the theme. I knew I wanted to use Flourishes Italian Garden tomato image for my card.

Here are stamp by step instructions:

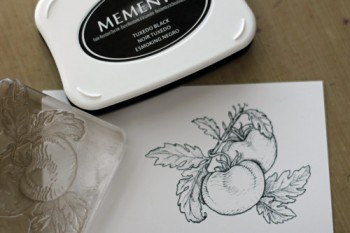
Stamp image in Tuxedo Black Memento Ink.

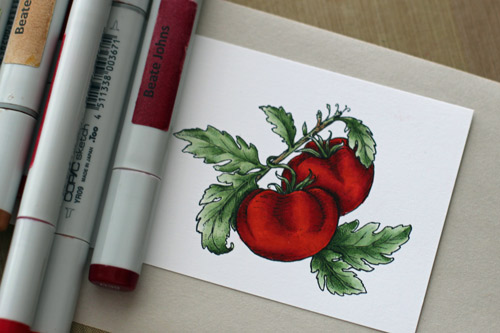
Color image with Copic Markers (YR09, R24, R29, R39, YG61, YG63, YG67, E31, E33, E35) and cut out.

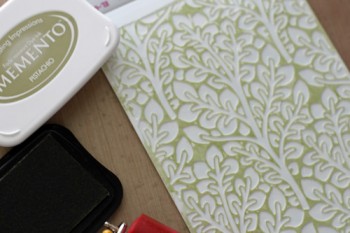
Brayer Pistachio Memento Ink over the inside of the Flora M-Bossabilities folder and emboss a 2 1/2″ x 4 3/8″ piece of white cardstock.

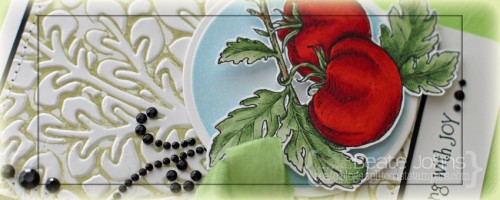
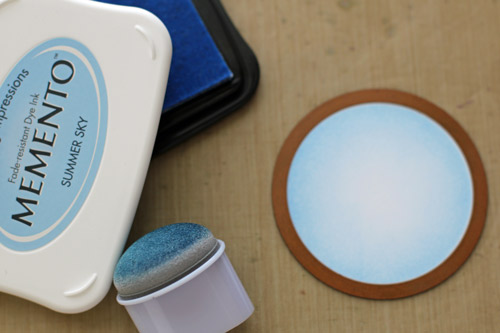
Cut and emboss a piece of white cardstock with the 3rd largest Standard Circle Nestabilities die and sponge the edges of the circle with Summer Sky Memento Ink.

Adhere image over the circle with dimensional adhesive. Stitch embossed background to a slightly bigger piece of black cardstock. Tie ribbon around the lower edge of the embossed layer and tape circle to the lower right of that layer.

Stamp sentiment on lower left of the card base (3 1/2″ x 11″ piece of white cardstock, folded in half) with Tuxedo Black Memento Ink. Finish off the card with black rhinestones.

Thanks so much for coming by! Have a wonderful day!
Hugs and smiles

I am super excited to post my first post as Artist in Resident for Imagine Crafts today. The challenge this month is to use a new Kaleida-color ink pad, the matching Memento Ink  and a Fireworks! Ink spray. That was not an easy challenge for me. I am so not a multi-colored kind of girl. But I made it work. 🙂 I used the new Tomato Vine Kaleidacolor ink pad. The matching Memento Ink colors are Rich Cocoa, Bamboo Leaves, Morocco, Love Letter and Peanut Brittle Memento Ink.

To see step by step instructions for this card click on more.

Continue reading »


When I received the new blanks and Bezel matching dies from Spellbinders I had to try them out right away.  I used the Birds one die to cut patterned paper. The edges were sanded before the pieces were adhered to Bird blanks.  Brown cardstock was cut and embossed with the branch die from Cherry Blossoms.

Corrugated cardboard was cut with the largest of the new Heart One dies. The cardboard was painted with Snow Cap Paint Dabber and then sanded. The heart was adhered to white cardstock and cut out before the branch and birds were adhered in it’s center.

A 1 3/4″ x 5 1/2″ piece of Winter Fun patterned paper was adhered to a 3 1/2″ x 5 1/2″ of patterned paper from the same paper pack. Seam binding was tied around the vertical strip and topped with a button, tied on with Linen Thread.

A sentiment from GinaK. Designs Mistletoe Memories was inked with Wheat and Jumbo Java VersaMagic ink on white cardstock and cut out. It was adhered next to the seam binding bow.

The top right and bottom left corner were rounded before Washi tape topped with a button on the top right finish off the card.

Thanks so much for stopping by! Have a wonderful day!
Hugs and smiles

It’s my turn to share on the Spellbinders blog. Today I have a video tutorial for a tri-fold gift card holder created with the new A2 Bracket Border dies. I hope you have time to check it out and let me know what you think.

Have a wonderful weekend!
Hugs and smiles

Yesterday’s tutorial on Splitcoaststampers was written by Joan Ervin. She showcased the Triple Stamping technique. It’s an easy way to add dimension to your card.

I created a card with that technique with the beautiful Sweet ‘n Sassy Stamp To Paris with Love.  I started by cutting three pieces of Neenah Solar White cardstock in rectangles ( 3 1/2″ x 3 15/16″, 2 1/2″ x 2 15/16″ and 1 1/2″ x 1 15/16″). The layers were adhered on top of each other with repositionable adhesive and the image was stamped over it in Tuxedo Black Memento Ink.  The flowers of the image were colored with Copic Markers (R11, R12, R22, YG01, YG03, YG17).  The frame and the flowers were colored with white crayon before the edges were sponged with Summer Sky and Bahama Blue Memento Ink. Each layer was adhered to a 3/16″ bigger piece of black cardstock.

The layers were stacked on top of each other with foam adhesive squares.  A piece of Solar White cardstock was cut and embossed with a die from the new Spellbinders Filigree Delight set and adhered to a piece of Limeade Bazzill cardstock. The image layers were adhered over it with more foam adhesive squares and May Arts ribbon was tied around the lower part.

More white cardstock was cut and embossed with a tag die from the new Charmed I’m Sure Spellbinders die set. A sentiment from the set was stamped on it with Tuxedo Black ink and the center was sponged with Summer Sky Memento ink. The tag was tied to the bow and a button with silver cord.

The layers were adhered to a card base cut and embossed out of white cardstock with a Grand Rectangle Nestabilities die. Rhinestones from Want2Scrap finish off the card.

Here is a video for the visual learner:

[youtube]https://www.youtube.com/watch?v=8YWHeJtM6vQ[/youtube]

Thanks so much for stopping by! Have a wonderful day!
Hugs and smiles

My turn to share another card on the Spellbinders blog today. I hope you have time to check out the entire card and let me know what you think. The image was colored with Copic Markers (Roses: R10, R11, R22 Rose leaves: G40, G43, G46 Violets: Y11, Y13, Y15, E99 Violet Leaves: YG01, YG03, YG17 Berries: R27).

Thanks so much for stopping by! Have a wonderful day!
Hugs and smiles

I stamped Rose and Felix in Tuxedo Black Memento Ink on Neenah Classic White cardstock The image was cut and embossed with Spellbinders Classic Frame die and colored with  Copic Markers (Skin: E0000, E00, BV00   Hair: E97, E99, E25, E29   Dress: B41, B52, B45, C0, C2    Skirt: YR30, YR31, Y21   Roses and Belt: R22, R27, R29   Flowers: Y15, Y17, R22, R27   Leaves: YG01, YG03, YG17    Felix: E31, E33, E34    Background: B0000, B000, B00). Another frame was cut and embossed out of Textured Kraft cardstock. The frame was sponged lightly with Vintage Photo Distress ink. The outer edge of the image layer was paper pierced before it was adhered over the Kraft cardstock frame.

A 2 1/2″ x 4″ strip of October Afternoon Sidewalks Paper was  stitched to a 4″ x 5 1/4″ piece of the same paper pack, that had the bottom two corners  rounded. White organdy Ribbon was tied around the horizontal strip. The bow was topped with a button, tied on with iridescent curling Ribbon.

The layers were adhered to the card base, a 4 1/4″ x 11″ piece of Solar White cardstock folded in half. The frame was adhered in it’s center with dimensionals. Part of a Finesse Rhinestone Swirl was adhered under the bow and Rhinestones from a  72 Count Rhinestone pack were added to the frame to finish off the card.

Thanks so much for stopping by. Have a great day!
Hugs and smiles

Today is my turn to share on the Spellbinders blog and showcase new dies. It’s a tough job, but someone has to do it. LOL  I LOVE all the new dies from this release. I hope you have time to check out the card, created with a JustRite Stampers sentiment, Want2Scrap rhinestones and Spellbinders new Radiant Rectangles and Stately Circle dies.

Thanks so much for stopping by! Have a wonderful day!
Hugs and smiles

Today’s tutorial on Splitcoaststampers is for a technique I first saw Jennifer McGuire use. It combines dies and embossing resist to create unique backgrounds. We call it Puzzle Piece Resist.

For my card I started with a 3″ x 5 1/2″ piece of Neenah Solar White cardstock. I stamped the zig zag background stamp from Simon Says Very Special stamp set in VersaMark all over the cardstock and embossed it with clear embossing powder.

Two heart dies from a new Spellbinders die set (Hearts One) were cut and embossed out of the background. The hearts were removed and the big background was sponged with London Fog Memento Ink. The big heart was sponged with the die on with Ladybug Memento Ink, the little one was sponged after the die was taken off.


The background was adhered to the card base, a 3 1/2″ x 11″ piece of cardstock, folded in half. The right hand corner of the card was rounded.  Before the big heart was adhered back into the background, a button was tied on with silver cord. The small heart was adhered back to the background as well.

A sentiment from Very Special was stamped in Tuxedo Black Memento Ink on white cardstock and cut out. Two sentiments from the new stamp set You were stamped also in black ink on white cardstock and cut out. A 1/4″‘ x 5 1/2″ strip of red Glimmer Paper (Stampin’ Up!) was adhered to the left hand side of the background strip before the sentiment pieces were adhere next and over the glimmer strip.

Red glimmer paper was cut and embossed with the small heart die. The heart was adhered to the lower right of the background strip. Red and black rhinestones on the upper right hand side finish off the card.

Here is a video for the visual learner:

[youtube]https://www.youtube.com/watch?v=M9s0jtJi7yk[/youtube]

Thanks so much for stopping by! Have a wonderful day!
Hugs and smiles

© 2012 fresh & fun Suffusion theme by Sayontan Sinha