Today’s tutorial on Splitcoaststampers is written by the wonderful Susan Roberts. She shows us how to create a flower by cutting and melting ribbon pieces. It’s perfect for winter, when my hands seem to be cold all the time. 🙂

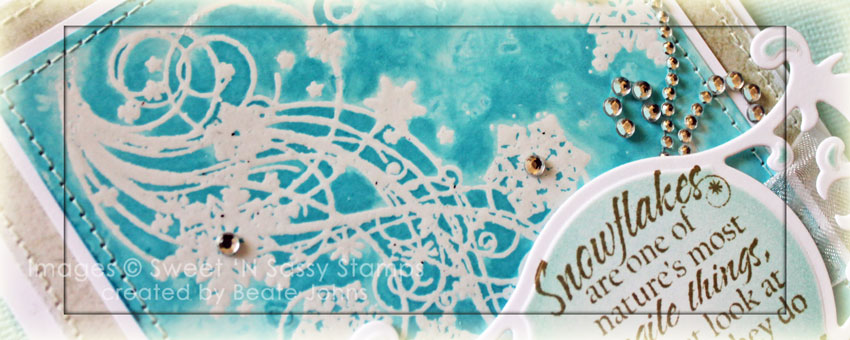
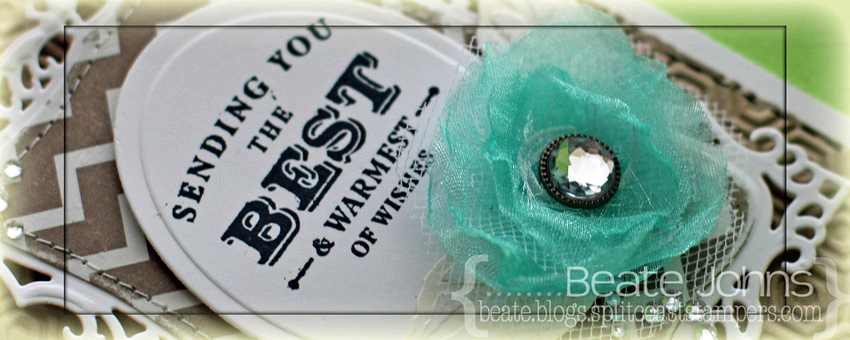
For my sample I used ribbon and tulle bought at Hobby Lobby. Both were cut with the two smallest Blossom Nestabilities® dies, heated and stuck together with a decorative brad.

A sentiment from Simon Says Stamp Apothecary Labels was stamped in Tuxedo Black Memento Ink on Neenah Solar White cardstock that had been cut and embossed with the second largest of the Classic Oval SM Nestabilities® dies.

Two pieces of Fancy Pants Country Boutique Paper were cut and embossed with the single leaf dies from the Bitty Blossoms Shapeabilities® die set. The leaves were sanded before they were adhered under the ribbon flower, who was in turn adhered to the lower half of the sentiment oval.

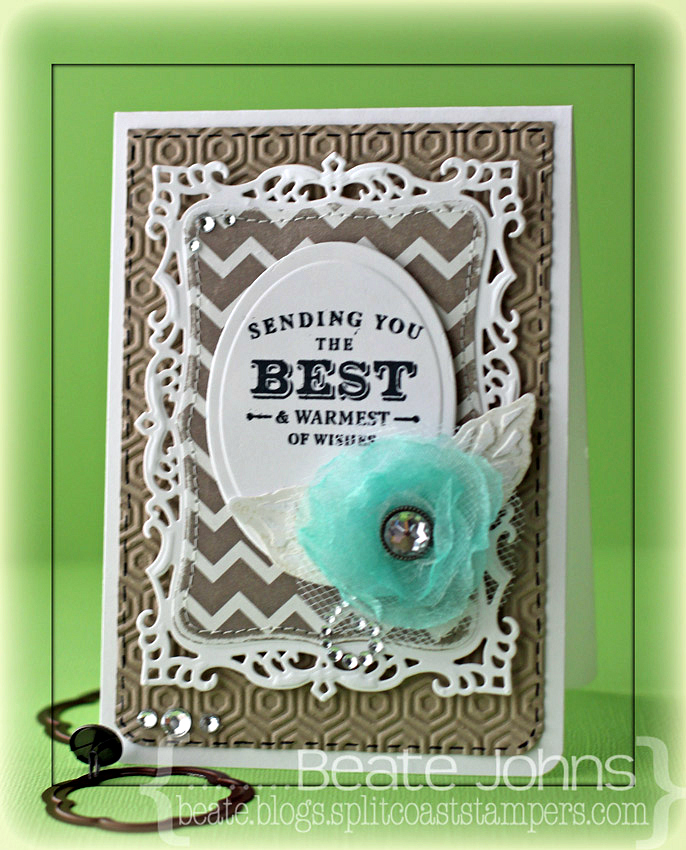
Another piece as well as more Neenah Solar White cardstock was cut and embossed with the second largest Decorative Label Eight Nestabilities® die. The patterned paper was sanded and cut on the embossed edge before it was stitched to the white die cut. The sentiment panel was adhered to the center of the fancy panel with foam adhesive squares.

The bottom corners of a 3 1/2″ x 5 1/4″ piece of Kraft cardstock were rounded and a faux stitched border was added with a black gel pen. The layer was then embossed with the So Trendy M-Bossabilities ® folder. It was adhered to the card base, a 3 3/4″ x 11″ piece of Solar White cardstock, folded in half with the bottom corners rounded. Rhinestones finish off the card.

Here is a video for the visual learner:

[youtube]https://www.youtube.com/watch?v=ajo7y88Rf3Q[/youtube]

Thanks so much for stopping by! Have a wonderful day!
Hugs and smiles

Becky and Melanie thought it would be great fun to team up for a little Holiday Hop today. We are showcasing Becky’s new set, “Warm Woolen Mittens” along with Becky’s new cut file “Grand Banners” and “Grand Banners – Winter Sentiments” and Melanie’s newest set, “Lots of Letters” as well as some of her other recent favorites.

For my card I stamped one  of the patterns from Pretty Patterns in VersaMark ink on a 3″ x 5″ piece of Neenah Solar cardstock. It was embossed with clear embossing powder and stars were cut and embossed out of the lower half with the two smallest dies from the Star Nestabilities set. I had seen Jennifer McGuire create a card with this technique and had wanted to try that out ever since.

The bottom left corner was rounded before the background was sponged first with Teal Zeal, then with Nautical Blue Memento Ink. The stars were sponged with London Fog Memento Ink while the dies were still on the cardstock.

The card base is a piece of 3 3/4″ x 11″ piece of Neenah Solar White cardstock folded in half. Again the bottom left corner was rounded. The background and the stars were adhered to the card base with adhesive foam squares.  A 1/4″ x 5″  silver glimmer paper (Stampin’ Up!) strip  was adhered to the right hand side of the background. A small star was cut out the same paper.

The word happy is from the stamp set Inspiration Mosaic. It was stamped in Tuxedo Black Memento Ink on a strip of white cardstock. 2013 was stamped behind it with numbers from the new Lots of Letters set. The sentiment was cut out with a Pennant die. The glitter star was adhered to the left of the sentiment and both were adhered to the upper half of the card. Part of a Finesse Rhinestone swirl finish off the card.

Make sure you visit everyone’s blog to leave a comment and be entered to win a clear “I do!” and “Beyond Baskets” stamp set! A winner will be announced Thursday.

Becky Oehlers (Illustrator of Warm Woolen Mittens)

JJ Bolton

Laurie Schmidlin

Latisha Yoast

Michelle Woerner

Richard Breaks

Vera Yates

Tosh Leyendekker


Thanks so much for looking! Have a wonderful day!
Hugs and smiles

Sorry I am so late posting today. While I was good about participating in this week’s challenges at Splitcoaststampers, I was horrible at writing my blog posts for my creations.

I created this card for both Monday’s Technique Challenge (create your own polka dots) and Monday’s CAS challenge (sketch). I started by cutting Neenah Solar White cardstock and patterned paper from BBP All Hallow’s Eve with MFT’s Cameo die-namics die. Next I stamped the frame of the matching set in Jet Black Archival ink over the patterned paper frame. The image from Sweetest Pumpkin in the Patch was stamped in Tuxedo Black Memento Ink and was colored with Spectrum Markers (Skin: FS2, FS3, TN2 Pumpkin: GB5, OR1, GB7, G10 Stem: DG2, TN2, GB7, GB10, TN7 Shirt: DG2, DG4 Pants: EB7, EB8 Hair: CT2, TN2, GB8 Background: BT1, BT2).

The card base is a 4 1/4″ x 11″ piece of Kraft cardstock folded in half. The bottom corners were rounded.  A 5/8″ x 3 1/4″ piece of BBP All Hallow’s Eve paper was adhered to the lower right hand side of the card. A 5/8″  x 3 5/8″ strip of black cardstock was stamped in the polka dot background from MFT’s By the Numbers stamp set with Distress Embossing Ink and embossed with white embossing powder. The black strip was adhered underneath the patterned paper strip.

Two buttons were added with embroidery thread to dress up the card. I didn’t have the right color thread for my white button, so I colored with the the BT1 Spectrum Noir Markers. The image layers were adhered slightly over the paper strip with foam adhesive squares. A sentiment from the Sweetest Pumpkin In the Patch was stamped on the bottom left of the card to finish off the card.

Thanks so much for stopping by! Have a wonderful Saturday.
Hugs and smiles

One of last weekend’s VSN challenges was to create a card with the Salted Background Technique. That was the perfect time for me to create a a video for that technique.

I had received the newest order from Sweet ‘n Sassy Stamps latest release. I knew I wanted to use the gorgeous Snowflake Swirl image for that technique. I embossed the Swirl and a few snowflakes on a 3 1/2″ x 4 1/2″ piece of Glossy Cardstock Tumbled Glass Distress Re-inker was brushed over the cardstock, rock salt was sprinkled over it and the cardstock was misted with water. After the background dried, it was adhered to a 1/4″ bigger piece of Neenah Solar White cardstock.

A 4 1/4″ x 5 1/4″ piece of MME Lost & Found 2 Sunshine paper was sanded and the edges were stitched. The salted background layers were adhered to the paper.

A sentiment from the Snowflake swirl was stamped in Frayed Burlap on a piece of Neenah Solar White cardstock that had been cut and embossed with a Fancy Tags 3 die. The embossed parts were sponged with Tumbled Glass ink.

White Organdy Ribbon was threaded through the tag and tied around the layers. The bow was topped with a button that was tied on with silver curling ribbon.  The layers were adhered to the card base, a 4 1/2″ x 11″ piece of white cardstock folded in half. Baby Bling and parts of a Finesse Rhinestone swirl finish off the card.


Here is a video for the visual learner:

[youtube]https://www.youtube.com/watch?v=ULQ1XTRI304[/youtube]

Thanks so much for stopping by! Have a wonderful day!

Hugs and smiles

© 2012 fresh & fun Suffusion theme by Sayontan Sinha