Today’s featured new CAS-ual Friday stamp set is called Merry Kiss-mas.  As soon as I saw the little gifts, I knew I wanted to line them up and dress them up with patterned paper.

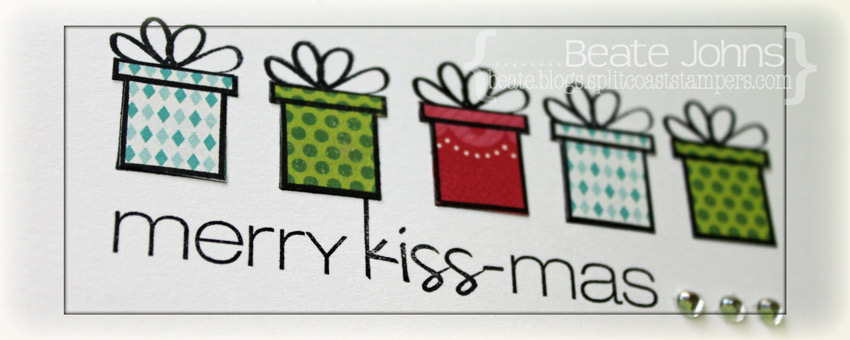
I used my favorite Christmas Paper Pack Carta Bella’s Merry & Bright for that.  The card base is a 5 1/2″ x 7 1/2″ piece of Neenah Solar White cardstock folded in half. Five presents were stamped in the center of the card with Tuxedo Black Memento Ink.

The bottom right corner was rounded and a sentiment was stamped right under the presents.  Don’t you just love that font? Three rhinestones from Sleek Strips Silver Rhinestones next of the sentiment finish off the card. Now this is one quick Christmas card.

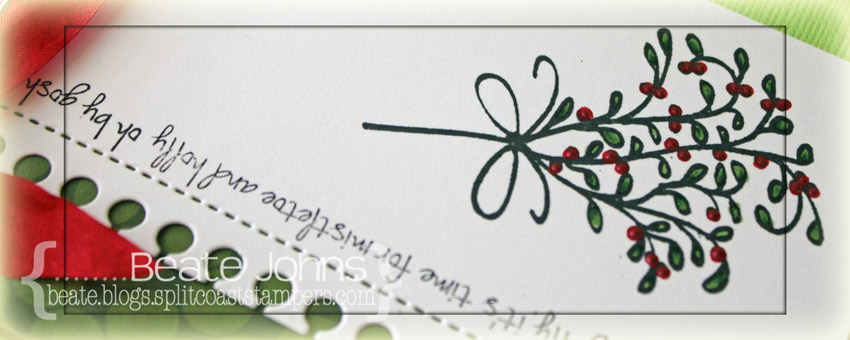
For my second card I had to use Debby Hughes amazing layout again. I can see this becoming one of my go to sketches for CAS cards. For this one I started by cutting the edge of a 3″ x 5 1/2″ piece of white cardstock with the Notebook Edge Die-namics die. The mistletoe image was stamped in Tuxedo Black Memento Ink. It was colored with Copic Markers (G24, G28) and Liquid Pearls were added to create the berries.

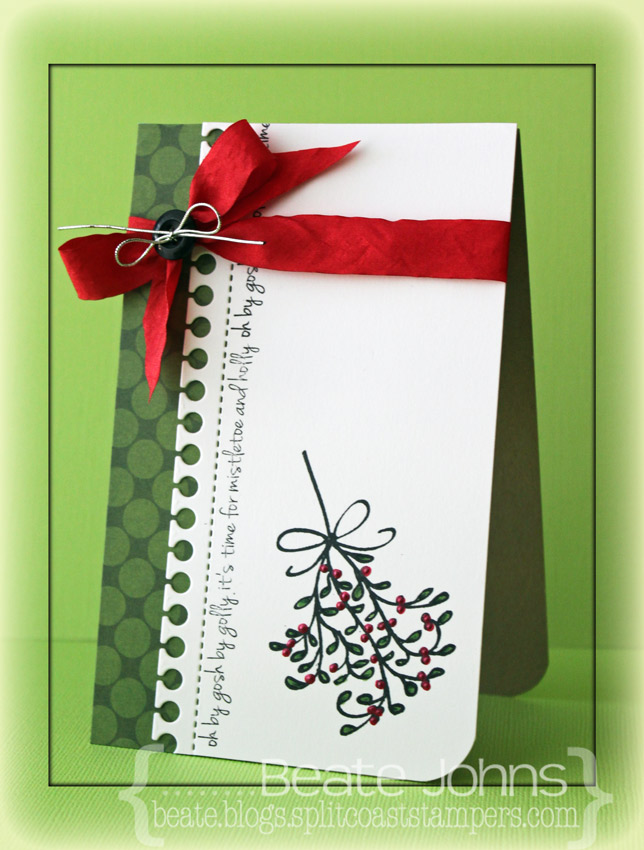
The long thin sentiment was stamped in Tuxedo Black Memento Ink along the notebook edge before red ribbon was tied around the top of the layers. The bow was topped off with a button, tied on with silver cord. The layers were adhered to the card base, a 3 1/2″ x 11″ piece of Kraft cardstock folded in half. The bottom corner was rounded to finish off the card.

Make sure you check the CAS-ual Fridays Stamp blog to see more samples created with the new set.  Thanks so much for stopping by! Have a wonderful day!

Hugs and smiles


The second challenge during VSN last week was to create something with an image with wheels. I searched through my stamps and found a scooter from one of Unity’s Kit of the Month.

I stamped it twice in Jet Black Archival Ink, once on Neenah Solar White cardstock, once on Pink Paislee Spring Jubilee Patterned Paper. They were both cut out and the patterned paper was adhered over the white cardstock image. The image was colored with Copic Markers and a few rhinestones from a Sleek Strips Silver Rhinestones .

A green piece of patterned paper was cut in a slope and adhered to a blue paper piece from Spring Jubilee paper. The edges were stitched before the layers were adhered to the card base, white cardstock, folded in half.  White cardstock was cut with MFT Cloud Die-namics die.  Two clouds were added to the scene and highlighted with Stardust Stickles.

A piece from the notebook paper I still had from the last challenge was cut into banner shape by hand . A sentiment from the same KOM from Unity was stamped on the banner and it was adhered to the upper left hand side. A button was threaded with Honeydew Twine and adhered on the top edge of the banner.

VSN only gives you 45 minutes per card. That’s not a lot of time for me, so this card as well as the ones the next few days will be CAS cards. Very much out of my comfort zone.

Thanks so much for stopping by!
Hugs and smiles

I can’t believe my guest designer stint with Kraftin’ Kimmie Stamps is already over. Time seems to fly now that school has started again. Today’s challenge is to create a scene. I made it easy on myself and used a stamp that already looks like a scene when you stamp it. It’s an image from Emilie Goulet’s new Too Cute to Spook 1 set.

The image was stamped in Tuxedo Black Memento Ink once on Neenah Solar White cardstock and once onEcho Park Hello Summer patterned paper. Both images were colored with Copic Markers (Pumpkins: YR00, YR12, YR15, YR18, R08   Leaves: G20, G21, G24, G28   Skin: E000, E00, E01   Shirt: E41, E42, E43, B91, B93, B95  Pumpkin Eyes: E50, E51, E53).  The image on the patterned paper was cut out with scissors and adhered to the image on the white cardstock, which was cut and embossed with a Card Creator Matte B die.

The images were masked and a circle mask was adhered to the upper left corner. With the die still on the cardstock, the image was sponged with Broken China and Chipped Sapphire Distress Inks . Next the circle mask was taken off and that area was sponged with Mustard Seed Distress Ink. The layer was then adhered to black cardstock, cut and embossed with a Card Creator Matte A die.

A piece of Hello Summer paper was cut and embossed with another Matte B die, sanded and stitched to a piece of black cardstock, cut and embossed with the next larger Matte A die. Ribbon was tied around the layers before the image layers were adhered with dimensional adhesive. The layers were adhered to the card base,  5 1/2″ x 8 1/2″ cardstock from the Emerald Coast Color Made Easy collection.

A sentiment from the set was stamped on a piece of Solar White cardstock, cut and embossed with the smallest of the Nested Lacey Pennants dies. Four rhinestones from a Sleek Strips Silver Rhinestones were adhered underneath the sentiment before the pennant was adhered to the upper left corner. Part of a Finesse Rhinestone Swirl above the bow finish off the card.

I hope you have time to check out the other designers samples and participate in the challenge. Have a wonderful weekend!
Hugs and smiles

Today’s Timeless Tuesday Challenge hostess is Makiko. She has a fun challenge for us. Pick a letter from the alphabet and have three things on your card that start with that letter. I picked the letter S and included (Sewing, Sanding, Sponging).

I started by stamping an image from the new On the Porch set in Tuxedo Black Memento Ink on white cardstock. The image was cut and embossed with a Standard Circle Nestabilities die , colored with Copic Markers (Chair: E30, E31, E33   Blanket: RV000, RV00, RV10, R00   Book: B91, B93, B95, E40, E41, E42   Flower Pot: E97, E08, E09, E18   Leaves: YG01, YG03, YG17   Ground: W00, W1, W2, W3, W5, W7, W9). The image was stamped again on a piece of patterned paper. The pillow was cut out and adhered to the main image and the edges of the circle were sponged. The circle was adhered to a piece of white cardstock, cut and embossed with a Scallop Circle Nestabilities die.

Patterned paper was cut and embossed the Grand Square Nestabilities die. The edges were sanded and stitched before pink ribbon was tied around the paper. The bow was topped with a button, tied on with embroidery floss. The paper were adhered to the card base, white cardstock cut and embossed with a Grand Scallop Square Nestabilities die. The image layers were adhered to the center of the card with dimensionals.

A sentiment from the set was stamped in Tuxedo Black Ink on a piece of white cardstock cut and embossed with the smallest Petite Oval Nestabilities die. The edges were sponged and the oval was layered on a piece of white cardstock, cut and embossed with the smallest Label 10 Nestabilities that had been sponged as well. The image was adhered to the lower left of the image.  Rhinestones on the top left and lower right finish off the card.

Take a peek at what the other Timeless Tuesday designer have created for today…

I hope you have time to play. Thanks so much for stopping by! Have a wonderful day!
Hugs and smiles


© 2012 fresh & fun Suffusion theme by Sayontan Sinha