My card today is super easy. I started with a 4″ x 11″ piece of Neenah Solar White cardstock. It was folded in half and the bottom left corner was rounded. One corner of a 2 1/2″ x 5 1/4″ piece of Echo Park’s Holly Jolly Christmas paper was rounded before the edges were sanded. The layer was adhered to the left hand side of the card front.

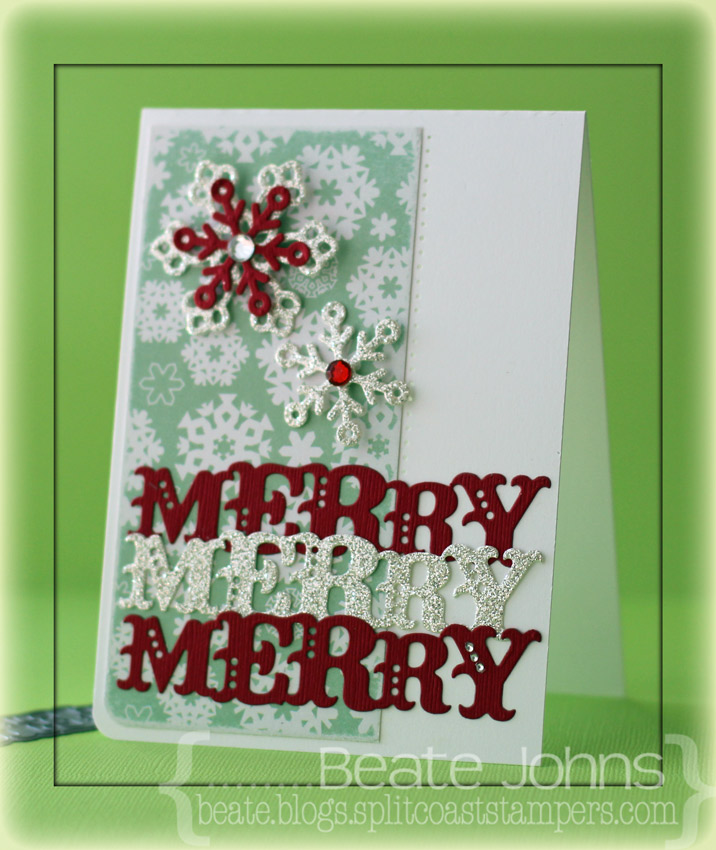
I have had the Taylored die Merry for a while and had to use it before Christmas is over. I like it a lot. I cut two Merry’s out of Red Devil Fourz Bazzill cardstock and one of silver glimmer paper. They were adhered to the lower part of the card base. Three tiny rhinestones were added on the Y of the bottom Merry.

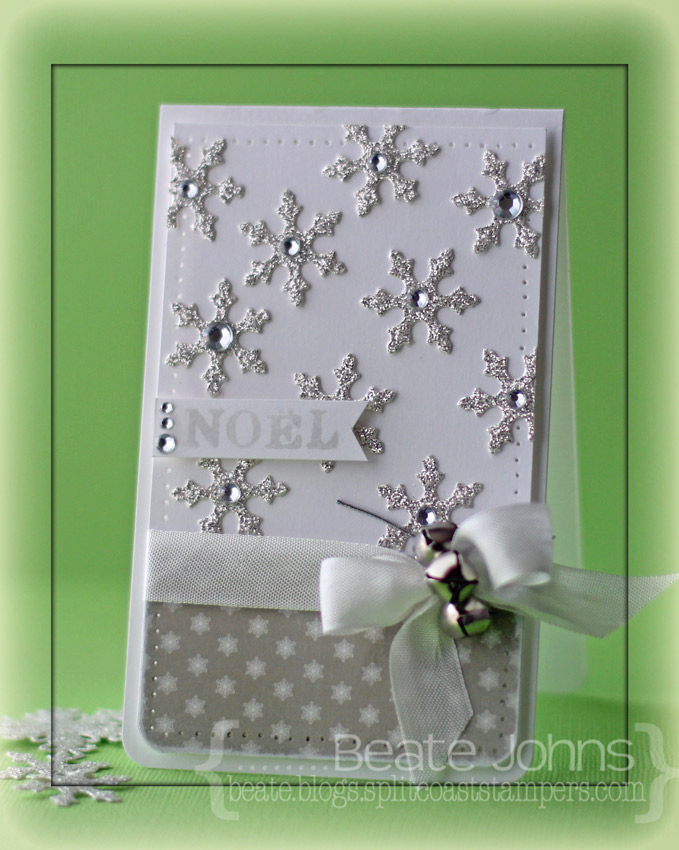
Next I cut and embossed silver glimmer paper and Red Devil cardstock with the two small dies from the 2012 Snowflake Pendant Shapeabilities® die set. The snowflakes were adhered to the upper right hand side of the card front and topped with rhinestones. A paper piercing edge along the paper strip above the sentiments finish off the card.

I want to wish you a Merry Christmas. I hope you have a wonderful time with friends and family! Have a wonderful day!
Hugs and smiles

I have another post on the Spellbinders blog today. I hope you have time to check out the entire card. It works great for the current Simon Says Stamp challenge, which is to create a Christmas project.

Thanks so much for stopping by!  I don’t know how much I will be posting over the weekend and next week! I wish you all a wonderful Christmas. Hopefully you get to spend it with loved ones!!!
Hugs and smiles

It’s time for a new Crafty Friends Challenge. Charmaine is the hostess and her challenge to us is to create a mostly white card, with just a splash of color. I will also enter the card into the current Simon Says Stamp Challenge, which is to use your favorites. Here I used paper piercing, rhinestones, dies, patterned paper and paper piercing.  The layout of the card is from the current CASE Study card by Windy Robinson.

I started by cutting snowflakes out of silver glimmer paper with one of the Snowflake Borderabilities dies.  A 1 3/4″ x 3″ strip of Carta Bella’s Winter Fun patterned paper was adhered to the bottom of a 3″ x 5″ piece of Neenah Solar White cardstock after the edges of the paper were sanded.  The bottom edges were rounded and the edges of the layers were paper pierced.  Seam Binding was tied around the top of the patterned paper and three bells were tied on with silver cord.

The layers were adhered to the card base, a 3 1/4″ x 10 1/2″ piece of Solar White cardstock folded in half with the bottom corners rounded. A sentiment from Simon Says Stamps Small Folded Banners Holiday was stamped in Platinum Stazon on white cardstock. It was cut into banner form. Want2Scrap Rhinestones finish off the card.

Check out my fellow Crafty Friends for more  inspiration:

    Thanks so much for looking! I hope you have time to join us in the challenge. It’s easy and fun! Have a wonderful week!
    Hugs and smiles


Do you have an Advent tradition? When the kids were little, I had an advent calendar that I filled with small treats every day. As they grew older we started filling the advent calendar with a little hint where the treat is hidden. My kids still love this little scavenger hunt, even though my hints are too easy for them to find (I am not good at this…but it’s the tradition that counts, right?). Well…over the moves the first advent calendar got lost and the one I made for a Splitcoast tutorial years ago, lost a few tins. It was time for a new one.

I really wanted the KaiserCraft Advent calendar to alter, but I couldn’t find it online (last minute as I am), so I ordered this Karen Foster Countdown Calendar. It comes with rubon numbers, but I didn’t use those.

I started by covering each drawer front with Carta Bella Merry & Bright paper. The drawers are tiny.I cut the papers into 1 7/16″ squares, sanded the edges and used a 1/2″ circle punch for the finger holes. I adhered the paper with Scor-Tape. I mention it because I first adhered it with Glue & Seal, thinking liquid adhesive would work better, only to have the paper just come off again.

The numbers were cut out of Red Glimmer Paper (Stampin’ Up!) with By the Numbers Die-namics dies. Those were popped up with adhesive foam squares on each drawer. Rhinestones were added to add just a bit more sparkle. I bought the tinsel 2 years ago in my LSS in Ohio. It comes on a pretty wooden spool. Unfortunately I don’t know the maker of it. The sticker came off.

Thanks so much for stopping by! Have a wonderful day!
Hugs and smiles


I am exciting to be guest designing for Tiddly Ink this month. For my first card I decided to use the darling Winter Wryn image. I printed her out on Neenah Solar White cardstock and colored her with Copic Markers (Coat/Hat: YR09, R24, R29, R39    Hat/coat trim: W00, W1, W2    Skin: E50, E21, E34    Hair: Y21, Y23, E31, E33     Boots: C1, C3, C5, C7, C9). The cardstock was cut down to 5 1/4″ length and the left hand side was cut with the Notebook Die-namics die. The right hand corner was rounded.

A piece of Carta Bella Merry & Bright paper was adhered on the left to form a 3 1/4″ x 5 1/4″ layer. It was adhered to the card base, a 3 1/2″ x 11″ piece of Kraft cardstock, folded in half. Both bottom corners were rounded.

A sentiment from Kelli Purkey’s Joy stamp set was stamped in Sea Breeze VersaMagic ink on white cardstock. It was embossed with iridescent ice embossing powder and cut out.  Hemp cord was wrapped into a bow and tied together with a bow. The sentiment was taped under it and it was adhered to the upper right hand side.

Do you have any Tiddly Ink images? They are so cute and so much to color.
Hugs and smiles

Are you on Pinterest? Do you pin things and tell yourself you will create something like that at one point later on? A blogging friend of mine, Kendra Wietstock, is posting a Pinterest inspired project from the first of December until the 21st on her blog. I thought I join her today.

Ever since I saw a Christmas tree made out of string on Pinterest, I knew I wanted to try it. But when buying string for it, I changed my mind a bit and bought fuzzy white yarn instead. I had seen a Christmas tree decor at Target that I liked and thought I could re-create it with the string tree technique. Plus white and silver would work great with the current Moxie Fab World challenge.

Well…it worked kind of. I wrapped a styrofoam cone with wax paper. Then started glueing the string to the cone.

Once I wrapped the entire cone and the glue was dry, I took the styrofoam cone out and tried to separate the my string tree from the was paper. Note to self: This doesn’t work the with fuzzy yarn! LOL So I stuck the styrofoam cone back in and started on the decoration.

I cut and embossed hearts and stars out of shiny silver paper (bought at a scrapbook store back in Ohio) with the small dies from Sweet Folk Art. They were strung up on silver cord and adhered to the tree. The tree was topped with a star created out of the same paper cut with the bigger star die. Red and Silver rhinestones finish off the tree.

I am happy with how it turned out, even if it’s a bit different then the pinterest idea I started out with.  Thanks so much for stopping by! Have a wonderful Sunday!
Hugs and smiles


I have another video post to share with you on the Spellbinders Paper Arts blog. The coming week is all about Nestabilities®. Nestabilities started my love for Spellbinders products. Once the original shapes came out I was hooked. In the video I talk a bit about some of my favorite techniques you can do with Spellbinders dies and show how to create this telescoping image.

I hope you have time to stop by, check it out and tell me what you think. I would love to hear from you!  Have a wonderful weekend!
Hugs and smiles


Yesterday I had some free time to play along some of my favorite challenges. I created this card for the current Way to Use it challenge on Splitcoaststampers (favorites), the current CASE Study and Simon Says Stamp challenge (snowflakes).

The current CASE study showcases a gorgeous card from Windy Robinson. Her card had some great dry embossing with Nestabilities dies. Her card had flowers in the center, but I thought snowflakes would be more appropriate for December. Plus I LOVE snowflakes. So I cut snowflakes out of Neenah Solar White cardstock, Frosted Teal and Patina Bazzill cardstock with dies from the 2012 Snowflake Pendant Shapeabilities® die set.

A 3 1/2″ x 11″ piece of Neenah Solar White cardstock was folded in half and the bottom corners were rounded.  Two of the Wonky Rectangles Nestabilities® were embossed in the center of the card. A sentiment from Merry Everything was stamped in the center of the embossed rectangles with Midnight Black VersaMagic Ink.

Red silk ribbon was tied around the lower part of the card base. Thin silver wire was wrapped around a stylus and added to the small white snowflakes. The bigger blue snowflake and a while one were adhered to the left hand side of the sentiment. A second white snowflake was adhered over the ribbon bow.  Rhinestones from Want2Scrap finish off the card.

Thanks so much for stopping by! Have a wonderful Friday!
Hugs and smiles

This week on the Spellbinders blog it was all about Gift ideas. I had some 7Gypsies 6″ x 6″ Shadowboxes for quite a while and thought it would be great to alter one. I hope you have time to check out my post with step by step instructions HERE. I used a picture of my kids from 10 years ago. They were so cute when they were little.  Altering items is definitely out of my comfort zone. Let me know what you think.

Thanks so much for stopping by! Have a wonderful day!
Hugs and smiles

Today’s tutorial on Splitcoaststampers is written by Judy Maddigan and super fun. My little Santa cracked me up wobbling back and forth. I hope you try it out.

I made two samples. One really simple one with pieces cut out of Carta Bella Merry & Bright paper cut with Simon Says Stamp exclusive Christmas Trees dies. The tree was decorated with Silver Stickles and Red Baby Bling Rhinestones.  A tiny star was cut out of Desert Marigold Fourz Bazzill paper with another die from the Holiday Trees set.

The santa (from Simon Says Stamp Gnome Sweet Gnome ) was a bit more tricky, since the stamp comes only with his face, not the back.  I stamped it twice in Tuxedo Black Memento Ink on Neenah Solar White cardstockand cut them out. I flipped one over and traced the lines from the front to the back, leaving off his face and his thumbs.

The images were then colored with Copic Markers (Red: YR09, R24, R29, R39    Mittens: YG01, YG03, YG17    Beard/Hair: N0, N1, N3   Hat trim: W00, W1   Skin: E50, E21, E34, R20). Red paperclips that had been unbend and reshaped were adhered to the inside of the back with Scor-Tape. The front was run through my Xyron and adhered over the back, hiding the paper clip ends. The Santa as well as the tree were adhered to a covered Hershey’s Nugget with Glossy Accents.

Here is a video what these little rockers do: They crack me up, especially that little Santa Gnome.

[youtube]https://www.youtube.com/watch?v=-dLGB22EbVY[/youtube]

And here is a video on how to create the rocker for the visual learner:

[youtube]https://www.youtube.com/watch?v=7CR8qa_D_c8[/youtube]

Thanks so much for stopping by! Have a wonderful day!
Hugs and smiles

© 2012 fresh & fun Suffusion theme by Sayontan Sinha