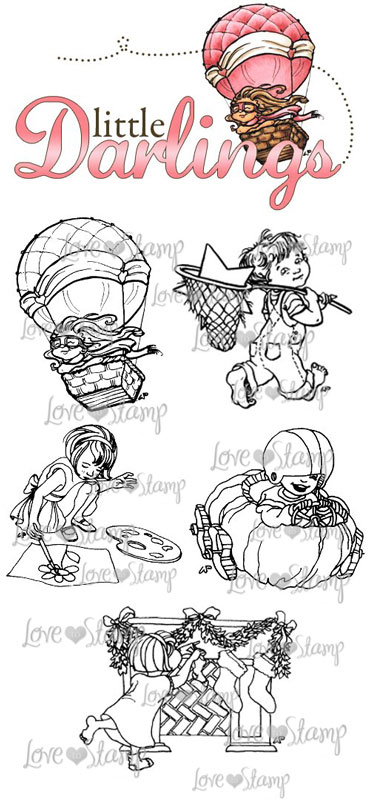
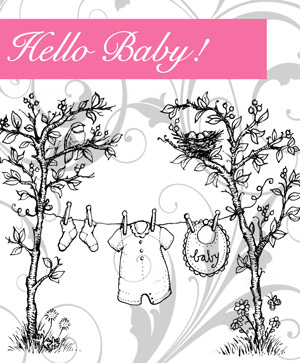
Today is the final day of this month Flourishes Sneak Peeks. The set featured to day was designed by Marcella Hawley and is called Hello Baby!.

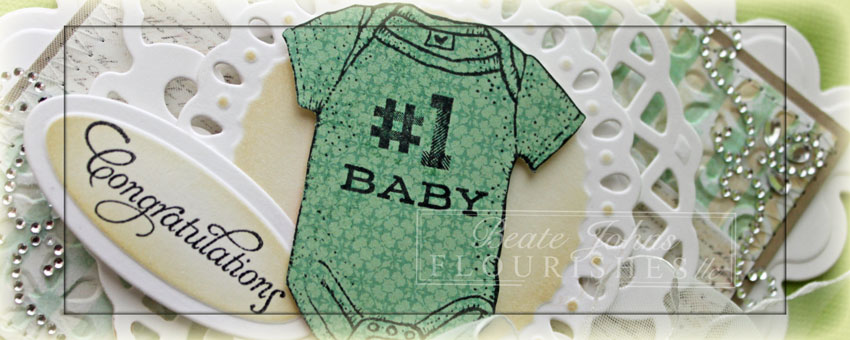
I created this card for my brother and his wife. They had a little baby boy yesterday. Well….not so little. He weight 9 lbs 8 oz and measured 22. 4 inches. I heard he has black hair just like my brother did when he was a baby. I can’t wait to see pictures. I wish I could hold the little darling. His name is Johannes, which is a family name on my Dad’s side. My uncle, my grandpa and several other male in my Dad’s family tree owned that name (German version of Johns, Hans for short).

I stamped the onesie in Tuxedo Black Memento Ink on patterned paper. It was cut out and adhered to a piece of white cardstock, cut and embossed with a Tear Drop Circle Nestabilities die that had been sponged with Antique Linen Distress Ink. The layers were adhered to a piece of white cardstock, cut and embossed with a Lattice Pendants die.

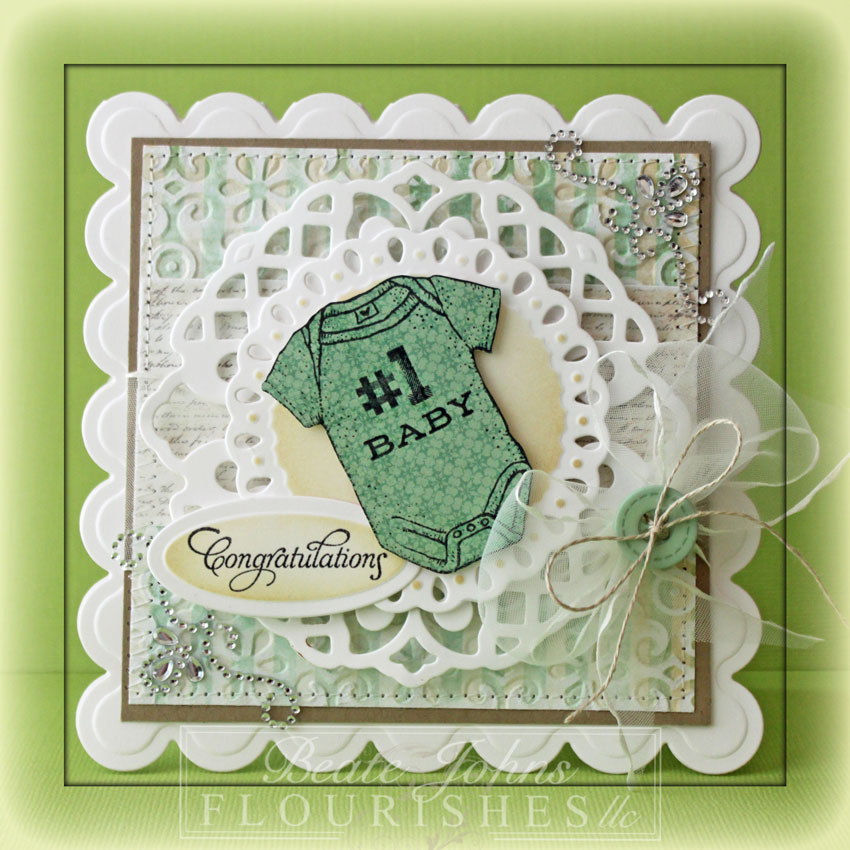
A piece of MME Lost & Found 2 Blush patterned paper was embossed with Elegance M-Bossabilities and sanded. A strip of patterned paper from the same paper pack was adhered over the embossed layer before it was stitched to a slightly bigger piece of Kraft cardstock. Ribbon was tied around the horizontal strip and topped with a button before the layers were adhered to a card base, cut and embossed with a Grand Scallop Square Nestabilities die out of white cardstock.

A sentiment from Tag Lines was stamped on a piece of white cardstock, cut and embossed with a Petite Oval Nestabilities die and sponged with Antique Linen Distress ink. It was adhered to the lower left of the Onesie. Rhinestones on the upper right and lower left finish off the card.

Want to win this set? All you need to do is leave some love in the form of a comment on the blogs below! Why? You need to try to figure out….

One of the ladies on our link list below will be picking a name from the comments on her blog post today. We don’t know which one it is… so the more blogs you leave comments on, the more chances you have to win!

Senior Design Team

DID YOU KNOW YOU COULD WIN OUR ENTIRE APRIL RELEASE? Have you checked out our Motherly Love Challenge? Just click HERE to find out how to play! You can also play in our Noon Time Challenges, which start today at noon with another one ushered in tomorrow at noon!  Both are fast-paced and fun challenges that will give you yet one more chance to win our full April release!   All challenges will close this Friday at 5 PM EST and winners will be announced Saturday in our Winner’s Circle blog post! So get those fingers inky and good luck!

And, don’t forget our New Release Bundle! If you buy all three sets in a bundle, you save 10% off the price. But, this offer only lasts through next Friday, April 20. So… you have to act fast! Just click HERE to see!

Thanks so much for stopping by! Have a wonderful day!
Hugs and smiles

Welcome to the Elisabeth Bell for Whimsy Stamps BLOG HOP!

On Monday we announced the wonderful news that Whimsy Stamps has welcomed the amazing Elisabeth Bell to our family of Whimsy Stamps artists.

Whimsy Stamps is releasing 4 new Elisabeth Bell Little Cottage Cuties rubber stamps today and these new goodies are available to buy right now from the Whimsy Stamps store along with all your Whimsy favourites.

~ Apple Blossom ~                                  ~ Chloe ~
 

~ Picked Sweet ~                                     ~ Sun Kissed ~

The Whimsy Stamps DT and Special Guests have been previewing these beautiful stamps for the past 2 days, and today we are celebrating their release with a BLOG HOP!

The hop starts today (Wednesday March 7th at 12.00PM EST) and ends on Wednesday March 14th at 12.00PM EST.

For this hop we have five different prize draws! One lucky hopper will win the entire new release of ALL four stamps. We also have four mini candy stops throughout the hop where you can enter to win a new release stamp! We’re not telling you where they are, so be sure to complete the hop to find them!

If you would like to hop along with us today, please CLICK HERE to start the hop at Debbie’s blog.

For my sample I stamped Chloe in Tuxedo Black Memento Ink on Neenah Solar White cardstock. The image was cut and embossed with the largest Label 22 Nestabilities die and colored with Copic Markers (Apples: YG01, YG03, YG17    Basket: E31, E33, E35, E37, E37    Skin: E000, E01, E11, R20    Hair: Y26, E33, E35, E37    Shirt: Y13, Y15, Y17    Pants: B93, B95, B97, B99    Hairband: R08, R27, R39     Ground: YG03, YG63, YG67, E31). The image was airbrushed with Copic Marker B12, after I added a few dots with masking fluid. Once the background was airbrushed and the masking fluid rubbed off, I added Glossy Accents over the dots, hoping it would look a bit like spring rain.

A 2 1/2″ x 4 1/2″ piece of My Mind’s Eye Miss Caroline Dolled Up patterned paper was adhered to a 4 1/2″ square of the same paper pack. The edges were sanded and stitched before the paper was adhered to the card front, a piece of Solar White cardstock, cut and embossed with a Grand Scallop Square Nestabilities die. A paper Doily was adhered to the upper left hand side, and some cheesecloth to the lower right before the image was adhered to the center with dimensionals.

A sentiment from Every Day Circle Postmarks was stamped in Rich Cocoa Memento Ink. The center was colored with Copic Markers Y15 and Y17. The sentiment was cut out and adhered to a piece of white cardstock, cut and embossed with a Eyelet Pendant Shapeabilities die. Parts of a sanded finish off the card.

Finally, here is a complete blog hop list in hopping order:

Guess what? You found the first of the candy stops right here. Add your info to Mr. Linky if you are interested in winning one of the newly released stamps.

Thank you so much for hopping with us today and I hope you enjoy the new release!

Today’s hostess is Mona. She challenged us to create a corner bookmark. I hadn’t made one of those since I wrote the tutorial. With me buying all my books on Kindle now, I don’t usually have books laying around. But…. I do have magazines I can use them for. And since it’s for a magazine, I don’t have to worry about making it not bulky so it doesn’t hurt the book pages. 🙂

I couldn’t help myself. I had to use the Rose from A Year in Flowers 2 again. I LOVE that image. I stamped it several timed in Rich Cocoa Memento Ink on Neenah Solar White cardstock. They were colored with Copic Markers (Roses: R00, R01, R02, R05   Leaves: G40, G43, G46), cut out and layered.  A piece of white cardstock was cut with a Standard Circle Nestabilities die and embossed with the new Elegance M-Bossibilities folder. The circle was stitched to a piece of Kraft cardstock, cut and embossed with a Beaded Circle Nestabilities die. The rose layers were adhered slightly to the lower right of the circles.

My bookmark base was created out of a 4″ square of Neenah Solar White cardstock. It was scored and the bottom edge was cut and embossed with the Eyelet Borderabilities die. The edges of a 1 1/4″ x 4″ piece of My Mind’s Eye Follow Your Heart Be Happy paper patterned paper were sanded, stitched and adhered over the lower part. Seam binding was tied around it. The bow was topped with an  October Afternoon button tied on with Linen Thread.

With the same Linen thread I tied on a small tag, cut and embossed with one of the new Tailor-Made Classic Tag Template die.  The center was lightly sponged with Antique Linen Distress ink before a sentiment from Tiny Flowers and Tags. I didn’t want the seam binding in the back of the bookmark to get in the way of the magazine pages, so I taped another 1 1/4″ x 4″ strip of the same patterned paper over it on the back.

The image layers were adhered to the right of the bookmark. Baby Bling Rhinestones on the embossed part and parts of a Finesse Rhinestone Swirl finish off the bookmark.

Check out my fellow Timeless Tuesday Challenge Members for more inspiration:

Cindy Haffner
Heather Jensen
Maki Jones
Mona Pendleton
Tammy Hershberger
and February Guest Designer Tera Fujan

Thanks so much for stopping by! Have a wonderful day!
Hugs and smiles

It’s day two of the sneak peeks for Flourishes’ January Release and I got to play along with the release sets! This next set is about creating a note or two for those friends that you truly care about — both near and far! The good news is, while these sentiments are from the heart, their messages are good not only for Valentine’s Day, but the whole year through!

Introducing…

This 4 by 3″ set — called Heartlines — is a perfect addition to any of Flourishes images to send some love this Valentine’s Day! Four artistically scripted sentiments perfect for friends and Valentines! This set even offers a darling row of hearts to add as a border, box or accent! Flourishes’ ever-so-talented design team has showed off this set in true creative form!

For my card I stamped a sentiment from Heartlines in Tuxedo Black Memento Ink on a piece of Neenah Solar White cardstock that had been cut and embossed with a Standard Circle Nestabilities die. The solid heart from Fanciful Flourishes was stamped over the sentiment with Spun Sugar Distress ink. The outline words were colored with Copic Markers (R32, R35, R37).

The circle was adhered to a slightly darker black cardstock circle. Both circles were adhered to a piece of Cherry Cobbler cardstock, cut and embossed with a big Scalloped Circle Nestabilities die. Everything was adhered to a piece of white cardstock cut and embossed with the Fair Isle Pendant die. Pink Baby Bling Rhinestones were adhered to the Fair Isle die cut and Stardust Stickles was added over the colored letters.

Two 4″ wide strips of MME Lost & Found 2 Blush paper were stitched over a 4″ x 4 1/2″ piece of the same paper pack after the two bottom corners were rounded. White Organdy Ribbon was tied around the strips before the layers were adhered to the card base, a 4 1/4″ x 9 1/2″ piece of Kraft cardstock folded in half. The sentiment layers were adhered in the card center with dimensionals. Part of a Finesse Rhinestone Swirl to the upper right corner of the card base.

Want to win this set? All you need to do is leave some love in the form of a comment on the blogs below! Why? You need to try to figure out…..

One of the ladies on our link list below will be picking a name from the comments on her blog post today. We don’t know which one it is… so the more blogs you leave comments on, the more chances you have to win!

Barbara Anders

Julie Koerber

Christine Okken

Cindy Lawrence

Danielle Kennedy

Dawn Burnworth

Stacy Morgan

Tammy Hershberger

Sharon Doolittle

Heather Jensen

Cindy Haffner

Mona Pendleton

Jan Marie Caruso

DID YOU KNOW YOU COULD WIN OUR ENTIRE JANUARY RELEASE? Have you checked out our New Year Challenge? Just click HERE to find out how to play! You can also play in our Noon Time Challenges! Check out yesterday’s noon time challenge – The Year of the Dragon Challenge. Or, you could check back today at noon for another special, fast-paced challenge designed to spark creativity and give you another chance to win some wonderful goodies! All challenges will close this Friday at 5 PM EST and winners will be announced Saturday in our Winner’s Circle blog post! So get those fingers inky and good luck!

Can’t wait until all of our sets are revealed Friday morning? Well, you can pre-order them now if you like what you see on our designers’ blogs! Just click HERE. You’ll also see that we are offering our special New Release Bundle again – 10% off if you purchase all of our stamp sets in one bundle!

Thanks all for stopping by! We’ll see you here back here a noon!

Thanks so much for stopping by! Have a wonderful day.
Hugs and smiles

CardMaker Magazine is launching a new blog and is featuring Little Darling Stamps today. Little Darling stamps will be included in CardMaker Magazine’s “Our Favorite Products” in the January issue that is on sale in stores now. To celebrate this occasion, Angie Hunt is giving away five Little Darling Stamps, one from each of the five releases so far, to a random commenter on her blog.

For my card I did something for the first time. I merged digital images. When I agreed to help out for this event, I got to pick a Little Darlings image, but as digital image. I picked the darling Ice Dancer. To give her an area to skate on, I purchased this Ice Skating Lake digi image from Make it Crafty. I followed the excellent tutorial on merging images from Crafty Cardmakers, which made it very easy to merge my images.

I printed them out on Neenah Solar White cardstock and cut the image with the largest of the Standard Circle Nestabilities dies. The image was colored with Copic Markers (Coat and socks: R24, R29, R39   Coat Trim: C00, C1, C3   Skirt and shoes: E42, E43, E44, E47   Shirt: E40, E42   Skin: E50 E51, E53, BV00   Hair: Y21, Y23, E33   Trees: G21, G24, G28   Sky: B0000, B000, B00, B91) before it was layered on to a piece of Solar White cardstock, cut and embossed with the largest scallop circle from the standard circle collection. Stardust Stickles was used to add sparkle to the snow and Glossy Accents on part of the lake.

For my card layout I used the current Sketch Saturday Sketch. Little Darlings is sponsoring it this week. The winner will be receiving a $15 merchant gift voucher from LovetoStamp.

I cut a circle with a Grand Circle Nestabilities die out of  Echo Park’s Times & Seasons paper and sanded the edges. One 2 1/8″ and a 2 3/8″ wide strip from the same paper pack were also cut and embossed with the same die and had their edges sanded.

A white cardstock strip was cut and embossed with one of the Jumbo Scalloped Borderabilities dies and adhered under the blue layer. A piece of White Crochet Lace was adhered to one side of the red layers. Both of the strips were adhered to the circle layer and the edges were stitched.

White Organdy ribbon was tied around the horizontal strip, topped with a button tied on with Silver Curling ribbon. The layers were then adhered to a card front, cut and embossed with a Grand Scalloped Circle die out of Solar White cardstock.  A sentiment from Whimsy’s Treasured Moments Tickets was stamped in Tuxedo Black Memento ink on a piece of Solar White cardstock, cut and embossed with a Standard Nestabilities circle die. The sentiment center was colored with Copic Markers B000, B00. Part of a Finesse Rhinestone swirl and more silver Rhinestones finish off the card front.

Thank you so much for stopping by! Good luck winning those stamps.
Have a wonderful day!
Hugs and smiles

Here is another card I made for one of the VSN challenge. I combined it with last weeks MFT sketch. For my card I picked the Pure Innocence set called Snow Day. I stamped the image in Tuxedo Black Memento Ink on Neenah Solar White cardstock as well as different patterned paper from Echo Parks Season’s Greetings. The image and clothes pieces were colored with Copic Markers (jacket/boots: R17, R29, R39   Hat: YG21, YG25, YG17   Pants: B000, B12, B14    Hair: Y23, E25, E29    Skin: E0000, E00, E01) cut out and assembled.

A piece of Season’s Greetings paper was cut with MFT’s Tag die-namic die. The edges were sanded before the paper was stitched to a piece of Solar White cardstock. A sentiment from Snow Day was stamped on the right edge in Tuxedo Black Ink. The paper pieced image was adhered to the tag with dimensionals. Sugar Sparkly Fluff was added to the pom poms of the hat and the rims of the boot. Stardust Stickles was added to the snowballs.

Two 4″ long strips of Season’s Greetings were cut with the Small Scalloped Border Die-namics die, sanded and adhered to a 4″ x 5″ piece of the same paper pack.  a 3 1/4″ wide patterend paper was adhered on top of the blue paper and two 3/8″ wide Kraft strips were adhered to the papers before they were stitched to a 1/4″ bigger piece of Kraft cardstock.

White Organdy Ribbon was tied above the red strips and topped with a blue button, which was tied on with iridescent curling ribbon. Before the tag was adhered to the layers with dimensionals, a button was tied to the top with more curling ribbon.

Solar White cardstock was cut and embossed with a Snowflake Borderabilities die. The snowflakes were airbrushed with Copic Marker B02. The snowflakes were adhered to the layers with dimensionals. The airbrushed parts of the snowflake were covered with Stardust Stickles. Everything was adhered to the card base a 4 1/2″ x 11″ piece of white cardstock, folded in half.

Thanks so much for stopping by! Have a wonderful day.
Hugs and smiles

Happy Halloween!!!! I hope you will have a safe and fun holiday tonight! I thought I should create a Halloween card to post today.

I created this card for the Whiff of Joy Challenge. It’s a sketch this week and a fun one to boot. It also works for Lori Tecler’s Blogger Challenge, which is to create a Happy Haunting card.

I stamped the Little Witch image in Tuxedo Black Memento Ink on Neenah Solar White cardstock and colored her with Copic Markers (coat and hat: N3, N5, N7, N9   Hair: YR16, E99, E07   Skin: R000, R01, R02   Blue: B000, B00, B2   Broom: E35, E37, E39, Y21, Y23, E99  Patch: V12, V15, V09   Background: YR30, 1/5th YR31, YR31).

The image was cut and embossed with a Classic Circle Nestabilities die and the Out of the Box Technique. It was layered first on a slightly bigger piece of black cardstock, then aon a piece of white cardstock, cut and embossed with the Kaleidoscope Pendant. Diamond Stickles was added to the green dots of the blue fabric as well as dotted on the background.

The edges of two pieces of MME Mischievous patterned paper were sanded and adhered to a 4 1/4″ square of the same paper pack. The layers were stitched to a 3/16″ bigger piece of black cardstock piece. Green Organdy Ribbon were tied around the the layers vertically before the image was adhered to the layers with dimensionals. A button was tied over the bow with black waxed linen.

The sentiment from this set was stamped in Tuxedo Black ink on a white cardstock circle. The image and background was colored just like the main image and it was adhered to the lower right of the image. Baby Bling Rhinestones were added to the top left corner of the layers and parts of a Finesse Swirl to the top and bottom right. Both the swirl and the baby bling Rhinestones were colored with Copic Marker YG25 before they were added to the layers.

The card base was cut and embossed with a Grand Classic Scallop Square Nestabilities die out of dark orange cardstock from Stampin’ Up!. The edges of the cardstock were colored with Copic Marker E07 to match the witches hair. A

The inside of the card is pretty simple A 1 3/4″ x 4 1/4″ strip of Mischievous paper was adhered to a 4 1/4″ white cardstock square. That was stitched to a 3/16″ bigger piece of black cardstock and everything was adhered to the inside of the card. The witch image was stamped in Rusty Hinge Distress ink to a white cardstock circle and the edges were sponged with the same color.

Whiff of Joy is looking for Design Team Members for their Sketch Challenge team. To apply make a card for this sketch and add DT behind your name when you enter the challenge. I think I might try. I like challenges and I adore Whiff of Joy images.  Wish me luck!

Happy Halloween!


Here is another card for one of the HYCCT challenges. The hostess for this challenge was Barbara Anders. She challenged us to create a card with two sizes of any geometric shape on your project: Circles, rectangles, squares, ovals, you choose, just use two sizes!

I knew I wanted to use another Wee Image. I bought three of them, but I think I might get them all. The girl is just so cute. Since the Winter Fairy image was pretty even all around, I chose to cut it with the largest Circle Nestabilities die after I stamped her in Tuxedo Black Memento Ink on Neenah Solar White cardstock.

The image was colored with Copic Markers (Skin: E0000, E00, R30    Hair: Y21, Y23, E31, E33     Coat: G12, G14, G16    Leaves: G07, G16, G28      Berries: R08, R29, R39     Flowers/mitten: RV21, RV23, RV25), masked, a few cloud masks were added and the image was airbrushed with Copic Marker B02. The coat trim was covered with Sugar Sparkly Fluff and the ground was covered with Chunky Crystal Crafty Sparkles.  The image was adhered to a piece of Kraft cardstock that had been cut and embossed with Big Scalloped Circles. The edges or the image were paper pierced.

A 1 3/4″ strip of one pattern of Patterned Paper from Echo Parks Holly Jolly Christmas collection was adhered over a 5″ square of another pattern of the same pack. A white strip of cardstock had been cut and embossed with a Snowflake Borderabilities. It was adhered under the green horizontal strip. The paper was cut and embossed with one of the Grand Circle Nestabilities and stitched to as lightly bigger white cardstock circle.

White Organdy Ribbon was colored with Copic Marker RV25 (I don’t have any bright pink ribbon) and tied around the horizontal strip. The bow was topped with a yellow button that was tied on with iridescent curling ribbon.  The snowflakes that came out of the Borderabilities cut were airbrushed with Copic Marker RV23 and two were adhered to the upper right of the image.

A sentiment from Whimsy’s Magical Whimsy Seals was stamped in Tuxedo Black Memento Ink on a piece of white cardstock, cut and embossed with a Classic Circle Nestabilities die. The seal was colored with Copic Marker RV10 and RV00. Another snowflake was adhered next to the sentiment panel.

Stardust Stickles was added to the wings of the fairy and the pink parts of the snowflakes. Everything was adhered to the card base, Kraft cardstock cut and embossed with Grand Scallop Circle Nestabilities.

Thanks so much for stopping by! Have a wonderful day.
Hugs and smiles

Today Becky at PageMaps is revealing beautiful new card sketches. Some of the Flourishes team were lucky enough to get a sketch early to prepare a sample for it. My sketch looked like this:

Of course I had to add a bit of ribbon and sewing, but otherwise, I think I stayed true to the sketch. I started with cutting and embossing a 4″ white strip of Solar White cardstock with one of the Eyelet Borderabilities. It was adhered to a 1 3/4″ x 4″ strip of Vintage Whimsy The Girls Paperie paper before they were both stitched to a 4″ x  5 1/4″ piece of Jubilee The Girls Paperie Paper, which had the two bottom corners rounded.

Ivory Organdy Ribbon was tied over the upper layer and topped with a button and linen thread.  The layers were adhered to the card base, a 4 1/4″ x 11″ piece of Solar White cardstock, folded in half with the bottom corners rounded.

The sentiment is from Flourishes “With Gratitude” set. I love this set and seem to use it all the time lately. The sentiment was stamped in Jet Black Archival ink in the center of a piece of white cardstock that had been cut and embossed with one of the Fancy Tag 3 dies.  A partial image of a flower was stamped in the center and the entire tag was sponged with Vintage Photo distress ink while the die was still placed over it.

Burlap was cut with one of the Classic Heart dies and adhered to the upper left hand side of the card. A Pearl pin was stuck through it. Before the image was adhered with dimensionals, part of a Finesse pearl swirl was added to the lower right hand corner.

Check out some other sketches and the samples the other Flourishes designers came up with:

Barbara Anders
Danielle Kennedy
Mona Pendleton
Silke Ledlow
Stacy Morgan
Tammy Hershberger

Thanks so much for stopping by! Have a wonderful day!
Hugs and smiles

Today’s Timeless Tuesday challenge hostess is Silke. She asks us to play Bingo! For my card I picked the center row (embossing, pearls and embossing).

I stamped an image from the Zinnia set in Tuxedo Black Memento Ink on Neenah Solar White cardstock and colored it with Copic Markers (Flowers: RV63, RV66, RV69   Stems and leaves: YG61, YG63, YG67   center: YR15, E37, E29   background: B0000, B000). The image was cut with the largest Lacey Oval Nestabilities die. The image was first sponged with Antique Linen, then with a bit of Vintage Photo Distress inks. The edge of the oval was paper pierced.

A strip of white paper was cut and embossed with an Eyelet Borderabilities die. It was adhered under a 2 1/4″ wide strip of MME Lost & Found paper which was in turn taped on a 5″ square from another Lost & Found Paper line. The layers were cut with the smallest of the Grand Circle Nestabilities die.

The circle was stitched to a bigger piece of white cardstock that was hand cut into a slightly bigger circle. White Silk Ribbon was tied around the horizontal strip and topped with a pink button. The image layer was adhered with dimensionals. Pink Flower Pins were stuck behind the ribbon and image.

A sentiment from the same set was stamped on a piece of white cardstock, cut and embossed with the smalest Petite Oval Nestabilities die and sponged like the main image.  Since I knew I would place the sentiment partially over the main image, I stamped the part that I would hide under the sentiment over the sentiment layer in second generation Vintage Photo ink.

The card base was cut and embossed with the second smallest Grand Scallop Oval Nestabilities die. The layers were adhered to the card base with dimensionals. Baby Bling white pearls finish off the card.

Please check out my fellow Timeless Tuesday Challenge Team members:
Betty Wright
Cindy Haffner
Heather Jensen
Makiko Jones
Silke Ledlow
Tammy Hershberger
Allison Cope – August Guest Designer

I hope you have time to participate in this challenge! Thanks so much for stopping by! Have a wonderful day!
Hugs and smiles

© 2012 fresh & fun Suffusion theme by Sayontan Sinha