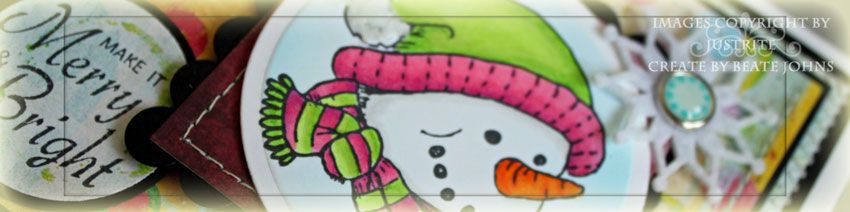
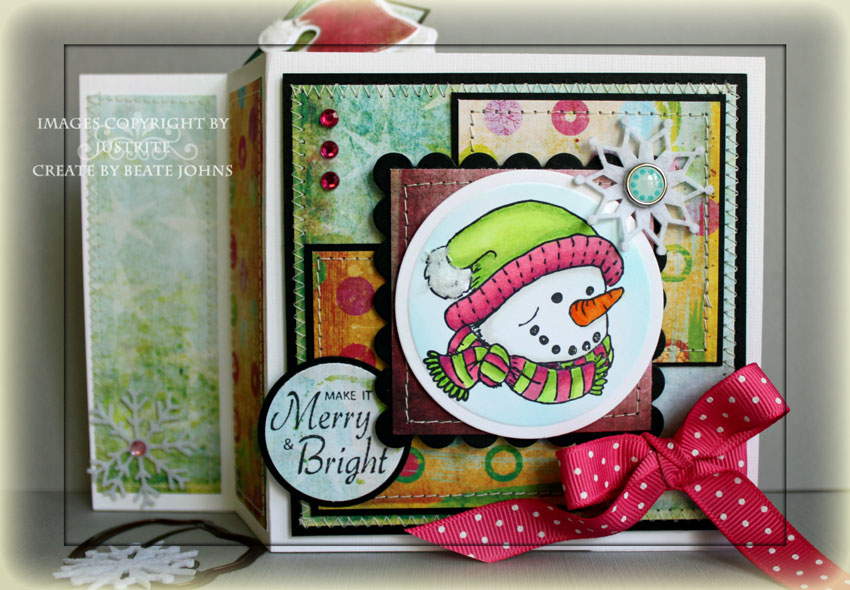
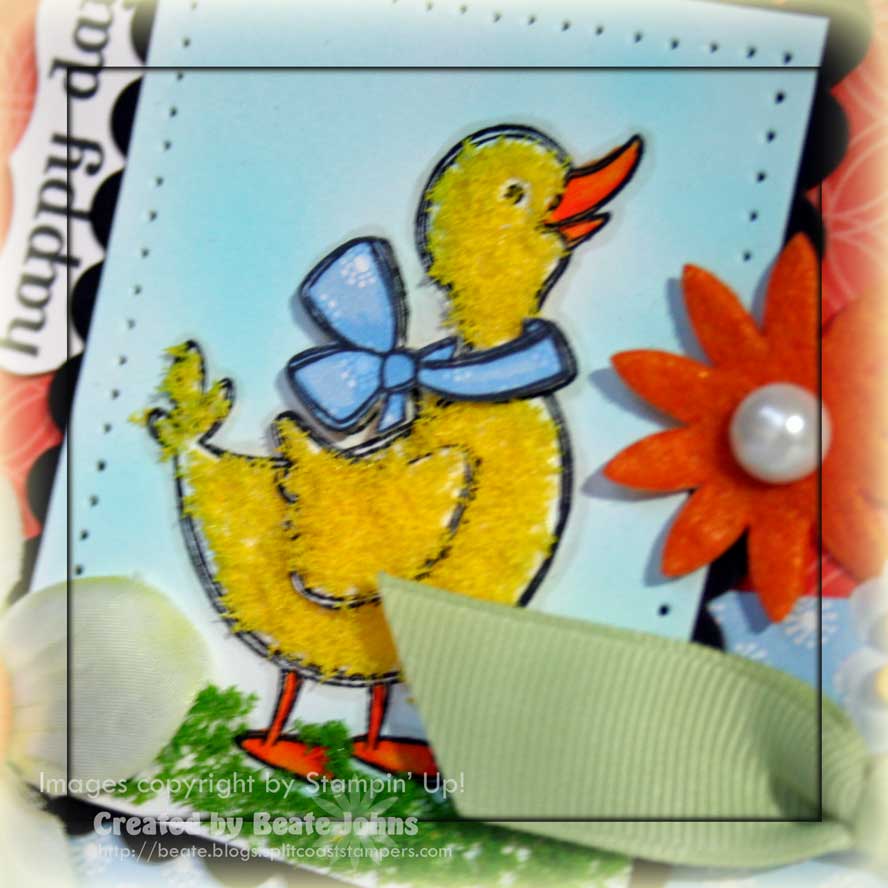
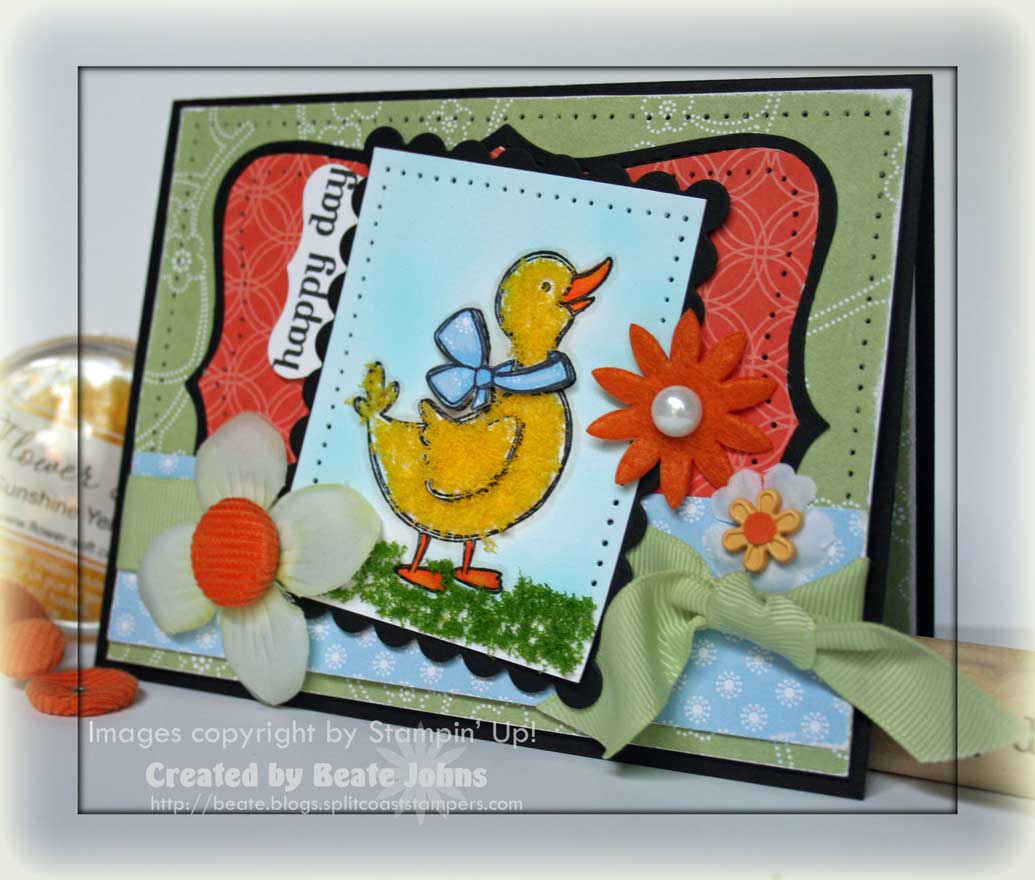
I am excited to be a Guest Designer for Little Darlings new rubber stamp release. I stamped the image called Snowy Friends in Tuxedo Black Memento Ink on Neenah Solar White cardstock. It was cut and embossed with a Classic Circle Nestabilities die and colored with Copic Markers (Skin: E0000, E00, R20 Hair: E99, E37, E29 Pants: E42, E43, E44 Jacket: G0000, G00, G00 Shoes: R24, R27, R39 Hat: YR15, Y18, R24, R28 Snowman Scarf: G03, G05, G07 Snowman hat: C3, C5, C7, C9 Branch: E25, E29 Eyes: E99, E39, E27).

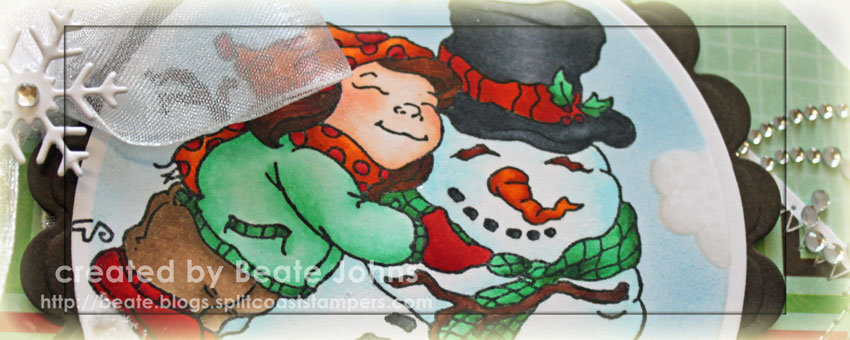
The image was masked and two cloud masks were added before the circle was airbrushed with Copic Marker B41. The bottom was covered with Polar White Flower Soft.   The bottom of the clouds were colored with Copic Markers (W00, W0, W1). The layer was adhered to a piece of Canyon Brown Cardstock, cut and embossed with a Big Scalloped Circle Nestabilities die.

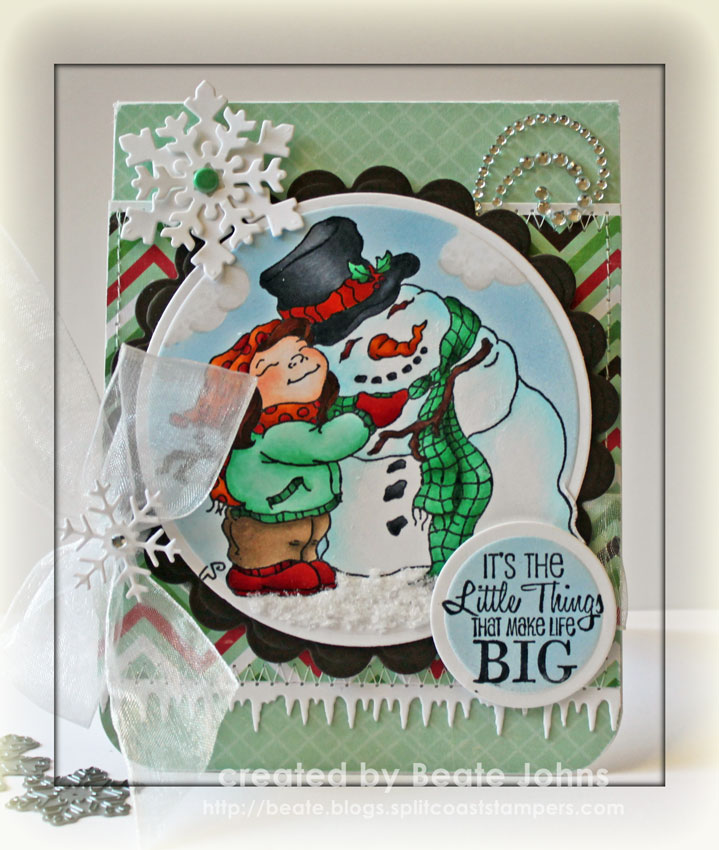
A white paper strip was cut with MFT’s  new Icicle Border die. It was adhered under a 4″ square of Echo Park Holly Jolly Paper and a slim strip of white cardstock was adhered on top. The layers were stitched to a 4″ x 5 1/4″ piece of Holly Jolly paper. The bottom two corners were rounded and white organdy ribbon was tied around the horizontal layers before the image was adhered with dimensionals.

Two snowflakes were cut out of white cardstock with Whimsy Layered Snowflake die, stacked and topped with a brad, that had been colored with Copic Marker G02. The snowflake was adhered to the upper right edge of the layers, part of a Finesse Rhinestone Swirl to the top right.

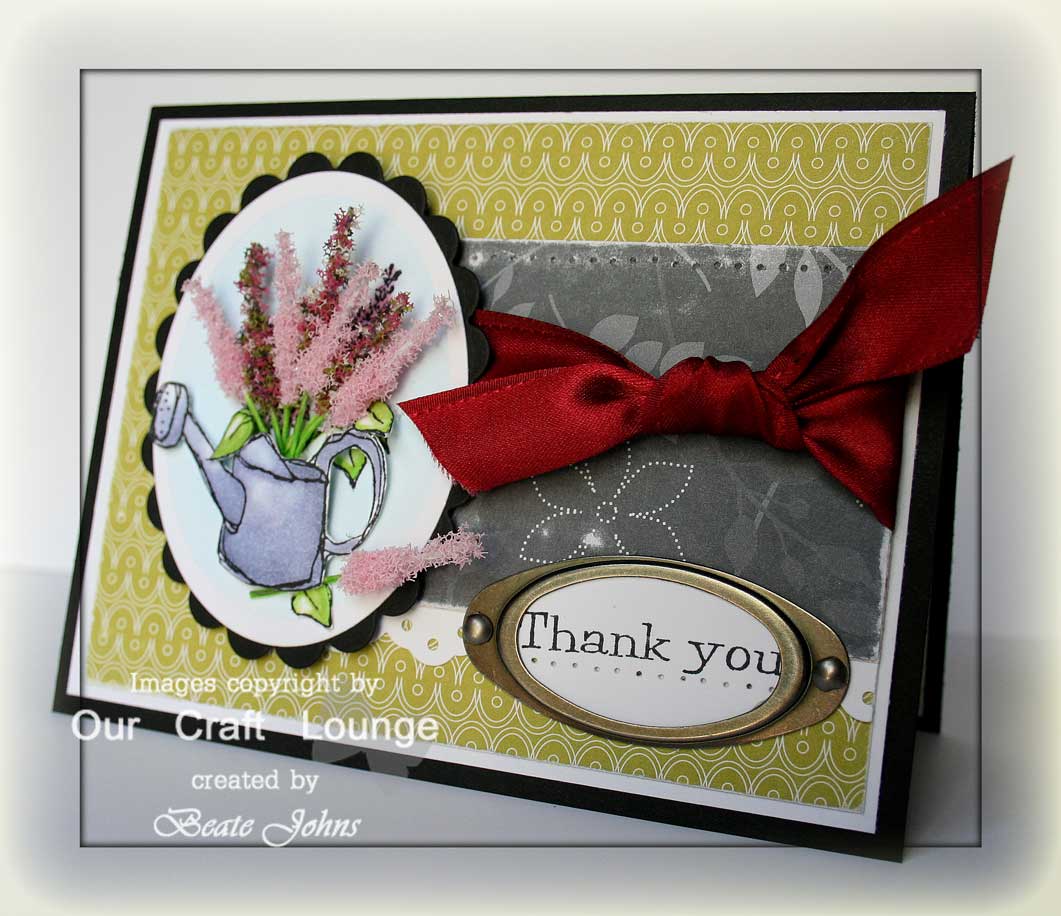
Another snowflake was cut with the smallest of the MFT Snowflakes die-namic dies. It was adhered to the top of the bow with Glossy Accents. A Baby Bling Rhinestone was adhered in the center of the snowflake.

A sentiment from The Cats Pajama’s Bearing Flowers was stamped in Tuxedo Black ink on a piece of Neenah Solar White cardstock, cut and embossed with a Classic Circle Nestabilities die. It was airbrushed with Copic Marker B41 and adhered to the lower right  of the image.

If you like this image and the others from this release, check out the Little Darlings Challenge Blog. Participate in the challenge and you could win a $10 Gift certificate if you win and made a project without their stamps, or a $20 Gift certificate if you made a project with Little Darling stamps.

Thanks so much for stopping by! Have a wonderful day.
Hugs and smiles

wagsnwhiskersangelfsufwide.jpg

Here is another card I created for the Flower Soft Ultra Fine Product Review. I created it the day before I left to the CHA. By the time I was done stamping, I had really poor light, hence the not so great pictures. I am sorry about that.

wagsnwhiskersangelfsuf.jpg

The card base is a 4 3/4″ x 9 1/2″ piece of Old Olive cardstock, folded in half. The edges of the card front were sponged with Pine Needles Distress ink. A 4″ square of My Mind’s Eye Dreamy 2paper was stitched to a 3/16″ bigger piece of Whisper White cardstock after the edges had been sponged slightly with Aged Mahogany Distress ink. May Arts Lace was taped to the lower half of the layers, then May Arts Organdy Ribbon was tied above the lace before they were adhered to the card front with dimensionals.

Wags’n Whiskers Angel Whispers was stamped in Tuxedo Black Memento Ink on Neenah White cardstock and colored with Copic Markers (R35, R39, YR65, YR68, E09, E18, E00, E02, T3, T5, W00, W01). The image was cut out with Nestabilities Label One and air brushedwith Copic Marker B24. Sage Flower Soft Ultra Fine was added as grass, Stickles Stardustover the wings, butterflies, hairbow and the dots of the dress.

Have a wonderful day! Hugs and smiles

flowersoftufproudofyouwide.jpg

Flower Soft has a great new product out…well actually two. But the latest product review on SCS was all about the new Flower Soft Ultra Fine. I really like the much finer new product. It makes it easier to use on more detailed stamps. The other new product is their beautiful new line of stamps called Moments in Time

flowersoftufproudofyou.jpg

My image is from the Moments in Time stamp set called Man of the Hour. This image reminds me so much of my two boys when they were little. Kids grow up way to fast, don’t they? The image was stamped in Tuxedo Black Memento ink on Neenah White cardstock and colored with Copic Markers (Shirt and socks: R24, R27, R29, BG93, BG96  Ball E33, E34, E35  Shorts: E70, E71, C00 Grass: YG01, YG03, YG05  Skin: E50, E51, E53  Shoes: E44, E47  Hair: Y18, Y26, YR28, E15, E8). The image was cut out and embossed with Curved Rectangle Nestabilities. While leaving the die on, I airbrushed the sky with Copic Marker B24.

On the ground I added Flower Soft Ultra Fine Sand, for the grass I used the Flower Soft Ultra Fine Sage. The sand color was to light, so after the glue dried, I airbrushed that area with E47. The top right of the image was paper pierced.

The card base is a 4 1/4″ x 11″ piece of Always Artichoke cardstock folded in half. A 3 1/2″ x 4 7/8″ piece of Kraft cardstock was stamped with the ball from the same set in Frayed Burlap Distress ink. The edges were sponged with the same ink. That layer was stitched to a 1/4″ bigger piece of Chocolate chip cardstock. The stitched layers were attached to the card front with dimensionals.

The sentiment is from Verve’s Dare To Be You stamp set. It was stamped in Tuxedo Black ink on Neenah White cardstock, punched with SU’s large oval punch and sponged with Frayed Burlap ink before it was adhered to the image.

The rubber stamps from Flower Soft come as unmounted rubber sheets along with Kling-on cushion. I created a quick tutorial on how to mounting unmounted rubber stamps. I used my Flower Soft image for the photo tutorial and a Stamp’n Whiskers image for the video tutorial that you can see here:

[youtube]https://www.youtube.com/watch?v=WW6U-vPnqpU[/youtube]

oclwinterscenewide.jpg

For the last Flower Soft Review I shot a video on how to apply Flower soft to stamped images. I used Polar White Flower soft, my favorite color.

oclwinterscenefsbeate.jpg

The card base is a 5 1/2″ x 8 1/2″ piece of Chocolate Chip cardstock folded in half. A 3 3/4″ x 5″ piece of Merry Days of Christmas paper from My Mind’s Eye was stitched to a 1/4″ bigger piece of White cardstock and adhered to the card base.

The image is from OCL’s Tweet Winter Wishes. It was stamped on Kraft cardstock in black Memento ink and colored with Copic Markers. The image was cut with Label eight Nestabilities. The edges were sponged with Snow Cap Adirondack ink. I also sponged white pigment ink where I wanted to add Flower Soft. White Flower Soft is a bit translucent. To make it look white on Kraft cardstock, it’s better to add white ink underneath.

The sentiment was stamped with Black memento ink on White cardstock. It was punched out with the small oval punch, the edges were sponged with Willow Dye ink from Adirondack.

Here is a quick video for the visual learner:

[youtube]https://www.youtube.com/watch?v=wXVA0Lerphk[/youtube]

Today’s tutorial is for a simple Luminaria. They can be created lots of different ways, but I thought I start showing an easy one, all out of one piece of cardstock. The images and the background were printed out with the new Flower Soft CD-Rom. It contains some super cute images and helps to make some quick cards and projects.

flowersoftluminary.jpg

The ovals were cut with Oval Nestabilities (of course….I seem to not be able to create one project without Spellbinders products. I am truly hooked on those!). Vellum Paper was taped behind the window.

The images were cut out and taped to my box with Scor-Tape and dimensionals. Polar White Flower Soft was added to the trees and ground.

Here is a video for the visual learner:

[youtube]https://www.youtube.com/watch?v=8_r7wc47ivI[/youtube]

Our annually Tutorial Holiday Blitz week is going on at SCS right now. I already missed alerting you about the first two wonderful tutorials, a scrapbook wallet tutorial written by Makeesha Byl and a Matchbook Candy holder by Theresa Momber. I am sorry about that. I was crazy busy packing up sold Stampin’ Up! products and shipping them out. Thank you all for helping me make room in my craft room for new stamps from other companies!

Today’s tutorial is written by Libby Hickson and is for a Snowglobe card. She had posted one last winter and I had asked her right there and then if she would write this for us for this year’s Holiday Blitz. How fun to see one of those on the back of the Winter Mini catalog from Stampin’ Up! earlier this year.

flowersoftsnowglobeverve.jpg

My card is pretty simple. The cute little polar bear and the background are from Flower Soft. Flower Soft has some cute new products coming out. Make sure you come back tomorrow to learn more about them. The sentiment is from Verve. I received it as a thank you with an order last fall. Julee is so sweet to always include a little thank you stamp with each order. It was stamped with Tuxedo Black ink on Gina K’s Pure Luxury Cardstock. It was punched out with the large oval punch from Stampin’ Up! and layered on a Black Scallop Oval Punch-out.

The patterned paper is My Mind’s Eye Merry Days of Christmas. I tied 1″ celery Satin ribbon around the snow globe bottom. I can’t help by make more of those adorable snowflakes, Sherry Cheever showed us how to make. I made a smaller version that I sponged with Faded Jeans Distress ink and sprinkled with Shard Vintage Glass Glitter. The button is from Basic Grey and was tied on with waxed linen.

I hope you have time to check out the new tutorials, let the authors know how wonderful their projects are and try them out.

Have a wonderful day! Hugs and smiles

christmaswiperwide.jpg

I worked ahead this week and already made this card on Monday as my entry for the Technique Challenge, which was to create a Wiper card.

I haven’t made a square one before, so it was perfect to use the sketch with the challenge. As my main image I chose this cute stamp from JustRite’s Old Fashioned Christmas set. Frosty was stamped in Tuxedo Black Memento Ink on Gina K’s Pure Luxury White cardstock, cut out with Circle Nestabilities and colored with Copic Markers (RV13, RV14, RV17, YG01, YG03, YG05, W1, YR04, YR07) and airbrushed with Copic Marker B000. White Flower Soft was added the to the pompom on the hat.

christmaswipertlc243beate.jpg

My card base consists of two 4 1/2″ x 7 1/2″ pieces of Textured Whisper White cardstock scored at 1 1/2″ and 3″. A 3 3/4″ square of Fancy Pants Happy Holidays Patterned paper was sewn to a 4″ Black square. The three smaller patterned paper squares measure 2 5/16″ and are from the same paper pack. They two outer ones were layered on a 2 7/16″ black cardstock square, the one in the middle on a scalloped black square that had been cut with Square Nestabilities.

Melon Mambo dotted ribbon was tied around the big square layers before the smaller square were adhered. A retired felt snowflake from Stampin’ Up! with a My Mind’s Eye Brad in it’s center was added to the top right corner of the main image. Three little pink rhinestones filled the left top corner.

For the sentiment I chose another JustRite stamp from the Merry Little Christmas set. It was stamped in Tuxedo Black Memento ink directly on Fancy Pants patterned paper, punched out with a 1 1/4″ circle punch. It was layered on a 1 3/8″ black circle and adhered to the bottom left of the main image.

christmaswiperpopup.jpg

My wiper pop up image was a little Santa hat cut out with Spellbinders Holiday Cheer die. It was cut out twice, once out if White cardstock, once out of red/pinkish patterned paper from the Happy Holidays Paper pack. I cut the red center out, sanded it a bit and taped it to the white layer. White Flower Soft was added to the rim and pompom of that hat.

You can find the step by step tutorial for wiper cards on Splitcoast. Here is the video for the visual learner:

[youtube]https://www.youtube.com/watch?v=SDrn0UG2Bto[/youtube]

Today we actually have three tutorials on Splitcoast. They all show you different ways to use Flower Soft. Rose Ann Reynolds wrote one on Flower Soft on stamped images, I wrote two:

Flower Soft Bouquet

Flower Soft on Chipboard

Check out our Product Focus page on Flower Soft in the Resource section as well. It is a cool, but slightly messy product.

oclflowersoftbouquetbeate.jpg

My card base is a 5 1/2″ x 8 1/2″ piece of Basic Black cardstock folded in half,  topped first with a 4″ x 5 1/4″ piece of Whisper White cardstock, then with a 1/4″ smaller piece of Walk in the Park Designer Paper.

The horizontal paper strip is from the same designer paper pack, which can be found in the Occasional Mini catalog from Stampin’ Up!, and measures 2 1/4″ x 3 1/4″. It has a strip of Whisper White cardstock underneath that had been punched with the Eyelet Border Punch. The top edge was paper pierced and all edges were distressed with a sanding block. The gorgeous red ribbon is from May Arts and was tied around the designer paper.

The sentiment and image stamps are from Our Craft Lounge’s Growing Gratitude set. It’s perfect for adding Flower Soft Bouquets in either the watering can image or even the flower pot.  I used Copic Markers to color the image. BV20 and BV23 for the watering can, YG03 and YG05 for the leaves and B00 to airbrush the background.

oclflowersoftbinsidebeate.jpg

On the inside I added a 4″ x 5 1/4″ piece of Whisper White cardstock. It was layered with a 1 1/4″ x 5 1/4″ strip of Walk in the Park Designer paper that had been slightly sanded. Between both layers is a strip of Basic Black cardstock that had been punched with the Eyelet Border punch.

The image on the small oval is also from the Growing Gratitude set. It was stamped with Tuxedo Black Memento ink and colored with Copics (R10, R11, YG03, YG05). The edges of the oval were paper pierced and Stardust Stickles was added to the flower heads.

Have a wonderful day! When you read this, we are already on our way to Germany. We arrive their in the early morning (1:40 a.m. Florida time, 7:40 a.m. German time). Let’s just say the next two days will be long and blurred together! Wish us no rain!!! That’s what the forcast calls for there.

Hugs and smiles 

wsc72sketch.jpg

I love how different Jenn’s sketch is.

Make sure to participate this weekend and post your link on Jenn’s blog.

She is giving away a Splitcoast mug of your choice!

wagonfowwsc72closeup.jpg

I started with stamping my little duck from the Occasional Mini catalog Wagon Full of Fun in Tuxedo Memento ink on Neenah cardstock. I colored the bill and feet with copics and outlined the duck with W1 Copic and air brushed the sky with Copic B00.

Sunshine Flower Soft was added over the body of the duck with glue. I stamped the duck twice more, one more time on white cardstock and one time on Delicate Dots Designer Paper. I cut out the wing of the white cardstock duck, popped it up with a dimensional and added Sunshine Flower Soft over the wing as well. I cut out the bow around the ducky’s neck from the designer paper and added it to the main image with dimensionals. I added Shamrock Green Flower Soft under the ducky’s feet.

The image was layered on a basic black scallop rectangle that had been cut with Nestabilities. The edges top and side edges of the image layer were paper pierced.

wagonfofwsc72frontbeate.jpg

The card base is a 5 1/2″ x 8 1/2″ piece of Basic Black cardstock folded in half. It was layered with a 4″ x 5 1/4″ piece of Delicate Dots Designer Paper. The Designer Paper was sanded and paper pierced.

I cut one Top Note Die cut out of Basic Black cardstock, one out of retired Haiku designer paper. The Haiku paper was cut down a bit, layered on the black cut out and paper pierced around the top edges. It was taped to the center of the green designer paper with a 1 3/8″ x 5 1/4″ piece of Delicate Dots Designer Paper added over the bottom. Celery 5/8″ Grosgrain ribbon was tied around the bottom.

The sentiment is from Many Happy Returns. It was stamped in black on Whisper White cardstock, punched out with the Curly label punch and adhered to the top left of the image. The image was secured to the card base with dimensionals. I added two flowers from the Pretties kit, one with a Pumpkin Corduroy Button, one with a Flower brad in it’s center. The last flower is from Flower Fusion and has a half Pearl from the Pretties kit to top it  off.

 wagonfulloffunwsc72fluffy.jpg

The inside is kept pretty simple.

I started with a sanded piece of the Delicate Dots Designer Paper. It was followed by a White Top Note Die cut that had been layered first with a 1 1/4″ strip of Basic Black, then a  1 1/8″ strip of Delicate Dots DP.

To finish it off I added a felt flower from Flower Fusion with a 5/16″ Jumbo Brad in its center.

Make sure to check

Cambria Turnbow

Charmaine Ikach

Jenn Balcer

Mary Jo Albright

Lori Craig and

Sharon Harnist’s blogs for more samples.

Have a great weekend. Hugs and smiles

© 2012 fresh & fun Suffusion theme by Sayontan Sinha