I am excited to be  guest designing for JustRite Stampers this week. My first project is a tag with new Samantha Walker products. I made a tag since that’s the current JustRite Stampers Friday Challenge . I hope you have time to hop on over and check out the finished tag and my step by step instructions there! You still have until Wednesday to participate in the challenge!!!

Thanks so much for stopping by! Have a wonderful Monday!
Hugs and smiles

I created this card for the current JustRite Stampers challenge, which is a color challenge. We are to use a light yellow, pink and peach for our creation. I knew right away I wanted to use a flower from the older original sets and paper from  My Mind’s Eye Miss Caroline Howdy Doody paper pack.

I stamped an image from Plant a little Love in Tuxedo Black Memento Ink on Neenah Solar White cardstock, cut part of it out and colored it with Copic Markers (RV000, RV10, RV21, RV23, YR000, YR00, YR12, YR15, G40, G43, G46). A piece of Howdy Doody Paper was cut with a Classic Oval Nestabilities die, the edges were sanded and a sentiment from the new Spring Rose Medallion was stamped with Tuxedo Black Ink in the center of it. The edges of the oval were stitched before it was layered first on a white piece of cardstock, cut and embossed with a Floral Oval Nestabilities die, then a piece of Kraft cardstock, cut and embossed with one of the Lattice Motif dies.

The edges of a  1 3/4″ x 4 1/8″ strip of Howdy Doody paper were sanded before the strip was adhered to a 4 1/8″ square of white cardstock that had been embossed with the Flower Fun M-Bossabilities folder. The edges were stitched before May Arts Ribbon was tied around the horizontal strip. A button was tied on with embroidery thread and the layers were adhered to a card base, Kraft cardstock cut and embossed with a  Grand Scallop Square Nestabilities die.

The image layers were adhered with dimensional adhesive and parts of a Finesse Rhinestone swirl were used to finish off the card.

You should participate in the current JustRite Stampers challenge. You could win Copic Markers!!!
Thanks so much for stopping by! Have a wonderful day!
Hugs and smiles

JustRite Stampers released gorgeous new background stamps. I had to try one out right away. It is called Grandma’s Attic.  I created the card for the current JustRite Stampers challenge.

I stamped it once in Tuxedo Black Memento Ink on a piece of Pink Paislee London Market Patterned paper, once partially on Kraft cardstock and again partially on another patterned paper piece from London Market paper pack. The biggest piece was cut and embossed with a Classic Square Nestabilities die. The edges were sanded before the layer was stitched to a slightly bigger piece of Kraft cardstock.

The dress form was cut out from the Kraft cardstock piece. The edges were sponged from the Frayed Burlap Distress Ink before it was adhered to the main image square. One of the spools was cut out from the other patterned paper piece and adhered to the main image.  A brad was added as well as a wooden spool button. A piece of vellum cardstock was cut and embossed with a wing die from Home Sweet Home. Th embossed parts were highlighted with a white pastel pencil before it was adhered underneath the dress form. A piece of Neenah Solar White cardstock was cut and embossed with the largest Square Swatches die and the layers were adhered above it.

A 3″ wide strip of London Market Paper was adhered over a different patterned paper from the same pack. It was cut and embossed with a Grand Square Nestabilities die. The edges were sanded before the paper was stitched to a slightly bigger piece of Kraft paper. The image layer were adhered to the bigger squares with dimensional foam adhesive before May Arts Ribbon was tied around it vertically.  The layers were then adhered to the card base, Solar White cardstock cut and embossed with a Grand Scallop Square Nestabilities die.

A sentiment from the new Vintage Rose Medallion stamp set was stamped in Tuxedo Black on Solar White cardstock that had been cut and embossed with a Home Sweet Home tag die. The center of the tag was sponged with Frayed Burlap ink before the tag was tied to the ribbon bow with Linen Thread and a button. Another piece of London Market paper was cut and embossed with the larger Heart die from Home sweet home. The edges were sanded and the heart was adhered slightly under the tag. Heart Silver Rhinestone Nestabling was addded over the heart and Fancy That! Border bling to the upper right and lower left hand side to finish off the card.

Thanks so much for stopping by! Have a wonderful weekend!
Hugs and smiles

The current JustRite Stampers challenge is to create a card using spring colors and butterflies. I just got new Spellbinders dies in and couldn’t wait to try out the smaller of the two butterfly dies from Wings of Hope. I cut and embossed a piece of Neenah Solar White cardstock and sponged the butterfly with the die still on with Cantaloupe Memento Ink.

A frame from JustRite Stampers Kindness was stamped in Rich Cocoa Memento Ink on  Solar White cardstock. It was cut and embossed with the largest Label 20 Nestabilities die. Another piece of white cardstock was cut and embossed with the smallest of the Large Petite Oval Nestabilities die and sponged with New Sprout Memento Ink. A sentiment from Kindness was stamped in Rich Cocoa ink on the oval before that was adhered to the stamped frame with dimensionals. The butterfly was adhered to the lower right of the frame.

An image from Classic Scallop Border I was stamped in Rich Cocoa ink on white cardstock and cut out. It was stitched to a piece of Pink Paislee London Market Patterned paper that had been cut and embossed with the second smallest  Grand Rectangle Nestabilities die and the edges had been sanded. Fancy Waves! Border bling was adhered to the bottom of the scallop before the sentiment and butterfly were adhered to the center of the paper.

A piece of vellum was cut and embossed with the largest of the Floral Oval Nestabilities dies and adhered under the sentiment layers with dimensionals.  May Arts ribbon was threaded between the Vellum and the label, the label was adhered to the patterned paper with dimensionals and the ribbon was tied into a bow. Everything was adhered to the card base, which was cut and embossed out of Solar White cardstock with a Grand Scallop Rectangle die. Rhinestones from the new Sleek Strips Silver Rhinestones on the butterfly and label finish off the card.

I hope you have time to participate in the challenge. You could win JustRite stamps! Have a wonderful weekend!
Hugs and smiles

P.S.: Yes, I am hooked on Grand Scalloped Rectangle cards right now and that Floral Oval hasn’t left my desk since I unpacked it. Hi…I am Beate and I am a Spellbindersaholic…..no, I don’t want a 7 step program. I am loving with it!

I created this card during last weekend’s Virtual Stamp night over at Splitcoaststampers for the Spring is for the Chicks challenge. I thought it was the perfect challenge to combine it with the current JustRite Stampers challenge (Black/White plus one additional color).

I started by stamping the both labels from Vintage Oval Label Cling set in Tuxedo Black Memento Ink on  Neenah Solar White cardstock. The smaller label was stamped twice. One of the smaller label was cut and embossed with Label 6 Nestabilities dies, the other with the smallest of the Petite Oval large Nestabilities die. The large label was cut and embossed with the largest Label 13 Nestabilities die.  The edges of the layers were sponged with Spun Sugar Distress ink while the dies were still on and then they were layered on top of each other with dimensionals. Fancy That Want2Scrap Border Bling was added to the top and bottom of the smaller label die cut.

Two pieces of Solar White cardstock were cut and embossed with a Lace Doily Motifs die. They were adhered on top of each other and the labels were adhered on top of that.

A piece of MME Lost & Found  Madison Avenue paper was cut and embossed with the Spiral Blossom one die. The edges were  sanded before the flower was rolled.  Frost Smooch Glitz was added to the edges and a large Rhinestone was placed in the flower center. It was adhered to a piece of black Core’dination cardstock that had been cut and embossed with one of  Donna Salazar’s Shadow Flowers dies. Another piece of black cardstock was cut and embossed with a Foliage die. The rolled flower layers were adhered to the lower right corner, the foliage die cut on the upper right.

Another piece of Madison Ave paper was cut and embossed with with a  Grand Square Nestabilities die. The edges were sanded and the layer was stitched to a slightly bigger black square. The layers were adhered to a piece of white cardstock, cut and embossed with a Grand Scallop Square Nestabilities die. The card base was cut and embossed with the same die. Parts of a Finesse Rhinestone Swirl on the upper right and lower left corner finish off the card.

Thanks so much for stopping by! Have a wonderful day!
Hugs and smiles

I created this card for yesterday’s Free 4 All Challenge. Jeanne asked us to created something with a blue flower. I love this rose image from JustRite Stampers new With Sympathy stamp set and thought they would look good in blue.

The image was stamped in Tuxedo Black Memento Ink on a piece of My Mind’s Eye Be Amazing patterned paper. The image was cut out with a  Classic Square Nestabilities die and the Out of the Box technique and colored with  Copic Markers (B0000, B91, B95, G20, G21, G24, G28. YR30).  One more rose bud and a leave branch were stamped on a scrap piece of the same paper, colored and cut out.

The square was sponged with Antique Linen and Vintage Photo Distress ink and the edges were stitched. The square was adhered to a piece of white cardstock, cut and embossed with the largest of the  Fleur De Lis Square Nestabilities dies.

A piece of Be Amazing paper was cut and embossed with a  Grand Square Nestabilities. The edges were sanded and stitched and a piece of Light Blue Organdy Ribbon was tied around the paper vertically. The image layer was adhered over the paper and ribbon and a button was tied over the bow. The paper was adhered to the card base, Neenah Solar White cardstock, cut and embossed with a Grand Scallop Square Nestabilities die.

A sentiment from Fleur De Lis Label 20 stamp set was stamped on a piece of white cardstock, cut and embossed with a Standard Circle Nestabilities die. The edges were sponged an a leave from the image was stamped in the center with Antique Linen ink. Fancy That! Border Bling on the top right of the image corner and three small Rhinestones under the sentiment finish off the card.

I made it into a birthday card so I can enter it into the current JustRite Stampers challenge Birthday Bash.

Have a great weekend and stop by tomorrow for a bit more candy! 🙂
Hugs and smiles

Today a new product review was posted on Splitcoaststampers. It is for Spellbinders new M-Bossabilities embossing folders. Needless to say I love them (what Spellbinders product do I not love?). To show off the folders, I created a quick and easy tutorial on how to create a Faux Letterpress look.

The background was created with the new Elegance M-Bossibilities folder. It was inked with Cantaloupe Memento Ink andNeenah Solar White cardstock was embossed with the folder. It was cut down to a 2 15/16″ square, which was then stitched to a piece of Solar White cardstock, cut and embossed with the largest of the Fleur De Lis Square Nestabilities dies. The card base was cut out of the same cardstock with the same die and the card front was adhered on top.

An image from JustRite Stampers Botanical Butterflies was stamped in Tuxedo Black Memento Ink on a piece of white cardstock, cut and embossed with a Parisian Accent die. The image was colored with Copic Markers (Butterfly: Y17, YR15, YR18    Leaves: G40, G43, G46) and sponged with Old Paper Distress ink. The image layer was adhered to the lower right of the card base with dimensionals.

A sentiment from Fleur De Lis Label 20 stamp set was stamped in black on white cardstock that had been cut and embossed with a Nested Lacey Pennants die. Parts of a Finesse Rhinestone Swirl finish off the card. I made this card into a birthday card I can enter it into JustRite Stampers current Birthday Bash Challenge.  You still have an entire week to enter the challenge for a chance to win JustRite stampers stamp sets.

Here is a video for the visual learner:

[youtube]https://www.youtube.com/watch?v=45XWgbAOKqw[/youtube]

The current JustRite Stampers Challenge is easy. Make a Christmas Card or Tag.  The winner of the challenge will receive two sets of die sets from the JustRite store, three honorable mentions will oone die set! SWEET!!!

For my creation I started out stamping the biggest stamp from Musical Notes in Rich Cocoa Memento Ink on Classic White cardstock. One was cut out and embossed with the  second largest Label 20 Nestabilities die, the other with the third largest die. The ribbon and ornate embellishments of the image were colored with Copic Markers (R24, R27, R29, YR21, YR23, YR24) before both labels were sponged with Vintage Photo Distress ink. A sentiment from the Christmas Nested Frames was stamped in Rich Memento Ink in the center of the smaller label before that layer was adhered to the larger label with dimensionals.

A piece of MME Lost & Found Christmas was cut and embossed with a Label 21 Nestabilities die. The edges were sanded and then cut at the embossed line. A piece of Kraft cardstock was cut and embossed with the same die. The edges of both the cardstock and paper layers were sponged with Vintage Photo Distress ink before the layers were stitched on top of each other.Red Seam Binding (Stampin’ Up!) was tied around the layers. The bow was topped with a button, tied on with Linen Thread.

Another piece of Lost & Found Christmas paper was cut and embossed with the second smallest Grand Label 23 Nestabilities die. The edges were sanded and cut off at the embossed line. A piece of Kraft cardstock was cut and embossed with the same die. The edges of both the cardstock and paper layer were sponged with Vintage Photo before the layers were stitched together. The sentiment layers were adhered to this layer with dimensionals. Cream Baby Bling Pearls finish off this section.

Now I had to decide if I should make it into a card and just cut a base for it, of into something else. I thought it would look great as a box. I took pictures while making the box for step by step instructions. If you are interested how I made this, click on more.

Thanks so much for stopping by!
Have a wonderful day!
Hugs and smiles

Continue reading »

Yesterday’s Featured Stamper on Splitcoaststampers was Anne Harada.  I cased this card of hers for the Featured Stamper challenge as well as the current JustRite Stampers challenge. I kept the top part of her card as a layout and the butterflies. I switched the blue with pink and her gorgeous lace (didn’t have double sided lace like that) with Crochet Lace topped with Organdy Ribbon.

I stamped two butterfly images from the new Botanical Butterflies set two times each in Embossing Ink on Natural White cardstock and embossed them with clear embossing powder. The images were cut and embossed with a Classic Square Nestabilities die and two images were sponged with Spun Sugar, two with Frayed Burlap Distress ink. The squares were stitched to pieces of Canyon Brown Cardstock, that had been cut and embossed with a Eyelet Square Nestabilities die.

A 4 3/8″ x 4 3/4″ piece of MME Lost & Found 2 Blush Patterned paper was stitched to a 3/16″ bigger piece of Natural White cardstock. Crochet Lace was adhered over the center horizontally before the four butterfly squares were adhered with dimensionals. Ivory Ogandy Ribbon was tied over the lace and topped with a button, tied on with cream embroidery floss.

A sentiment from Fleur De Lis Label 20 was stamped in Walnut Stain Distress ink on a piece of Natural White cardstock, that had been cut and embossed with a Blossom Tags & Accent die. The inner part of the die cut was sponged lightly with Frayed Burlap ink. It was adhered to the lower left butterfly square.  Two Baby Bling pearls were added to the sentiment and parts of a Finesse Pearl Swirl were added above the sentiment and above the ribbon bow.

The card base was cut and embossed with a Grand Scallop Square Nestabilities die. The layers were adhered to the card base.

You still have time to participate in the JustRiteStampers challenge. You have to create a Thank you card and add a link to the JustRite Stampers blog before Wednesday evening. You can win stamp sets if your card get chosen as a winner!

The card also works for this month Inspiration Emporium Challenge. We are to use our favorite tool! Besides my sewing machine, I LOVE my Nestabilities dies and my Blending tool. Sponging with the Blending tool and Craft mat create such gorgeous results! I have one blending tool for each color group so I don’t have to change the foam everytime I sponge.

Don’t they look pretty on four Craft Spinners put together? I hope you try out the challenges! JustRiteStampers will give away stamp sets, Inspiration Emporium a $50 gift certificate for the store. So what are you waiting for! Get your stamp on!

Thanks so much for stopping by! Have a wonderful day.
Hugs and smiles


I created this card for today’s JustRite Stampers Color Challenge. The inspiration piece is a beautiful bed cover shown in this picture. It also worked great for yesterday’s Way to Use it Challenge on Splitcoast, Flower Frenzy.

Doesn’t that just scream Springtime? I hope Ohio hears that scream….because on Wednesday, I created this card while snow was falling.  It didn’t stay on the ground, thank goodness, but really? Snow at the end of March? No thank you!

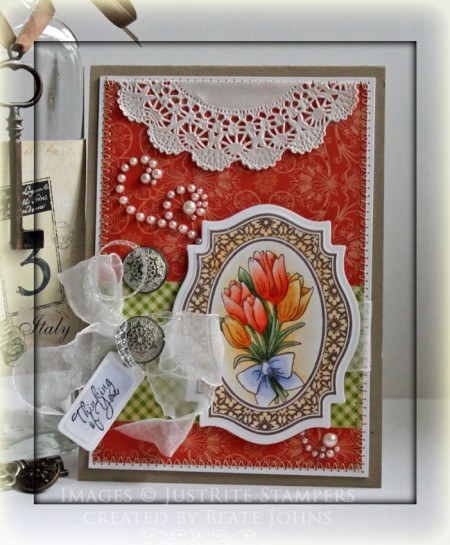
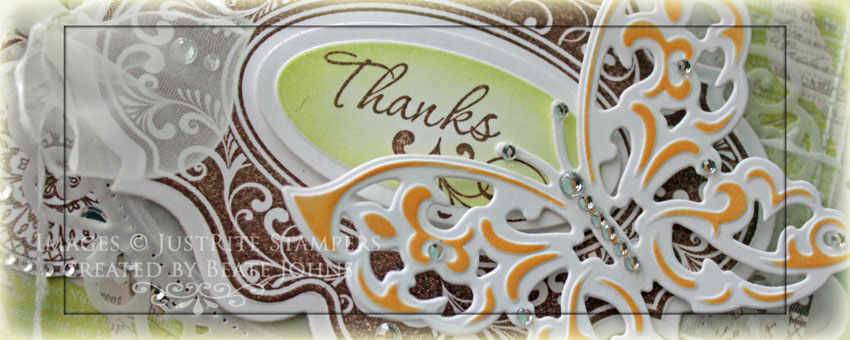
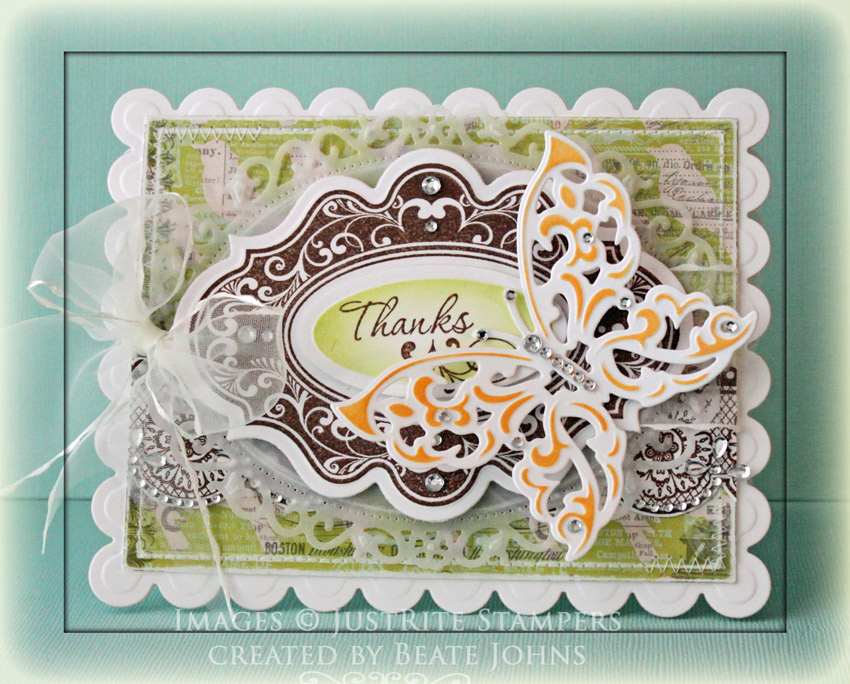
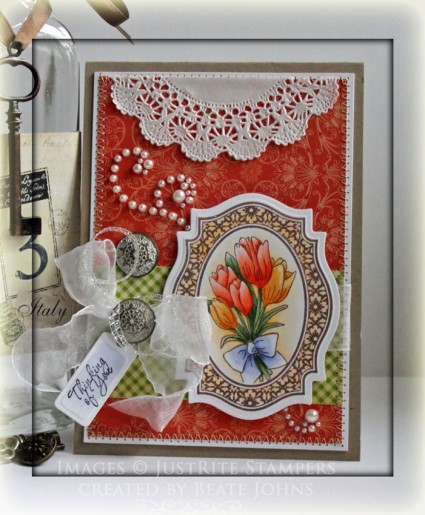
For my card I decided to use a frame from the Fancy Label Cling set with an image from the Breath of Spring set. The frame was stamped first in Rich Cocoa Memento Ink on Neenah Solar White cardstock, It was then masked and the tulip bouquet from Breath of Spring was stamped in the same color.

The image was colored with Copic Markers (Tulips: YR61, YR65, YR68   Y21, Y23, Y38    Leaves: YG61, YG63, YG67   Bow and tag: B60, B63    Shading and Frame: YR30, 1/5th YR31 (custom made marker), YR31) and cut out with Label 18 Nestabilities (those just came in that day! Perfect timing).


After coloring I went on the hunt for the perfect paper. I looked through my entire stash trying to find matching blue paper, but couldn’t find a thing. I guess I need more paper, LOL?

I finally settled on a 2 1/4″ x 3 3/4″ strip of Material Girl green paper from Cosmo Cricket stitched on a 3 3/4″ x 5 /12″ piece of Cosmo Cricket Ever After paper. 1/2 a doily was adhered to the top and White Organdy Ribbon was tied around the green paper strip. The ribbon was heated with a heat gun to age it and topped with a Vintage Brad from Stampin’ Up!. A second brad was placed over it.

The image was adhered over the ribbon with dimensionals. A Recollections Pearl Swirl was cut up. The big part was adhered on the top left , the small piece was adhered to the lower right of the image.

The sentiment is from the Cling set Fancy Tags. It was stamped in Tuxedo Black Memento ink (just noticed I did a booboo and didn’t stamp that in Rich Cocoa. DUH) on a piece of Solar White cardstock cut and embossed with the smallest die from the Tag Trio set. The embossed part of the tag was colored with Copic Marker B60.

I hope you have time to play in this challenge. To participate, make a card, upload it and post a link on the JustRite Inspiration blog. Please visit the other designers that prepared samples for you:

Sharon Harnist

Lori Craig

Bianca Mandity

Kathy Jones

Thanks so much for stopping by!
Have a wonderful weekend! Hugs and smiles

© 2012 fresh & fun Suffusion theme by Sayontan Sinha