It was my turn to share a Savvy Saturday Video on the Spellbinders blog yesterday. I usually don’t scrapbook, so this weeks theme “Grand Layouts” was a bit nerve racking for me. I hope you have time to check out the page and let me know what you think.

Thanks so much for stopping by! Have a wonderful weekend!
Hugs and smiles

I have a quick tutorial on the Spellbinders blog today showing off how to use M-Bossabilities (or any other embossing folder) to create a Pergamano look.

I hope you have time to hop on over an check it out. Have a wonderful day!
Hugs and smiles

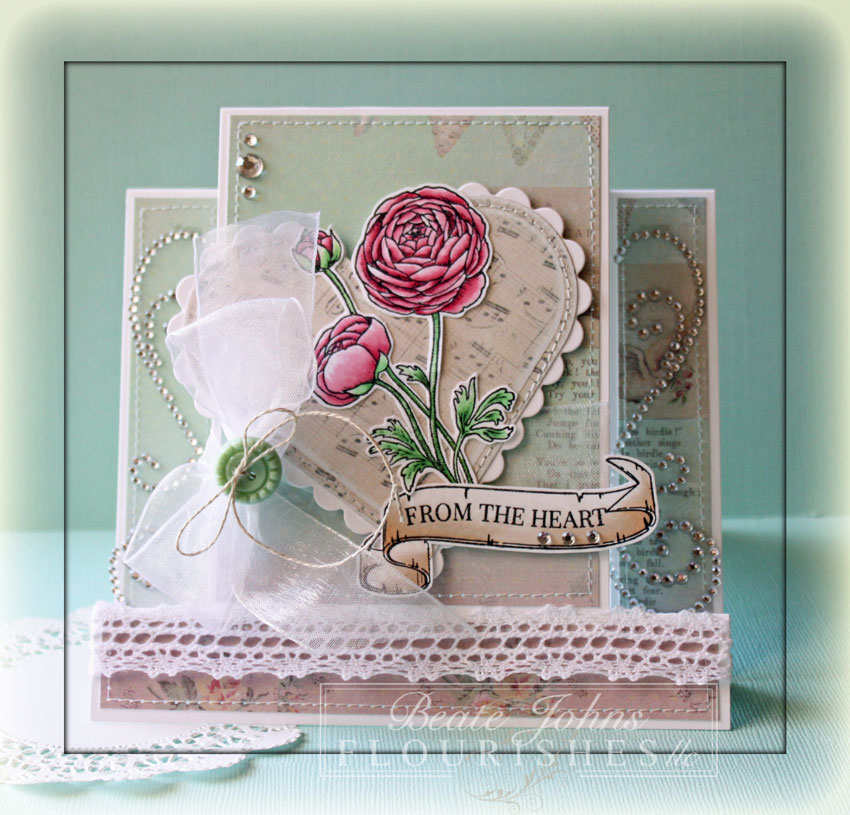
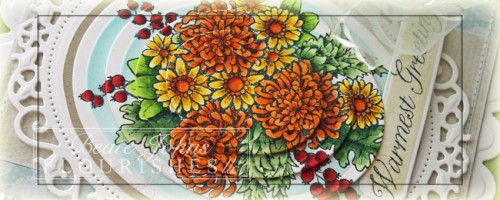
I created this card as a sample for Wednesday’s tutorial on Splitcoaststampers. I thought the bouquet from Autumn Blossoms would work great for the Telescoping Image Technique.

The image was stamped twice in Tuxedo Black Memento Ink on white cardstock. The images were colored with Copic Markers (Y13, Y15, Y17, YR12, YR16, YR18, G20, G21, G24 ,G28, YG11, YG13, YG17, R24, R27, R39) and cut and embossed with Classic Oval LG dies. The edges of the larger ovals were sponged with Tumbled Glass Distress ink before the layers were adhered on top of each other with dimensional adhesive. The ovals were then adhered to Kraft cardstock that was hand cut into a slightly larger oval layer. All layers were adhered to white cardstock, cut and embossed with the Floral Oval Nestabilities die.

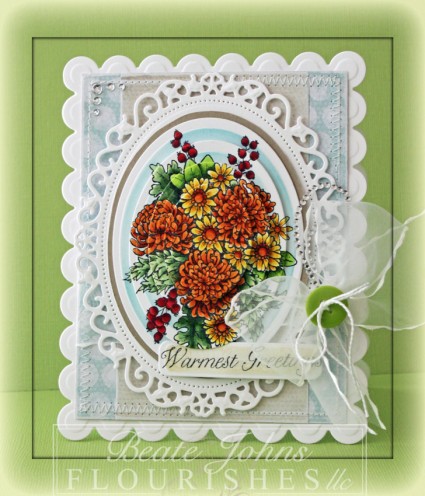
Pieces of patterned paper were cut and embossed with the second smallest Grand Rectangle Nestabilities die. The edges were sanded and stitched before Sheer ribbon was tied around the layer and through one of the Floral Oval openings of the frame.  The bow was topped with a button, tied on with embroidery thread.

A sentiment from Autumn Blossom was stamped on white cardstock, cut and embossed with one of the insert dies from the Fancy Framed Tags One dies. The raised part was sponged with Antique Linen Distress ink.

The layers were adhered to a card base, cut out of white cardstock with the second smallest Grand Scallop Rectangle Nestabilities die. Part of a Finesse Rhinestone Swirl over the bow and a few single Rhinestones on the top right finish off my card.

Here is a video for the visual learner:

[youtube]https://www.youtube.com/watch?v=xbBTf55aRKs[/youtube]

Check out what my fellow design team member have created today:

Thanks so much for stopping by! Have a wonderful weekend
Hugs and smiles

May Flowers is the topic of this weeks topic at the Spellbinders blog. I created a flower out of Crepe paper for my post. Please check out the entire post and step by step instructions HERE.

Have a great day!
Hugs and smiles

Remember this box from last week?

I wrote a tutorial for Splitcoast for that box and it came out today. Check here for step by step instructions on how the box was created.

Here is a video for the visual learner:

[youtube]https://www.youtube.com/watch?v=ShIz7gS_-jk[/youtube]

Thanks so much for stopping by! Have a wonderful day
Hugs and smiles

Today’s challenge hostess is Cindy Haffner. She challenged us to create a Center Step card. I haven’t made one of those in a while. I wanted mine to match the heart box I created last week, so I started with a card base out of  Neenah Classic White cardstock. Each portion of the card was stitched with a 3/8″ smaller piece of  Melissa Frances 5th Avenue Patterned paper.

I cut and embossed a piece of 5th Avenue paper with the second largest of Classic Heart Nestabilities dies. The paper was sanded and stitched to piece of white cardstock, cut and embossed with the second largest of the Classic Scalloped Heart die. The big flower image from Sweet Nature was stamped in Tuxedo Black Memento Ink on  Neenah Solar White cardstock, colored with Copic Markers (YG41, YG45, R81, R83, R85), cut out and adhered on top of the heart layers.

White Organdy ribbon was tied around the middle section of the card and the heart layers were adhered over it with dimensionals.  White Crochet Lace was adhered on the top of the bottom score line.

The banner from the new “From the Heart” set was stamped in Tuxedo Black Ink on Solar White cardstock. A sentiment from the same set was stamped in the center of the banner. The banner was cut out and colored (E40, E41) and adhered under the flower images. Parts of a Finesse Rhinestone Swirl were added to each of the side layers. Rhinestones from the 72 Count Rhinestone pack on the top left of the main panel and under the sentiment finish off the card.

Check out my fellow Timeless Tuesday Challenge Members for more inspiration:

Cindy Haffner
Heather Jensen
Maki Jones
Mona Pendleton
Silke Ledlow
Tammy Hershberger
and
January Guest Designer Cheryl Lea

Check back with the Flourishes Designer tomorrow for more sneak peeks of this set. Thanks so much for stopping by! Have a wonderful day!
Hugs and smiles

Today’s challenge hostess is Heather. Her challenge is to create something other then a card. I thought about it for a while and decided to try to create a heart shaped box. Since it was going to be a Valentine project, I thought Melissa Frances 5th Avenue Patterned paper.

I started by cutting two thin coasters with the largest  Classic Scalloped Heart die. I cut Neenah Classic White cardstock with the same die and one piece of Melissa Frances paper with the largest  Classic Heart Nestabilities The paper was sanded and stitched to one of the scalloped cardstock heart. The layers were adhered to one of the coaster hearts.

One of the sentiments from the new Heartlines stamp set was stamped in London Fog Memento Ink on a piece of Solar White cardstock that had been cut and embossed with a Fancy Tag 3 die. The heart row from the same set was stamped underneath and Baby Pink Rhinestones were adhered in between each heart. Three Zva Creative Flowers were covered with Stardust Stickles were added  to the upper left side of the sentiment panel. The sentiment was adhered to the lower right of the heart with dimensionals and parts of a Finesse Rhinestone Swirl were added to the upper left and right side of the tag.

Two 1 3/4″  wide strips of the Melissa Frances paper were adhered together. A 3/8″ line was scored on the long side of the strip and it was cut in about 5/8″ increments up to the score line. A smaller heart was cut out of a coaster and adhered to the bigger scalloped heart coaster, that had been covered with white cardstock. The paper strip was adhered around the smaller heart to form the walls for the box.  White Crochet Lace was adhered around the top of the strip.

I cut another heart the same size as the one that helped create the walls out of a coaster as well as out of more paper. The paper piece was sanded and adhered to the coaster heart. Two pieces of Crochet Lace were adhered to the bottom of the box top and the smaller heart was adhered over the lace ends. The other ends were adhered to the outside of the box so that the lid would stay on.

Check out my fellow Timeless Tuesday Challenge Members for more inspiration:

Cindy Haffner
Heather Jensen
Maki Jones
Mona Pendleton
Silke Ledlow
Tammy Hershberger
and
January Guest Designer Cheryl Lea

Check back with the Flourishes Designer tomorrow for more sneak peeks of this set. Thanks so much for stopping by! Have a wonderful day!
Hugs and smiles

© 2012 fresh & fun Suffusion theme by Sayontan Sinha