On Wednesday a new Product Focus was published on Splitcoaststampers. This time we got to review the Perfect Squares Tool. So when I was creating a card for last Sunday’s Featured Stamper Challenge, I used that tool to cut and score my layers.

The Featured Stamper was Angela R. I hope you have time to check out her gallery on SCS. She creates beautiful cards. For my case I chose this cad of hers. I kept the layout, but changed the topper and the ribbon. I also added a little bling. Just a little. 🙂

I started by stamping the Butterfly from Taylored Expressions Make it Amazing in Jet Black Archival Ink and cut it out. The frame from the same set was stamped with Jet Black Ink on Neenah Solar White cardstock. The frame was hand cut before a flower image was inked with Sky Blue and New Sprout Memento Markers and stamped in it’s center. A few dots in each color were added before the butterfly was adhered over the flower with Scor-Tape (under the body), and double stacked foam adhesive (under the wings).

A 3 1/4″ white cardstock square was cut and a border was embossed 1/8″ in. A sentiment from Make it Amazing was stamped to the lower right side with Jet Black ink. Honeydew Twine was threaded through a black button and tied around the layer before it was adhered to the card base with dimensional. The card base is a 3 3/4″ x 7 1/2″ piece of Kraft cardstock, folded in half.

The image layers were adhered to the card with foam adhesive squares. Three rhinestones from a Sleek Strips Silver Rhinestone and Frost Smooch Glitz over the butterfly finish off the card.

Thanks so much for stopping by! Have a wonderful day!
Hugs and smiles

It’s a day of partying and celebration! Flourishes turned five this month and we want YOU to help us celebrate! Today we’re ushering in a 2-4-6-8, Help Flourishes Celebrate Day with challenges at 2, at 4, at 6 and at 8PM! If you missed our 2PM Challenge, just click HERE or if you didn’t tune in at 4PM, just click HERE to catch up! If you play, we have some FUN goodie bags for our winners! Are you ready for the 6PM Challenge?

HOW TO PLAY: This challenge is about adding sprinkles onto your card or creation — Glitter? Beads? Flower Soft? You choose! Just sprinkle on some fun and you’ll be in the running! Use Flourishes stamps if you have them — your entries will count twice. If you don’t have Flourishes stamps, play along anyway, you could win some! If you upload to SCS, please use the keyword FLLCIS5C. You have until August 31st to enter and can enter as many times as you like!

For my sample I thought I use the Gerber Daisies image again. I LOVE that image. It looks great if you use it partially or completely. I stamped the image in Tuxedo Black Memento Ink on a piece of white cardstock, that had been cut and embossed with the second largest of the Resplendent Rectangles dies. The image was colored with Copic Markers (Y11, Y13, Y15, Y17, YR16, YG17, YG21, YG23, YG25, W1, W3).

The die was placed back over the layer, the Gerber Daisies were masked and Tumbled Glass Distress ink was sponged over the white spots. I added Goldrush Smooch Glitz over the center of each flower to add some sparkle!

The card base and card front were cut and embossed with the largest Marvelous Rectangle die. The embossed part of the card front was sponged with Tumbled Glass ink before the image layer was adhered with dimensional adhesives.

A sentiment from the Gerber Daisies image was stamped in the lower right of the image layer. Rhinestones in each corner finish off the card.

I hope you have time to play along. If you need some inspiration, be sure to hop on over and see what the other designers created for this challenge:

Cindy Haffner

Danielle Kennedy

Pat Adam – honorary DT Member today!

The OFFICIAL Rules…..

  • Simply create a card and sprinkle on an embellishment of some kind!
  • Entries need to be in by Friday, August 31 by 5 PM EST
  • Those that use Flourishes stamps will be counted twice for their entry
  • You must link your creation on this post using our inlinkz widget in order to qualify
  • You must have a link to our challenge in your blog or gallery post
  • Please DO NOT combine challenges.
  • If you upload to SCS, please use the keyword FLLCIS5C
  • We’ll announce the winners Tuesday, September 4th at noon CST!

HOW CAN YOU WIN?

Play in this challenge and that counts as one entry for a stamping prize pack (including stamps and other goodies!) Play in all five and you will be entered toward our grand prize! Winners will be drawn randomly but if your card is one of our designers’ faves, your work will be added to our Customer Cards Gallery on Pinterest for all to see! So get those fingers inky and join us for our birthday bash!

Take note… the next challenge is coming your way in just 2 hours… at 8PM CST! See you then!

Thanks so much for stopping by! I have a wonderful day!
Beate

Today’s  Timeless Tuesday Challenge hostess is Heather. She created a Bingo card for us to play/stamp with. I decided to use the middle row of the bingo card (Pink – Ribbon – Die Cut).

I cut and embossed a piece of white cardstock with a Petite Oval Nestabilities die. While the die was still on the cardstock, part of the Hollyhock image was stamped in Rich Cocoa Memento Ink. The image was then colored with Copic Markers (RV000, RV10, RV13, G40, G43, G46, YR30, YR31). The oval was first layered on a piece of brown cardstock, then on a piece of white cardstock, cut and embossed with the largest Floral Oval Nestabilities die.

Patterned paper was cut and embossed with a a Grand Rectangle Nestabilities die. The edges were sanded and stitched before May Arts Ribbon was tied around the horizontal strip. The bow was topped with a button, tied on with Linen Thread. The layers were adhered to the card base, cut and embossed with a Grand Label 23 Nestabilities die.

A sentiment from the Hollyhock set was stamped in Rich Cocoa ink on a piece of white cardstock, cut and embossed with the Tailor-Made Keyhole Die. The embossed part was colored with YR30, YR31 Copic Markers. The tag was adhered to the upper right hand side of the image oval. Rhinestones finish off the card.

Take a peek at what the other Timeless Tuesday designer have created for today…

I hope you have time to play. Thanks so much for stopping by! Have a wonderful day!
Hugs and smiles

It’s my turn to share on the Spellbinders blog today. And since it’s Saturday, it’s a short video explaining how I created this wall hanging. For an image of the entire project and the video, please check this blog post.

Thanks so much for stopping by! Have a wonderful weekend!
Hugs and smiles

Yesterday’s tutorial on Splitcoast was written by the wonderful Susan Roberts. She created a fun tutorial on how to use embossing folders and solid shape stamps. For my sample I used the butterfly image from Fanciful Flourishes and one of my favorite M-Bossabilities folder called Flower Fun.

The butterfly was inked with Pear Tart Memento Ink, the embossing folder with Chipped Sapphire Distress Ink. The butterfly was pressed into the inked embossing folder before it was stamped on Neenah Classic White cardstock. The image was cut out and the wings were brushed with Frost Smooch Glitz.

A sentiment from Flourishes new Magnolia set was stamped in Tuxedo Black Memento Ink on a piece of white cardstock, cut and embossed with a Fancy Tag 3 die. The embossed part was sponged with Pear Tart ink.  The butterfly was adhered to the right hand side of the sentiment panel. Rhinestones from a Baby Bling and Sleek Strips Silver Rhinestones strip were used for the body of the butterfly. Part of a  Fancy That! Border Bling was added underneath the sentiment.

A piece of MME On the Bright Side Two patterned paper was cut and embossed with a Standard Circle Nestabilities die. The edges were sanded and stitched before the it was adhered to the card base, which was cut out of Solar White cardstock with the largest Blossom Nestabilities die.

Here is a video for the visual learner:

[youtube]https://www.youtube.com/watch?v=dBPQWnIi2mE[/youtube]

Thanks so much for stopping by! Have a wonderful day.
Hugs and smiles

I’m a day early with a very special birthday surprise….tomorrow is my dear friend Korin Sutherland’s birthday! A group of her friends are getting together today for a fun early birthday party, since tomorrow is the fantastic April Release Blog Hop for Sweet ‘n Sassy Stamps, and we didn’t want to take the spotlight from that. After all, our sweet girl deserves her OWN day in the spotlight! So please join us as we celebrate Korin’s birthday a little early! After all – you can never have too much celebration, can you?!?!

For my project I used the Sweet ‘n Sassy Rose Cottage image. It was stamped in Tuxedo Black Memento Ink on Neenah Solar White cardstock and colored with Copic Markers (Y13, Y 15, Y17, YR15, YR18, YG11, YG13, YG17, BG0000, BG000, BG01) and cut and embossed with a Classic Square Nestabilities die.

Two butterflies were stamped, colored and cut out and adhered over the main square. Frost Smooch Glitz was added over the butterfly. The square was adhered to a card base, cut and embossed with the Lace Doily Motif die out of Solar White cardstock.

A little while ago I shot a video about the Basic Blending techniques with Copic Markers.

[youtube]https://www.youtube.com/watch?v=0CbZKf4LRjY[/youtube]


Below is the whole birthday party train….prepare yourself for some fantastic cupcakes and ice cream from these talented ladies!!

And feel free to leave Korin some early birthday love, either on her blog, her Facebook page, or the Sweet ‘n Sassy Stamps Facebook page!

Thanks so much for stopping by! Have a wonderful day!
Hugs and smiles


Hello and welcome to Day Two of our March Rubber & Die Release Showcase!

On Wednesday (21 March) Whimsy Stamps released this month’s rubber designs, new Shapeology dies and new Shape EZ templates. From then until 27 March the Whimsy Stamps DT and Special Guests are showcasing these fabulous new goodies with a daily mini blog hop and I am part of today’s hop!

Each mini blog hop has a new release prize hidden somewhere along the way and you have 24hrs to enter each prize draw.

To be entered into today’s mini blog hop prize draw, be sure to leave a comment on ALL of the DT’s posts listed below by 12.00PM EST tomorrow. All winners will be announced on the Whimsy blog on 28 March.

For my sample today I stamped the new Elisabeth Bell image Lemon Pepper in Tuxedo Black Memento Ink on Neenah Solar White cardstock. The image was cut and embossed with the a Petite Oval Nestabilities die and colored with  Copic Markers (Skin: E50, E51, E53   Hair: E33, E37, E39, E29   Bonnet: B000, B00, B02   Shirt: Y17, YR15, YR18   Lemons and leaves: Y11, Y14, Y15, YG01, YG03, YG17   Background: B0000).  The edges of the oval were sponged with Antique Linen and Frayed Burlap Distress ink. Solar white cardstock was cut and embossed with the largest Floral Oval Nestabilities die and the image was adhered to it.

A 2″ strip of Pink Paislee She Art was adhered to another piece from the same paper pack. They were cut and embossed with second smallest Grand Rectangle Nestabilities die and the embossed edges were  sanded. May Arts Sheer Aqua Ribbon was threaded through one of the wholes in the floral frame and it was tied vertically around the layers. The image was adhered to the layers with dimensionals.

A card base was cut out of white cardstock and the second smallest Grand Scallop Rectangle die. A card front was cut with the same die and adhered to the base, to hide the hinge. The layers were adhered on top of that.  A sentiment from Treasured Moment Tickets was stamped in Tuxedo Black Ink on Solar White cardstock that had been cut and embossed with the smallest Lacey Oval Nestabilities die. The edges were sponged just like the main image, first with Antique Linen, then with Frayed Burlap Distress Ink.

A hint of Smooch Illuminate was added over the balloon for a subtle shimmer, Frost Smooch Glitz over the little bird. Silver Baby bling on the floral oval die cut and part of a  Fancy That! Border Bling on the upper left corner finish off the card.

To take a peek at today’s fabulous new release creations, please click on the links below…


Beate Johns {Special Guest} – you are here
Ellie Stover
Erin Bailey
Heidy Blom

Remember that the entire new release is available to buy right now from the Whimsy Stamps store along with all your Whimsy favourites.

Thanks for stopping by and don’t forget to pop back to the Whimsy blog tomorrow for more new release creations!

Have a wonderful day!
Hugs and smiles


Hello and welcome to Day One of our March Rubber & Die Release Showcase!

On Wednesday (21 March) Whimsy Stamps released this month’s rubber designs, new Shapeology dies and new Shape EZ templates. From then until 27 March the Whimsy Stamps DT and Special Guests are showcasing these fabulous new goodies with a daily mini blog hop and I am part of today’s hop!

Each mini blog hop has a new release prize hidden somewhere along the way and you have 24hrs to enter each prize draw.

To be entered into today’s mini blog hop prize draw, be sure to leave a comment on ALL of the DT’s posts listed below by 12.00PM EST tomorrow. All winners will be announced on the Whimsy blog on 28 March.

For my card I stamped the new Wee Image Angie in Tuxedo Black Memento Ink on Neenah Solar White cardstock. The image was cut and embossed with the second largest Romantic Rectangle die (Oh yeah! I got new dies and I am loving it!!!). The image was colored with  Copic Markers (Skin: YR0000, YR000, YR00, BV000    Hair: E97, E99, E09, E39, E29     Wings: C00, C1, C3    Bow, ladybug: R00, R01, R02, R05). The image was masked, cloud masks and the die were added and the inner part was  airbrushed with Copic Marker B02. Shading was added to the clouds with Copic Markers (W00, W0, W1).

A 2 1/4″ wide strip of Pink Paislee Spring Jubilee Patterned Paper was adhered to a piece of the same paper pack. It was cut with the largest Romantic Rectangle die. The edges were sanded and the piece was cut down at the embossed line. The edges were then stitched and May Arts ribbon was tied around the horizontal strip. The bow was topped with a button, tied on with embroidery floss.

The layer was adhered to a piece of white cardstock, cut and embossed with the same Romantic Rectangle die. The image was adhered to the center of the card front with dimensionals. A piece of Fancy That! Border Bling was adhered over the image.  The card base was cut out of white cardstock with the same die and the card front was adhered over it, to hide the card hinge.

A sentiment from Thank you Tabs 1. It was stamped in Tuxedo Black Memento Ink, cut out and and adhered under the lower left corner. Two Wild Orchard Flowers were adhered above and underneath the sentiment panel.  A small piece of a  Finesse Swirl was adhered next to the lower flower and two small rhinestones were added to the main image. Frost Smooch Glitz on the angel wings finish off the card.

To take a peek at today’s fabulous new release creations, please click on the links below…

Ann Vento
Beate Johns {Special Guest} – you are here
Deb Routledge {Special Guest}
Dena Concienne {Special Guest}

Remember that the entire new release is available to buy right now from the Whimsy Stamps store along with all your Whimsy favourites.

Thanks for stopping by and don’t forget to pop back to the Whimsy blog tomorrow for more new release creations!

Have a wonderful day!
Hugs and smiles

Welcome to Whimsy Stamps March rubber stamp and die RELEASE DAY!

Whimsy Stamps is releasing 20 fantastic new rubber stamps and 7 wonderful new Shapeology dies today together with 2 brand new Shape EZ templates! These new goodies are available to buy right now from the Whimsy Stamps store along with all your Whimsy favourites.

From today until 27 March the Whimsy DT and Special Guests will be showcasing these fabulous new stamps and dies with a daily mini blog hop. Each mini blog hop has a new release prize hidden somewhere along the way and you will have 24hrs to enter each prize draw by leaving a comment on every blog listed for that day.

At the end of release week (Wednesday 28 March) we will post a Release Round-Up on the Whimsy blog. This will include a selection of new release DT work from the past week together with a complete list of winners from the daily mini blog hops.

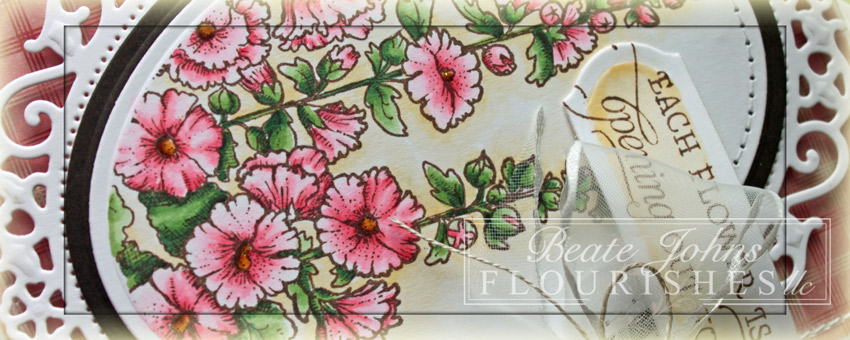
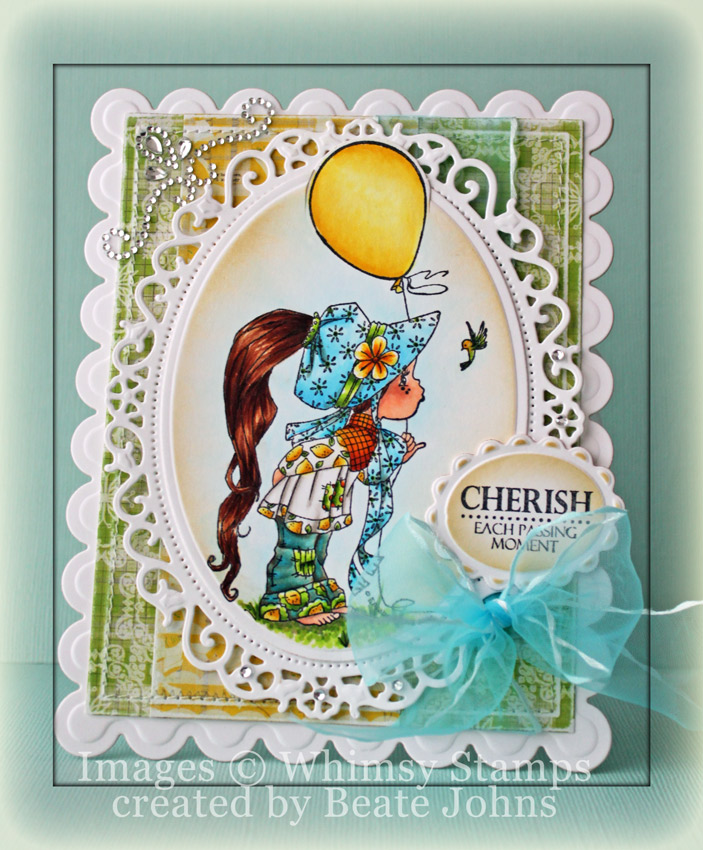
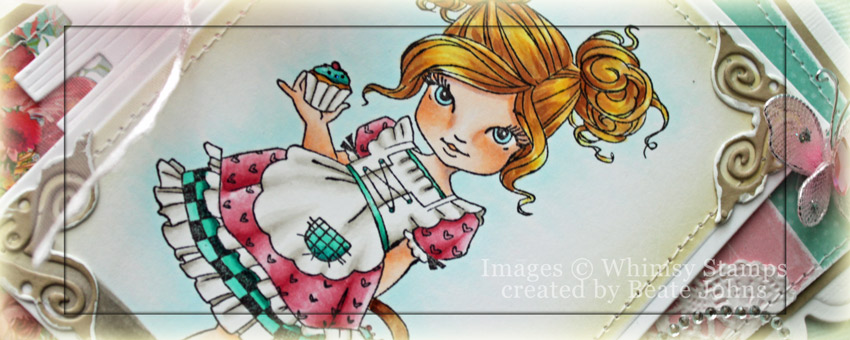
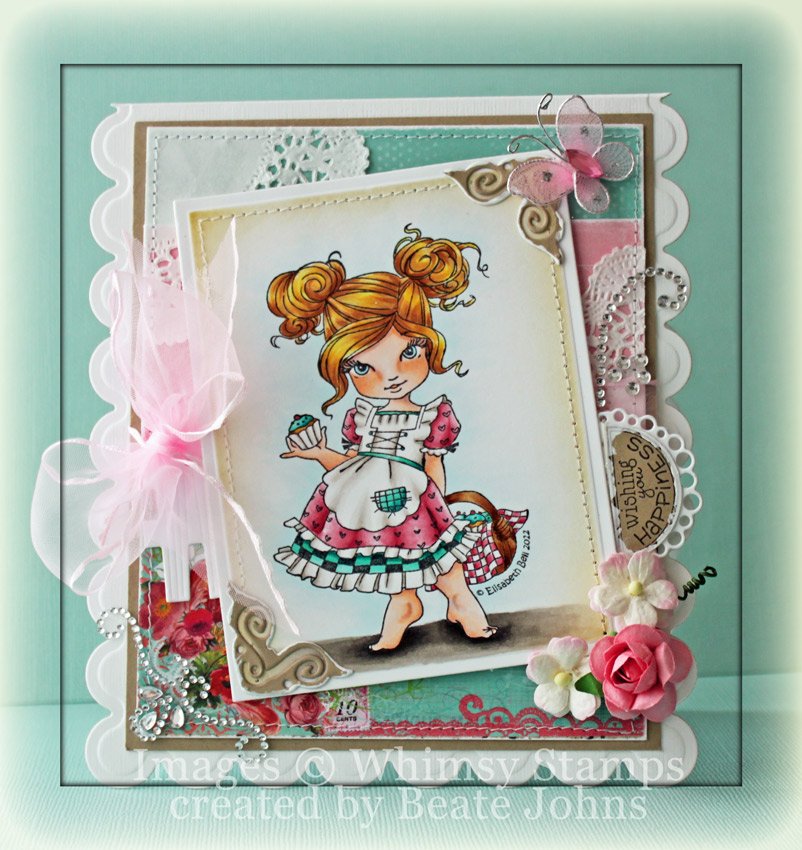
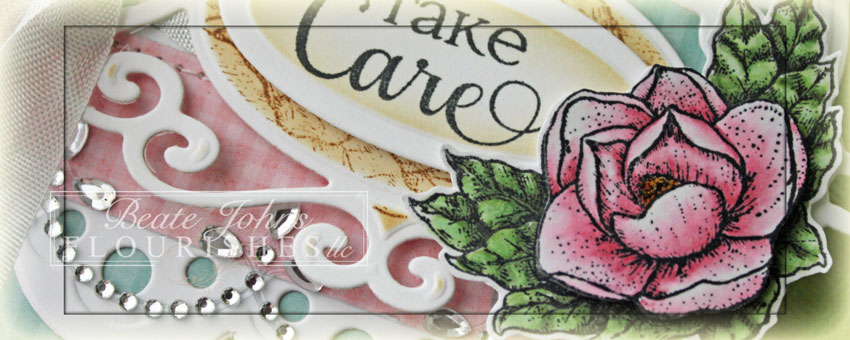
For my card today I chose a new image from Elisabeth Bell called Cinnamon Sugar. It was stamped in Tuxedo Black Memento Ink on Neenah Solar White cardstock, cut and embossed with the second smallest Grand Rectangle Nestabilities die.  the image was colored with Copic Markers (Skin: YR0000, YR000, YR00, BV000   Hair: Y11, Y23, E31, E33    Dress: R81, R83, R85, BG32, BG34, BG49   Basket: E31, E33, 35, E37   Apron: W00, W1, W3    Eyes:B00   Background: B0000     Ground: W00, W1, W3, W5, W7, W9).

The edges of the rectangle were  sponged with Antique Linen and Frayed Burlap Distress ink. Kraft cardstock was cut with a die from the Corner die set. The edges were painted with Snow Cap Paint.  Once the corners were dry they were adhered to the upper right and lower left corner of the image.

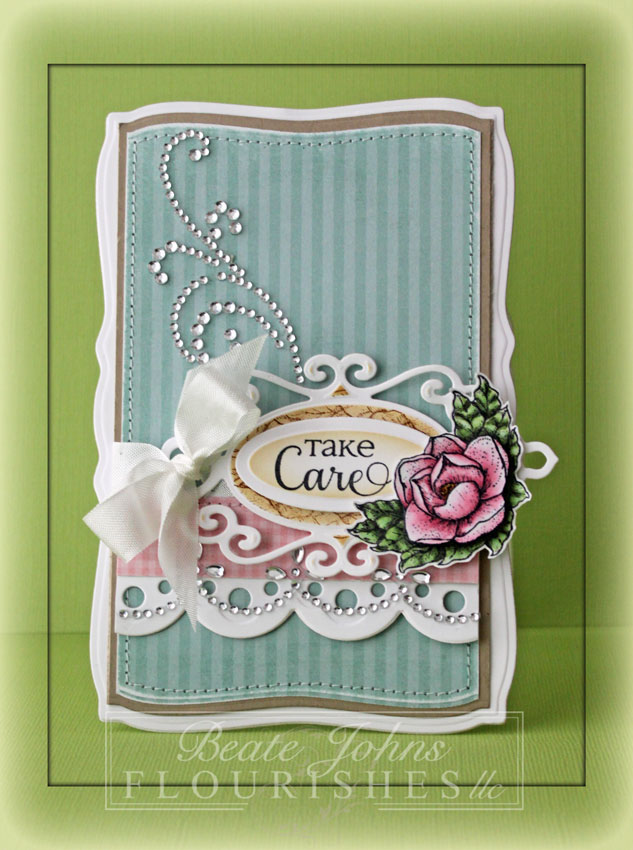
A 2 1/4″ x 4 1/4″ strip of Pink Paislee Spring Jubilee Patterned Paper was adhered to a 4 1/4″ x 5 1/4″ piece from the same paper pack. The edges of the papers were sanded , parts of a paper doily were adhered to the upper left and right side of the paper layer. The layers were stitched to a slightly bigger piece of Kraft cardstock. May Arts Pink Sheer ribbon was tied around the horizontal strip.

A piece of Solar White cardstock was cut with the new fence die and was adhered slightly under the ribbon. The image was adhered over the ribbon with dimensional adhesives after three flowers (Zva Creative and Wild Orchid Crafts) were adhered to the lower right corner of the image.

A sentiment from the new Celebration Circle Pennants was stamped in Tuxedo Black Ink on Kraft cardstock. It was cut out and the edges were painted with Snow Cap Paint. After it was dried it was adhered to a piece of white cardstock, cut with a Circle Pennant die. The sentiment panels were adhered slightly above the flowers to the right of the image.

The card base was cut and embossed with a Grand Scallop Rectangle die and the layers were adhered to the base. Part of a Fancy That! Border Bling was adhered to the lower left corner, part of a Finesse Swirl was adhered above the sentiment panel and a light pink butterfly from Want2Scrap finished off the card.

To be entered into today’s mini blog hop prize draw, be sure to leave a comment on ALL of the DT posts listed below by 12:00PM EST tomorrow:

Here is a full reveal of the wonderful March release:

4 Crissy Armstrong rubber stamps
Balloon Bouquet ~ Birthday Hippo ~ Birthday Pile-up ~ Wee Snippet’s Cake


2 Elisabeth Bell rubber stamps
Cinnamon Sugar ~ Lemon Pepper

4 Kenny K rubber stamps
Football ~ Soccer ~ Fabby Farrah ~ Sassy Sadie

3 Meljen’s Designs rubber stamps
Birthday Cupcake ~ Darling Dalmatian ~ Pixie Dust Fairy

3 Wee Stamps rubber stamps
Amy Whimsy ~ Angel Cody ~ Angie Whimsy

4 Raindrop Echo Designs rubber stamp sets
Aged To Perfection Notables 3 (coordinating die available) ~ Celebration Circle Pennants (*new* coordinating die available) ~ Party Hat Sentiments (*new* coordinating die available) ~ Vintage Birthday Tabs 1 (coordinating die available)

5 Raindrop Echo Designs Shapeology dies
Birthday Sentiments ~ Fence ~ Party Hats Die set ~ Circle Pennants Die set ~ Party Time Notables 3


2 TLC Shapeology die
Cherry Cake ~ Egg Tag

Shape EZ by TLC
Cherry Cake ~ Gradient Wedding Dress

Don’t forget to visit today’s DT and leave a comment on their blog posts to be entered into the draw to win a new release stamp, then pop back to the Whimsy blog tomorrow for the next list of showcase posts!

Thanks for stopping by and I hope you enjoy our new release! Have a great day!
Hugs and smiles

This week’s hostess is Silke and she created another sketch for us. Of course I had to use one of the new sets again. First I was thinking to use one of the new bookplates instead of the star, but I couldn’t find my new die. Turned my craft room upside down…not sure where it went. So I changed my plan and used the smaller of the Magnolias images.

The image was stamped twice in Tuxedo Black Memento Ink on white cardstock. On one image I colored the leaves and colored the rose gray, on the other I colored just the rose and colored it pink and cut the rose out  (Copic Markers: RV81, RV85, G40, G82, G85, T3). The rose was adhered to the colored leaves with dimensional adhesive and Goldrush Smooch Glitz was added in to the flower center.

(FYI: I colored the bottom rose gray, so in case it shows a little, it will look like a shadow. If you look at the close up image, you can see the gray peeking through just a bit.)

A card front and the card base were cut and embossed with the largest of the Curved Rectangles dies. The card front was adhered to the card base so the curved rectangle shape looks complete.

Matching layers were cut out of Kraft cardstock as well as a piece of My Mind’s Eye Dolled Up paper. The top and bottom of each layer was cut with the edge of the Curved Rectangle die to match the shape of the card. These layers were stitched together.

White cardstock was cut and embossed with a Fancy Tag 2 die. The center was sponged with Vintage Photo distress ink and the edges of that center were stamped with the leave border of Magnolias, also in Vintage Photo ink. Another piece of white cardstock was cut and embossed with the smallest of the Petite Oval Nestabilities, sponged first with Antique Linen, then very lightly at the edges with Vintage Photo ink. A sentiment from the same set was stamped in the center of that oval with Tuxedo Black Memento ink. The oval was adhered to the Fancy Tag die cut with dimensionals.

A strip of white cardstock was cut with Classic Scallop Edgeabilities and a 1″ wide strip of Dolled Up paper was adhered above the scalloped strip.  The strips were adhered to the stitched layers.  Seam binding was threaded through one of the openings on the left hand side of the Fancy Tag die cut. The sentiment layers were adhered to the right hand side of the card base, slightly above the horizontal strips and the seam binding was tied into a bow.  Parts of a Finesse swirl and part of a Fancy Waves! Border bling finish off the card.

Check out my fellow Timeless Tuesday Challenge Members for more inspiration:

Cindy Haffner
Heather Jensen
Maki Jones
Mona Pendleton
Silke Ledlow
Tammy Hershberger
and March Guest Designer Meredith MacRitchie

Thanks so much for stopping by! Have a wonderful day!
Hugs and smiles


© 2012 fresh & fun Suffusion theme by Sayontan Sinha