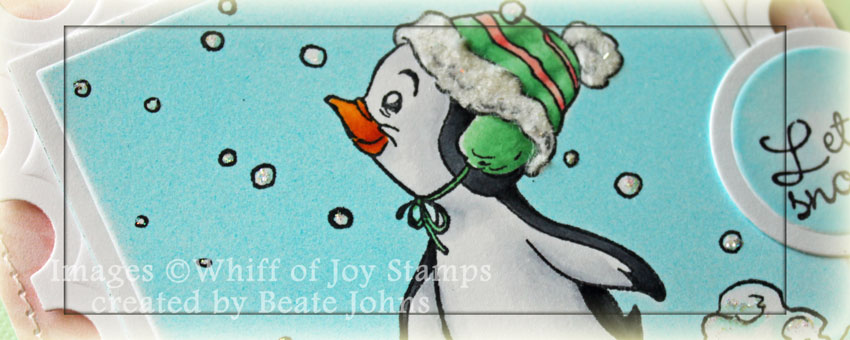
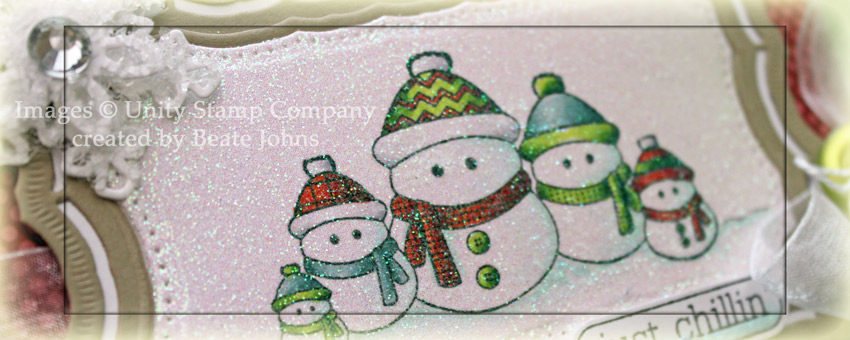
It’s Friday that means it’s Friends with Flair time at the Unity Blog.  I thought I share a card I made during the last VSN. This one was for Lori’s Glitter Window Challenge. I stamped the cute snow man family image from the Stamp of the week club Just Chillin’ stamp set  in  Tuxedo Black Memento Ink on Neenah Solar White cardstock. It was colored with Copic Markers (YG01, YG03, YG17, R05, R27, R39, BG70, Bg72, BG75, C00, C1, C3, BG0000, BG10) and cut and embossed with one of the Resplendent Rectangles Nestabilities die.

After cutting a frame out of Kraft cardstock with the same and the next size up Resplendent Rectangle dies, I realized that the regular glitter window technique wouldn’t work so well for these shapes. So instead I ran the image layer face down through my Xyron machine and rubbed loose glitter all over.  The frame and the image layer were adhered on another piece of Solar White cardstock and cut down to the size of the Kraft cardstock layer.

The card base was created out of a 9 1/2″ x 6″ piece of white cardstock, folded in half with the edges rounded.  the card front was covered with My Mind’s Eye Winter Wonderland paper patterned paper. White organdy Ribbon was tied around the layers and the bow was topped with a button tied on with embroidery thread.

The image was adhered over the card front with foam adhesive squares. The sentiment was stamped in Tuxedo Black ink on white cardstock, cut out and adhered to the lower right of the image. The lower part of the sentiment panel was colored with Copic Marker BG10 and topped with Stardust Stickles.

White cardstock was cut and embossed with two small Create a Flake 4 Spellbinders dies. They were adhered together with more foam adhesive square. A rhinestone was added to the center of the flake. It was then covered with Glossy Accents and Vintage Glass Glitter Shards were sprinkled over it. The snowflake was adhered to the top left of the image to finish off the card.

Thanks so much for stopping by! Have a wonderful weekend!
Hugs and smiles

Another VSN challenge last weekend was to create a card that shows off something physical on your card. I decided to use a sentiment that talks about Dance . I used die cuts that were in my little box of die cuts I cut and then didn’t use, so the card came together pretty quickly.

The sentiment is from Verve’s Beautiful You. It was stamped in Jet Black Archival Ink on white cardstock, cut and embossed with the second largest Floral Oval Nestabilities die.

White cardstock cut and embossed with a Lace Doily Accents die was adhered underneath a 2″ x 3 1/2″ piece of Head over Heels paper . The strip was adhered to  3 1/2″ x 5 1/4″ piece of Handmade Lilybeedesigns paper . The edges were sanded and stitched before gingham ribbon was tied around the top edge of the horizontal strip. the paper was then adhered to the card base, a 3 1/2″ x 11″ piece of Neenah Solar White cardstoc, folded in half.

The sentiment oval was adhered to the center of the card with dimensional foam adhesive. Rhinestones and a Linen fabric flower, created with Bitty Blossoms dies, finish off the card. And yes, that flower was made already as well. I am sure you know how that goes…lol

Thanks so much for stopping by! Have a wonderful day. TGIF
Hugs and smiles

The next challenge during VSN was to create a project that has at least three R’s in it. For me I picked

Ribbon – Rhinestones – Red

I made a quick little tag with Taylored Expressions Love Monsters. A monster, a sentiment and a few hearts were stamped on a piece of Neenah Solar White cardstock in Tuxedo Black Memento Ink, that had been cut and embossed with one of Spellbinders Tags & Flags die. The images were colored with Copic Markers (YG01, YG03, R05, R27, R39, Y17, YR15, YR18).

The tag was finished up with a few Rhinestones from a Sleek Strips Silver Rhinestones pack, a button and May Arts Ribbon.

Thanks so much for stopping by!
Hugs and smiles

The second challenge during VSN last week was to create something with an image with wheels. I searched through my stamps and found a scooter from one of Unity’s Kit of the Month.

I stamped it twice in Jet Black Archival Ink, once on Neenah Solar White cardstock, once on Pink Paislee Spring Jubilee Patterned Paper. They were both cut out and the patterned paper was adhered over the white cardstock image. The image was colored with Copic Markers and a few rhinestones from a Sleek Strips Silver Rhinestones .

A green piece of patterned paper was cut in a slope and adhered to a blue paper piece from Spring Jubilee paper. The edges were stitched before the layers were adhered to the card base, white cardstock, folded in half.  White cardstock was cut with MFT Cloud Die-namics die.  Two clouds were added to the scene and highlighted with Stardust Stickles.

A piece from the notebook paper I still had from the last challenge was cut into banner shape by hand . A sentiment from the same KOM from Unity was stamped on the banner and it was adhered to the upper left hand side. A button was threaded with Honeydew Twine and adhered on the top edge of the banner.

VSN only gives you 45 minutes per card. That’s not a lot of time for me, so this card as well as the ones the next few days will be CAS cards. Very much out of my comfort zone.

Thanks so much for stopping by!
Hugs and smiles

The first challenge from last weekend’s Virtual Stamp Night was to create a card with Note book paper.  The paper we have at home was really thin, so I first adhered a piece of copy paper behind it to give it a bit more stability. Then I cut and embossed it with a die from Spellbinders Office Supplies set.  Next I stamped an image from MFT My Favorite Sentiments in  Jet Black Archival Ink on the lower right of the layer.  It was adhered to the lower right of the card base, a 4 1/4″ x 11″ piece of cardstock, folded in half with the bottom corners rounded.

Black, Berrylicious and White cardstock were cut with Banner Day Die Die-namics and adhered on top of each other. Three hearts from Tag You’re It stamp set were stamped in Ladybug Memento Ink on white cardstock, cut out and taped to the center of each banner piece. Rhinestones in between each banner piece and one in the sentiment finish off the card.

Thanks so much for stopping by! Have a wonderful Monday!
Hugs and smiles

I created this card during last weekend’s Virtual Stamp night over at Splitcoaststampers for the Spring is for the Chicks challenge. I thought it was the perfect challenge to combine it with the current JustRite Stampers challenge (Black/White plus one additional color).

I started by stamping the both labels from Vintage Oval Label Cling set in Tuxedo Black Memento Ink on  Neenah Solar White cardstock. The smaller label was stamped twice. One of the smaller label was cut and embossed with Label 6 Nestabilities dies, the other with the smallest of the Petite Oval large Nestabilities die. The large label was cut and embossed with the largest Label 13 Nestabilities die.  The edges of the layers were sponged with Spun Sugar Distress ink while the dies were still on and then they were layered on top of each other with dimensionals. Fancy That Want2Scrap Border Bling was added to the top and bottom of the smaller label die cut.

Two pieces of Solar White cardstock were cut and embossed with a Lace Doily Motifs die. They were adhered on top of each other and the labels were adhered on top of that.

A piece of MME Lost & Found  Madison Avenue paper was cut and embossed with the Spiral Blossom one die. The edges were  sanded before the flower was rolled.  Frost Smooch Glitz was added to the edges and a large Rhinestone was placed in the flower center. It was adhered to a piece of black Core’dination cardstock that had been cut and embossed with one of  Donna Salazar’s Shadow Flowers dies. Another piece of black cardstock was cut and embossed with a Foliage die. The rolled flower layers were adhered to the lower right corner, the foliage die cut on the upper right.

Another piece of Madison Ave paper was cut and embossed with with a  Grand Square Nestabilities die. The edges were sanded and the layer was stitched to a slightly bigger black square. The layers were adhered to a piece of white cardstock, cut and embossed with a Grand Scallop Square Nestabilities die. The card base was cut and embossed with the same die. Parts of a Finesse Rhinestone Swirl on the upper right and lower left corner finish off the card.

Thanks so much for stopping by! Have a wonderful day!
Hugs and smiles

I have one more card to share with you that I created for a December VSN challenge. We were to use a Frosted Image Technique. You stamp an image in a colored in, then stamp over it in white ink and rub to get a frosted look. Well…that didn’t work with Distress ink and Adirondack Snow Cap ink.

I started by stamping images from an old PTI set that I had for a while  (called Life) in Spruced Ice and Scattered Straw Distress Ink. Next I pressed those ink pads in my craft mat and did the same with my Snow cap ink. I rubbed white ink over the colored inks and then smudged that mix over the images.

A sentiment from that set was stamped in Jet Black Archival ink and topped with one tiny Baby Bling Rhinestone. To finish the card off I added a double scored border around the edges with my Scor-Pal.

Thanks so much for stopping by! Have a Happy, Healthy and Successful 2012.
Hugs and smiles


Today I am sharing another card I created for a VSN challenge in the beginning of the month. This challenge was to add a snowflake into your design.

For my sample I cut and embossed a piece of Cryogen White cardstock with a Classic Square Nestabilities die, stamped it with a Snowflake from Sweet ‘n Sassy Stamps Snowflake Silhouette in Spun Sugar Distress ink and stitched it to a piece of Pink Pirouette cardstock, cut and embossed with the largest Postage Stamp Nestabilities die.

I cut and embossed more shimmery cardstock with dies from the retired Create a Flake one  Spellbinders die pack (you can still find Create a Flake 2 and the new Create a Flake 3 packs in stores), sponged the centers with New Sprout Memento ink,  and topped with Vintage Glass Glitter Shards. The layers were topped with a tiny button and tied together with wire before the snowflake was adhered to the pink snowflake layers.

The card base is a 4 1/4″ x 11″ piece of Cryogen White cardstock, folded in half with the bottom corners rounded. A 1 3/4″ wide strip of My Mind’s Eye Lost & Found 2 Rosy paper was adhered to the lower half and May Arts Organdy Ribbon was tied over it. The snowflake layers were adhered to the card base with dimensionals. Part of a Finesse Rhinestone swirl and additional Rhinestones finish off the card.

Thanks so much for stopping by! Have a wonderful day!
Hugs and smiles

Today I want to share a tag with you I created for one of the VSN challenges on Friday. We were to incorporate Music in our project. With all the gorgeous paper out there, it was an easy challenge. Since I had just gotten my latest Ranger product order, I had to try that out right away.

I started by cutting a tag with Tim’s Tag die out of Kraft cardstock. The edges of the tag were sponged with Walnut Stain Distress ink.

2 7/8″ wide pieces of  MME Lost & Found Christmas were adhered to make a slightly smaller layer. The edges were sanded and sponged them with Vintage Photo Distress ink before the layers were stitched to the tag base. A paper doily as cut, sponged with Vintage Photo ink and topped with a partial circle of the Lost & Found Christmas paper.

The doily was adhered to the left hand side of the age. Finesse Pearl swirl piece were adhered to top right of the doily. A sentiment from Flourishes Sentimental Christmas was first stamped in Tsukineko’s Delicata Gold ink, then in Tuxedo Black Memento Ink on the lower right corner of the green paper strip. The same gold ink was used to add a gold edge to the tag base.

A lightweight coaster as well as a dark red piece of paper from the Christmas collection were cut with Tim’s Mini Reindeer die. The patterned paper was sanded. Both the paper as well as the coaster edges were sponged with Vintage Photo ink before the paper was adhered to the coaster reindeer. Small branches were cut out of Core’dinations paper with Tim’s Festive Greenery die. The paper was sanded before both the branches as well as the reindeer were adhered over the doily layers.

The tag was sprayed with Biscotti Perfect Pearls Mist and a few more pearls were added to the reindeers neck. Seam Binding was dyed with Vintage Photo Distress Reinker and sprayed with more Biscotti Perfect Pearls mist before it was tied under a black button and adhered to the top of the tag.

Thanks so much for stopping by!
Have a wonderful day!
Hugs and smiles


It’s Virtual Stamp night over on Splitcoaststampers. The first challenge is hosted by Lydia. She is asking us to create a card with something that gives us the “Warm Fuzzies”. Who wouldn’t get the warm fuzzies looking at this darling image. Plus the sweet penguin has a warm looking hat on.

To start out I stamped the Penguin’s first Snow image in Tuxedo Black Memento Ink on Neenah Solar White cardstock. The image was cut out with a Classic Square Nestabilities die and colored with Copic Markers ( Penguin: C00, C1, C3, C5, C7, C9, Y17, YR15, YR18   Hat: YG41, YG45, R30, R32   Snow: BG10, BG11). I covered the main image with a mask cut with Eclipse tape. But the snow flakes were too small for that, so I used Liquid Masking Fluid. The image was airbrushed with Copic Marker B04.

Stardust Stickles was added to the snow and snow flakes. Sugar Sparkly Fluff was added to the hat rim and pom-pom. The image was adhered to a piece of Solar White cardstock, cut and embossed with the largest Postage Stamp Nestabilities die.

A 1 1/4″ x 4 1/4″ strip of Echo Park Holly Jolly patterned paper was adhered to the lower part of a 4 1/4″ x 5 1/2″ piece of the same paper pack. The lower corners were rounded. White Crochet Lace was adhered above the paper strip before White Organdy Ribbon was tied above teh paper strip. The image was adhered over the ribbon with dimensionals.

The sentiment is from Whiff of Joy’s Seasonal Greetings. It was stamped in Tuxedo Black Ink on Neenah Solar White cardstock, cut and embossed with Standard Circle Nestabilities die. The center of the circle was colored with Copic Markers B0000 and B000. The layers were adhered to a card base a 4 1/4″ x 11″ piece of Solar White cardstock, folded in half.  Part of a Finesse Rhinestone Swirl and additional Rhinestones finish off the card.

Thanks so much for stopping by! I hope you have time to play with us tonight.
Have a great evening.
Hugs and smiles

© 2012 fresh & fun Suffusion theme by Sayontan Sinha