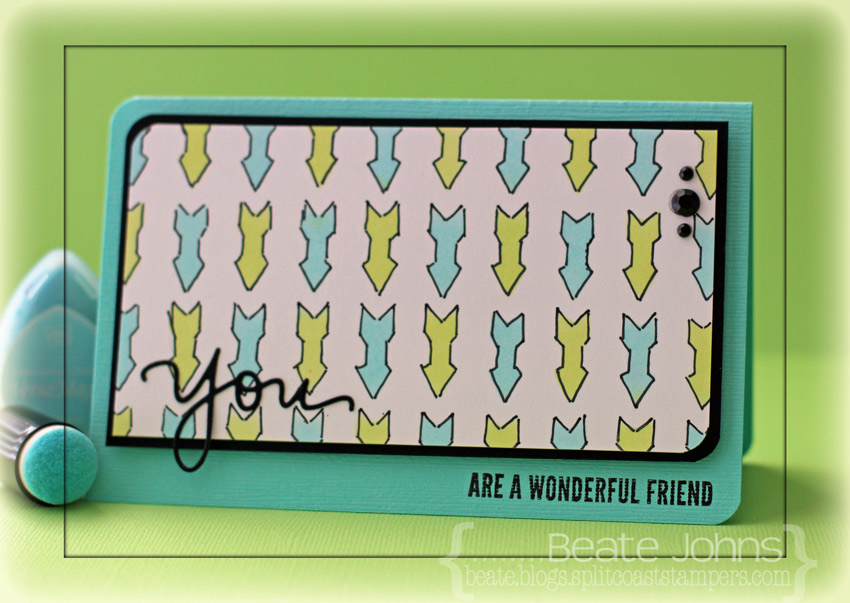
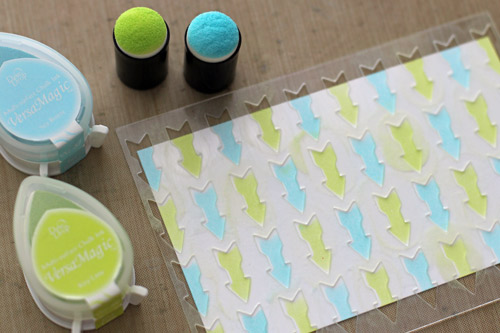
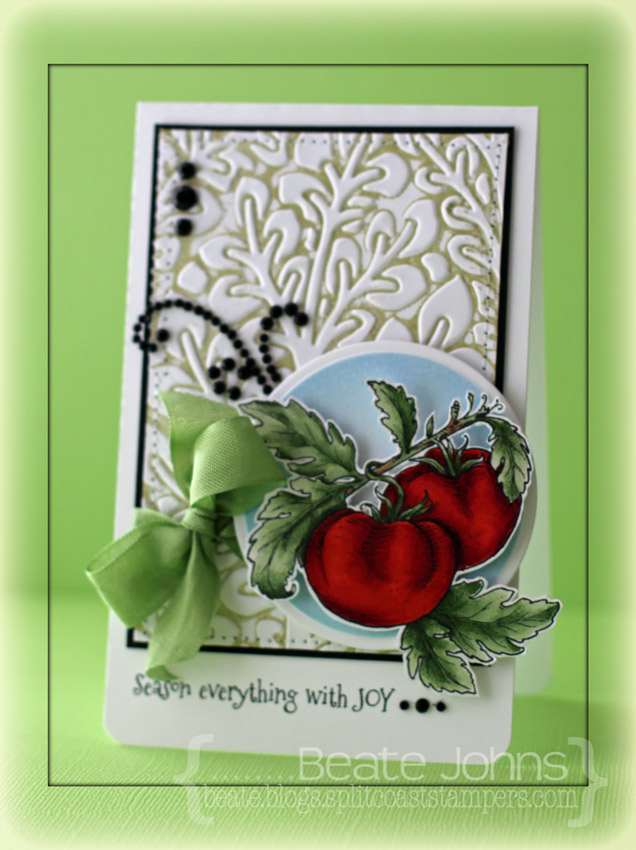
For my third Imagine Crafts project this month I thought I use my favorite VersaMagic ink colors (Key Lime and Sea Breeze) along with a new Arrows stencil from Donna Salazar.

I started by placing the stencil over a 2 5/8″ x 5″ piece of white cardstock and sponged the arrows alternating Key Lime and Sea Breeze VersaMagic Inks.

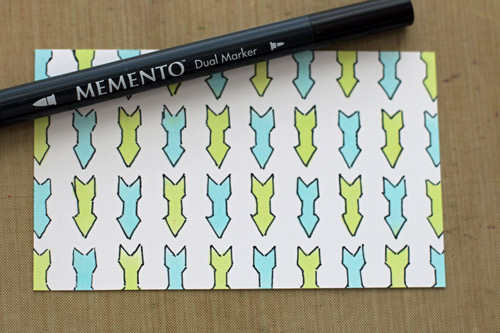
The arrows were outlined with Tuxedo Black Memento Marker.

Round top left and bottom right corner and adhere to a slightly bigger piece of black cardstock.

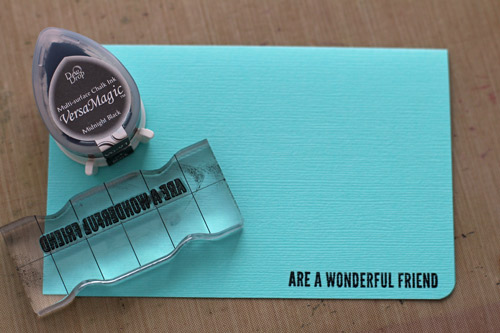
Stamp sentiment in Midnight Black VersaMagic Ink on the bottom right of the card base, a 5 1/2″ x 7″ piece of Patina Bazzill cardstock, folded in half.

Round bottom right and upper left corner and adhere arrow layer with dimensional adhesive. Finish off card by adding three black rhinestones on the top right of the arrow layer.

Thanks so much for stopping by! Have a wonderful day!
Hugs and smiles

It was my turn to share a Savvy Saturday Video on the Spellbinders blog yesterday. I usually don’t scrapbook, so this weeks theme “Grand Layouts” was a bit nerve racking for me. I hope you have time to check out the page and let me know what you think.

Thanks so much for stopping by! Have a wonderful weekend!
Hugs and smiles

I created this card for Imagine Crafts.  We were to create a card with a theme, picking one of the new Kaleidacolor pad names as the theme. I knew I wanted to use Flourishes Italian Garden tomato image for my card.

Here are stamp by step instructions:

Stamp image in Tuxedo Black Memento Ink.

Color image with Copic Markers (YR09, R24, R29, R39, YG61, YG63, YG67, E31, E33, E35) and cut out.

Brayer Pistachio Memento Ink over the inside of the Flora M-Bossabilities folder and emboss a 2 1/2″ x 4 3/8″ piece of white cardstock.

Cut and emboss a piece of white cardstock with the 3rd largest Standard Circle Nestabilities die and sponge the edges of the circle with Summer Sky Memento Ink.

Adhere image over the circle with dimensional adhesive. Stitch embossed background to a slightly bigger piece of black cardstock. Tie ribbon around the lower edge of the embossed layer and tape circle to the lower right of that layer.

Stamp sentiment on lower left of the card base (3 1/2″ x 11″ piece of white cardstock, folded in half) with Tuxedo Black Memento Ink. Finish off the card with black rhinestones.

Thanks so much for coming by! Have a wonderful day!
Hugs and smiles

I created this card back in November with the Simon Says Stamp November Card kit.  I started by stamping the heart from Music to my Ears (stamp set included in kit) in Midnight Black VersaMagic Ink on white cardstock (from kit). After the ink dried, I cut out the heart.

Two strips of BasicGrey Serenade patterned paper were adhered to a 3 3/4″ x 5 1/4″ piece of Neenah Desert Storm cardstock (included in kit). The border strip from the set was stamped underneath the paper strips and a sentiment on top. The layers were adhered to the card base, a 4″ x 11″ piece of white cardstock, folded in half.

Doodlebug black twine was tied to a BasicGrey button (both included in kit) . The button was adhered to the heart and the heart was adhered to the left hand side of the card. Want2Scrap rhinestones finish off the card.

Thanks so much for stopping by! Have a wonderful day!
Hugs and smiles

I am super excited to post my first post as Artist in Resident for Imagine Crafts today. The challenge this month is to use a new Kaleida-color ink pad, the matching Memento Ink  and a Fireworks! Ink spray. That was not an easy challenge for me. I am so not a multi-colored kind of girl. But I made it work. 🙂 I used the new Tomato Vine Kaleidacolor ink pad. The matching Memento Ink colors are Rich Cocoa, Bamboo Leaves, Morocco, Love Letter and Peanut Brittle Memento Ink.

To see step by step instructions for this card click on more.

Continue reading »


When I received the new blanks and Bezel matching dies from Spellbinders I had to try them out right away.  I used the Birds one die to cut patterned paper. The edges were sanded before the pieces were adhered to Bird blanks.  Brown cardstock was cut and embossed with the branch die from Cherry Blossoms.

Corrugated cardboard was cut with the largest of the new Heart One dies. The cardboard was painted with Snow Cap Paint Dabber and then sanded. The heart was adhered to white cardstock and cut out before the branch and birds were adhered in it’s center.

A 1 3/4″ x 5 1/2″ piece of Winter Fun patterned paper was adhered to a 3 1/2″ x 5 1/2″ of patterned paper from the same paper pack. Seam binding was tied around the vertical strip and topped with a button, tied on with Linen Thread.

A sentiment from GinaK. Designs Mistletoe Memories was inked with Wheat and Jumbo Java VersaMagic ink on white cardstock and cut out. It was adhered next to the seam binding bow.

The top right and bottom left corner were rounded before Washi tape topped with a button on the top right finish off the card.

Thanks so much for stopping by! Have a wonderful day!
Hugs and smiles

Wednesday Splitcoaststampers ran a Product Focus on Kreate-a-lope Templates. They make it really easy and fast to create envelopes. You can read all our reviews here. Here are some of the envelopes I have created with the templates:

I made this one to match the card I created for last weeks Triple Stamping tutorial.  I needed a bigger envelope, so I used Stampin’ Up! Whisper White 12″ x 12″ cardstock and the A6 envelope template.

I stamped the same image from Sweet ‘n Sassy Stamp To Paris with Love in Tuxedo Black Memento Ink on the lower right of the envelope.  I sponged the entire envelope with Summer Sky Memento Ink.

I used copy paper and the A6 template to make a matching envelope for the Puzzle Resist card I made a couple of weeks ago. I used masks cut out of copy paper with the new Hearts One die and stamped the chevron strip from Very Special in London Fog Memento Ink all over.  I added a faux stitched border with a black gel pen and stamped  a sentiment and button stamp (also from Very Special) with Red Magic VersaMagic Ink.

I created this envelope out of older 12″ x 12″ Bo Bunny Country Garden patterned paper that I had for a while. The templates are a great way to use up older paper and create envelopes with them.I just added an address label.

Thanks so much for stopping by! Have a wonderful weekend!
Hugs and smiles

It’s my turn to share on the Spellbinders blog. Today I have a video tutorial for a tri-fold gift card holder created with the new A2 Bracket Border dies. I hope you have time to check it out and let me know what you think.

Have a wonderful weekend!
Hugs and smiles

Yesterday’s tutorial on Splitcoaststampers was written by Joan Ervin. She showcased the Triple Stamping technique. It’s an easy way to add dimension to your card.

I created a card with that technique with the beautiful Sweet ‘n Sassy Stamp To Paris with Love.  I started by cutting three pieces of Neenah Solar White cardstock in rectangles ( 3 1/2″ x 3 15/16″, 2 1/2″ x 2 15/16″ and 1 1/2″ x 1 15/16″). The layers were adhered on top of each other with repositionable adhesive and the image was stamped over it in Tuxedo Black Memento Ink.  The flowers of the image were colored with Copic Markers (R11, R12, R22, YG01, YG03, YG17).  The frame and the flowers were colored with white crayon before the edges were sponged with Summer Sky and Bahama Blue Memento Ink. Each layer was adhered to a 3/16″ bigger piece of black cardstock.

The layers were stacked on top of each other with foam adhesive squares.  A piece of Solar White cardstock was cut and embossed with a die from the new Spellbinders Filigree Delight set and adhered to a piece of Limeade Bazzill cardstock. The image layers were adhered over it with more foam adhesive squares and May Arts ribbon was tied around the lower part.

More white cardstock was cut and embossed with a tag die from the new Charmed I’m Sure Spellbinders die set. A sentiment from the set was stamped on it with Tuxedo Black ink and the center was sponged with Summer Sky Memento ink. The tag was tied to the bow and a button with silver cord.

The layers were adhered to a card base cut and embossed out of white cardstock with a Grand Rectangle Nestabilities die. Rhinestones from Want2Scrap finish off the card.

Here is a video for the visual learner:

[youtube]https://www.youtube.com/watch?v=8YWHeJtM6vQ[/youtube]

Thanks so much for stopping by! Have a wonderful day!
Hugs and smiles

Love is in the air and Simon Says Stamp has made it even more fun to create projects to show someone that you love them with their 2013 Valentine’s Day Release.   I was asked to create a project using something from this release to share in today’s Valentine’s Day Blog Hop.

For my card I combined several of the new Simon Says Exclusive stamp set and dies.  I started  by stamping an image from Talk Bubbles 2 all over a  3″  x 4 5/8″ piece of Neenah Solar White cardstock in Sea Breeze VersaMagic ink. Small hearts from the new Lots of Hearts set were added in Key Lime VersaMagic ink in between the clouds. A sentiment from Just a Love Note was stamped in each bubble with the same ink.  Faux stitching was added to the edges with a black gel pen.

A cloud was cut with one of the Talk Bubbles 2 dies out of Solar White ink and stamped with the matching stamp in Key Lime ink. A sentiment from Talk Bubbles 2 was stamped into the cloud, rhinestones were added underneath and the cloud was adhered to the lower left of the layer with foam adhesive squares.

The card base is a 3 1/2″ x 11″ piece of Bazzill Limeade cardstock folded in half. The sentiment that I used inside the clouds was stamped in black in on the bottom right corner before the cloud panel was adhered over it with foam adhesive squares.  White and Limeade cardstock was cut with the new String of Hearts Craft die. I ran the white cardstock heart strip through my Xyron and covered it in glitter. It was adhered on top of the green hearts and both strings were adhered over the cloud background.

Last week I created another card with new Simon Says clear stamps. Just in case you missed it, you can find it here.

And now to the giveaway part! Leave a comment on this blog post and one lucky winner will receive a Simon Goodie Bag (if you know Heidi, it will be a good one!).  We will draw the winner on Thursday morning 1/31/13 at 9:00 AM EST. so be sure to leave your comment by then.

Thanks for visiting! The next stop in the Simon Says Stamp Valentine’s Day Blog Hop is the amazing Stephanie Klauck . If while hopping, you encounter a broken link, you can go back to the beginning for links to everyone who is participating in the hop.

Have a wonderful day! Hugs and smiles


© 2012 fresh & fun Suffusion theme by Sayontan Sinha