When I received the new blanks and Bezel matching dies from Spellbinders I had to try them out right away.  I used the Birds one die to cut patterned paper. The edges were sanded before the pieces were adhered to Bird blanks.  Brown cardstock was cut and embossed with the branch die from Cherry Blossoms.

Corrugated cardboard was cut with the largest of the new Heart One dies. The cardboard was painted with Snow Cap Paint Dabber and then sanded. The heart was adhered to white cardstock and cut out before the branch and birds were adhered in it’s center.

A 1 3/4″ x 5 1/2″ piece of Winter Fun patterned paper was adhered to a 3 1/2″ x 5 1/2″ of patterned paper from the same paper pack. Seam binding was tied around the vertical strip and topped with a button, tied on with Linen Thread.

A sentiment from GinaK. Designs Mistletoe Memories was inked with Wheat and Jumbo Java VersaMagic ink on white cardstock and cut out. It was adhered next to the seam binding bow.

The top right and bottom left corner were rounded before Washi tape topped with a button on the top right finish off the card.

Thanks so much for stopping by! Have a wonderful day!
Hugs and smiles

I am back with another cute Tiddly Inks image called Cocoa Wishes. It was printed out on Neenah Solar White cardstock. It was cut 3 1/2″ wide and the image was colored with Copic Markers (Skin: E50, E21, E33, R20   Hair: E13, E15, E19, E18   Jeans: B91, B93, B95, B97   Ear Muffs/shirt/bird: YR09, R24, R29, R39    Cup: E40, E41, E42, E43  ).

Two pieces of  3 1/2″ wide strips of Carta Bella’s Winter Fun patterned paper were adhered above the image and the edges were stitched. The layers were adhered to the card base a 3 1/2″ x 11″ piece of Kraft cardstock, folded in half. The bottom corners were rounded and a piece of red washi tape was adhered on the the paper strips on top.

A sentiment from Snowflake Letters Mini seals was stamped in Tuxedo Black Memento Ink on a piece of white cardstock, cut and embossed with a Standard Circle Nestabilities die. A red button was tied on with a silver cord before the sentiment circle was adhered with foam adhesive squares. A few snowflakes were cut and embossed out of silver glimmer paper with Snowflake Borderabilities dies and adhered to the card to finish it off.

Thanks so much for looking! Have a wonderful day!
Hugs and smiles

It’s time for a new Crafty Friends Challenge. Charmaine is the hostess and her challenge to us is to create a mostly white card, with just a splash of color. I will also enter the card into the current Simon Says Stamp Challenge, which is to use your favorites. Here I used paper piercing, rhinestones, dies, patterned paper and paper piercing.  The layout of the card is from the current CASE Study card by Windy Robinson.

I started by cutting snowflakes out of silver glimmer paper with one of the Snowflake Borderabilities dies.  A 1 3/4″ x 3″ strip of Carta Bella’s Winter Fun patterned paper was adhered to the bottom of a 3″ x 5″ piece of Neenah Solar White cardstock after the edges of the paper were sanded.  The bottom edges were rounded and the edges of the layers were paper pierced.  Seam Binding was tied around the top of the patterned paper and three bells were tied on with silver cord.

The layers were adhered to the card base, a 3 1/4″ x 10 1/2″ piece of Solar White cardstock folded in half with the bottom corners rounded. A sentiment from Simon Says Stamps Small Folded Banners Holiday was stamped in Platinum Stazon on white cardstock. It was cut into banner form. Want2Scrap Rhinestones finish off the card.

Check out my fellow Crafty Friends for more  inspiration:

    Thanks so much for looking! I hope you have time to join us in the challenge. It’s easy and fun! Have a wonderful week!
    Hugs and smiles


Do you have an Advent tradition? When the kids were little, I had an advent calendar that I filled with small treats every day. As they grew older we started filling the advent calendar with a little hint where the treat is hidden. My kids still love this little scavenger hunt, even though my hints are too easy for them to find (I am not good at this…but it’s the tradition that counts, right?). Well…over the moves the first advent calendar got lost and the one I made for a Splitcoast tutorial years ago, lost a few tins. It was time for a new one.

I really wanted the KaiserCraft Advent calendar to alter, but I couldn’t find it online (last minute as I am), so I ordered this Karen Foster Countdown Calendar. It comes with rubon numbers, but I didn’t use those.

I started by covering each drawer front with Carta Bella Merry & Bright paper. The drawers are tiny.I cut the papers into 1 7/16″ squares, sanded the edges and used a 1/2″ circle punch for the finger holes. I adhered the paper with Scor-Tape. I mention it because I first adhered it with Glue & Seal, thinking liquid adhesive would work better, only to have the paper just come off again.

The numbers were cut out of Red Glimmer Paper (Stampin’ Up!) with By the Numbers Die-namics dies. Those were popped up with adhesive foam squares on each drawer. Rhinestones were added to add just a bit more sparkle. I bought the tinsel 2 years ago in my LSS in Ohio. It comes on a pretty wooden spool. Unfortunately I don’t know the maker of it. The sticker came off.

Thanks so much for stopping by! Have a wonderful day!
Hugs and smiles


Welcome to the Whimsy Stamps November 2012 rubber stamp and die release!

Today, Whimsy Stamps is releasing 21 fantastic new Rubber Stamps & Stamp Sets, 5 wonderful new Whimsy Shapeology Dies, 2 fabulous new Shape EZ by TLC templates, 2 beautiful Whimsy Designer Paper 6×6  packs and 2 new Whimsy Prints Collection pre-colored topper sets. These new goodies are available to buy right now from the Whimsy Stamps store along with all your Whimsy favorites.

From today until 27 November, the Whimsy DT and Special Guests will be showcasing these new products with a daily mini blog hop. Each mini blog hop has a new release prize hidden somewhere along the way and you have 24hrs to enter each prize draw by leaving a comment on every blog listed for that day.

At the end of release week (Wednesday 28 November) a ‘Release Round-Up’ will be posted on the Whimsy blog. This will include
a selection of DT work from the new release week together with a complete list of winners from the daily mini blog hops.

For my card today I used the darling  Christmas Hamster Wee image. It was stamped inTuxedo Black Memento Ink on Neenah Solar White cardstock that had been cut and embossed with one of Donna Salazar designed Snapshot Spellbinders™ Shapeabilities® dies. The image was colored with Copic Markers (Hamster: E40, E41, E42, E43, E44, R00, R01   Jacket: YG01, YG03, YG17, W00, W1, W3   Ornament: YR09 ,R24, R29, R39, Y32, Y35, Y38, E97). The hamster was masked and sponged first with Toffee Crunch, then with Peanut Brittle Memento Ink.  A button was tied on the bottom of the polaroid image with a silver cord.

The card base is a piece of 3 1/2″ x 11″ piece of Neenah Avalanche White Lineal cardstock folded in half. The bottom corners were rounded. The center of a 3/8″ x 3 1/2″ strip of  Carta Bella’s Merry & Bright patterned paper with my Cutter Bug Bee (to create the dots), then adhered to a wider strip of the same paper pack.

Three pieces of Merry & Bright paper were stamped with one of the Holiday Circle Pennants. They were cut out and adhered under the paper strips before they were adhered to the lower half of the card base. The hamster image was adhered slightly askew over the strip with foam adhesive squares. Rhinestones from a Sleek Strips Silver Rhinestones finish off the card.

To be entered into today’s mini blog hop prize draw, be sure to leave a comment on ALL of the DT posts listed below by 12.00pm EST tomorrow:

Debbie
Ellie
Heidy
Iris
Simonne
Tammy Louise
Beate – Special Guest  (that’s me)
Colleen – Special Guest
Zoe – Special Guest 

** Guest Designer Contest – January 2013 **

Would you like to join us as our guest designer for our January 2013 release?

If you would like to be considered for this, please make a new post on your blog telling us
why you would like to be a guest designer for Whimsy Stamps and add the direct link to your post in
the Linky tool on the Guest Designer Contest page HERE.

Please ensure you include at least one Whimsy Stamps creation in your blog post (this
doesn’t have to be new, but it would be great if it was a recent creation).

The contest will remain open during the entire November release week and will close at 12.00pm
EST on Wednesday 28 November. The winning entry will be announced in the “Release in Review”
post on the Whimsy blog on Wednesday 5 December.

For a full reveal of this month’s release, please visit the Whimsy blog.

Thanks so much for stopping by and I hope you enjoy Whimsy’s new release! Have a wonderful day!
Hugs and smiles

I created this card a while ago for an inspiration challenge on Splitcoast.  I started with a 3″ x 5″ piece of Neenah Solar White cardstock . The bottom two corners were rounded and the Petite Christmas Tree was cut in the lower right corner. Carta Bella’s Merry & Bright patterned paper was adhered behind the tree cut out and the layers were stitched to a slightly bigger piece of black cardstock.

White cardstock was cut and embossed with a Spellbinders Nested Pennants die and a sentiment from the new Small Folded Banners Holidays was stamped over it in Jet Black Archival ink. A button was tied on to the right edge with silver cord before it was adhered to the upper left edge. Red striped washi tape was adhered over it.

Silver Rhinestones were adhered under the sentiment and on top of the tree. Baby Bling red rhinestones were added to the tree to finish off the card.

Thanks so much for stopping today! Have a wonderful day!
Hugs and smiles

Today’s featured new CAS-ual Friday stamp set is called Merry Kiss-mas.  As soon as I saw the little gifts, I knew I wanted to line them up and dress them up with patterned paper.

I used my favorite Christmas Paper Pack Carta Bella’s Merry & Bright for that.  The card base is a 5 1/2″ x 7 1/2″ piece of Neenah Solar White cardstock folded in half. Five presents were stamped in the center of the card with Tuxedo Black Memento Ink.

The bottom right corner was rounded and a sentiment was stamped right under the presents.  Don’t you just love that font? Three rhinestones from Sleek Strips Silver Rhinestones next of the sentiment finish off the card. Now this is one quick Christmas card.

For my second card I had to use Debby Hughes amazing layout again. I can see this becoming one of my go to sketches for CAS cards. For this one I started by cutting the edge of a 3″ x 5 1/2″ piece of white cardstock with the Notebook Edge Die-namics die. The mistletoe image was stamped in Tuxedo Black Memento Ink. It was colored with Copic Markers (G24, G28) and Liquid Pearls were added to create the berries.

The long thin sentiment was stamped in Tuxedo Black Memento Ink along the notebook edge before red ribbon was tied around the top of the layers. The bow was topped off with a button, tied on with silver cord. The layers were adhered to the card base, a 3 1/2″ x 11″ piece of Kraft cardstock folded in half. The bottom corner was rounded to finish off the card.

Make sure you check the CAS-ual Fridays Stamp blog to see more samples created with the new set.  Thanks so much for stopping by! Have a wonderful day!

Hugs and smiles


Today’s Holiday Blitz tutorial is written by Susan Culotti. She shows us how to create a flip top box (like it’s used for cigarettes or crayons). I shot the video and created this box as a sample.

My box base is a piece of Kraft cardstock. The patterned paper used to decorate the box is from Carta Bella’s Winter Fun patterned paper. Holiday Apothecary Labels stamps and dies were used to dress up the box.  Rhinestones from Sleek Strips Silver Rhinestones finish off the box.

Here is a video for the visual learner:
[youtube]https://www.youtube.com/watch?v=5M9mODY5weM[/youtube]

Thanks so much for stopping by! Have a wonderful day!
Hugs and smiles

I created a card last month for a featured stamper challenge on Splitcoaststampers.  I had picked this card to case, mostly because I had just gotten MFT’s Hexagon dies and wanted to try them out. I cut Neenah Solar White cardstock the larger strip. I cut slightly smaller pieces out of Carta Bella’s Merry & Bright patterned paper. The patterned paper pieces were fed through a Xyron sticker maker and adhered to the larger white strip.

The card base is a 3 1/2″ x 11″ piece of Patina Bazzill Cardstock, folded in half. The bottom right corner  was rounded. The hexagon strips were adhered to the left hand side of the card. More white cardstock was cut with MFT’s Let it Snowflake and Framed Greetings die.

A sentiment from Seasonal Sentiments was stamped in Red VersaMagic ink was stamped on the Framed Greeting die cut and adhered on the lower right card base.  The snowflake were sprinkled over the card and topped with rhinestones from a Sleek Strip Silver Rhinestone to finish off the card.

Thanks so much for looking! Have a wonderful day!
Hugs and smiles

P.S.: Today’s tutorial is written by my wonderful colleague and friend Lori Craig. She is showing us how to create colored glass.

Hello and welcome to Day 3 of our October Rubber & Die Release Showcase!

On Wednesday (24 October) Whimsy Stamps released this month’s new rubber designs, Shapeology dies, Whimsy Designer Paper packs and Shape EZ templates. From then until 30 October the Whimsy Stamps DT and Special Guests are showcasing these fabulous new goodies with a daily mini blog hop!

Each mini blog hop has a new release prize hidden somewhere along the way and you have 24hrs to enter each prize draw.

To be entered into today’s mini blog hop prize draw, be sure to leave a comment on ALL of the DT’s posts listed below by 12.00PM EST tomorrow. All winners will be announced on the Whimsy blog on 31 October.

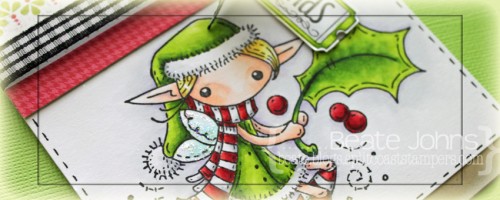
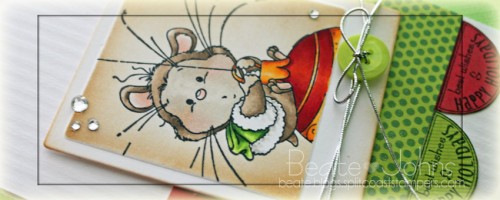
For my card today I used this super cute Meljen’s Designs Holly Christmas Fairy. She was stamped in Tuxedo Black Memento Ink on Neenah Solar White cardstock . It was colored with  Copic Markers (Reds: R32, R35, R37, R39 Greens: YG01, YG03, YG17 Skin: E0000, E00, E01 Hair: Y11, Y13, E31 Wings: BG000, BG10 Background: C00, C1, BV00). The wings were covered with Stardust Stickles and a faux stitched border added with a Copic Multiliner.

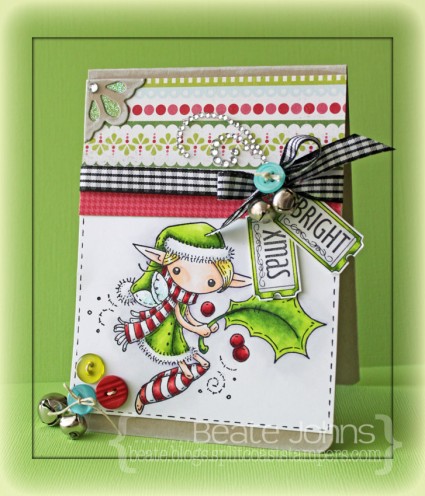
The card base is a 4 1/4″ x 11″ piece of Kraft cardstock folded in half. The edges were inked with Moonlight Brilliance ink and the bottom corners of the card were rounded. Three buttons were stitched to the bottom right corner of the image layer before it was adhered to the lower half of the card.

Two pieces of Carta Bella’s Merry & Bright patterned paper were adhered above each other . Black Gingham ribbon was tied around them before they were adhered to the card base. The ribbon bow was topped with a button and two little bells were tied underneath.

Two tickets from the new Holiday Mini Tickets were stamped in Tuxedo Black ink on white cardstock, colored with Copic Markers and cut out. The sentiments were adhered underneath the bow. Kraft cardstock was cut with a Corner die. The edges were sponged with Moonlight white ink and green Carta Bella paper was adhered underneath. Glitter was adhered over the openings. A rhinestones from Sleek Strips Silver Rhinestones was adhered on the top corner of the corner die. Part of a Finesse Rhinestone swirl above the bow finish off the card.

To take a peek at today’s fabulous new release creations, please click on the links below…

Remember that the entire new release is available to buy right now from the Whimsy Stamps store along with all your Whimsy favorites.

Thanks so much for stopping by! Have a wonderful day!
Hugs and smiles

© 2012 fresh & fun Suffusion theme by Sayontan Sinha