Do you have an Advent tradition? When the kids were little, I had an advent calendar that I filled with small treats every day. As they grew older we started filling the advent calendar with a little hint where the treat is hidden. My kids still love this little scavenger hunt, even though my hints are too easy for them to find (I am not good at this…but it’s the tradition that counts, right?). Well…over the moves the first advent calendar got lost and the one I made for a Splitcoast tutorial years ago, lost a few tins. It was time for a new one.

I really wanted the KaiserCraft Advent calendar to alter, but I couldn’t find it online (last minute as I am), so I ordered this Karen Foster Countdown Calendar. It comes with rubon numbers, but I didn’t use those.

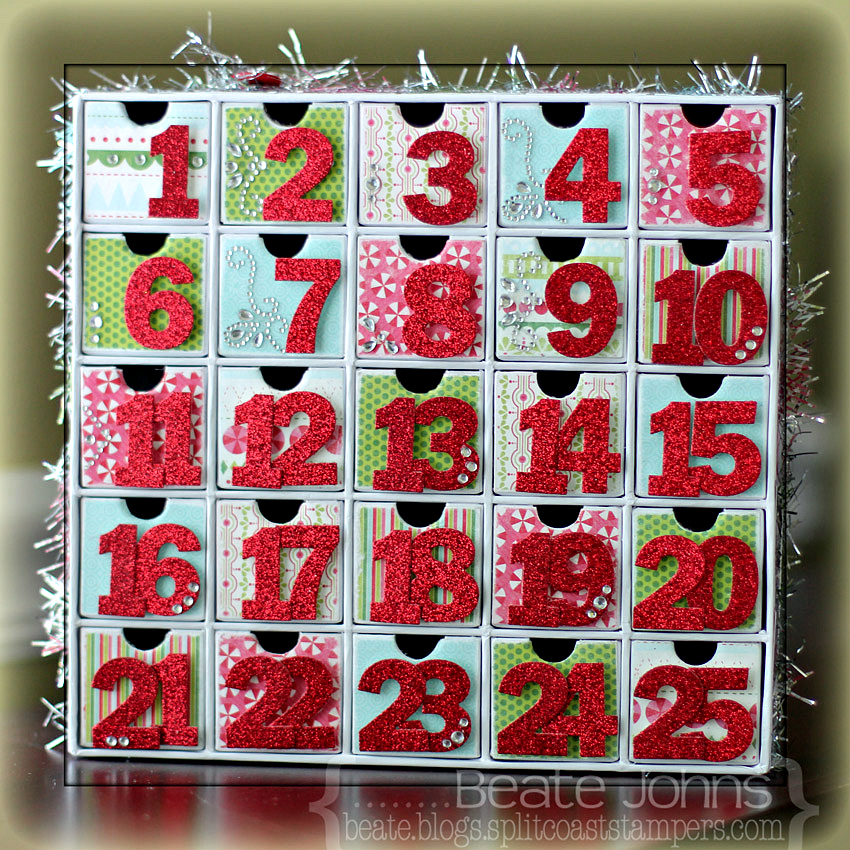
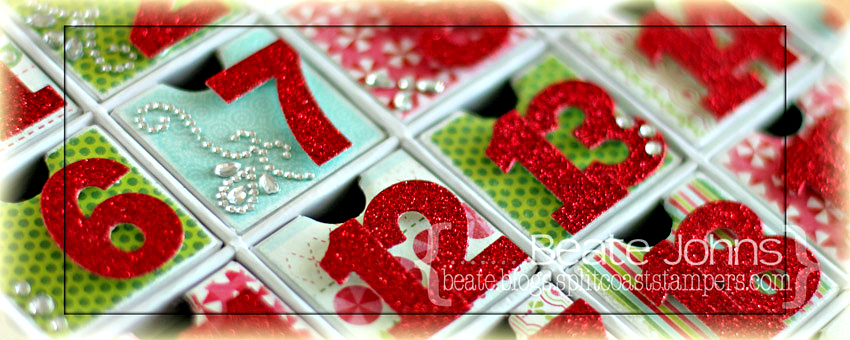
I started by covering each drawer front with Carta Bella Merry & Bright paper. The drawers are tiny.I cut the papers into 1 7/16″ squares, sanded the edges and used a 1/2″ circle punch for the finger holes. I adhered the paper with Scor-Tape. I mention it because I first adhered it with Glue & Seal, thinking liquid adhesive would work better, only to have the paper just come off again.

The numbers were cut out of Red Glimmer Paper (Stampin’ Up!) with By the Numbers Die-namics dies. Those were popped up with adhesive foam squares on each drawer. Rhinestones were added to add just a bit more sparkle. I bought the tinsel 2 years ago in my LSS in Ohio. It comes on a pretty wooden spool. Unfortunately I don’t know the maker of it. The sticker came off.

Thanks so much for stopping by! Have a wonderful day!
Hugs and smiles


I am exciting to be guest designing for Tiddly Ink this month. For my first card I decided to use the darling Winter Wryn image. I printed her out on Neenah Solar White cardstock and colored her with Copic Markers (Coat/Hat: YR09, R24, R29, R39    Hat/coat trim: W00, W1, W2    Skin: E50, E21, E34    Hair: Y21, Y23, E31, E33     Boots: C1, C3, C5, C7, C9). The cardstock was cut down to 5 1/4″ length and the left hand side was cut with the Notebook Die-namics die. The right hand corner was rounded.

A piece of Carta Bella Merry & Bright paper was adhered on the left to form a 3 1/4″ x 5 1/4″ layer. It was adhered to the card base, a 3 1/2″ x 11″ piece of Kraft cardstock, folded in half. Both bottom corners were rounded.

A sentiment from Kelli Purkey’s Joy stamp set was stamped in Sea Breeze VersaMagic ink on white cardstock. It was embossed with iridescent ice embossing powder and cut out.  Hemp cord was wrapped into a bow and tied together with a bow. The sentiment was taped under it and it was adhered to the upper right hand side.

Do you have any Tiddly Ink images? They are so cute and so much to color.
Hugs and smiles

While creating yesterday’s card, I cut a strip of the MME Lime Twist Life is a Party Paper with the second die from MFT’s Retro Square Die-namics dies. It was too pretty to throw away, so I created another card with it. The card base is a 3 1/2″ x 11″ piece of  Neenah Solar White cardstock, folded in half. The upper 3/4 (and a bit of the back) was embossed with the Simplicity M-Bossabilities folder and that Life is a Party paper strip was adhered where the embossing ended.

A heart was cut out of Patina Fourz Bazzill cardstock with the smallest heart from Hearts a Plenty Die-namics die. It was topped with a pink button, tied on with silver cord and adhered with foam adhesive squares to the left hand side of the retro strip. A tiny arrow from MFT’s Flags & Tags Die-namics set was cut out of black cardstock and adhered to the right of the heart, pointing to the sentiment.

The sentiment was stamped with Melanie’s new Lots of Letters set in Tuxedo Black Memento Ink. The bottom corners of the card were rounded. Black and silver Rhinestones from Want2Scrap finish off the card. This card is another entry for the Keen on Neon Moxie Fab World Challenge.

Thanks so much for stopping by! Have a wonderful day.
Hugs and smiles

I am excited to be joining in the Gina K. Designs Design Team December Inspiration Blog Hop! Gina and the Design Team will inspire you with many beautiful ideas, and as you hop through their blogs, make sure to leave a comment on each of them because a few random comments will be chosen and those stampers will each win a grab bag of Gina K. Designs products! To see the full list of winners, check the Big News forum at Stamp TV a couple of days after the hops.

The new Melanie Muenchinger set called Lots of Letters  is just perfect for my new love of Clean and simple cards. It  is available in both clear photopolymer and red rubber.

This is the first letter and number set from Gina K. Designs and is packed with frames and elements that will help your stamped cards, pages or personalized designs shine!   Gina K. also carries matching Silhouette Studio cut files for only 99 cents each which make creating beautiful and professional cut designs with these stamps a breeze. The square and circles images are also perfect for your dies and punches, fitting perfectly in a ¾” or larger die or punch.

I created this card not just for Melanie’s blog hop, but also as an entry for the Keen on Neon Moxie Fab World Challenge.  I started with a 3″ x 5″ piece of white cardstock. The bottom right corner was rounded before I stamped the square stamp with the one rounded edge  four times in the right corner  (once in Mango Madness VersaMagic ink, once in Key Lime VersaMagic ink, once in Sea Breeze VersaMagic and once in Rose Bud Memento Ink). Hi was stamped in the orange square with Tuxedo Black Memento Ink.


More white cardstock was cut and embossed with MFT’s Retro Squares Die-namic die and adhered over a thin strip of MME Life of the Party patterned paper (old pack…I wish I had more. Love the funky colors). The white cardstock piece was adhered to the right hand side of the  card base, a 3 1/2″ x 11″ piece of Patina Fourz Bazzill cardstock, folded in half. The retro square strip was adhered to the left hand side, leaving only about 1/4″ of the Patina base showing.

A heart was cut out of orange Core’dinations cardstock with the smallest heart from Hearts a Plenty Die-namics die. It was topped with a button that was tied on with silver cord. The heart was adhered slightly above the center of the retro squares strip. Black rhinestones were added to the square strip and silver chevron rhinestones to the colorful stamped squares to finish off the card.

Please see Melanie’s blog for the full link list of blog hop participants! Also, if you come back tomorrow, you will see another card created with the Lots of Letter sets and with leftovers from what I used (or tried to use) on this car).  And this afternoon, I am posting some super exciting Splitcoaststampers news here! I am tickled pink about this!

Thanks so much for stopping by! Have a wonderful day!
Hugs and smiles

I have another Clean and Simple card to share with you that is mostly made with supplies from the new Simon Says Stamp December card kit. I created the card for the current CAS(E) this sketch challenge. I will also enter it into the current Simon Says Stamp Challenge, because the current one is anything goes! One lucky entry will win a $50 shopping spree!!!

I started by cutting two red papers of Pink Paislee Sidewalks patterned paper (included in kit) in 2″ wide strips. The bottom was cut with one of MFT’s Fishtail Flags Die-namics die and the center was cut with Simon Says Stamp Air Vent die. Sea Salt Bazzill cardstock (included in kit) was adhered behind the vent and a 1/4″ strip of white cardstock was adhered above. A white button was tied on to the side of that paper strip with Beetle Black twine.


A 2 1/2″ long strip of Sea Salt cardstock was cut with MFT’s small scalloped border die and adhered to the top right of the strip. Rhinestones from a Sleek Strip Silver Rhinestones pack were adhered next to each scallop. The banner strip was adhered to the card base, 3 1/2″ x 11″ piece of green Bazzill cardstock (included in kit), folded in half. The bottom corners were rounded.

A sentiment from Merry Everything (included in kit) was stamped in Tuxedo Black Memento Ink on a piece of Neenah Solar White cardstock that had been cut with a small folded  Banner die.  It was adhered slightly off center underneath the vent die cut. A tiny rhinestone was adhered as the dot over the i and three rhinestones from the Sleek strip pack were adhered on the bottom right corner to finish off the card.

Thanks so much for stopping by! Have a wonderful day!
Hugs and smiles

Today’s tutorial on Splitcoaststampers was created by the wonderful Shelly Hickox. She shows us how to use die cuts and turn them into 3d images. What a great idea! I had to try it out right away. Her sample is vintage prefection, so I tried to go a different route and see if it would work for a different style as well.

I used the elephant die from My Favorite Things Circus Spectacular and cut it 7 times out of light-weight coasters. The elephants were cut down adhered to each other with Beacon 3 in 1 Craft Glue. Once it was dry it small pieces of dictionary page pieces were adhered to the elephant with Glue N’ Seal. Once it was dry, Pearl Acrylic paint was added over it.

A frame was cut twice out of light weight coasters with the Vintage Cameo die. A piece of Fancy Pants The Good Life patterned paper was cut with the same die, adhered to the frame. The edges were painted with Acrylic Pearl Paint. Another piece of The Good life paper was adhered behind the frame and the elephant was adhered in the middle.

The card base was cut out of Neenah Solar White cardstock with the largest Stax Jumbo Fishtail Banners. More The Good Life paper was cut with the same die, sanded and cut down. The edges were stitched, Beetle Black doodlebug twine was tied around the layer before it was adhered to the card base.

A sentiment from Circus Spectacular was stamped on more The Good Life paper with Tuxedo Black Memento Ink. It was cut out and layered on Solar White cardstock, cut and embossed with the Ticket Strip Die-namics die. It was adhered on the left side of the frame and topped with a button to finish off the card.

Thanks so much for stopping by! I hope you have time to check out Shelly’s amazing tutorial and sample.
Hugs and smiles

I created this card a few weeks ago for a CASE study challenge.  For this one I paired 3/4″ x 3 1/4″ wide strips of different colored blue Bazzill cardstock were adhered to a slightly bigger white base. Clouds were cut out with Flat Bottom Cloud Die-namic dies.

The layer was adhered to the card base, a 3 1/2″ x 11″ piece of Neenah Solar White cardstock, folded in half. The bottom corners were rounded. A sentiment from Simon Says Stamps On Edge stamp set was stamped underneath the colored cardstock layers in Tuxedo Black Memento Ink.

White cardstock was cut with the Simon Says Stamp die Always and adhered right on the edge of the colored cardstock edge.  Black Doodlebug Twine was tied right under that edge and topped with a button. Faux Stitching was added to the colored cardstock with a white gel pen. Three rhinestones from a Sleek Strips Silver Rhinestones finish off the card.

Thanks so much for stopping by! Have a wonderful day.
Hugs and smiles

Today I am sharing a CAS card I created a while back, when I was playing with the Pazzles electronic die cutter. I think I am getting old. I really prefer dies and a regular die cutting machine over electronic ones and messing with sticky mats.

The focal point here is a speech bubble cut with a Say What Die-namics die out of Neenah Solar White cardstock. It was stamped in Jet Black Archival ink with a sentiment and frame from the Say What stamp set.

The card base is a 3 1/2″ x 11″ piece of Solar White cardstock. The bottom corners were rounded and a thin border was drawn with a Copic Multiliner.  A strip of black polka dotted Washi Tape was adhered to the center of the card and a kraft cardbstock tag (cut with the Pazzles) was adhered slightly askew over it. A strip of Heart and Clouds Washi Tape and Tiny Hearts Washi Tape were adhered underneath the black one before the speech bubble was adhered over those with foam adhesive squares.

Twine was tied through the tag hole and the three dots stamp from Say What was stamped in black on the bottom right of the tag. Three rhinestones from Sleek Strips Silver Rhinestones finish off the card.

Thanks so much for stopping by! Have a wonderful day!
Hugs and smiles

Today’s featured new CAS-ual Friday stamp set is called Merry Kiss-mas.  As soon as I saw the little gifts, I knew I wanted to line them up and dress them up with patterned paper.

I used my favorite Christmas Paper Pack Carta Bella’s Merry & Bright for that.  The card base is a 5 1/2″ x 7 1/2″ piece of Neenah Solar White cardstock folded in half. Five presents were stamped in the center of the card with Tuxedo Black Memento Ink.

The bottom right corner was rounded and a sentiment was stamped right under the presents.  Don’t you just love that font? Three rhinestones from Sleek Strips Silver Rhinestones next of the sentiment finish off the card. Now this is one quick Christmas card.

For my second card I had to use Debby Hughes amazing layout again. I can see this becoming one of my go to sketches for CAS cards. For this one I started by cutting the edge of a 3″ x 5 1/2″ piece of white cardstock with the Notebook Edge Die-namics die. The mistletoe image was stamped in Tuxedo Black Memento Ink. It was colored with Copic Markers (G24, G28) and Liquid Pearls were added to create the berries.

The long thin sentiment was stamped in Tuxedo Black Memento Ink along the notebook edge before red ribbon was tied around the top of the layers. The bow was topped off with a button, tied on with silver cord. The layers were adhered to the card base, a 3 1/2″ x 11″ piece of Kraft cardstock folded in half. The bottom corner was rounded to finish off the card.

Make sure you check the CAS-ual Fridays Stamp blog to see more samples created with the new set.  Thanks so much for stopping by! Have a wonderful day!

Hugs and smiles


I created a card last month for a featured stamper challenge on Splitcoaststampers.  I had picked this card to case, mostly because I had just gotten MFT’s Hexagon dies and wanted to try them out. I cut Neenah Solar White cardstock the larger strip. I cut slightly smaller pieces out of Carta Bella’s Merry & Bright patterned paper. The patterned paper pieces were fed through a Xyron sticker maker and adhered to the larger white strip.

The card base is a 3 1/2″ x 11″ piece of Patina Bazzill Cardstock, folded in half. The bottom right corner  was rounded. The hexagon strips were adhered to the left hand side of the card. More white cardstock was cut with MFT’s Let it Snowflake and Framed Greetings die.

A sentiment from Seasonal Sentiments was stamped in Red VersaMagic ink was stamped on the Framed Greeting die cut and adhered on the lower right card base.  The snowflake were sprinkled over the card and topped with rhinestones from a Sleek Strip Silver Rhinestone to finish off the card.

Thanks so much for looking! Have a wonderful day!
Hugs and smiles

P.S.: Today’s tutorial is written by my wonderful colleague and friend Lori Craig. She is showing us how to create colored glass.

© 2012 fresh & fun Suffusion theme by Sayontan Sinha