This week the Flourishes team focuses sets that are about to retire. Once they are sold out, you won’t be able to order them anymore.

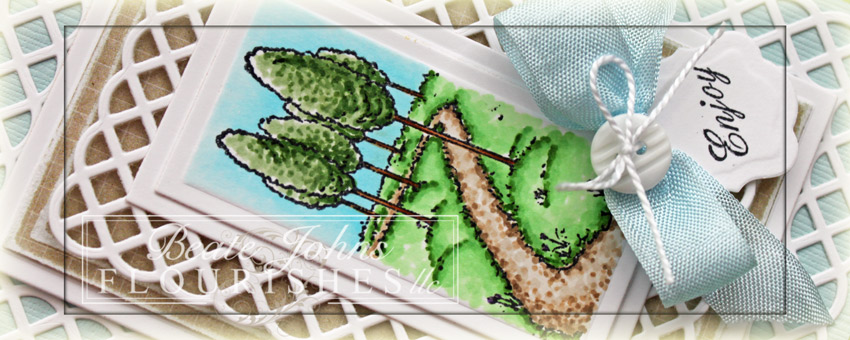
I love this image from Country Home set and decided to combine it with the Card Creator dies. Two pieces of white cardstock were cut and embossed with a Matte A and Matting B Basics die, another with the second largest Fancy Weave Card Creator die. The image from Country Home was stamped in Tuxedo Black Memento Ink on the smallest rectangle and colored with Copic Markers (Grass: YG11, YG13, YG17    Trees: YG61, YG63, YG67, E33, E37   Road: E40, E42, E43, E44    Flowers: V17 Sky: B0000, B000, B00). It was first adhered to the slightly bigger layer, then to the weave layer.

The flowers on the side of the road are purple and my sky is blue….so it fits for this week’s Timeless Tuesday challenge.

Next I cut a piece of patterned paper with another Matte basic die and another piece of white cardstock, with the next size up Matte die. More white cardstock was cut and embossed with the biggest Fancy Weave die. The layers were adhered on top of each other and then added to a 4″ x 5 1/4″ card base, created out of cardstock from the Color Made Easy Emerald Coast collection.

Part of a sentiment from Cottage Home was stamped on white cardstock, cut and embossed with one of the Tailor-Made Classic Tag set dies.  Sky Blue Color Made Easy ribbon was tied into a bow. The sentiment was tied on it with embroidery floss and a button.

Check out what my fellow design team member have created today:

Thanks so much for stopping by! Have a wonderful weekend!
Hugs and smiles

Today the Flourishes Design Team focuses on the stamp set Poppy Patch. For my sample  stamped several images of that set in Tuxedo Black Memento Ink on white cardstock. It was cut and embossed with the third largest Card Creator Matting B Basics die and the Out of the Box technique. The image was colored with Copic Markers (YR04, R24, R29, R39, G20, G21, G24, G28) and sponged first with Tumbled Glass, then with Broken China Distress Ink.

The image was adhered to black cardstock, cut and embossed with the third largest of the Matte A Basic dies.  Ribbon was tied around the lower part of the layers. Another piece of white cardstock was cut and embossed with a Tailor-Made Classic Tag Template die. The center of the tag was sponged with Broken China ink and a sentiment from Passion Flower was stamped in it’s center. The tag was tied to the bow along with a button. The card base was cut and embossed out of white cardstock with the largest of the Card Creator Faux Postage dies.

Check out what my fellow design team member have created today:

Thanks so much for stopping by! Have a wonderful weekend
Hugs and smiles

I created this card as a sample for Wednesday’s tutorial on Splitcoaststampers. I thought the bouquet from Autumn Blossoms would work great for the Telescoping Image Technique.

The image was stamped twice in Tuxedo Black Memento Ink on white cardstock. The images were colored with Copic Markers (Y13, Y15, Y17, YR12, YR16, YR18, G20, G21, G24 ,G28, YG11, YG13, YG17, R24, R27, R39) and cut and embossed with Classic Oval LG dies. The edges of the larger ovals were sponged with Tumbled Glass Distress ink before the layers were adhered on top of each other with dimensional adhesive. The ovals were then adhered to Kraft cardstock that was hand cut into a slightly larger oval layer. All layers were adhered to white cardstock, cut and embossed with the Floral Oval Nestabilities die.

Pieces of patterned paper were cut and embossed with the second smallest Grand Rectangle Nestabilities die. The edges were sanded and stitched before Sheer ribbon was tied around the layer and through one of the Floral Oval openings of the frame.  The bow was topped with a button, tied on with embroidery thread.

A sentiment from Autumn Blossom was stamped on white cardstock, cut and embossed with one of the insert dies from the Fancy Framed Tags One dies. The raised part was sponged with Antique Linen Distress ink.

The layers were adhered to a card base, cut out of white cardstock with the second smallest Grand Scallop Rectangle Nestabilities die. Part of a Finesse Rhinestone Swirl over the bow and a few single Rhinestones on the top right finish off my card.

Here is a video for the visual learner:

[youtube]https://www.youtube.com/watch?v=xbBTf55aRKs[/youtube]

Check out what my fellow design team member have created today:

Thanks so much for stopping by! Have a wonderful weekend
Hugs and smiles

Did you see that Flourishes has all their Christmas sets on  25% off right now until the end of the month? Because of that the Timeless Tuesday team showed off Christmas cards on Tuesday and the design team is showing off more Christmas projects today.

Of course I had to combine the gorgeous Flourishes stamps with newly released Spellbinders dies.

I love the Holiday Tree die cut set. I used the tree die to cut and emboss white cardstock.  Brown rhinestones were randomly added. Patterned paper was cut and embossed with the second Label Eight Nestabilities die. The edges were sanded before it was adhered to the card base, white cardstock cut and embossed with the largest Decorative Label Eight die.

A sentiment from Petals & Peace was stamped in Tuxedo Black Memento Ink on white cardstock that had been cut and embossed with an insert die from Fancy Framed Tags One. It was adhered to the lower right of the tree.

Check out what my fellow team members have created today:

Thanks so much for stopping by! Have a wonderful day!
Hugs and smiles


Today is Silke and my first Flourishes Friday Focus post. It is time for a sketch challenge. I used an image from the Nasturtiums set and a sentiment from the Fuchsias in Bloom set.  Both sets are on the retirement list and won’t be available much longer.

I started by cutting and embossing a piece of white cardstock with the soon to be released Card Creator Matting B Basics (3rd smallest die). I stamped the big image from Nasturtiums in Tuxedo Black Memento Ink on the piece while the die was still over it. I stamped part of it again so I could cut one flower off and overlay it on the main image. The image was colored with Copic Markers (Y21, Y23, Y35, Y38, YR07, YR09, G40, G43, G46, BG000, BG01) and adhered to a piece of cardstock cut and embossed with the third largest Card Creator Postage Edges die.

A piece of My Mind’s Eye Howdy Doody Paper was cut and embossed with the third smallest of the Card Creator Matting A Basics die. The paper was sanded and the edges were stitched before it was adhered behind the image layers.

The layers were adhered to a piece of white cardstock, cut and embossed with the second largest Postage Edges Card Creator die. The layers were adhered to the card base,  a 4 1/4″ x 11″ piece of green cardstock, folded in half.

A 4 1/4″ long strip of white cardstock was cut and embossed a Classic Edges One die and a Classic Decorative Insert Five die. Ribbon was tied around the top  before the strip was adhered to the card base.  The ribbon was topped with a button. Parts of a Finesse Rhinestone Swirl and a few small rhinestones finish off the card.

If you are interested in winning the two “soon to be retired” Flourishes set I used for this card, just add your url to the Mr. Linky underneath. I will pick a winner on Monday with the help of random.org.

Check out what the other design team members have created with this sketch:

Thanks so much for stopping by! Have a wonderful weekend!
Hugs and smiles

© 2012 fresh & fun Suffusion theme by Sayontan Sinha