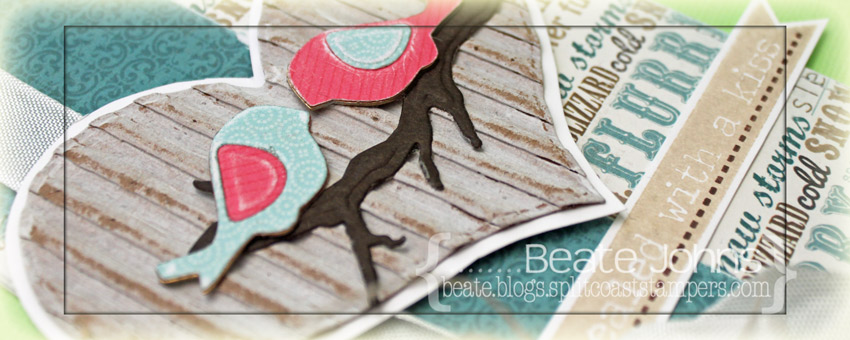
When I received the new blanks and Bezel matching dies from Spellbinders I had to try them out right away.  I used the Birds one die to cut patterned paper. The edges were sanded before the pieces were adhered to Bird blanks.  Brown cardstock was cut and embossed with the branch die from Cherry Blossoms.

Corrugated cardboard was cut with the largest of the new Heart One dies. The cardboard was painted with Snow Cap Paint Dabber and then sanded. The heart was adhered to white cardstock and cut out before the branch and birds were adhered in it’s center.

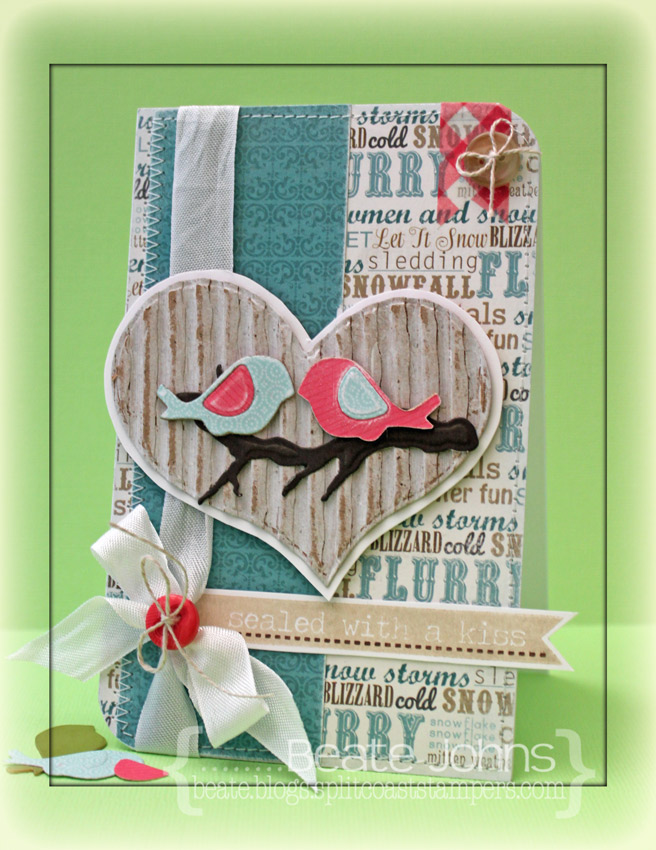
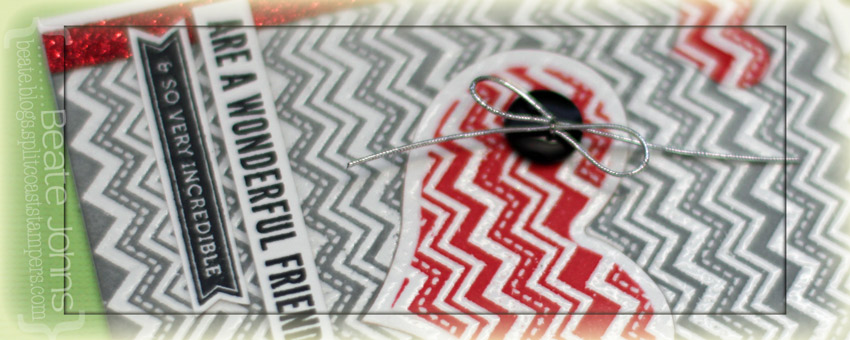
A 1 3/4″ x 5 1/2″ piece of Winter Fun patterned paper was adhered to a 3 1/2″ x 5 1/2″ of patterned paper from the same paper pack. Seam binding was tied around the vertical strip and topped with a button, tied on with Linen Thread.

A sentiment from GinaK. Designs Mistletoe Memories was inked with Wheat and Jumbo Java VersaMagic ink on white cardstock and cut out. It was adhered next to the seam binding bow.

The top right and bottom left corner were rounded before Washi tape topped with a button on the top right finish off the card.

Thanks so much for stopping by! Have a wonderful day!
Hugs and smiles

It’s my turn to share on the Spellbinders blog. Today I have a video tutorial for a tri-fold gift card holder created with the new A2 Bracket Border dies. I hope you have time to check it out and let me know what you think.

Have a wonderful weekend!
Hugs and smiles

Love is in the air and Simon Says Stamp has made it even more fun to create projects to show someone that you love them with their 2013 Valentine’s Day Release.   I was asked to create a project using something from this release to share in today’s Valentine’s Day Blog Hop.

For my card I combined several of the new Simon Says Exclusive stamp set and dies.  I started  by stamping an image from Talk Bubbles 2 all over a  3″  x 4 5/8″ piece of Neenah Solar White cardstock in Sea Breeze VersaMagic ink. Small hearts from the new Lots of Hearts set were added in Key Lime VersaMagic ink in between the clouds. A sentiment from Just a Love Note was stamped in each bubble with the same ink.  Faux stitching was added to the edges with a black gel pen.

A cloud was cut with one of the Talk Bubbles 2 dies out of Solar White ink and stamped with the matching stamp in Key Lime ink. A sentiment from Talk Bubbles 2 was stamped into the cloud, rhinestones were added underneath and the cloud was adhered to the lower left of the layer with foam adhesive squares.

The card base is a 3 1/2″ x 11″ piece of Bazzill Limeade cardstock folded in half. The sentiment that I used inside the clouds was stamped in black in on the bottom right corner before the cloud panel was adhered over it with foam adhesive squares.  White and Limeade cardstock was cut with the new String of Hearts Craft die. I ran the white cardstock heart strip through my Xyron and covered it in glitter. It was adhered on top of the green hearts and both strings were adhered over the cloud background.

Last week I created another card with new Simon Says clear stamps. Just in case you missed it, you can find it here.

And now to the giveaway part! Leave a comment on this blog post and one lucky winner will receive a Simon Goodie Bag (if you know Heidi, it will be a good one!).  We will draw the winner on Thursday morning 1/31/13 at 9:00 AM EST. so be sure to leave your comment by then.

Thanks for visiting! The next stop in the Simon Says Stamp Valentine’s Day Blog Hop is the amazing Stephanie Klauck . If while hopping, you encounter a broken link, you can go back to the beginning for links to everyone who is participating in the hop.

Have a wonderful day! Hugs and smiles


I have another card to show you with the new Ali Edwards Be Mine stamp set.  I started by stamping five hearts from the set in Tuxedo Black Memento Ink in the center of the card base,  a 5 1/2″ x 7″ piece of Neenah Solar White cardstock , folded in half. The bottom right corner was rounded.

Hearts were stamped on Handmade Lilybeedesigns paper. The hearts were cut out and adhered over the ones on the heart base. Lines were scored above and underneath heart row.  Parts of two sentiment were inked up and stamped underneath the lower score lines.

A small strip of Arrow Washi tape was added on the top left of the card. A button as well as Want2Scrap rhinestones finish off the card. Thanks so much for stopping by today!
Hugs and smiles


Today is my turn to share on the Spellbinders blog and showcase new dies. It’s a tough job, but someone has to do it. LOL  I LOVE all the new dies from this release. I hope you have time to check out the card, created with a JustRite Stampers sentiment, Want2Scrap rhinestones and Spellbinders new Radiant Rectangles and Stately Circle dies.

Thanks so much for stopping by! Have a wonderful day!
Hugs and smiles

Today’s tutorial on Splitcoaststampers is for a technique I first saw Jennifer McGuire use. It combines dies and embossing resist to create unique backgrounds. We call it Puzzle Piece Resist.

For my card I started with a 3″ x 5 1/2″ piece of Neenah Solar White cardstock. I stamped the zig zag background stamp from Simon Says Very Special stamp set in VersaMark all over the cardstock and embossed it with clear embossing powder.

Two heart dies from a new Spellbinders die set (Hearts One) were cut and embossed out of the background. The hearts were removed and the big background was sponged with London Fog Memento Ink. The big heart was sponged with the die on with Ladybug Memento Ink, the little one was sponged after the die was taken off.


The background was adhered to the card base, a 3 1/2″ x 11″ piece of cardstock, folded in half. The right hand corner of the card was rounded.  Before the big heart was adhered back into the background, a button was tied on with silver cord. The small heart was adhered back to the background as well.

A sentiment from Very Special was stamped in Tuxedo Black Memento Ink on white cardstock and cut out. Two sentiments from the new stamp set You were stamped also in black ink on white cardstock and cut out. A 1/4″‘ x 5 1/2″ strip of red Glimmer Paper (Stampin’ Up!) was adhered to the left hand side of the background strip before the sentiment pieces were adhere next and over the glimmer strip.

Red glimmer paper was cut and embossed with the small heart die. The heart was adhered to the lower right of the background strip. Red and black rhinestones on the upper right hand side finish off the card.

Here is a video for the visual learner:

[youtube]https://www.youtube.com/watch?v=M9s0jtJi7yk[/youtube]

Thanks so much for stopping by! Have a wonderful day!
Hugs and smiles

It’s time for me to share with you another card made with the new Ali Edwards Be Mine stamp set. I started with a 3″ x 5″ piece of  Neenah Solar White cardstock. I cut the circle border die at an angle across the width of the layer. Above and underneath the border cut I scored two lines with my Scor-Pal.

A piece of Echo Park So Happy Together was adhered behind the circle border. The words of one of the sentiments were inked up separately with Tuxedo Black Memento Ink and stamped above and underneath the border.  The top right and bottom left corner were rounded. Silver cord was wrapped above the top of the border and topped with a button.

The layer was adhered to a slightly bigger piece of black cardstock, before it was adhered to the card base, a 3 1/2″ x 11″ piece of Kraft cardstock, folded in half. A heart from Be Mine was stamped with Tuxedo Black ink on So Happy Together patterned paper, cut out and adhered to the lower right of the card. Rhinestones next to the heart and happy finish off the card.

I hope you have time to check out everyone else’s work with this set. Comment on each blog and you might win a $25 gift certificate for the Technique Tuesday store!!!


Thanks so much for stopping by! Have a wonderful day!
Hugs and smiles

Happy New Year! I hope you had a wonderful and save New Years Eve!

I am excited to be guest designing for Technique Tuesday this month with Ali Edwards newest set called Be Mine. For my card  I started with a 3″ x 5″ piece of Neenah Solar White cardstock. The heart from the set was stamped in Tuxedo Black Memento Ink on the left hand side and colored with Copic Markers (YR09, R24, R29, R39). A sentiment was stamped on the lower right hand side.

Two pieces of Washi Tape were adhered to the upper left side and the bottom corners were rounded. The layer was adhered to a slightly bigger piece of Kraft cardstock. Two buttons were tied to over the washi tapes with silver cord.  The layers were adhered to the card base, a 3 1/2″ x 11″ piece of white cardstock, folded in half, with foam adhesive squares. Rhinestones finish off the card.

Thanks so much for stopping by! Have a wonderful day!
Hugs and smiles

© 2012 fresh & fun Suffusion theme by Sayontan Sinha