sapinkdreamswide.jpg

Sunday’s Featured Stamper was Cathleen Torina. If you haven’t checked out her gallery, grab something to drink, settle in a comfy chair and check out her gallery. Her work is amazing. I browsed her gallery for quite a while on Sunday before I settled on casing this card. Mostly because I had that frame stamp from Tim’s Mini Ornates and I haven’t used it yet.

sapinkdreamswdiefs171.jpg

My card base is a 5″ x 10″ piece of Chocolate chip cardstock folded in half. The edges of the card front were sponged with Walnut Stain Distress Ink. The edges of a 4 1/2″ square of My Mind’s Eye Laundry Line Patterned paper were sanded, sponged with Old Paper Distress Ink and then stitched to a 4 11/16″ square of Vanilla Cardstock. Ivory Silk May Arts Ribbon was tied around the layers before those were attached to the card base with dimensionals.

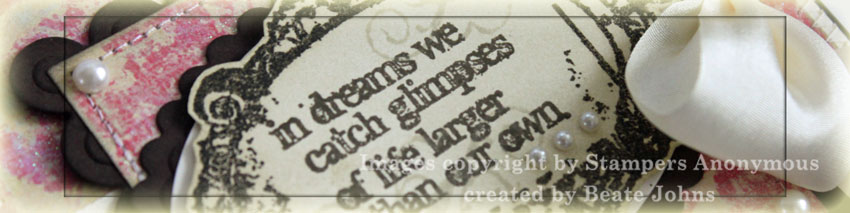
The frame stamp is from the stamp set Mini Ornates. It was stamped in Walnut Stain Distress ink on Vanilla cardstock and embossed with Walnut Stain Distress Embossing Powder. The sentiment is from the same set and was also stamped in Walnut Stain ink. The frame was cut out and sponged with Old Paper Distress ink. It was adhered with dimensionals first on a Vanilla Oval, then on a scalloped Chocolate chip oval that had been sponged with Walnut Stain ink. Both ovals were cut with Petite Oval Nestabilities. Kaisercraft Pearl Pearls were added all over the card to finish it off.

sapinkdreaminsidebj.jpg

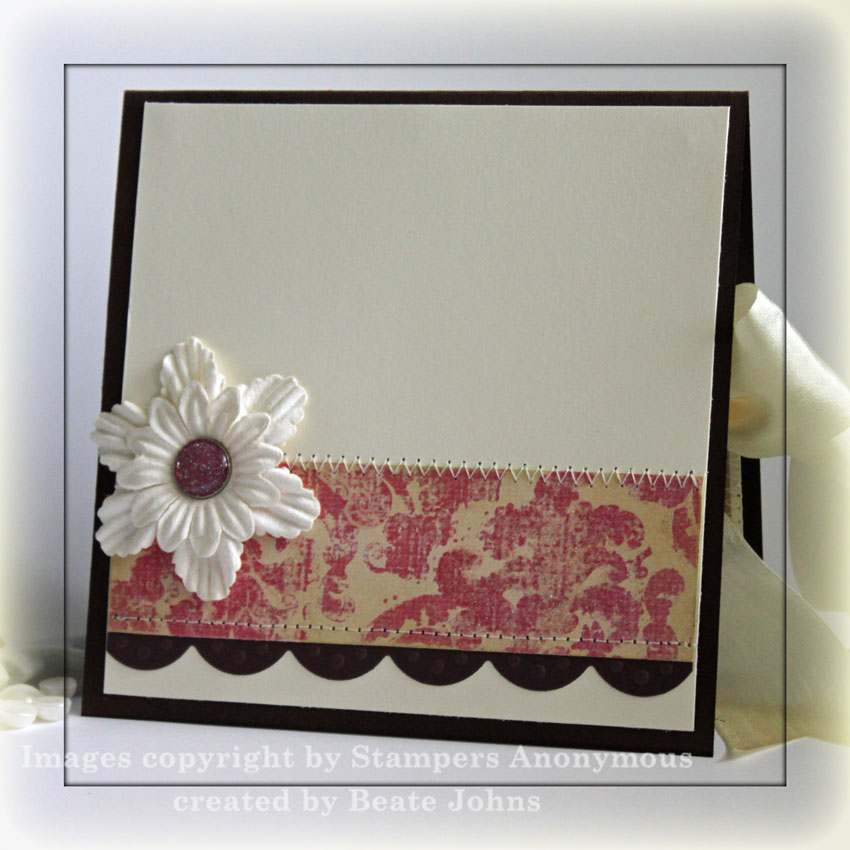
For the inside of the card I cut a Chocolate Chip strip with Jumbo Scallop Borderabilities. That was adhered under a 1 3/8″ x 4 5/8″ strip of Laundry Line paper. That was stitched to a 4 5/8″ square of Vanilla cardstock. Prima Flowers with a Recollection Brad center finish off the card.

Have a wonderful day! Hugs and smiles

stampendous-silly-monkeys.jpg

With my big birthday order from Eclectic Paperie, Joy sent me some stamped images.

One of them is this adorable Changito image.

I used it to practise with my Copic Markers. It just sat on my table with the monkeys teasing me everytime I saw them.

So I finished them off with Crate Paper, a sentiment from the Stampin’ Up! set Smarty Pants and my new long rectangle templates from Nestabilities.

 Daisy had sent me stamped images in my last order of a few of their new stamps. I had to try out the Delia Chick image right away.

I made this card last week Thursday for the Way to Use it challenge Better Sharpen Up.  We were supposed to use Pencil crayons to color in our image.

I had a bad migraine all of Wednesday afternoon (last week). Thursday morning the pills finally started working, but I was still very nauseous. I had to stamp though, because I didn’t want to break my challenge streak. 

pomegranate-happy-chick-wt1.jpg

I colored the image in with my Pure Colored Pencils and blended them with Gamsol and Tsukineko Fantastix.

I cut down the image to a 2″ x 2 3/8″ rectangle, doodled the border with my 03black Micron pen  and added AMuse Card candy. I also added Stickles Stardust on the icing and Gelly Roll Stardust on the ribbon, on the darker parts of the cake and the chick.

I then layered it on a 1/4″ bigger piece of Black cardstock. I cut a 2 1/2″ x 2 7/8″ piece of Purely Pomegranate and sponged the edges to make it darker and was about to tape my main image on it, when I smudged the nice white center image. I didn’t feel good enough to repeat all the coloring and embellishing, so I sponged the edges. Not as pretty as before, but it hid my mess.

The card base here is a 4 1/4″ x 8 1/2″ piece of Garden Green cardstock. I used my retired Stampin’ Up! Stripes template and a sponge to add the stripes,  stamped All in a Row dots between them and highlighted the stripes by adding a doodled border with my 03black Micron pen.

The horizontal layer measures 2 1/4″ x 3 3/4″ and is a piece of Holiday Harmony Designer Paper. I stamped the dotted border from In the Spotlight around the side and top edge and adhered a 1/4″ x 3 3/4″ piece of black cardstock on the bottom.

May Ribbon was added around the Designer paper and AMuse Card candy on the black strip on the bottom.

The saying is from the Stampin’ Up! set It’s all Good. It was stamped in Black Palette ink on Shimmery White cardstock, punched out with the 1 1/4″ circle punch, layered first on a 1 3/8″ black circle, then on a sponged scallop Purely Pomegranate circle.

Last I added a small black photo corner on the top right and topped it with three little AMuse Card Candy jewels.

Emily, winner of sketch challenge #3, send me this beautiful monkey card.

rak-emily-anderson.jpg

Emily, thanks for this gorgeous and fun card. I love the monkey on the Au Chocolat designer paper!

That’s what I wanted this card to say at first….but then decided to use a different sentiment, so I could be able to actually send the card away. This little monkey does look a bit lecherous though with his tongue hanging out…what do you think? To me he looks like he wants to monkey around!

changito-gitar-party-time.jpg

I just love these monkey images. I stamped  my little guy with Black Palette ink on shimmery white cardstock. I colored him with aqua painter and classic ink pads: Close to Cocoa, Ruby Red, Real Rust and Brocade blue.

The patterned Paper is from My Mind’s Eye. I ran it through the cuttlebug and used the Tiny Bubble dry embossing folder. I have been waiting forever for this to come back in stock. Kim McNutt made me NEED that folder in a bad way.

 The sentiment is stamped with Everyday Flexible Phrases.

Julia is killing me with her Bold and Bright challenges. Today’s Way to Use it challenge dares you to use YoYo Yellow. I can’t even remember when I used it last. It has to have been over a year at least!!! It’s so bright, I never reach for it.

I really didn’t think I would participate in this challenge. It’s just too much out of my comfort zone. BUT…I had my latest order from Eclectic Paperie on my table. I had ordered the super cute Changito images. One of them is a monkey with a banana. I thought I might be able to work YoYo Yellow into a card with that image.

I tried to make it into a rectangle card, but in the end, the chocolate chip card base was cut back down to  4 1/4″ x 8 1/2″. I just can’t help myself. I love square cards.

changito-banana-hi-there-wt.jpg

I stamped the little cutie pie in Black Palette ink on shimmery white cardstock. I started by coloring the banana with my YoYo Yellow marker. Then I added some Summer Sun and More Mustard so you could look at it without sun glasses. I went over it with an aqua painter to blend them a little bit.

The monkey was colored with creamy caramel Marker. I added several layers over most of his body part, just colored the lower face region only once to make it look lighter.  I then punched  a small oval out of a post it note and used the negative image to color the shadow under the monkey with aqua painter and Bordering blue ink from the ink pad. Next I went all around the monkey with bordering blue.

I layered the image first on More Mustard, then on Chocolate Chip cardstock. I use the small oval punch to make the two tabs out of chocolate chip cardstock and added More Mustard brads.

The background started out as a 4″ square of YoYo Yellow. I added circles with my sponge dauber and More Mustard and Summer Sun ink. then I stamped the Palm image in Summer Sun over the dots.

The horizontal strip is a scrap piece of Au Chocolat Designer paper I had laying around. I added Summer Sun and More Mustard ink over it with my daubers.

The saying is also from Stampendous. The stamp comes as “Hang in there”, I used the stamp-a-majic to make the Hi on shimmery white cardstock. I punched it out with the 1/2″ circle punch, cut a chocolate chip mat with the coluzze and adhered it overlapping the main image just a bit. Then I stamped there from the saying on the bottom right.

This card is my next Sketch challenge for you. I am still a newbie in making sketches on Adobe, and I am having trouble, making this one because of the wavy line. 

 If you are interested in participating, add a link to your card as a comment to this post. I will raffle away some stamped images of my bees on Shimmery White as well as some matching May Arts ribbon. You have time until Monday morning at 9 a.m. to enter.

I am excited to see what Lori and Sharon will upload. Here is my bee card. It’s not only the card for our bee challenge, but also fit in perfectly for today’s limited supply challenge on SCS.

 stampendous-bees-thanks-lsc.jpg

I started with stamping the Bee Daisy   (Follow the link!!! Eclectic paperie has 20 IN STOCK right now) on shimmery white Cardstock with Black palette ink. I colored the bee with classic inks and aqua painter. The colors I used were Apricot Appeal, Ruby Red, Close To Cocoa, Chocolate Chip, Sage Shadow, True Thyme and Bordering Blue.  I layered the image on a Giga scallop circle punchout in True Thyme and set is aside.

The card base is Ruby Red cardstock. The next layer is Apricot Appeal. The dotted paper is from Scenic Route. I drew my wavy line on the back of the Scenic route paper before cutting it. I layered a piece of Ruby Red cardstock under it and cut it with my Decorative scissors. I added some May Arts ribbon and taped the top part on to the rest of the card.

After adhering my main image, I added a trail for the bee with black journaling marker and stamped Thankzzz from Stampin’ Up!’s Cute as a Bug set.

First of all, I want to wish you a Happy Mother’s Day! I already talked to my Mom yesterday, because she is going on a one day excursion today.

Last night it was the first time EVER that I did a challenge a day early. I have to confess that I hadn’t see Candy’s gallery before. Beth sure knows how to pick them. Candy’s gallery  is filled with great cards! While I was browsing I saw she made a card with Stampendous bees. I had to pick that one to case.

stampendous-birthday-bee-fs.jpg

The gift bearing bee was stamped on shimmery white cardstock with brown Palette ink. I colored her in with Marigold Morning, Ruby Red, Close to Cocoa, Chocolate Chip, Bordering Blue, Sage Shadow and True Thyme. I doodled the borders with my brown Micron pen and colored it in with some of the colors I used for the bees.

The background on top of my 5 1/4″ square True Thyme card is stamped with My Favorite Things Behind the Scenes stamps and my Hint of Pesto Versamagic Dew Drop.

The patterned paper is Fancy Pants, the ribbon one of my new favorite from May Arts.

I hope you all have a wonderful day. I don’t know how much stamping I will get done today! The sun is shining and we are going to the beach in about an hour.

I made this card for the Bee challenge I was supposed to have with Sharon and Lori this week. Sharon still hasn’t gotten her bees, so we postponed the challenge to next week. I can’t wait that long. LOL

I will make another card for next weeks challenge. I love playing with the bees.

Julee posted a great sketch a while ago that I just had to try out.

stampendous-bees-julee-sket.jpg

 I varied from her sketch only that I made it into a special fold. You take this lovely May Arts ribbon off, pull on the left side and it opens up to a card 4 1/4″ x 11″.

I used Prima Cardstock, Scenic Route and Daisy D’s patterned paper.

I stamped the Stampendous Pal Topper on shimmery white cardstock, cut it out and layered it on Ruby red cardstock I had sponged with chocolate chip first.

I stamped sweet friend all around the yellow paper with Karen Foster Snap stamps. Then I added don’t worry on the top right with the bigger version of those stamps.

The flowers the bees are holding is a Prima flower. The flowers on the bottom left are punch outs from the Spring Flower punch. I punched them out in Ruby Red and sponged the petals with chocolate chip. The center is a mustard brad. I love Stampin’ Up! colored brads.

On the main image are usually black dots. I covered those up with  Amuse Twinkle Stickers. To finish it off I highlighted the darker colored parts of the bees with the Stardust glitter pen.

I had a fun night yesterday. After watching some shows, I went back stamping. Did I mention yet, that I love the Stampendous Bees? I knew they would look pretty on a Joy fold!  And since I am behind on sending out RAK’s and Thank you cards, I made several, all just a tad different.

stampendous-bee-utiful-day.jpg

I stamped the Bee trio on Shimmery white with black Palette ink. It has become my favorite ink for watercoloring. It works well with acrylics as well as rubber stamps. It is a true black and it doesn’t run!

I added it’s a bee-utiful day on the bottom with Karen Foster’s snap stamps and Black Palette ink. I got the smaller and bigger version of those very affordable and versatile stamps. I love them. Now I can make any saying I want!

Next I colored the image with Marigold Morning, Cranberry Crisp, True Thyme, Chocolate Chip, Sage Shadow and Bordering blue. Once it was dry I used Stardust Stickles and the Sakura Gelly Roll pen to add glittery highlights (which can’t be seen in the photo).

The patterned paper is Scenic Route from the Harvest collection. It works so well with the bee images. The colors are so rich! I used up both sheets and will have to order more from Joy! My shopping cart is filling up again. LOL ….But it’s a perfect time to order from Eclectic Paperie this weekend. They have a SALE!!!!! 15 % off your entire order. Only this weekend with this coupon:

Save 15%

eP Logo 50%

Happy National Scrapbooking Day!Beginning Saturday, May 5th until Sunday May 6th 11:59(PST), you will receive 15% off of your entire purchase at www.eclecticpaperie.com

Discount Code – NSD07This code does not apply to Gift Certificates or the “Spoil Your Mom” Mother’s day exclusive.

Offer Expires: Sunday, May 6, 2007 11:59 (PST)

If you look closely on the very front of the photo, you will see the inside image. I used the single bee holding a flower for that, doodled the same border around her white shimmery base and colored her in like the Bee trio.

© 2012 fresh & fun Suffusion theme by Sayontan Sinha